background image

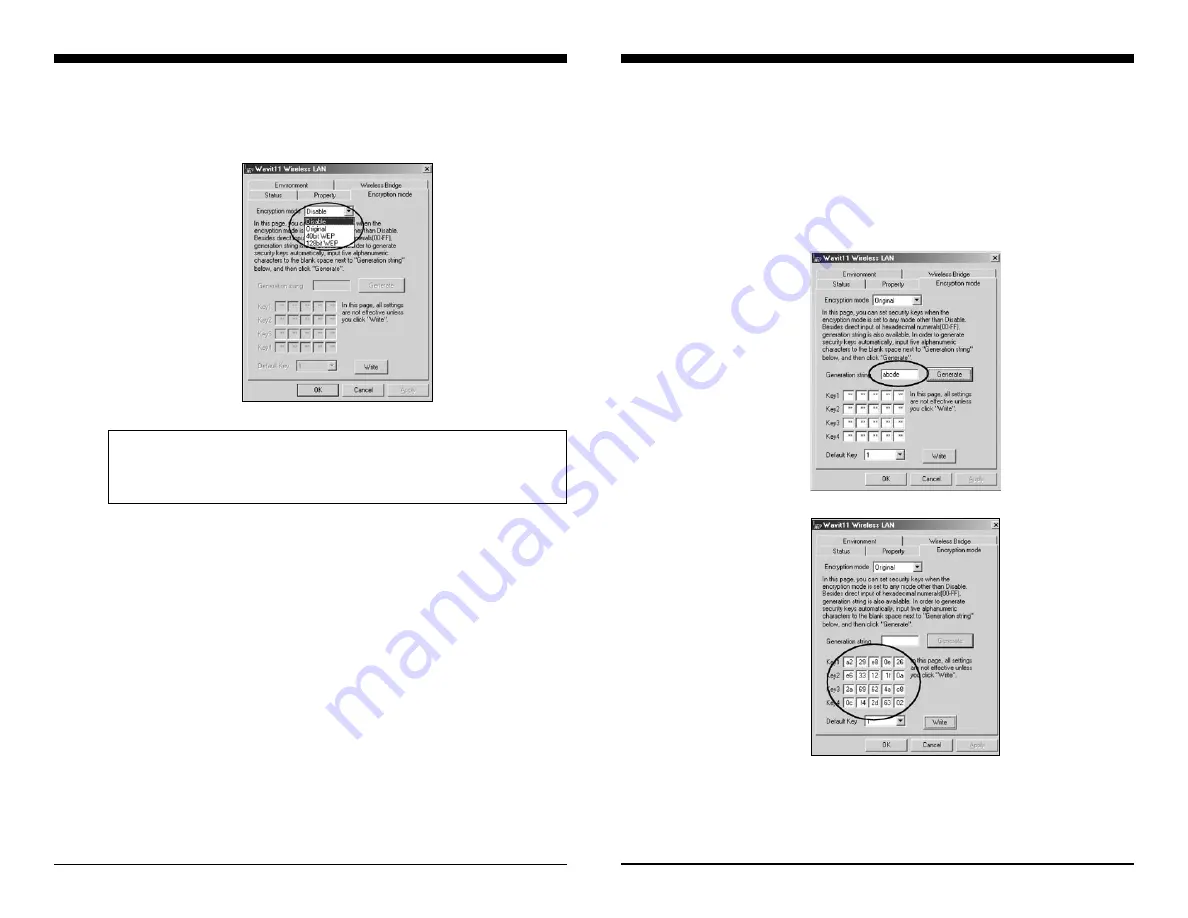
Encryption Mode

The Encryption mode used for the wireless LAN communication between
Wavit11 is selected.

Items that Can Be Set with Configuration Utility

44/47

10.4

Encryption Key

This Encryption key is used for the encryption of data transmission. Set the
same encryption key for each Wavit11.

There are two ways to set encryption key:

•  If a string is set, the Wavit11 will automatically generate an encryption 

key from that string.

•   Set the encryption key directly.

Items that Can Be Set with Configuration Utility

10.5

Wavit11

User’s Manual

NOTE

:  

Wavit11s cannot communicate with each other in different encryption
modes.

Summary of Contents for Wavit11

Page 1: ...User s Manual MITSUMI Electronics Corp 1 47...

Page 2: ...802 11 Ad Hoc Mode 21 7 4 Setting Up Infrastructure Mode 22 7 5 Setting Up Both Mode 24 7 6 Setting Up AP Mode 26 7 7 Setting Up Wireless Bridge Mode 28 7 8 Changing Wavit 11 IP address 30 7 9 Changin...

Page 3: ...correct the interference by one or more of the following measures Reorient or relocate the receiving antenna Increase the separation between the equipment and receiver Connect the equipment into an ou...

Page 4: ...is a registered trademark of Mitsumi Electronics Corp Wi FiTM is a registered trademark of Wireless Ethernet Compatibility Alliance RC4 is a registered trademark of RSA Security Inc in the United Stat...

Page 5: ...page 40 How to Use Wave11 5 47 4 5 About Wireless LAN Network There are 4 types of wireless LAN networks that use Wavit11 Make a selection according to the usage of the wireless LAN network About Wire...

Page 6: ...rk such as the Internet BSS LAN Type 802 11 Ad Hoc Mode 5 2 Wavit11 User s Manual NOTE 1 This type cannot be used to connect to a wired LAN 2 This type cannot be used to connect to the Internet 3 When...

Page 7: ...d LANs Build this network type to set up a wireless connection between two wired LANs A pair of Wavit11 units can be used to establish two way communica tions between two separate LANs Wireless Bridge...

Page 8: ...Windows Installation Method of Wavit11 Configuration Utility 6 1 Wavit11 User s Manual NOTE 1 Wavit11 Configuration Utility does not operate on the operating system other than Microsoft Windows such a...

Page 9: ...Network icon in the control panel Installation Method of Wavit11 Configuration Utility 9 47 6 2 STEP 3 Check that an Ethernet adapter has been installed in the Configuration page STEP 4 Click the Can...

Page 10: ...t Start Setting Control Panel STEP 2 Click Network icon in the Control Panel Installation Method of Wavit11 Configuration Utility 10 47 6 3 STEP 3 Check that the relevant TCP IP protocol has been inst...

Page 11: ...ress automatically proceed to STEP 5 Installation Method of Wavit11 Configuration Utility 11 47 STEP 5 Click the Cancel button STEP 6 Click the Cancel button Proceed to Confirm an IP Address page 13 I...

Page 12: ...that are confirmed here Return to STEP5 if Obtain an IP address automatically is selected Installation Method of Wavit11 Configuration Utility 12 47 STEP 8 Click the Cancel button STEP 9 Click the Can...

Page 13: ...ow STEP 4 Confirm the IP Address and Subnet Mask Installation Method of Wavit11 Configuration Utility Wavit11 User s Manual NOTE If Ethernet adapter is not discovered install an Ethernet adapter as ex...

Page 14: ...t the Wavit11 Configuration Utility disc into drive E STEP 2 Click the My Computer icon STEP 3 Click the Compact Disc E icon Installation Method of Wavit11 Configuration Utility 6 5 Wavit11 User s Man...

Page 15: ...STEP 5 Click the Next button in the Install Shield Wizard window STEP 6 Select the Destination Folder Click the Next button to install the Configuration Utility in the default folder Click the Browse...

Page 16: ...r to install it to another folder select from Existing Folders and click the Next button Setup Status appears Installation Method of Wavit11 Configuration Utility 16 47 STEP 8 The Install Shield Wizar...

Page 17: ...etting Up Wavit11 17 47 Starting Wavit11 Configuration Utility STEP 1 Connect Wavit11 to the personal computer using a straight cable STEP 2 Insert the DC plug of an AC adapter into the Wavit11 DC IN...

Page 18: ...etween AC adapter and AC outlet 4 TCP IP setting of personal computer Setting Up Wavit11 Wavit11 User s Manual NOTE If only MAC Address and IP Address are displayed in the station list in the Wavit11...

Page 19: ...TEP 2 Click the Property page Setting Up Wavit11 7 3 Wavit11 User s Manual NOTE 1 If the operational mode is AP or Wireless Bridge The Log in win dow will appear after clicking the Setup button 2 Inpu...

Page 20: ...e Channel is set correctly Then click the OK button STEP6 After returning to the Wavit11 Wireless LAN window check that all setups you have selected are correct Then close the Wavit11 Configuration Ut...

Page 21: ...ng Up Wavit11 21 47 7 3 STEP 3 In the Property page change the Operational Mode to 802 11 Ad Hoc set the SS ID then click the Apply button STEP 4 Click the OK button Setting Up Wavit11 Wavit11 User s...

Page 22: ...on STEP6 After returning to the Wavit11 Wireless LAN window check that all setups you have selected are correct Then close the Wavit11 Configuration Utility Setting Up Wavit11 22 47 Setting Up Infrast...

Page 23: ...s page check that the Operational Mode is set to Infrastructure then click the OK button STEP 6 After returning to the Wavit11 Wireless LAN window check that all setups you have selected appear correc...

Page 24: ...perty page Setting Up Wavit11 Wavit11 User s Manual NOTE When Wavit11 is in the Both mode it cannot operate both Infrastructure LAN and Ad Hoc LAN simultaneoulsy When Wavit11 is in the Both mode it de...

Page 25: ...ick the OK button STEP 6 After returning to the Wavit11 Wireless LAN window check that all setups you have selected appear correctly then end the Wavit11 Configuration Utility Setting Up Wavit11 Wavit...

Page 26: ...STEP 3 In the Property page change the Operational Mode to AP mode and set the SSID select the Channel then click the Apply button STEP 4 Click the OK button Setting Up Wavit11 Wavit11 User s Manual N...

Page 27: ...hen end the Wavit11 Configuration Utility Setting Up Wavit11 27 47 STEP 7 Change the control password Changing Control Password page 31 Setting Up Wavit11 Wavit11 User s Manual NOTE Many unidentified...

Page 28: ...Property page change the Operational Mode to Wireless Bridge select the Channel then open the Wireless Bridge page STEP 4 Input the last 6 digits of the MAC address indicated in the label on the othe...

Page 29: ...selected appear correctly then end the Wavit11 Configuration Utility STEP 8 Change the Control password Changing Control Password page 31 Setting Up Wavit11 Wavit11 User s Manual NOTE Many unidentifie...

Page 30: ...vit11 Wireless LAN window appears Setting Up Wavit11 Wavit11 User s Manual NOTE Set unique IP address for the host address that is different from your PC s address For example if your PC s address is...

Page 31: ...word and click the OK button STEP 3 Input the new password twice and click the OK button Setting Up Wavit11 31 47 7 9 STEP 4 Click the OK button STEP 5 The Wavit11 Wireless LAN window appears Setting...

Page 32: ...6 digits of the MAC address indi cated in the label on the bottom of the Wavit11 being initialized Then click the OK button Setting Up Wavit11 32 47 7 10 STEP4 Click the OK button STEP5 The Wavit11 W...

Page 33: ...Wireless LAN window STEP 2 Click the Encryption mode page Setting Encryption 33 47 8 1 8 STEP 3 The encryption mode page opens Select an encryption mode The encryption mode was set at Disable when Wa...

Page 34: ...the Encryption mode page select Original as an Encryption mode input a Generation string that generates encryption keys then click the Generate button STEP 2 Select the Default Key Setting Encryption...

Page 35: ...utton Setting Encryption 35 47 STEP 5 The Encryption mode and the Encryption keys are written Click the OK button STEP 6 After returning to the Wavit11 Wireless LAN window close the Wavit11 Configurat...

Page 36: ...EP as an Encryption mode input a Generation string that generates encryption keys then click the Generate button STEP 2 Select the Default Key Setting Encryption 36 47 8 3 STEP 3 Click the Write butto...

Page 37: ...N window close the Wavit11 Configuration Utility Setting Encryption 37 47 128bit WEP Encryption STEP 1 In the Encryption mode page select 128bit WEP as an Encryption mode input a Generation string tha...

Page 38: ...e Encryption mode and the Encryption key are written Click the OK button Setting Encryption 38 47 STEP 6 After returning to the Wavit11 Wireless LAN window close the Wavit11 Configuration Utility Sett...

Page 39: ...k the Write button STEP 2 Click the OK button Setting Encryption 39 47 8 5 STEP 3 The Encryption mode is written Click the OK button STEP 4 After returning to the Wavit11 Wireless LAN window close the...

Page 40: ...rsonal computer with a straight cable STEP 2 Insert the DC plug of the AC adapter into the Wavit11 DC jack STEP 3 Connect the AC adapter to the AC outlet Wavit11 Set Up page 17 Setting up Wavit11 9 1...

Page 41: ...11 appropriately STEP 2 Connect Wavit11 to HUB Cable Modem ADSL Modem Router with a crossover cable STEP 3 Insert the DC plug of the AC adapter into the Wavit11 DC jack STEP 4 Connect the AC adapter t...

Page 42: ...AP Wireless Bridge 802 11Ad Hoc SSID 32 characters maximum ASCII code 0x20 0x7e Channel 1 11 Data Rate 1M 2M 5 5M 11M Auto Roaming Enable Disable Hidden Node Compensation Enable Disable RTS Threshold...

Page 43: ...r all Wavit11s 2 IBSS LAN requires the same SSID settings for all Wavit11s NOTE 1 Channel setting will be required for the following operational modes Ad Hoc mode Both mode AP mode Wireless Bridge mod...

Page 44: ...for the encryption of data transmission Set the same encryption key for each Wavit11 There are two ways to set encryption key If a string is set the Wavit11 will automatically generate an encryption k...

Page 45: ...n the back of Wavit11 Items that Can Be Set with Configuration Utility 10 7 Wavit11 User s Manual NOTE 1 This item cannot be set if the Encryption Mode is either Original or 40bit WEP 2 Setting a diff...

Page 46: ...t Open the configuration tool and write in the encryption keys again Situations Verifying Measures Does not communicate in the Both mode Does not communicate in the Access Point mode Does not communic...

Page 47: ...network address sonal computer Open the configuration tool After initialization you need to and perform initialization reset all configurations Open the configuration After initialization you need to...

Reviews: