background image

8

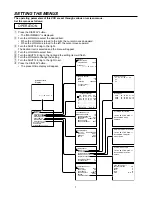
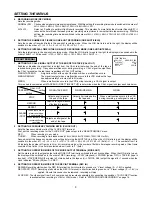
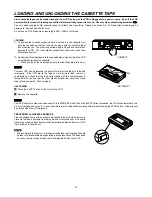
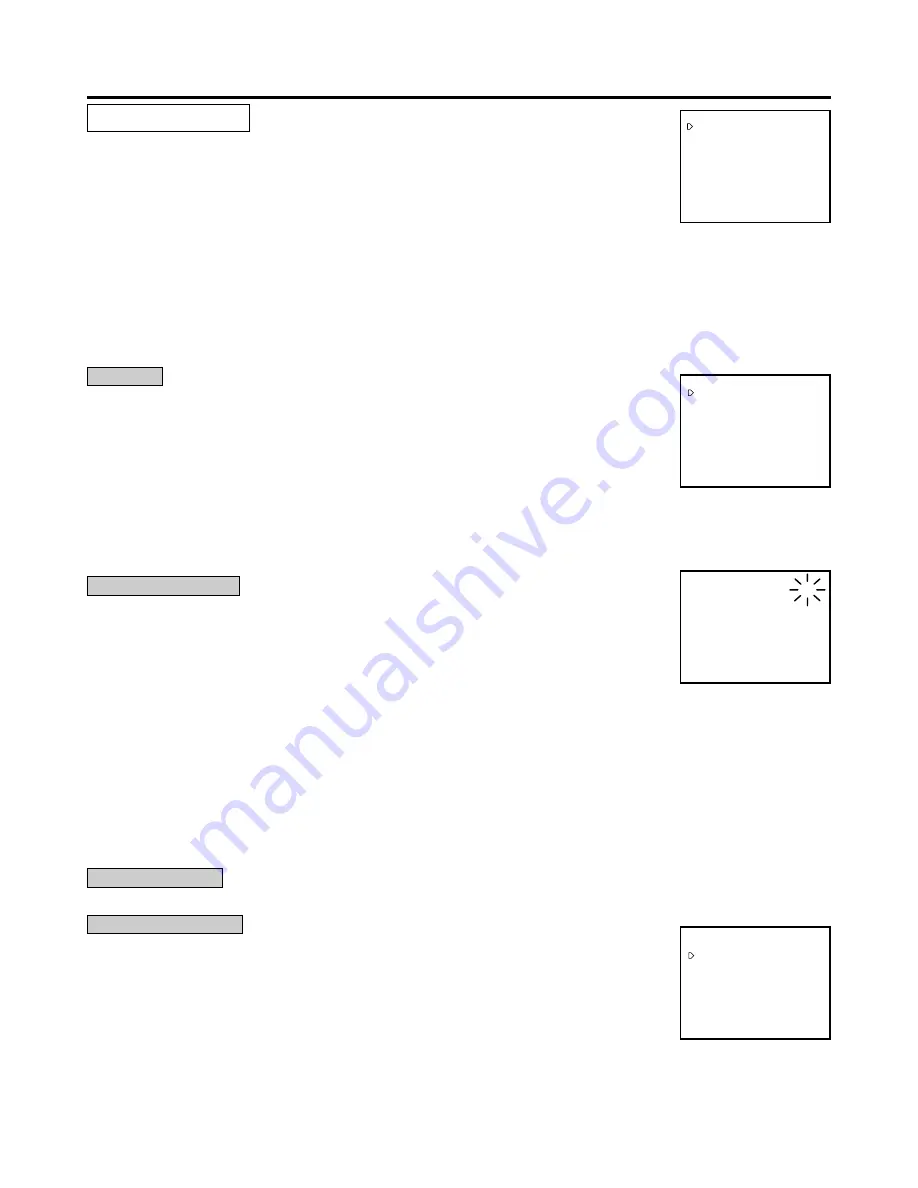
<MAIN MENU>
  DISPLAY
  TIME DATE SEARCH
  TIMER PROGRAM
  RECORDING SET UP
  REAR TERMINAL
  MAINTENANCE
  FIRST TIME SET UP
Use JOG to select, 
and ENTER.
Press DISPLAY to exit.

<DISPLAY>

1

SMALL

11 – 11 – 98   09 : 21 : 01

DISPLAY MODE
TIME DATE SIZE

Ex.

<MODE 1>

<TIME DATE SEARCH>

15:00

23

FORWARD

TIME
DATE
DIRECTION

  Use JOG to adjust,
  and ENTER.

<RECORDING SET UP>

3H

1M

OFF

NORMAL<SP>

1

SHOT

ALARM REC MODE
ALARM REC DURATION
EMERGENCY REC
REC MODE
ONESHOT•FIELD
ONESHOT•INTERVAL

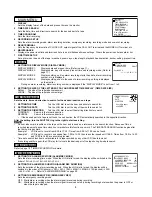
MAIN MENU

1

DISPLAY
Sets the display format of the date and present time on the monitor.

2

TIME DATE SEARCH
Sets the date, time and direction to search for the desired part of a tape.

3

TIMER PROGRAM
Sets the timer recording.

4

RECORDING SET UP
Sets the alarm recording mode, alarm recording duration, emergency recording, recording mode and one-shot recording.

5

REAR TERMINAL
Sets the frequency division ratio of CLOCK OUT, output signal of the CALL OUT terminal and the MODE OUT terminal, etc.

6

MAINTENANCE
Displays the power loss list and alarm loss list, etc. and initialises all menu settings.  Clears the power loss list and alarm list.

7

FIRST TIME SET UP
Set up for when the end of the tape is reached, quasi v-sync, tape length, playback head selection, buzzer setting, present time.

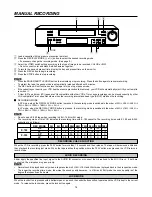
  DISPLAY

1

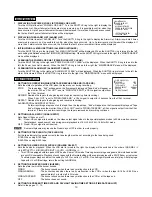
SETTING THE DISPLAY MODE (DISPLAY MODE)
DISPLAY MODE 1:

Displays date and present time. (Refer to page 11.)

DISPLAY MODE 2:

Displays date, day of the week, present time and recording mode. (Refer to
page 11.)

DISPLAY MODE 3:

Displays nothing; until an alarm recording starts, then date, alarm recording
number, etc. is displayed.

DISPLAY MODE 4:

Displays nothing; even in the case of alarm recording, nothing is displayed
on the monitor.

During an alarm recording, alarm recording number is displayed if the “DISPLAY MODE” is  set from 1 to 3.

2

SETTING THE SIZE OF THE LETTERS OF DAY AND PRESENT TIME DISPLAY  (TIME DATE SIZE)
SMALL:

The size of the letters becomes small.

LARGE:

The size of the letters becomes large.


TIME DATE SEARCH

Sets the date, time and direction to search for the desired location on a tape.

1

SETTING THE TIME

Turn the JOG dial to set the hour and minute to search for.

2

SETTING THE  DATE

Turn the JOG dial to set the day of the month to search for.

3

SETTING THE  DIRECTION

Turn the JOG dial to select the starting direction for search.

FORWARD:

Search in the forward direction.

REVERSE:

Search in the reverse direction.

If the desired part of a tape is not found in one direction, the VCR automatically searches in the opposite direction.

After the setting, turn the SHUTTLE ring to the right to start searching.

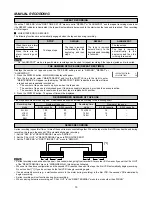
N

An hour index mark is written on the tape on the hour and is used as a reference in the search function.  Because of this, a
recorded tape must pass a time clock hour mark before this function can work.  The TIME DATE SEARCH function begins after
the first hour index mark.
Example 1:

VCR is set to record from 8:30 to 17:30 - Times from 9:00 to 17:30 can be found.

Example 2:

VCR is set to record in one speed from 7:00 to 14:30, then in another speed until 18:00 - Times from 7:00 to 14:30
and 15:00 to 18:00 are accurately located.

Time date search function is not available for a tape recorded by any other VCR than this model.

If recording quality is poor, the VCR may fail to locate the desired part of the tape during time date search.

  TIMER PROGRAM

Refer to page 18 “TIMER RECORDING” for details.

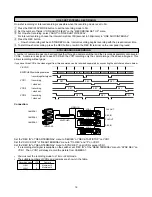
  RECORDING SET UP

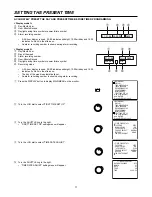
1

SETTING THE ALARM REC MODE (ALARM REC MODE)
Sets the alarm recording time mode.  When the JOG dial is turned, the display will be switched in the
order of 3H 

}

 6H 

}

 L18H 

}

 L24H 

}

 3H 

}

 ....

2

SETTING THE ALARM REC DURATION (ALARM REC DURATION)
Sets the duration of the alarm recording period.  When the JOG dial is turned, the display will be
switched in the order of 1M(minute) 

}

 2M 

}

 5M 

}

 10M 

}

 MAN1 

}

 MAN2 

}

 15S(second) 

}

 30S

}

 45S 

}

 1M 

}

 ....  Refer to “ALARM RECORDING” on page 20.

3

SETTING THE EMERGENCY REC (EMERGENCY REC)
Sets the emergency recording mode.
OFF: Starts alarm recording when the alarm signal is received during recording.
ON:

Starts alarm recording when the alarm signal is received not only during recording but also when the power is OFF or
when the tape is stopped.

Summary of Contents for HS-7168E

Page 1: ...KING POSITION VERTICAL ADJUST REC PLAY MODE COUNTER RESET COUNTER MEMORY SKIP INDEX PAUSE SHUTTLE HOLD DISPLAY TIMER REC VIDEO SOFT SHARP COLOR B W HS 7168E B HS 7168EM B HS 7168E A ONLY VIDEO CASSETTE TAPES WITH THE V MARK MAY BE USED WITH THIS MODEL THIS INSTRUCTION MANUAL IS IMPORTANT TO YOU PLEASE READ IT BEFORE USING YOUR VIDEO CASSETTE RECORDER ...

Page 2: ...e mains outlet first Then unplug the lead by gripping the plug not the lead and carefully remove the plug from the mains outlet NEVER TOUCH OR INSERT ANY OBJECT INSIDE THE VCR Touching the inside of the cabinet or inserting foreign objects of any kind not only creates a safety hazard but can also cause extensive damage PROTECT THE MAINS LEAD Damage to the mains lead may cause fire or shock hazard ...

Page 3: ...peat and alarm recording Protection against power failures Recording data including date time and timer set up are stored in backup memory so the system can resume recording after a power failure The time of the failure is displayed on the monitor Digital ELAPSED TIME display The Elapsed Time of recording and playback is stored in a non volatile memory IC The elapsed time display should be used as...

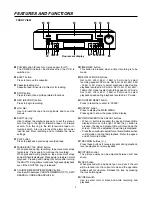
Page 4: ...he SHUTTLE ring is released A COUNTER MEMORY SKIP INDEX button Use to switch between COUNTER MEMORY P 17 SKIP SEARCH or INDEX SEARCH P 22 FEATURES AND FUNCTIONS FRONT VIEW B TIMER REC button This button is pressed when a timer recording is to be made C REC PLAY MODE buttons Set to 3H L24H 48H 168H or 0H mode to select recording speed in SP mode Set to 3H L24H 24H 48H 168H or 0H mode to select play...

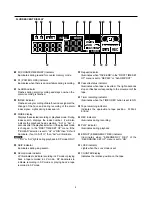
Page 5: ...recording 3 ALARM indicator Flashes during alarm recording and stays on when the alarm recording is finished 4 INDEX indicator Flashes during recording of date hour index signal at the change of the hour and during recording of the alarm index signal Lights during index search 5 MODE display Displays the selected recording or playback mode During index search displays the index number It will also...

Page 6: ...to indicate the VCR s mode of operation Selected by setting MODE OUT on the REAR TERMINAL menu 8 CLK CLOCK OUT terminal Output terminal to control an external camera switcher 9 CALL OUT terminal Output terminal to indicate when tape has finished recording or if there has been a problem during recording A RESET button When pressed the present time alarm recording list power loss list and the number...

Page 7: ...ck in 24H 168H or 0H mode playback a tape which is recorded in 3H or 6H mode with this VCR and press the PAUSE button If the vibration occurs during normal playback in L18H or L24H mode playback a tape in each playback mode 2 Press the VERTICAL ADJUST or button to reduce or eliminate the picture vibration MONITOR TO BE CONNECTED Connection with a CCTV monitor for surveillance is recommended Connec...

Page 8: ...L DW MON FRI ALARM LIST ALL MENU INITIALIZE Turn the SHUTTLE RING then all MENU will be initialized POWER LOSS LIST CLEAR Turn the SHUTTLE RING then POWER LOSS LIST will be cleared ALARM LIST CLEAR Turn the SHUTTLE RING then ALARM LIST will be cleared 0001 05 01 98 01 00 0002 07 01 98 21 10 0003 10 01 98 09 15 POWER LOSS LIST 01 03 01 98 01 00 02 03 DAYLIGHT SAVINGS MONTH DATE YEAR TIME TIME DATE ...

Page 9: ...ARCH Sets the date time and direction to search for the desired location on a tape 1 SETTING THE TIME Turn the JOG dial to set the hour and minute to search for 2 SETTING THE DATE Turn the JOG dial to set the day of the month to search for 3 SETTING THE DIRECTION Turn the JOG dial to select the starting direction for search FORWARD Search in the forward direction REVERSE Search in the reverse dire...

Page 10: ...G TAPE END A signal is output at the end of the tape or when a malfunction occurs WRNG REMAIN The signal is output when a malfunction occurs in this VCR or when the tape has approximately 3 minutes left in 3H mode WRNG When a malfunction occurs in the VCR during recording a CALL signal is output This is used in conjunction with TAPE END FIRST TIME SET UP to determine when the CALL signal is output...

Page 11: ...m the CALL terminal REPEAT Rewinds the tape to the beginning and resumes recording ALARM PROT ALARM PROTECTION If alarm recordings are present on the tape then the tape stops End will appear on the fluorescent display and Tape End will appear on the monitor When CALL OUT is set to WRNG TAPE END a CALL signal is output from the CALL terminal If there are no alarm recordings the tape is rewound and ...

Page 12: ...o display MAIN MENU on the monitor 2 Turn the JOG dial to select FIRST TIME SET UP 3 Turn the SHUTTLE ring to the right FIRST TIME SET UP setting menu will appear 4 Turn the JOG dial to select TIME DATE ADJUST 5 Turn the SHUTTLE ring to the right TIME DATE ADJUST setting menu will appear 01 01 98 00 00 00 A0001 01 01 98 THU A0001 00 00 00 L18 1 2 3 4 1 2 3 4 5 6 DISPLAY MAIN MENU DISPLAY TIME DATE...

Page 13: ... right The hour digits of TIME display will flash Turn the JOG dial to the right to set the hour digits of the present time Set the 10 minutes digit and 1 minute digit in a similar fashion B Turn the SHUTTLE ring to the right Setting is now complete C Press the DISPLAY button The present time display will appear N The POWER button will not operate if any of the menu displays are flashing 2 SETTING...

Page 14: ...tape be sure to orient it squarely to the slot N N N N N Your new VCR has a protection circuit which will eject the tape if it is loaded improperly If the VCR ejects the tape you are trying to load remove it completely and check that the long narrow edge with the contents label is facing towards you and that the clear plastic window that shows the video tape is facing upwards Then try again UNLOAD...

Page 15: ...rdings can be played correctly by other VHS compatible Time Lapse Recorders when the recording interval and head type SP LP matches the recording 2 RECORDING MODE In SP mode when the REC PLAY MODE button is pressed the recording mode is switched in the order of 3H L24H 48H 72H 96H 120H 168H 0H 3H In LP mode when the REC PLAY MODE button is pressed the recording mode is switched in the order of 6H ...

Page 16: ...AT REC TIMES indicates the number of times a tape has been repeatedly recorded on The number of tape use counts up by one when the tape ends The number of tape use is memorised even if the mains supply is removed provided the backup is active The number of tape use is reset when the current tape is replaced with another 3 Press the DISPLAY button The present time will be displayed Recording time m...

Page 17: ...al VCRs A camera is assigned to each VCR with the VCR recording only the camera image it has been assigned This allows recording without gaps V SYNC Recording mode VCR Camera L18H L24H 3 9 Multiple of 3 Multiple of 9 CLK OUT REC IN REC IN VCR3 Set the REC IN of REAR TERMINAL menu to SERIES or REC START STOP on VCR1 Set the CLOCK OUT of REAR TERMINAL menu to T L REC and F on VCR1 Set the REC IN of ...

Page 18: ...recording and the power comes back on theVCR will begin recording in the same record mode as before the power failure After the power comes back on X will be displayed next to the present time for about 1 minute If a power failure occurs during playback the VCR will be in the stop mode when the power comes back on RECORDING AFTER A POWER FAILURE The power failure start time on recording is stored ...

Page 19: ...ecording mode HR Turn the SHUTTLE ring to select the recording mode display Turn the JOG dial to set the recording mode 8 Turn the SHUTTLE ring to the right The display stops flashing If the program has not been set completely the flashing will not stop Program number Day of the week Recording start time Next day indicator Recording end time Recording mode display DW START END HR 1 SPL 08 40 17 10...

Page 20: ...set the end day and turn the SHUTTLE ring to the right The start and end day cannot be set to the same day IN ORDER TO AVOID MISTAKES WHEN USING THE TIMER If an error is encountered when the TIMER REC button is pressed refer to the following table TIMER REC indicator flashes Symptom 1 Press the TIMER REC button 2 Correctly set the timer program 3 Press the TIMER REC button and confirm the TIMER RE...

Page 21: ...TERNAL TIME CLOCK ADJUSTMENT If the ALARM REC DURATION of the RECORDING SET UP menu is set to other than MAN1 the on screen clock can be reset to the nearest hour by applying a signal to the RST RESET IN terminal For example if the current time is 11 29 59 it will be reset to 11 00 00 and if the current time is 11 30 00 it will be reset to 12 00 00 1 When connecting the MODE terminal of the 1st VC...

Page 22: ...e DISPLAY button The present time display will appear During alarm recording the alarm recording count will automatically be displayed except when DISPLAY mode 4 is selected The alarm recording count display counts up to 9999 alarm recordings and then it is reset to 0000 and continues counting When initializing the alarm recording list the alarm recording count display will be reset The alarm indi...

Page 23: ...ast forward direction 1 Press the COUNTER MEMORY SKIP INDEX button to illu minate SKIP on the fluorescent display 2 Turn the SHUTTLE ring to the right or left ALARM RECORDING ALARM RECORDING Present position Index Fast forward Fast forward Index Approx 4 sec playback Approx 4 sec playback Fast forward Until the index signal is located the machine will fast forward or rewind When an index signal is...

Page 24: ...on is pressed the playback mode is switched in the order of 6H L18H 48H 72H 96H 120H 168H 0H 6H in case of the recording in LP mode AUDIO PLAYBACK The modes with the letter L L18H or L24H are for audio recording and playback on the linear track 2 4 3 PLAYBACK Tape End Selected REPEAT or ALARM PROT Playback The tape automatically rewinds to the be ginning and stops Stop STOP or REWIND Fast forward ...

Page 25: ...dge of the screen FRAME BY FRAME PLAYBACK You can use the JOG dial to advance the tape frame by frame 1 While the VCR is playing a tape press the PAUSE SHUTTLE HOLD button to freeze the picture on screen 2 Slightly rotate the JOG dial clockwise to advance the tape forward Slightly rotate it counterclockwise to reverse the tape To obtain a frame by frame picture continuously keep rotating the JOG d...

Page 26: ...s control is only effective during playback PICTURE QUALITY ADJUSTMENT For tracking adjustment at fast playback reverse playback or forward reverse slow playback mode press the PAUSE SHUTTLE HOLD button while turning and holding the SHUTTLE ring When pressing the TRACKING and buttons at the same time during playback reverse playback or forward reverse slow playback the tracking is set to the initi...

Page 27: ...not broken and the camera s power has not been lost Monitor Fluorescent display REMEDY CAUSE TO TURN OFF THE INDICATION End TAPE END CHECK THE TAPE ENDS DURING RECORDING Rewind the tape and press the EJECT button Check for loose connec tions Turn off the indication on the fluorescent display and on the screen by pressing the EJECT button or rewinding the tape LACK OF VIDEO SIGNAL INPUT NOTE 1 TAPE...

Page 28: ...ously for at least 40 hours per week Make sure the VCR has mains power supplied continuously for at least 40 hours per week The contents stored in the memory may be erased before the 31 days depending on the charge time of the power failure compensation circuit Set the present time again Is the repeat recording indicator illuminated Is the alarm recording started Is the external switch connected c...

Page 29: ...LL OUT terminals screw Active L Level voltage 0 0 4V outputted max drive current 50mA 5V DC 10mA 24V DC Non active Open max voltage 24V DC GND ALM MODE CALL OUT Interface circuit inside the VCR 2 CLK OUT terminal screw Interface circuit inside the VCR 10kΩ DC12V CLK OUT 10kΩ GND CLK OUT signal When F is selected in REC of CLOCK OUT mode in 3H or 6H recording 12V 0V 20msec When except F is selected...

Page 30: ...BACK REVERSE PLAYBACK FORWARD FRAME SHIFT FAST FORWARD REWIND Function Position 9 10 11 12 13 14 15 16 3H 6H L24H L18H Function Position 17 18 19 20 21 22 23 24 POWER ON OFF REVERSE FRAME SHIFT TIME DATE SEARCH INDEX SEARCH DISPLAY SET DISPLAY SET LEFT POSITION SHIFT RIGHT POSITION SHIFT Function Position 25 26 27 29 31 32 DOWN POSITION SHIFT UP POSITION SHIFT CLEAR START END REC PLAY MODE SKIP SE...

Page 31: ...s 600ohms mini mic jack Video Output 1 0Vp p 75ohms BNC plug Audio Output 6dBs 1kohms RCA plug Horizontal Resolution More than 330 lines Black White More than 240 lines Colour Audio Frequency Response 70Hz 7kHz 3H mode Signal to Noise Ratio Video better than 42dB Audio better than 43dB Operating Temperature 41 F 104 F 5 C to 40 C Relative Humidity Max 80 Dimensions 16 7 W x12 4 D x3 7 H in Jog dia...

Page 32: ...872C191D3 PRINTED IN JAPAN ...

Reviews: