Mitsubishi Diamond Plus 92 User Manual Download Page 13

- 9 -

ENGLISH

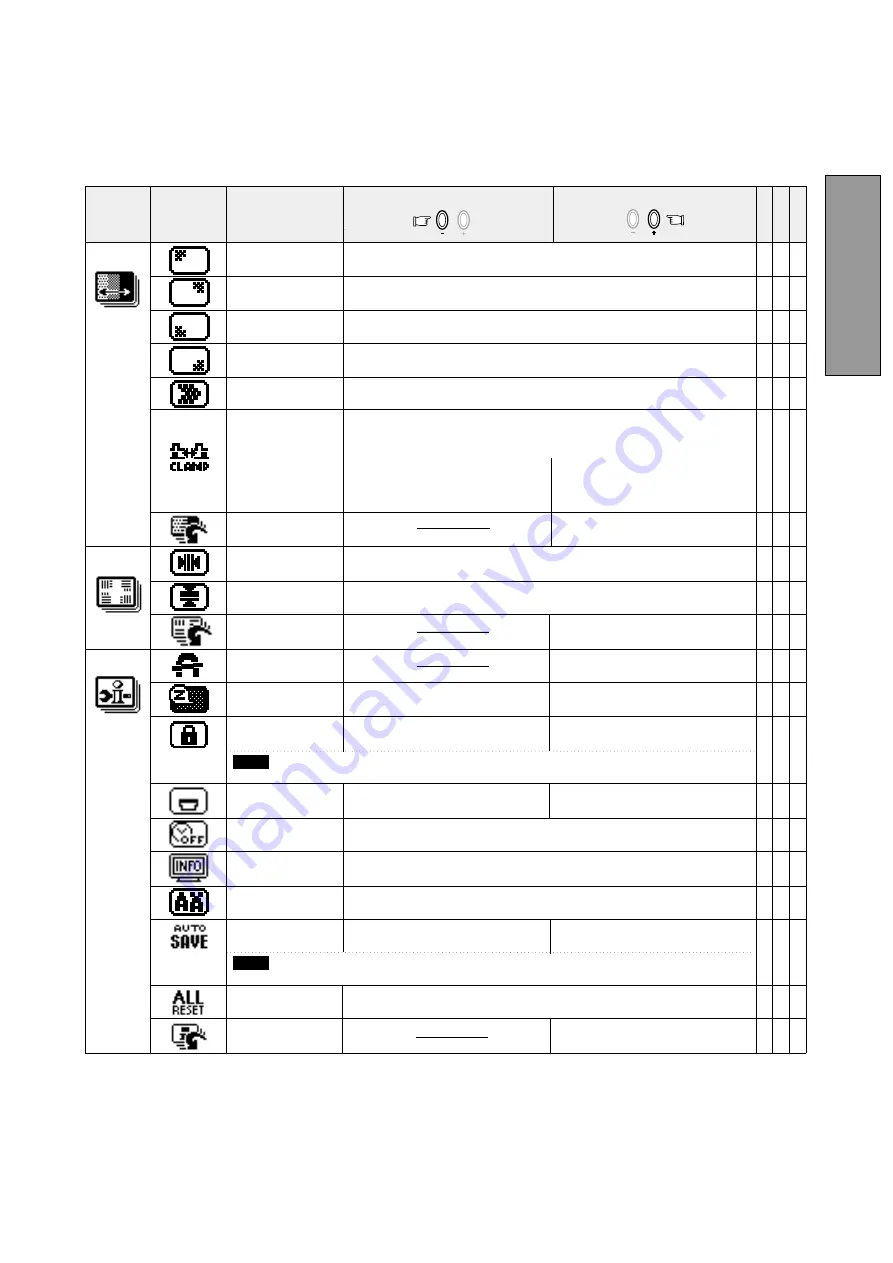
To adjust the purity condition on the top-left corner.

To adjust the purity condition on the top-right corner.

To adjust the horizontal beam alignment on the full screen area.

CORNER PURITY(TL)

CORNER PURITY(TR)

CORNER PURITY(BL)

CORNER PURITY(BR)

MOIRE CANCEL LEVEL

CLAMP PULSE POSITION

FACTORY PRESET

HORIZ-CONVERGENCE

VERT-CONVERGENCE

FACTORY PRESET

DEGAUSS

POWER SAVE

CONTROL LOCK

OSD POSITION

OSD TURN OFF

DIAGNOSIS

LANGUAGE

AUTO SAVE

ALL RESET

FACTORY PRESET

Group

Icon

Item
Icon

Item

To adjust the purity condition on the bottom-left corner.

To adjust the purity condition on the bottom-right corner.

To decrease the level of the moire-lear wave.

To eliminate an excessive green or white-back ground that may occur 
when external sync signals are applied to the monitor.

To clamp the video signal at the 
front of the H-Sync pulse.

To clamp the video signal at the 
back of the H-Sync pulse.  If you 
connect to an older Macintosh, you 
may need to press plus button.

To adjust the vertical beam alignment on the full screen area.

To restore to factory preset level.

To eliminate possible color shading 

or impurity due to magnetic effects.

To select the constant power 

consumption mode.

To select the power-save mode.

(Your computer must be set for 

power management.)

To permit all OSD adjustments.

To save the new setting automatically.

To adjust the time that the OSD screen is displayed for when no buttons
 are pressed, before it disappears.

To lock the OSD function except for 

"BRIGHT" and "CONTRAST".

To move the OSD screen position 

in a counter clockwise direction.

To move the OSD screen position 

in a clockwise direction.

To save the new setting with a 

comfirmation message.

Indicates the current scanning frequency, factory or user preset timing 
number, and signal input connector. 

To choose the language used on OSD.
ENG.....English, FRA.....French, ESP.....Spanish, GER.....German, JPN.....Japanese

Restores all items to the factory preset level.

Press the Minus Button

Press the Plus Button

To restore to factory preset level.

To restore to factory preset level.

"BRIGHT" and "CONTRAST" are unavailable at the locked condition.

NOTE

When selecting "OFF", if "SAVE" is not done before the OSD screen disappeared, the new setting is invalid.

NOTE

A B C

X X X 

X X X

X X X

X X X

X X

- - -

X X X

X X X

- - -

X X X


  X


X X X

X X X 

- - -


  X


  X


- - -

X:  Available

Summary of Contents for Diamond Plus 92

Page 1: ...n the space below SERIAL No The serial number is located on the rear cover of the monitor AUTO SCANNING WITH DIGITAL CONTROL COLOR DISPLAY MONITOR Internet Home Page http www mitsubishi electric com a...

Page 2: ...ii...

Page 3: ...does cause harmful interference to radio or television reception which can be determined by turn ing the equipment off and on the user is encouraged to try to correct the interference by one or more...

Page 4: ...ability Below you will find a brief summary of the environmental requirements met by this product The complete environmental criteria document may be ordered from TCO Development SE 114 94 Stockholm S...

Page 5: ...ction 3 1 4 DDC 3 1 5 Location Considerations 3 1 6 Cleaning Your Monitor 3 1 7 Unpacking 4 1 8 Tilt Swivel Base 4 Screen Position Adjustment 4 1 9 Quick Operation Chart 4 2 PART NAME 5 2 1 Control Na...

Page 6: ...maximum addressable resolution format of 1792 dots x 1344 lines This display is well suited for windowing environments Because of the analog signal inputs the monitor can display an unlimited palette...

Page 7: ...shock When transporting the monitor handle it with care 1 6 Cleaning Your Monitor When cleaning the monitor please follow these guidelines Always unplug the monitor before cleaning Wipe the screen and...

Page 8: ...OK OK 1 7 Unpacking After you unpack the box you should have all of the items indicated in Figure 1 Save the box and packing materials in case you transport the monitor Figure 1 Figure 2 1 Colour Moni...

Page 9: ...tion 1 POWER SWITCH A push on push off switch for AC power 2 POWER ON INDICATOR This indicator illuminates green when AC power is on and illuminates orange when the monitor is in the power management...

Page 10: ...back of the monitor The other end is plugged into a properly grounded three prong AC outlet The monitor s auto sensing power supply can automati cally detect 100 120V AC or 220 240V AC and 50 or 60Hz...

Page 11: ...Screen Display function The following procedure shows how to adjust the screen using the OSD function 4 1 How to adjust the screen If you don t press a button during the time set by OSD TURN OFF the O...

Page 12: ...een image near the corners of bottom To expand the width of the screen image near the corners of top To make the screen slant to the right To narrow the width of the screen image near the corners of t...

Page 13: ...to factory preset level To eliminate possible color shading or impurity due to magnetic effects To select the constant power consumption mode To select the power save mode Your computer must be set f...

Page 14: ...or may turn off automatically This is by an internal protection circuit operated and it is to avoid electrical components broken NOTE Contrast and brightness controls Power switch AC power cord discon...

Page 15: ...are required for all aperture grille CRTs A buzzing sound when power on A brief vibration or hum sound that is heard just after power up is normal This is caused by the automatic degaussing function...

Page 16: ...full white video signal at 9300K 8MPCD Horizontal 2 9 sec typ Vertical 500 sec typ DISPLAY SIZE 356mm x 266mm typ ratio 4 3 COLOUR 5000K 9300K AC100 120 220 240V 10 50 60Hz 105W typ OPERATING Temperat...

Page 17: ...Centris 610 650 660AV Macintosh IIvi IIvx Power Macintosh 4400 G3 Performa 6260 6310 6410 6420 Power Macintosh 6100 6100AV 6200 6300 Power Macintosh 7100AV 7200 7300 7500 7600 Power Macintosh 8100 81...

Page 18: ...200 70Hz 1600 x1200 75Hz IIsi IIci IIvi IIvx LC LCII LCIII LC475 LC630 Quadra 700 900 Quadra 610 650 800 950 Centris 610 650 Quadra 840AV Centris 660AV 6260 6310 6410 6420 Workgroup Server 8150 9150 6...

Page 19: ...is damaged by the use of an accessory which is not supplied by Mitsubishi Electric Australia OWNER RESPONSIBILITY Before you request repair to the product under this Warranty please check the followi...

Page 20: ...owner is at all times responsible for the repair of defects caused by accidental or intentional damage improper voltage fire misuse abuse neglect alterations by or negligence of the consumer incorrect...

Page 21: ...does not indicate that the material is recyclable If you have any questions on the recyclability of any materials please contact the Mitsubishi Electric Australia office in your state MITSUBISHI ELEC...

Page 22: ...must accept any interference received including interference that may cause undesired operation For questions regarding this declaration contact NEC Mitsubishi Electronics Display of America Inc 1250...

Reviews: