background image

8

6.1. For Wired Remote-controller

You can use Function Selection of remote controller to select which of
three types of timer to use: 

1

 Weekly timer, 

2

 Simple timer, or 

3

 Auto Off

timer.

6.1.1. Weekly Timer

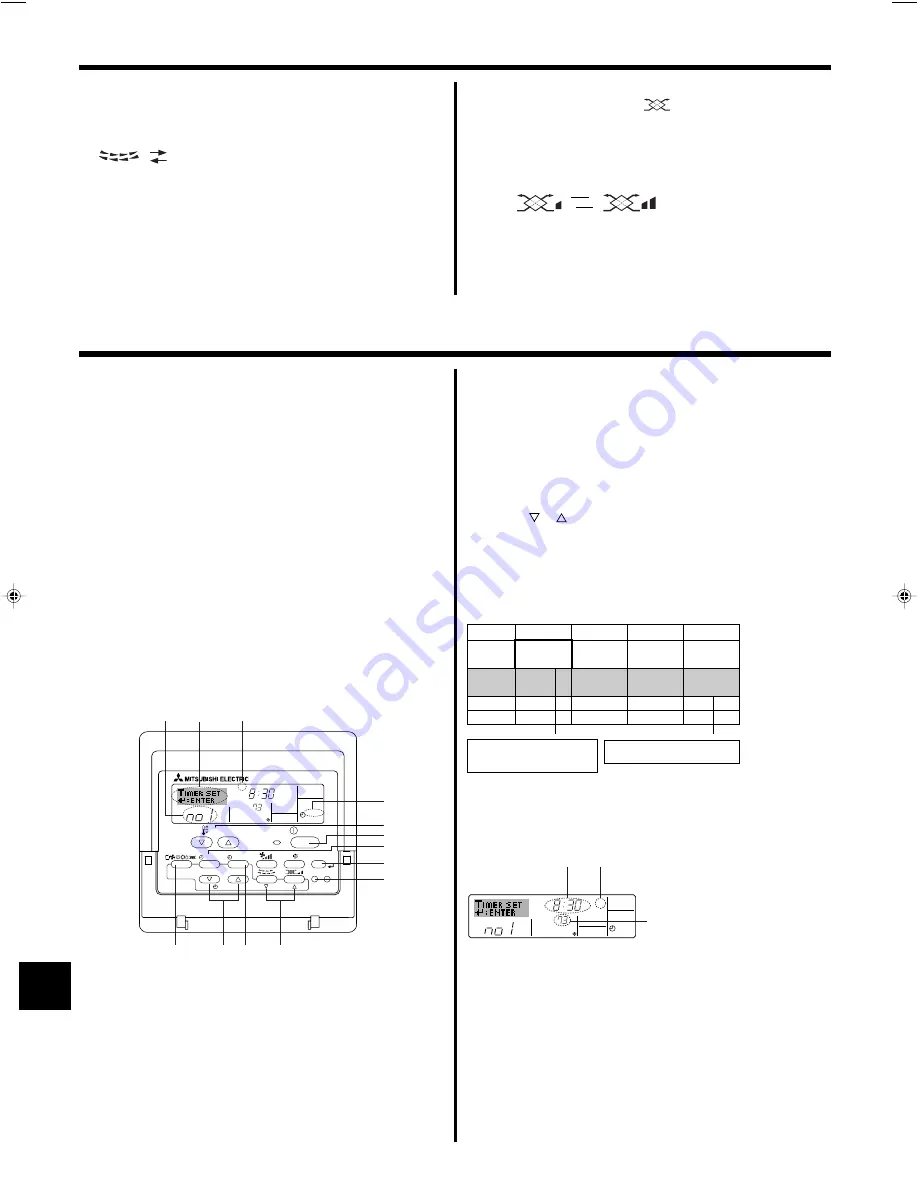
The weekly timer can be used to set up to eight operations for each day
of the week.
• Each operation may consist of any of the following: ON/OFF time

together with a temperature setting, or ON/OFF time only, or tempera-
ture setting only.

• When the current time reaches a time set at this timer, the air

conditioner carries out the action set by the timer.

Time setting resolution for this timer is 1 minute.

Note:
*1. Weekly Timer/Simple Timer/Auto Off Timer cannot be used at the same time.
*2. The weekly timer will not operate when any of the following conditions is in

effect.
The timer feature is off; the system is in an malfunction state; a test run is
in progress; the remote controller is undergoing self-check or remote con-
troller check; the user is in the process of setting a function; the user is in
the process of setting the timer; the user is in the process of setting the
current day of the week or time; the system is under central control. (Spe-
cifically, the system will not carry out operations (unit on, unit off, or tem-
perature setting) that are prohibited during these conditions.)

˚F

SUN

ON

WEEKLY

PAR-21MAA

ON/OFF 

FILTER

CHECK

OPERATION

CLEAR

TEST

TEMP.

MENU

BACK

DAY

MONITOR/SET

CLOCK

ON/OFF

2

¢

£

q

9

78

0

4

1

3

w

¡

Operation No.

Day Setting

<How to Set the Weekly Timer>

1. Be sure that you are at a standard control screen, and that the weekly

timer indicator 

¡

 is shown in the display.

2. Press the Timer Menu button 

w

, so that the “Set Up” appears on the

screen (at 

). (Note that each press of the button toggles the display

between “Set Up” and “Monitor”.)

3. Press the Timer On/Off (Set Day) button 

9

 to set the day. Each press

advances the display at 

£

 to the next setting, in the following sequence:

“Sun Mon Tues Wed Thurs Fri Sat” 

 “Sun” 

 ... 

 “Fri” 

 “Sat” 

 “Sun

Mon Tues Wed Thurs Fri Sat”...

4. Press the 

 or 

 Operation button (

7

 or 

8

) as necessary to select the

appropriate operation number (1 to 8) 

¢

.

* Your inputs at Steps 3 and 4 will select one of the cells from the matrix

illustrated below.
(The remote-controller display at left shows how the display would
appear when setting Operation 1 for Sunday to the values indicated
below.)

6. Timer

5. Operation

Low

High

<To Change the Right/Left Air Direction>

Press the louver button 

7

 as necessary.

• The louver image 

 appears.

Each press of the button switches the setting as follows.

(ON)

(OFF)

During swing operation, the arrow dis-
play move to the left and right.

No display
(Stop)

5.6. Ventillation

s

s

s

s

s

For LOSSNAY combination

5.6.1. For Wired Remote-controller

To run the ventilator together with the indoor unit:

Press the ON/OFF button 

1

.

• The Vent indication appears on the screen (at 

). The ventilator will

now automatically operate whenever the indoor unit is running.

5.6.2. For Wireless Remote-controller

The ventillator will automatically operate when the indoor unit turns on.

No indication on the wireless remote controller.

To run the ventilator independently:

Press the Mode button 

2

 until 

 appears on the display. This will

cause the ventilator to start.

To change the ventilator force:

Press the Ventilation button 

8

 as necessary.

• Each press toggles the setting, as shown below.

Note:
By setting the day to “Sun Mon Tues Wed Thurs Fri Sat”, you can set the same
operation to be carried out at the same time every day.
(Example: Operation 2 above, which is the same for all days of the week.)

<Setting the Weekly Timer>

Op No.

Sunday

Monday

Saturday

No. 1

No. 2

No. 8

• 8:30
• ON
• 73 °F

• 10:00
• OFF

• 10:00
• OFF

• 10:00
• OFF

• 10:00
• OFF

Setup Matrix

<Operation 1 settings for Sunday>

Start the air conditioner at 8:30, with
the temperature set to 73 °F.

<Operation 2 settings for every day>

Turn off the air conditioner at 10:00.

˚F

SUN

ON

WEEKLY

§

Shows the selected operation (ON or OFF)
* Does not appear if operation is not set.

Shows the temperature setting
* Does not appear if temperature is not

set.

Shows the time
setting

5. Press the appropriate Set Time button 

q

 as necessary to set the

desired time (at 

).

* As you hold the button down, the time first increments in minute inter-

vals, then in ten-minute intervals, and then in one-hour intervals.

6. Press the ON/OFF button 

1

 to select the desired operation (ON or

OFF), at 

§

.

* Each press changes the next setting, in the following sequence:

No display (no setting) 

 “ON” 

 “OFF”

 BG79U794H02_en

05.12.22, 2:02 PM

8

Summary of Contents for Mr.Slim PCA-A-GA

Page 1: ...condicionado para garantizar un uso seguro y correcto OPERATION MANUAL For safe and correct use please read this operation manual thoroughly before operating the air conditioner unit FOR USER PARA EL USUARIO Deutsch Nederlands Español Italiano ÏÏËÓÈÎ Português Dansk Svenska English Español PLA A AA PKA A GA PKA A GAL PKA A FA PKA A FAL PCA A GA ...

Page 2: ...ot remove the front panel or the fan guard from the outdoor unit when it is running When you notice exceptionally abnormal noise or vibration stop operation turn off the power switch and contact your dealer Never insert fingers sticks etc into the intakes or outlets If you detect odd smells stop using the unit turn off the power switch and consult your dealer Otherwise a breakdown electric shock o...

Page 3: ... Air outlet PCA A GA Ceiling Suspended PKA A GA PKA A GAL Wall Mounted PKA A FA PKA A FAL Wall Mounted Filter Air intake Louver Air outlet Vane Air intake Filter Louver Air outlet Vane Filter Air intake Louver Air outlet Vane Filter Air intake Vane ...

Page 4: ...e hour at which time the airflow di rection also changes Room Temperature display Showstheroomtemperature Theroom temperature display range is 8 39 C The display flashes if the temperature is less than 8 C or 39 C or more Louver display Indicates the action of the swing louver Does not appear if the louver is station ary Power On indicator Indicates that the power is on Fan Speed indicator Shows t...

Page 5: ...7 meters in a direct line from the indoor unit in an area 45 to the left and right of the unit However illumination such as fluorescent lights and strong light can affect the ability of the indoor unit to receive signals If the operation lamp near the receiver on the indoor unit is flashing the unit needs to be inspected Consult your dealer for service Handle the remote controller carefully Do not...

Page 6: ...ting Horiz outlet 1 2 6 5 3 7 5 1 Turning ON OFF To Start Operation Press the ON OFF button 1 The ON lamp and the display area come on Note When the unit is restarted initial settings are as follows Screen Types For details on setting the language for the remote controller display refer to section 8 Function Selection The initial language setting is English Function Selection of remote controller ...

Page 7: ...set the desired temperature The selected temperature is displayed Available temperature ranges are as follows Cooling Drying 19 30 C 67 87 F Heating 17 28 C 63 83 F Automatic 19 28 C 67 83 F The display flashes either 8 C 39 C 46 F 102 F to inform you if the room temperature is lower or higher than the displayed temperature 5 4 Fan speed setting Press the Fan Speed button 5 as many times as necess...

Page 8: ...and 4 will select one of the cells from the matrix illustrated below The remote controller display at left shows how the display would appear when setting Operation 1 for Sunday to the values indicated below 6 Timer 5 Operation Low High To Change the Right Left Air Direction Press the louver button 7 as necessary The louver image appears Each press of the button switches the setting as follows ON ...

Page 9: ...lear button 0 so that the time setting clears to at If you want to use only an ON setting or only an OFF setting be sure that the setting you do not wish to use is shown as Timer Settings F TIMER SUN ON OFF WEEKLY ª F F TIME SUN WEEKLY 10 F F TIME SUN WEEKLY 10 6 Timer 7 Press the appropriate Set Temperature button 3 to set the desired temperature at Each press changes the setting in the following...

Page 10: ...ing 5 hours OFF setting 2 hours 3 hours At Timer Start Display shows the timer s OFF setting hours remaining to OFF At 5 hours after timer start The air conditioner comes on and will continue to run until someone turns it off 6 1 3 Auto Off Timer This timer begins countdown when the air conditioner starts and shuts the air conditioner off when the set time has elapsed Available settings run from 3...

Page 11: ...ote controller during timer mode to stop the unit will cancel the timers If the current time has not been set the timer operation cannot be used 7 Other Functions F F TIME SUN FUNCTION PAR 21MAA ON OFF FILTER CHECK OPERATION CLEAR TEST TEMP MENU BACK DAY MONITOR SET CLOCK ON OFF 4 1 Lock Indicator 7 1 Locking the Remote Controller Buttons Operation function limit controller If you wish you can loc...

Page 12: ...selection mode Change the setting when needed Item 1 1 Change Language CHANGE LANGUAGE 2 Function limit FUNCTION SELECTION 3 Mode selection MODE SELEC TION 4 Display change DISP MODE SETTING Item 2 Language setting to display 1 Operation function limit setting operation lock LOCKING FUNCTION 2 Use of automatic mode setting SELECT AUTO MODE 3 Temperature range limit setting LIMIT TEMP FUNCTION 1 Re...

Page 13: ...ection Display mode setting 8 Function Selection Operation lock setting is not used Initial setting value Operation lock setting is except On Off button Operation lock setting is All buttons The automatic mode is displayed when the operation mode is selected Initial setting value The automatic mode is not displayed when the operation mode is selected The temperature range limit is not active Initi...

Page 14: ...utton H The selected setting will flash and the temperature can be set Settable range Cooling Dry mode Lower limit 19 C 30 C 67 F 87 F Upper limit 30 C 19 C 87 F 67 F Heating mode Lower limit 17 C 28 C 63 F 83 F Upper limit 28 C 17 C 83 F 63 F Automatic mode Lower limit 19 C 28 C 67 F 83 F Upper limit 28 C 19 C 83 F 67 F 4 3 Mode selection setting 1 Remote controller main sub setting To switch the...

Page 15: ...ature cooling day mode Limit temperature heating mode Limit temperature auto mode Mode selection Remote controller setting MAIN Remote controller setting SUB Use of clock setting Setting the day of the week and time Timer set Timer monitor Weekly timer Timer mode off Auto off timer Simple timer Contact number setting of error situation Display change Temperature display C F setting Room air temper...

Page 16: ... produced from the walls carpeting and furniture as well as odors trapped in clothing and then blows this air back into the room If the indoor temperature and the humidity are high this condition may occur when operation starts During defrosting mode cool airflow may blow down and appear like a mist During cooling mode water may form and drip from the cool pipes and joints During heating mode wate...

Page 17: ... the ON OFF button to restart operation Is the air conditioner connected to a central remote controller Consult the concerned people who control the air conditioner Does appear in the remote controller display Consult the concerned people who control the air conditioner Are timer settings invalid If the timer can be set WEEKLY SIMPLE or AUTO OFF appears in the remote controller display The initial...

Page 18: ...8 230 60 0 33 0 43 0 52 1 1 1 1 1 15 15 15 15 15 13 3 8 13 3 8 39 55 1 8 66 1 8 9 1 4 9 1 4 320 350 390 425 530 705 780 990 290 315 350 380 480 635 700 890 36 38 41 43 39 45 46 49 35 53 62 Model Power source Phase Voltage V Frequency Hz Fan motor FLA MCA A MOCP A Dimension Height inch Dimension Width inch Dimension Depth inch Airflow DRY CFM Low Middle2 Middle1 High WET CFM Noise level Low Middle2...

Page 19: ......

Page 20: ... el panel frontal del ventilador de la unidad exterior mien tras esté en funcionamiento Cuando note ruidos o vibraciones que no sean normales pare la unidad desconecte la fuente de alimentación y póngase en con tacto con su proveedor No inserte nunca dedos palos etc en las tomas o salidas de aire Si detecta olores raros pare la unidad desconecte el interruptor de red y consulte con su distribuidor...

Page 21: ...elo montado en techo PKA A GA PKA A GAL Modelo montado en pared PKA A FA PKA A FAL Modelo montado en pared Filtro Entrada de aire Rejilla Deflector Entrada de aire Filtro Rejilla Deflector Filtro Entrada de aire Rejilla Deflector Filtro Entrada de aire Deflector Salida de aire Salida de aire Salida de aire ...

Page 22: ...o auto mático en cuyo caso muestra el tiempo restante Indicador Sensor Aparece cuando se utiliza el sensor del mando a distancia Indicador Locked Indica que se han bloqueado los boto nes del mando a distancia Indicador Clean The Filter Se enciende cuando debe limpiarse el filtro Indicadores del temporizador El indicador se enciende si se ha con figurado el temporizador correspon diente Indicador d...

Page 23: ...de recibir señales emitidas a un máximo de 7 metros en línea recta en un rango de 45 a derecha e izquierda de la unidad Sin embargo ciertos sistemas de iluminación con fluorescentes o luces fuertes pueden afectar a la capacidad de recepción de señal de la unidad interior Si la luz de funcionamiento situada cerca del receptor de la unidad interior parpadea será necesario inspeccionar la unidad Cons...

Page 24: ...encienden la lámpara de encendido y la pantalla Nota Cuando se reinicia la unidad las configuraciones iniciales son las siguientes Tipos de pantallas El ajuste de idioma de la pantalla se puede cambiar a español utilizando la selección de función del controlador remoto Consulte la sección 8 punto 4 1 para cambiar el ajuste de idioma El ajuste inicial es inglés Selección de Función configure las fu...

Page 25: ...isor aparecerá la temperatura seleccionada Las gamas de ajuste de temperaturas disponibles son las siguientes Enfriamiento y secado 19 30 C 67 87 F Calefacción 17 28 C 63 83 F Automático 19 28 C 67 83 F La pantalla parpadea 8 C 39 C 46 F 102 F para informar si la temperatura de la habitación es inferior o superior a la temperatura que se visualiza 5 4 Ajuste de la velocidad del ventilador Pulse el...

Page 26: ...ionará una de las celdas de la matriz ilustrada a continuación La pantalla del mando a distancia en la izquierda muestra cómo se mostraría la pantalla cuando se configura Operación 1 para el do mingo con los valores indicados a continuación 6 Temporizador 5 Manejo Para cambiar la dirección del aire Derecha Izquierda Pulse el botón Louver 7 según sea necesario Aparece la imagen de la rejilla Cada p...

Page 27: ...o o apagado véase el paso 3 y luego pulse el botón Check Clear 0 para borrar la configuración de la hora a en Si desea utilizar sólo un valor de configuración de encendido o una configuración de apagado asegúrese de que la configuración que no desea utilizar se muestra como Valores fijados del temporizador F TIMER SUN ON OFF WEEKLY ª F F TIME SUN WEEKLY 10 F F TIME SUN WEEKLY 10 6 Temporizador 7 P...

Page 28: ...oras Al inicio del temporizador La pantalla muestra el valor de apagado del temporizador las horas restantes para el apa gado 5 horas después del inicio del temporizador El acondicionador de aire comienza a funcionar y continuaráfuncionandohastaquealguienlodetenga 6 1 3 Temporizador de apagado automático Este temporizador comienza la cuenta atrás cuando el acondicionador de aire comienza a funcion...

Page 29: ... ON OFF del mando a distancia durante el modo de temporizador para parar la unidad se cancelarán los temporizadores Si no ha ajustado la hora actual no podrá utilizar la función del temporizador 7 Otras funciones F F TIME SUN FUNCTION PAR 21MAA ON OFF FILTER CHECK OPERATION CLEAR TEST TEMP MENU BACK DAY MONITOR SET CLOCK ON OFF 4 1 7 1 Bloqueo de los botones del mando a distancia lí mite de funció...

Page 30: ...Pantalla alternante Lámpara ON parpadeando Ítem 1 1 Cambio de idioma CHANGE LANGUAGE 2 Límite de funciones SELECCIÓN DE FUNCIÓNES 3 Selección de modo SELECCIÓN DE MODO 4 Cambio de indicador MOSTRAR MODO Ítem 2 Ajuste del idioma que aparece en el indicador 1 Ajuste del límite de funciones bloqueo de funciones FUN CIÓN BLOQUEADA 2 Uso del ajuste de modo automático SELECCIÓN MODO AUTO 3 Ajuste del lí...

Page 31: ...e función El ajuste de función bloqueada no se utiliza valor de ajuste inicial El bloqueo de funcionamiento está ajustado excepto para los botón On Off encendido y apagado El bloqueo de funcionamiento está ajustado para todos los botones El modo automático aparece al seleccionar el modo de funcionamien to valor de ajuste inicial El modo automático no aparece al seleccionar el modo de funciona mien...

Page 32: ...ración Secado Límite inferior 19 C a 30 C 67 F a 87 F Límite superior 30 C a 19 C 87 F a 67 F Modo Calefacción Límite inferior 17 C a 28 C 63 F a 83 F Límite superior 28 C a 17 C 83 F a 63 F Modo Automático Límite inferior 19 C a 28 C 67 F a 83 F Límite superior 28 C a 19 C 83 F a 67 F 4 3 Ajuste de selección de modo 1 Ajuste del controlador remoto principal secundario Para cambiar el ajuste presi...

Page 33: ... MAIN PRINCIPAL Ajuste de controlador remoto SUB SECUNDARIO Utilización del ajuste del reloj Ajuste del día de la semana y la hora Ajuste del temporizador Visualización del temporizador Temporizador semanal Modo de temporizador apagado Temporizador de apagado automá tico Temporizador simple Ajuste de número de contacto en caso de avería Cambio de indicación Ajuste de visualización de tempe ratura ...

Page 34: ...e se mueven arriba y abajo antes de detenerse en la posición ajustada Se oye un sonido de agua fluyendo o en ocasiones una especie de silbi do Se oye un traqueteo o un chirrido Hay un olor desagradable en la sala La unidad interior expulsa un vaho o humo blanco La unidad exterior expulsa agua o vapor El indicador de operación no aparece en la pantalla del controlador remoto Aquí tiene la solución ...

Page 35: ...do el temporizador de apagado Pulse el botón ON OFF ENCENDIDO APAGADO para reiniciar el fun cionamiento El acondicionador de aire está conectado a un controlador remoto central Consulte a la persona encargada de controlar el acondicionador de aire Aparece en la pantalla del controlador remoto Consulte a la persona encargada de controlar el acondicionador de aire Los ajustes del temporizador no son...

Page 36: ...FA Monofase 208 230 60 0 33 0 43 0 52 1 1 1 1 1 15 15 15 15 15 13 3 8 13 3 8 39 55 1 8 66 1 8 9 1 4 9 1 4 320 350 390 425 530 705 780 990 290 315 350 380 480 635 700 890 36 38 41 43 39 45 46 49 35 53 62 Modelo Alimentación Fase Voltaje V Frecuencia Hz Motor del ventilador FLA MCA A MOCP A Dimensión altura inch Dimensión ancho inch Dimensión profundidad inch Flujo de aire DRY CFM Bajo Media 2 Media...

Page 37: ...3400 Lawrenceville Suwanee Road Suwanee Georgia 30024 Toll Free 800 433 4822 Toll Free Fax 800 889 9904 www mrslim com Specifications are subject to change without notice ...

Reviews: