background image

57

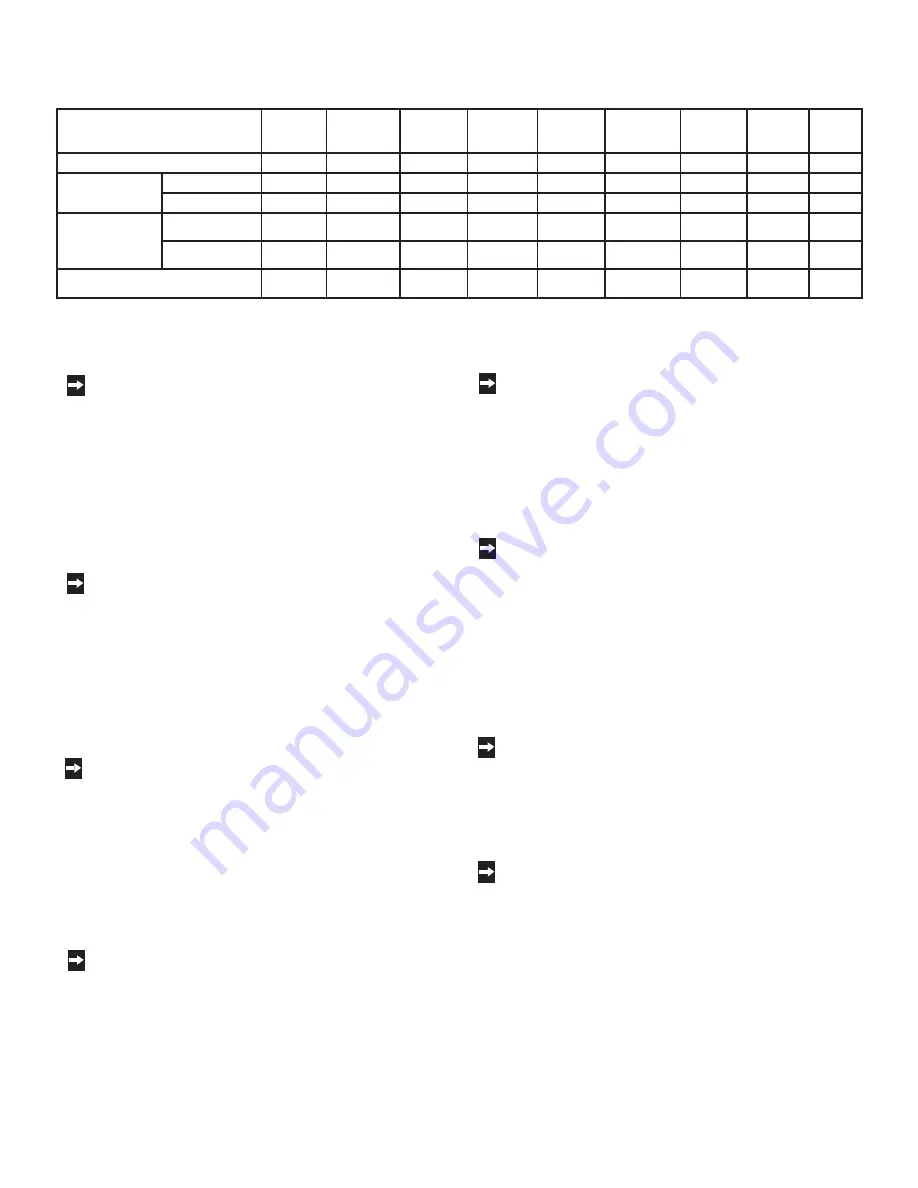
Format (picture shape) availability based on Input/Signal 

NOTE: You can find aspect ratios on the back of most DVD covers.  Also, Anamorphic DVDs are usually  

Available On-Screen Format Sizes

  Stretch     


Default format for ANT and Inputs 1-2.  The 
Stretched format stretches narrow 4:3 images 
across the screen, however, there is less stretch in 
the center than the sides.  


Note: Stretch is not available with 1080i/720p 

signal.

  Stretch Plus  


Similar to Stretch mode. To minimize distortions 
on the side, the picture is expanded to crop off 
portions of the top and bottom. Useful when no 
important information is shown at the top and/or 
bottom of the screen.  


Note: Stretch Plus is not available with 1080i/720p 

signal.

  Narrow    


Displays narrow 4:3 images in their original shape 
and adds stationary gray side bars to fill the screen.      

Note: Narrow is not available with 1080i/720p 

signal.        


Real, PC Expand and Full
These formats are only available with a PC signal.
                                                    
This format is only available with PC signal.

  Standard   


Default format for DTV and Component Input 
displays a full-screen format.  The Standard format 
displays Anamorphic DVDs that have the 1.78:1 or 
1.85:1 aspect ratios.  However, Anamorphic DVDs 
that have the 2.35:1 aspect ratio still display black 
bars at the top and bottom of the screen, while 
narrow (4:3) images are stretched evenly from side 
to side.

  Expand (480i/480p) 


Enlarges the picture, cropping some of the image at 
the top and bottom.  The Expand format is useful 
to reduce the letterbox top and bottom bars of non-
Anamorphic DVDs or to correct narrow  
4:3 images that have been stretched in the 
Standard format.   


  HD Expand (1080i/720p)  


Enlarges the picture to fit the screen vertically, 
cropping some of the image on both sides.  This  
format is useful to remove or reduce black side bars 
on HD broadcasts of 4:3 images with black bars 
(See page 55).     


Note: HD Expand is only available with 1080i/

720p signal.

  Zoom     


Enlarges the picture, cropping some of the image 
at each side, top and bottom.  The Zoom format 
is useful to remove or reduce the black top and 
bottom bars on Anamorphic DVDs with 2.35:1 
aspect ratio.  


Note: Zoom is not available with 1080i/720p signal.

Input signal

Standard Expand 

Zoom 

Stretch

Stretch 

PLUS

Narrow

Real

PC 

Expand

Full

Composite/S-video(480i)

OK

OK

OK

OK

OK

OK

N/A

N/A

N/A

Component 

(Y/Pb/Pr)

480i/480P

OK

OK

OK

OK

OK

OK

N/A

N/A

N/A

1080i/720P

OK

OK

N/A

N/A

N/A

N/A

N/A

N/A

N/A

HDMI 

(Digital Video)

480P

OK

OK

OK

OK

OK

OK

N/A

N/A

N/A

1080i/720P

OK

OK

N/A

N/A

N/A

N/A

N/A

N/A

N/A

Analog RGB (PC)

N/A

N/A

N/A

N/A

N/A

N/A

OK

OK

OK

Summary of Contents for L423FR

Page 1: ...visit our website at www mitsubishi tv com LCD Television System LT 4260 LCD Display model L423FR Owner s Guide ...

Page 2: ...cy energy and if not installed and used in accordance with the instructions may cause harmful interference to radio communications However there is no guarantee that interference will not occur in a particular installation If this equipment does cause harmful interference to radio or television reception which can be determined by turning the equipment off and on the user is encouraged to try to c...

Page 3: ...INDER IS PROVIDED TO CALL THE CATV SYSTEM INSTALLER S ATTENTION TO ARTICLE 820 40 OF THE NEC THAT PROVIDES GUIDELINES FOR THE PROPER GROUNDING AND IN PARTICULAR SPECIFIES THAT THE CABLE GROUND SHALL BE CONNECTED TO THE GROUNDING SYSTEM OF THE BUILDING AS CLOSE TO THE POINT OF CABLE ENTRY AS PRACTICAL Hg LAMP S INSIDE THIS PRODUCT CONTAIN MERCURY AND MUST BE RECYCLED OR DISPOSED OF ACCORDING TO LOC...

Page 4: ... or Other S Video Device 31 Connecting a Satellite Receiver Cable Box 32 Connecting a Computer 33 How Connections Affect the PIP and POP 34 Chapter 4 Remote Control Functions Overview of the TV Layer Buttons 37 Operation 38 Sleep Timer 39 Use With Other A V Products 40 Operation of PIP POP Double Window 42 Chapter 5 Menu Screen Operations The ViewPoint Menu System 45 MAIN Menu 47 SETUP Menu 48 ADV...

Page 5: ...e and uneven surfaces may cause the product and cart combination to overturn 7 Ventilation Slots and openings in the cabinet are provided for ventilation and to ensure reliable operation of the product and to protect it from overheating Do not block these openings or allow them to be obstructed by placing the product on a bed sofa rug or other similar surface Nor should it be placed over a radiato...

Page 6: ... following conditions a When the power supply cord or plug is damaged b If liquid has been spilled or objects have fallen into the product c If the product has been exposed to rain or water d If the product does not operate normally by following the operating instructions adjust only those controls that are covered by the operating instructions as an improper adjustment of other controls may resul...

Page 7: ...a result of the manufacturing process found in all panels Your picture performance will not be affected 23 Wall or Ceiling Mounting The product should be mounted to a wall or ceiling only as recommended by the manufacturer When mounting the LCD display to a wall or ceiling the stand and Set Back Box HD 6000 must be removed from the back of the LCD display CAUTION This product needs to be attached ...

Page 8: ...ny crevice DO NOT use any strong or abrasive cleaners as these can scratch the surfaces DO NOT use any commercial cleaners with ammonia bleach alcohol benzine or thinners as these can dull the surfaces DO NOT spray liquids or cleaners directly on the product s surfaces DO NOT scrub or rub the product harshly Wipe it gently Excessive moisture or water may damage your product Use caution when wiping...

Page 9: ...Chapter 1 Television System Overview Thank You 9 Unpacking Your New TV System 10 Special Features 11 Side Control Panel and Card Reader 12 Side Panel Input Output 13 ...

Page 10: ...hat drive us to deliver products that implement the latest in advanced television technology While some televisions are destined for obsolescence in the near future MDEA s televisions are all HD upgradeable This cornerstone of your home entertainment system will continue to provide unparalleled enjoyment for years to come Whether this is your first Mitsubishi consumer electronics product or anothe...

Page 11: ...card with your name address city state ZIP Code and the words 100 000 Give Away V and mail to P O Box 174268 Dept MOA Denver CO 80217 4268 Entries must be received no later than December 31 2005 and are limited to one per household Mechanically reproduced entries not acceptable Not responsible for late lost or illegible entries A random drawing held in January 2006 will select the winners from all...

Page 12: ...D VHS VCRs or to other IEEE 1394 compatible TVs When recording analog programs TV Disc will even use Dolby Digital Record to convert the analog stereo to high quality digital stereo compatible with Dolby Digital decoding surround receivers Digital Cable Ready CableCARD Your widescreen Mitsubishi HDTV receiver controller is Plug and Play ready It can descramble a cable provider s one way digital si...

Page 13: ...trol Functions page 37 for an explanation of their usage The ADJUST ENTER MENU and CANCEL buttons may be used to access or navigate through the screen menus CARD 3 Compact Flash CARD 4 Memory Stick CARD 1 MMC SD CARD 2 SmartMedia GUIDE left side of LCD Display right side of LCD Display See Media Card Playback Page 64 For Details ...

Page 14: ...ays speakers 7 HDMI MonitorLink Input This is a Mitsubishi exclusive proprietary digital interface for the display of high quality digital video signals from Mitsubishi products such as the HD 6000 HDTV Receiver Controller All video signals both analog and digital are sent digitally to your Mitsubushi TV Can also be used as a HDMI input for other compatible sources Note The HDMI HDTV input termina...

Page 15: ...stem Setup Attaching HD 6000 to 42 LCD Display 15 Set Back Configuration Setup 16 Connecting a Computer 20 Stand Alone Configuration Setup 21 Connecting a Computer 22 Wall Mount Configuration Setup 23 Connecting a Computer 27 ...

Page 16: ...D 6000 to the 42 LCD Display Attaching HD 6000 to 42 LCD Display The HD 6000 can be connected to the 42 LCD Display by one of the following methods Set Back Configuration Stand Alone Configuration Wall Mount Configuration When the HD 6000 is connected to the 42 LCD the HD 6000 front control buttons are inactive To control the HD 6000 and 42 LCD set the remote control to the CABLE DBS DTV Layer or ...

Page 17: ... 6000 over so that the bottom is facing up and gently place it on the protective material 5 Attach the 4 Mounting Hooks CAUTION Do not remove the stand The Display is heavy Move it with two or more people When the HD 6000 is connected to the 42 LCD the HD 6000 front control buttons are inactive To control the HD 6000 and 42 LCD set the remote control to the CABLE DBS DTV Layer or use control butto...

Page 18: ...nd bottom Slide the HD 6000 into place making sure that all 4 mounting hooks connect to the corresponding pin located on the LCD Display stand PIN ON LCD Display PIN ON LCD Display PIN ON LCD Display PIN ON LCD Display HOOK ON HD6000 HOOK ON HD6000 HOOK ON HD6000 HOOK ON HD6000 ...

Page 19: ...18 Set Back Configuration Setup continued 7 Secure the HD 6000 to the stand using the two M3 Bolts ...

Page 20: ...he HD 6000 to the AUTHORIZED CARD READER connector on the back of the LCD Display 10 Connect the RS 232C Cable from the MonitorLink Control RS 232C connector on the back of the HD 6000 to the RS 232C MonitorLink Control for HD 6000 connector on the back of the LCD Display HD 6000 Back Panel section detail LCD Display Back Panel section detail HD 6000 Back Panel section detail LCD Display Back Pane...

Page 21: ...anel to PC or Macintosh back panel 13 Refer to Chapter 2 in the HD 6000 Owner s Guide on how to connect A V equipment DVD player Cable Box etc to the back panel of the HD 6000 14 Refer to HD 6000 Owner s Guide for complete operating instructions The HD 6000 controls all features that the LCD HDTV system has to offer HD 6000 Back Panel section detail LCD Display Back Panel section detail Figure 7 C...

Page 22: ...6 Connect the RS 232C Cable from the MonitorLink Control RS 232C connector on the back of the HD 6000 to the RS 232C MonitorLink Control for HD 6000 connector on the back of the LCD Display CAUTION Do not remove the stand The Display is heavy Move it with two or more people HD 6000 Back Panel section detail LCD Display Back Panel section detail HD 6000 Back Panel section detail LCD Display Back Pa...

Page 23: ...e LCD Display 8 Connecting a Computer OPTIONAL Your Mitsubishi LCD display supports VGA SVGA XGA and WXGA PC resolutions only See Appendix B Supported PC Resolutions P 61 a Connect a Mini D sub 15 pin RGB cable from the LCD Display back panel to PC or Macintosh back panel b Connect a PC Audio Cable or 1 8 stereo mini jack cable from the LCD Display side panel to PC or Macintosh back panel 9 Refer ...

Page 24: ...ndicated by the arrows Remove the stand cover CAUTION Mitsubishi recommends that only qualified service personnel mount the LCD display Customers should not attempt to do the work themselves Mitsubishi bears no responsibility for improper mounting or mounting that results in an accident or injury Carefully read the installation instructions that come with the wall mount before starting installatio...

Page 25: ...figuration Setup continued 6 Remove the Screws indicated by the arrows CAUTION Be sure to use another person to hold or support the stand while removing the screws The stand can easily fall resulting in injury or damage ...

Page 26: ...nector located on the back of the LCD Display 10 Connect the USB Cable from the Authorized Card Reader connector on the back of the HD 6000 to the AUTHORIZED CARD READER connector on the back of the LCD Display HD 6000 Back Panel section detail LCD Display Back Panel section detail HD 6000 Back Panel section detail LCD Display Back Panel section detail CAUTION When the Stand s Metal Hooks Right an...

Page 27: ...f the HD 6000 to the RS 232C MonitorLink Control for HD 6000 connector on the back of the LCD Display 12 Connect the AC Power Cord from the back of the HD 6000 to the back of the LCD Display HD 6000 Back Panel section detail LCD Display Back Panel section detail HD 6000 Back Panel section detail LCD Display Back Panel section detail ...

Page 28: ...PC or Macintosh back panel 14 Refer to Chapter 2 in the HD 6000 Owner s Guide on how to connect A V equipment DVD player Cable Box etc to the back panel of the HD 6000 15 Refer to HD 6000 Owner s Guide for complete operating instructions The HD 6000 controls all features that the LCD HDTV system has to offer Figure 7 Connecting Computer LCD Display Side Panel to PC or Macintosh back panel LCD Disp...

Page 29: ...telectronicstores Connections Connecting a VCR directly to LCD Side Panel 29 Connecting an Audio Receiver 30 Connecting a DVD Player or Other S Video Device 31 Connecting a Satellite Receiver Cable Box 32 Connecting MonitorLink or a Computer 33 How Connections Affect the PIP and POP 34 3 ...

Page 30: ...o or a S Video cable from VIDEO OUT on the VCR back panel to VIDEO INPUT on the LCD Display side panel 2 Connect a set of audio cables from AUDIO OUT on the VCR back panel to VIDEO INPUT AUDIO RIGHT LEFT on the LCD Display side panel The red cable connects to the R right channel The white cable connects to the L left channel The Display Side Panel is shut off when the HD 6000 is connected to the L...

Page 31: ...S Video cable but not both from VIDEO MONITOR OUT on the back of the A V receiver to VIDEO INPUT on the LCD Display side panel 2 Connect a set of audio cables from AUDIO OUT on the LCD Display side panel to AUDIO TV IN on the back of the A V receiver The red cable connects to the R right channel The white cable connects to the L left channel NOTE The LCD Display side panel connections shown below ...

Page 32: ...yback be sure to set your player accordingly Please refer to your DVD player s Owner s Guide Other S Video Device Figure 5 1 Connect a S Video cable from VIDEO OUT on the device back panel to VIDEO INPUT on the LCD Display side panel 2 Connect a set of audio cables from AUDIO OUT on the device back panel to VIDEO INPUT AUDIO RIGHT AUDIO LEFT on the LCD Display side panel The red cable connects to ...

Page 33: ...DIO RIGHT AUDIO LEFT on the LCD Display side panel 3 To utilize the benefits of a digital A V receiver connect your Satellite Cable Box receiver s digital audio out to a digital input on your digital A V receiver See your Satellite Cable Box receiver and A V receiver Owner s Guides for instructions SeeAppendixA page61for componentvideo signalcompatibilityinformation Fordigitalaudioconnections seey...

Page 34: ...tereo mini jack cable from the LCD Display side panel to PC or Macintosh back panel Figure 7 Connecting Computer The Mini D sub 15 pin RGB and 1 8 3 5mm stereo mini jack cables can be found at your local electronics store Connecting your computer to this LCD will allow you to display your computer s images Since this monitor is widescreen 16 9 aspect ratio the display configuration will vary depen...

Page 35: ...PIP POP input sources can and cannot be used together The table on this page shows which inputs can and cannot be used together and the limitations they may have If you press the INFO button it will display the current Input signal 480i 480p 720p or 1080i format and sleep time See Operation of PIP and POP page 60 for operating instructions PIP POP sub Main Input Component 480i 480p 720p 1080i HDMI...

Page 36: ...35 This page intentionally left blank ...

Page 37: ...Chapter 4 Remote Control Functions Overview of the TV Layer Buttons 37 Operation 38 Sleep Timer 39 Use With Other A V Products 40 Operation of PIP POP and Double Window 42 ...

Page 38: ...rmat Additionally if you press the INFO key it will display sleep time 11 AUDIO Select the individual audio settings 12 VIDEO Select the individual video settings 13 PIP CH Scroll up or down through memorized channels in PIP or POP 14 PIP POP Cycle through PIP and POP display choices 15 EXCH Exchange PIP or POP with the main TV picture 16 SLEEP Set the LCD Display to turn off within 2 hours See Sl...

Page 39: ...pping on hard surfaces Do not use harsh chemicals to clean Use only a soft lightly moistened cloth Do not mix new and old batteries Do not heat take apart or throw batteries into fire Use only AA batteries Operating the Remote Control You can use the remote to control the LCD Display and other A V CABLE DBS DTV VCR DVD and AUDIO products Select the product you want to control by moving the slide s...

Page 40: ...l the maximum value of 120 minutes is reached 4 After 5 seconds of inactivity the message will disappear 5 Press SLEEP to view the remaining time before the timer turns the LCD Display off Canceling the Sleep Timer 1 Press the SLEEP button to display the on screen message Sleep 30 min Figure 11 On screen display for sleep timer Figure 10 Sleep button on remote control PAUSE REC DEVICE MENU CANCEL ...

Page 41: ... Remote Control to Use with Other Brands of Audio and Video Products Figures 12 14 this page figures 15 16 following page 1 Move the slide switch at the top of the remote to the product you want to control 2 Press and hold the POWER button on the remote control 3 Enter the first three digit code listed for your equipment and then release the POWER button on the remote control 4 Point the remote co...

Page 42: ...s set to TV the volume and mute functions change to match the A V receiver This is useful when using an A V receiver with the TV all the time In all other cases only one of the below devices is allowed for each slide switch position TV position TV A V receiver volume and mute only Cable DBS DTV position Cable box Satellite receiver DTV receiver VCR position VCR DVD position DVD LD Player Audio pos...

Page 43: ...used together see How Connections Affect the PIP and POP page 34 Activating the PIP POP and Double Window Press PIP POP to choose a display format Each time the PIP POP button is pressed on the remote control within 3 seconds of each other the PIP POP cycles through the following display options 1 Double Window 2 POP one POP 3 PIP large PIP 4 PIP small PIP To turn PIP POP Off wait at least 10 seco...

Page 44: ...43 This page intentionally left blank ...

Page 45: ...Chapter 5 Menu Screen Operations The ViewPoint Menu System 45 MAIN Menu 47 SETUP Menu 48 ADVANCED FEATURES Menu 50 AUDIO VIDEO SETTINGS Menu 52 ...

Page 46: ...n screen operating system which provides on screen information for menu choices and changes Setup Audio Video Advanced Features Press ENT for setup of the LT 4260 Press MENU to exit Figure 17 MAIN Menu The first screen that appears when you press the TV MENU button from your remote The following remote control buttons will help you move quickly through the system Figure 18 ADJUST or to select the ...

Page 47: ...Assign Input Assignments Select English or Spanish for the menus or screen display Set the Front Button Lock See pages 48 49 for more detailed setup information Figure 19 SETUP Menu Setup Audio Video Advanced Features ENTER Español Off English On Press ENT to change Input Assignments MENU to exit Input Assignment Language idoma Front Button Lock ...

Page 48: ... Balance Display a blue screen when viewing an input with no signal Reduce Power consumption of the display when connected to a non active computer See pages 50 51 for more detailed setup information Setup Audio Video Advanced Features ENTER Off Off On On Press ENT to adjust each of the 6 colors Color Balance PC Power Save Video Mute Setup Audio Video Advanced Features Component Off Off On On Pres...

Page 49: ...pped when you press DEVICE on the remote control Choices are COMPONENT Cycle through a list of preset names or Off INPUT Cycle through a list of preset names or Off PC HDMI Cycle through a list of preset names or Off Figure 22 INPUT ASSIGNMENT Menu Input Assignment Setup Audio Video Advanced Features Component Input PC HDMI Input PC HDMI Component ADJUST to select or change option MENU to return ...

Page 50: ...ace the remote control you can restore the function of the front panel buttons by pressing and holding the MENU button on the side panel for more than 8 seconds If the LCD Display is already on a message will be displayed to confirm the release of the Front Button Lock Figure 23 Language Idioma Figure 24 Front Button Lock SETUP Menu Language Front Button Lock Setup Audio Video Advanced Features EN...

Page 51: ...tColor settings Each active input can be individually reset PerfectColor ColorView Figure 27 Individual sliders for Magenta Red Yellow Green Cyan and Blue will be displayed The sliders have a numeric value where 63 is the maximum The default setting for each color is 31 center Highlighted text will show which slider you are adjusting Each active input can be individually adjusted Press Adjust or t...

Page 52: ...time Your display will go into standby and the screen will go to black The timer light will display amber while in standby To activate PC input again simply move the mouse or press a key on the keyboard Video Mute Figure 29 Video Mute when on lets you display a blue background when no signal is being received Setup Audio Video Advanced Features ENTER Off Off On On Press 65 to turn PC Power Save Mo...

Page 53: ...on the Remote Control 1 Press AUDIO or VIDEO to cycle through the available settings 2 Press or to adjust the setting After 5 seconds of inactivity the setting display will disappear Figure 43 AUDIO VIDEO SETTINGS menu Figure 44 AUDIO SETTINGS Setup Audio Video Advanced Features Component Off Off On On Press 65 to reset the selected device then press ENT A V Memory Reset Settings Black Enhancement...

Page 54: ...ound Your TV will create a simulated surround effect when watching a stereo program Level Sound Automatically equalizes the volume level of programs containing significant level differences from one segment to another for example regular programming to commercials To receive the best fidelity with music programs you can turn this setting to Off Sub Woofer Your TV is equipped with two stereo speake...

Page 55: ... Video media uses a video camera created at 30 frames per second Film media uses a film camera created at 24 frames per second Examples of video media are live TV broadcast such as news special events or video taped programs Examples of film media are motion pictures made for TV movies and many prime time programs Filmed media is converted by the broadcaster or home video company to 30 frames per ...

Page 56: ...55 This page intentionally left blank ...

Page 57: ...ation of PIP and POP 60 Appendix A HD Input Connection Compatibility 61 Appendix B Supported PC Resolutions 61 Appendix C Remote Control Programming Codes 62 Appendix D Media Command and Media Card Playback 64 Cable Management 66 Index 67 Troubleshooting 69 Warranty 74 ...

Page 58: ...er Anamorphic DVDs that have the 2 35 1 aspect ratio still display black bars at the top and bottom of the screen while narrow 4 3 images are stretched evenly from side to side Expand 480i 480p Enlarges the picture cropping some of the image at the top and bottom The Expand format is useful to reduce the letterbox top and bottom bars of non Anamorphic DVDs or to correct narrow 4 3 images that have...

Page 59: ...pand Zoom For letterbox 2 35 1 DVDs Narrow Stretch Widescreen Picture 16 9 HD 1080i 720p only Example A True HD Broadcast Standard Recommended HD Expand Recommended for 4 3 images with Black Side Bars Available On Screen Format Sizes continued Stretch Plus ...

Page 60: ...640 480 1024 768 1366 768 XGA 1024 x 768 1024 768 1024 768 1366 768 WXGA 1280 x 768 1280 768 1280 1366 768 768 SXGA 1280 x 1024 1280 960 1366 768 768 768 PC720P 1280 x 720 1280 1366 1366 720 768 768 1360 x 768 1360 1360 1366 768 768 768 Vertical compress to 768 from 1024 ...

Page 61: ...the TV layer to freeze the PIP image Press Pause again to return to a live image Picture Inside Picture PIP vs Picture Outside Picture POP You have the option to view two TV shows or inputs at the same time For example you can watch a game show and a sports event on another channel or a DVD movie and more The PIP option allows you to view another input as a picture inside picture The POP option al...

Page 62: ...0mVp p 75ohms can also receive signals from outputs labeled B Y and Cb Pr 700mVp p 75ohms can also receive signals from outputs labeled R Y and Cr Input when Used With HDMI HDCP compliant E EDID Enhanced Extended Display Identification 1 3 compliant HDMI uncompressed high speed digital single link connection Suggested scan rates 1080i 720p 480p Appendix B Supported PC Resolutions Dots lines Vertic...

Page 63: ...Pioneer 252 Saba 251 Sampo 263 Samsung 261 Sanyo 275 Sharp 260 SMC 275 Sylvania 264 Sony 254 278 279 Thompson 251 Toshiba 253 287 Venturer 281 Vialta 277 Wave 269 XWave 269 Yamaha 250 272 276 287 Zenith 259 DVD Players ABC 124 Archer 125 Cableview 105 Citizen 122 105 Color Voice 128 129 130 106 107 Comtronics 128 129 130 106 107 Curtis 112 113 Diamond 124 125 Eagle 129 Eastern 134 GC Brand 105 GE ...

Page 64: ...020 027 028 025 029 Magnavox 051 043 044 Marantz 030 031 Marta 026 Memorex 044 029 MGA 060 067 068 061 062 Minolta 020 065 Multitech 067 047 024 NEC 030 031 054 Olympic 044 043 Optimus 048 041 055 026 Orion 046 040 Panasonic 043 044 041 042 VCRs Penney 044 020 065 025 030 031 Pentax 020 031 065 Philco 051 044 047 043 046 040 063 Philips 051 043 044 Pioneer 043 Proscan 065 020 043 044 051 066 021 0...

Page 65: ...64 ...

Page 66: ...65 ...

Page 67: ...66 Cable Management ...

Page 68: ...3 S Video Device 31 Connections Affect the PIP and POP 34 D DTV Input Connection Compatibility 61 DVD Player with Component Video 31 E Exchanging Program Images PIP and POP 60 F Freeze the PIP 60 Side By Side Picture 60 Front Button Lock 49 Side Control Panel 12 I Input Assignment Menu 48 Input Levels when used with HDMI Signals 61 Component Video 61 L Language Menu 49 M Main Menu Screens Overview...

Page 69: ...Sleep Timer 39 Stereo Audio System Connecting 30 T Timer Menu 47 Troubleshooting 69 TV Speakers Menu 52 U Use of the Remote Control with Other A V Products 40 41 V Video Mute 51 Video Settings Description 54 Viewpoint Menu System 45 ...

Page 70: ...V s side panel Picture is out of focus or colors are not aligned Check the Sharpness ColorView and input signal settings page 50 You cannot see a picture when you play a VCR tape If you connected your VCR with A V cables use the DEVICE button to select the Input source INPUT that the VCR is connected to Check your VCRs owner s guide for further troubleshooting Cannot set adjustments to factory set...

Page 71: ...70 NOTES ...

Page 72: ...71 NOTES ...

Page 73: ...72 NOTES ...

Page 74: ...stered trademark of the CompactFlash Association MultimediaCard is a trademark of Infineon Technologies and licensed to the MultiMediaCard Association Memory Stick is a trademark of Sony Corp SmartMedia is a trademark of Toshiba Corp HDMI the HDMI logo and High Definition Multimedia Interface are trademarks or registered trademarks of HDMI Licensing LLC Macintosh is a registered trademark of Apple...

Page 75: ...uthorized MITSUBISHI service center whose name and address can be obtained from your MITSUBISHI dealer by writing at the address provided below calling MDEA at the 800 332 2119 or by using the support feature of our website at www Mitsubishi tv com b Warranty service will be provided in your home or if required at an authorized service shop provided that your television is located within the geogr...

Page 76: ... Address Tel No Mitsubishi Digital Electronics America 9351 Jeronimo Road Irvine CA 92618 949 465 6000 Type of Product Equipment Classification Models Liquid Crystal Display Class B Peripheral L423FR We hereby declare that the equipment specified above conforms to the technical standards as specified in the FCC Rules If you have questions regarding your television please call our Consumer Relation...

Reviews: