M a i n b o a r d
FT5000 HANDBOOK 5/5
General procedure for all jumper settings
The short general procedure for changing a configuration setting is the same for most of the
jumper functions, so we will describe it first.
1.
Read through the instructions on page 4 of this chapter.
2.
Remove the access cover as detailed in Chapter 2. You do not need to remove the baseboard
from the chassis, and you probably do not need to remove any add-in boards.
3.
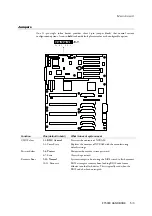
Locate the configuration jumpers at the edge of the baseboard toward the front of the system.
4.
Move jumper to pins specified for the desired setting.
5.
Reinstall the access cover using the original screws, connect the power cords, and turn on the
system for the change to take effect.
6.
You may need to repeat these steps to move the jumper back to its original setting, depending
on the jumper function.
CMOS clear jumper
The jumper at pins 1, 2, and 3 controls whether settings stored in CMOS nonvolatile memory
(NVRAM) are retained during a system reset.
Procedure to restore the system’s CMOS and RTC to default values:
1.
Move the CMOS jumper from pins 1 and 2 to pins 2 and 3 (the Clear CMOS memory
position).
2.
Reinstall the access cover for your safety (using the original screws), and connect the power
cords to the system.
3.
Turn the system on. Wait for POST to complete and for the messages ‘NVRAM cleared by
jumper’ and ‘Press F2 to enter Setup’ to appear. This automatically reprograms CMOS and
RTC to their default settings, except for the password.
4.
Enter Setup and make any changes necessary (for example, changing the boot device). Press
F10 to save the new Setup configuration and exit Setup.
5.
Turn off the system, and disconnect all AC power cords from the system.
6.
Again remove the access cover.
7.
Move the jumper from pins 2 and 3 back to pins 1 and 2 (the Protect CMOS memory
position).
8.
Reinstall the access cover using the original screws, and connect the power cords to the
system.
9.
Run BIOS Setup or the SSU to verify the correct settings. See the ‘Configuration’ chapter
Password clear jumper
The jumper at pins 5, 6, and 7 controls whether a stored password is retained or cleared during a
system reset.
Procedure to clear the current password and then enter a new one:
1.
Move the Password jumper from pins 5 and 6 to pins 6 and 7.
2.
Reinstall the access cover for your safety (using the original screws), and connect the power
cords to the system.
3.
Turn the system on, and wait for POST to complete. This automatically clears the password.
4.
Turn off the system, and disconnect all AC power cords.
5.
Again remove the access cover.
6.
Move the jumper from pins 6 and 7 back to pins 5 and 6.
7.
Reinstall the access cover using the original screws and connect the power cords to the system.
8.
Run the SSU to specify a new password. See the ‘Configuration’ chapter.

