background image

EN-23

ENGLIS

H

Advanced features

Displaying a user-defined image during startup or mut-
ing

You can display your desired image as the startup screen (or splash 
screen). Using the menu, you can also use it as the background that is 
displayed while the video is muted or no signal is input.

Important:

You can't select IMAGE CAPTURE when PASSWORD FUNC-
TION in the FEATURE menu is set to SPLASH ID SCREEN to 
activate the password lock.

You can't select IMAGE CAPTURE when the component video 
signal is input.

Procedure

1.

Press the COMPUTER button to select the image input to the 
COMPUTER/COMPONENT VIDEO IN terminal.

2.

Display your desired image.

3.

Display the INSTALLATION menu.

4.

Select IMAGE CAPTURE by pressing the 

S

 or 

T

 button.

5.

Press the ENTER button.

When the capture starts, the captured image will be dis-
played.

When you press ENTER button once, any button doesn't 
function until the capture completes.

When image resolution is lower than XGA(1024 x 768), the 
image is captured by adjusting its resolution to XGA.

When image resolution is higher than XGA(1024 x 768), the 
image area of XGA is only captured.

Important:

You can't change the new startup screen back to the original 
screen. (Even when you select RESET ALL in the FEATURE 
menu, the factory default screen is no longer effective.) When you 
want to change the startup screen again, capture another image.

The captured images will be deleted at the same time as pressing 
the ENTER button. If you pressed ENTER button wrongly, try to 
capture the same images again.

The captured image is displayed from the next startup. If the cap-
tured image isn't displayed, check to see if SPLASH SCREEN in 
the INSTALLATION menu is set to OFF. (See page 18.)

To display the captured image while the video is muted, set AV 
MUTE MODE in the INSTALLATION menu to IMAGE. (See page 
18.)

When BACK COLOR in the INSTALLATION menu is set to 
IMAGE, the captured image is displayed while no signal is input.

Some images can't be captured correctly because of their signal 
type.

Freeze

To stop the motion in the image temporarily (or to dis-
play a still image):

Press the FREEZE button on the remote control.

The image freezes temporarily.

To resume the motion in the image:

Press the FREEZE button on the remote control again.

Important:

Do not keep displaying a still picture for an extended period of 
time, as the afterimages may linger on the screen.

Page-up and page-down

You can go up and down the pages of a presentation projected from a 
computer using the remote control. Switch the pages using the PAGE 
UP or DOWN button on the remote control.
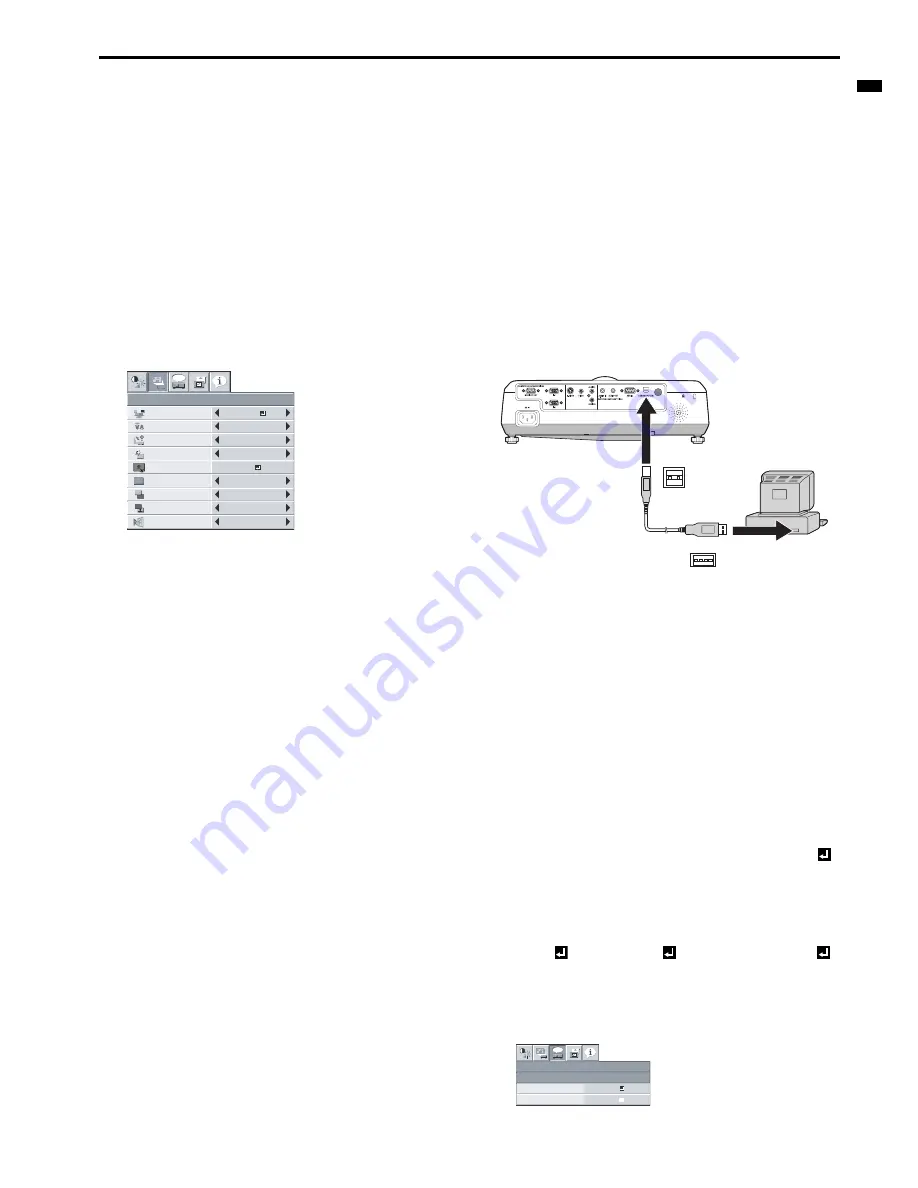
Connection

To manipulate images projected from the computer using the remote 
control, connect the projector with the computer as shown below.

When the projector is connected with the computer via the USB 
port, the "Page up/down" function works if the computer supports 
the USB connection as a standard feature. (In some cases, it may 
not work.)

"Page up/down" function when connecting with the USB cable 
cannot be supported in the Macintosh computer.

Wait for the lamp to light up before connecting the USB cable.

When the projector is connected using a longer cable, the image 
may not be projected correctly.

When you use a longer cable, the use of the repeater is recom-
mended.

Password function

This projector provides the password function that is intended to pre-
vent wrong operations by children and set controlled access for speci-
fied users.

DISPLAY INPUT ............When the projector is turned on, the star-

tup screen (or splash screen) appears and 
stays on the screen until the password is 
entered. When the password is entered, 
the startup screen switches to the regular 
operation screen.

MENU ACCESS ............All the buttons except for the POWER but-

ton on the projector are disabled. (The 
buttons on the remote control are 
enabled.) You can use this mode to pre-
vent wrong operations by  children and set 
controlled access for specified users.

SPLASH ID SCREEN ....IMAGE CAPTURE and SPLASH 

SCREEN in the menu become unselect-
able. SPLASH SCREEN is set to ON 


automatically.

To enable the password function:

1.

Display the FEATURE menu.

2.

Press the 

S

 or 

T

 button to select PASSWORD FUNCTION.

3.

Press the 

W

 or 

X

 button to change the mode among DISPLAY 

INPUT 

, MENU ACCESS 

 and SPLASH ID SCREEN 

.

When the password has already been set, the mode never 
changes. Press the ENTER button to cancel the password 
function and try again.

4.

Press the ENTER button.

The screen for setting the password function appears.

INSTALLATION

opt.

ON

SPLASH 
SCREEN

WALL SCREEN

AUTO POWER 
OFF

BACK COLOR

LAMP MODE

OFF

OFF

BEIGE

ON

BLUE

AUTO POWER 
ON

STANDARD

OFF

IMAGE 
REVERSE

IMAGE
CAPTURE

GO

BLACK

MUTE MODE

USB

USB 4-pin
(type B)

USB 4-pin
(type A)

to USB port

USB cable
(option)

MENU ACCESS

FEATURE

opt.

LOCK

UNLOCK

OK

OK

Summary of Contents for EX51U

Page 1: ...ENGLISH DATA PROJECTOR MODEL EX51U User Manual This User Manual is important to you Please read it before using your projector EN ...

Page 2: ...le with this equipment so as to keep inter ference within the limits of an EN55022 Class B device Please follow WARNING instructions WARNING TO PREVENT FIRE OR SHOCK HAZARD DO NOT EXPOSE THIS APPLIANCE TO RAIN OR MOISTURE CAUTION TO PREVENT ELECTRIC SHOCK DO NOT USE THIS POLARIZED PLUG WITH AN EXTENSION CORD RECEPTACLE OR OTHER OUT LET UNLESS THE BLADES CAN BE FULLY INSERTED TO PREVENT BLADE EXPOS...

Page 3: ...either registered trademarks or trademarks of Microsoft Corporation in the United States and or other countries Other brand or product names are trademarks or registered trademarks of their respective holders Declaration of Conformity Model Number EX51U Trade Name MITSUBISHI ELECTRIC Responsible party Mitsubishi Digital Electronics America Inc 9351 Jeronimo Road Irvine CA 92618 U S A Telephone num...

Page 4: ...f you are not sure of the type of power please consult your appliance dealer or local power company 11 Power cord protection Power supply cords should be routed so that they are not likely to be walked on or pinched by items placed upon or against them Pay particular attention to cords at plugs convenience receptacles and points where they exit from the appliance Do not put the power cord under a ...

Page 5: ...ke do not use the projector at any place subjected to high temperature and high humidity Please maintain an operating temperature humidity and altitude as specified below Operating temperature between 41 F 5 C and 95 F 35 C Operating humidity between 30 and 90 Never put any heat producing device under the projector to pre vent the projector from being overheated Do not install the projector at a p...

Page 6: ...and S buttons respectively While the menu is on the screen the KEYSTONE but ton functions as the ENTER button Terminal board 1 Power jack 2 COMPUTER IN terminal 1 2 Mini D SUB 15 pin 3 MONITOR OUT terminal Mini D SUB 15 pin 4 Remote control sensor Rear 5 USB COMPUTER terminal 6 AUDIO IN terminal Mini jack 7 AUDIO OUT terminal Mini jack 8 S VIDEO terminal 9 VIDEO terminal 10 Lock bar 11 SERIAL RS 2...

Page 7: ...CT button 10 PAGE UP DOWN buttons 11 AUTO POSITION button 12 Direction buttons 13 FREEZE button 14 VIDEO S VIDEO buttons 15 COMPUTER 1 2 buttons The UP and DOWN buttons are used in the KEY STONE adjustment in addition to the volume control 2 1 STANDBY ON ASPECT MAGNIFY KEYSTONE VOL PAGE UP DOWN MENU FREEZE AUTO POSITION AV MUTE ENTER 1 2 COMPUTER VIDEO VIEWER UNPLUG S VIDEO POWER 1 2 3 4 5 6 7 8 9...

Page 8: ...y with an old one If the solution of batteries comes in contact with your skin or clothes rinse with water If the solution comes in contact with your eyes rinse them with water and then consult your doctor Operation range of the remote control The maximum operation distance of the remote control is about 10 m or about 32 feet when the remote control is pointed at the remote control sensor of the p...

Page 9: ...o facilitate ventilation Place the projector at least 50 cm or 20 inch away from the wall to prevent the air inlet grille and the air outlet grilles that emit hot air from being blocked Do not use the projector in the following locations and manners which may cause fire or electric shock In a dusty or humid place In a sideways or upside down position Near a heater In an oily smoky or damp place su...

Page 10: ...terminals Speaker output is mono Projector DVD player or HDTV decoder Some DVD players have an output connector for 3 line fitting Y CB CR When connecting such DVD player with this projector use the COMPUTER IN terminal Important The terminal s names Y PB and PR are given as examples of when a HDTV decoder is connected The terminal s names vary depending on the connected devices Use a Mini D SUB 1...

Page 11: ...nput Check the type of the audio output terminal of the connected computer and prepare a proper cable for connection Some computers don t have the audio output terminal Speaker output is mono When the audio cable is connected to the AUDIO OUT terminal the speaker output is muted For Macintosh If your Macintosh has no video port a monitor output adapter is required Contact your dealer for further i...

Page 12: ...front 1 Tilt up the projector to the appropriate angle 2 Press the foot adjustment button front 3 Release the foot adjustment button front after fine adjusting a position of lengthwise direction of the image After using the projector 4 Put the adjustment feet front back into the projector by pressing the foot adjustment buttons Using the adjustment feet rear 1 Tilt up the projector to the appropri...

Page 13: ...ing red the STATUS indicator indicates that the lamp should be replaced soon Replace the lamp when the STATUS indicator blinks red See page 27 and 30 Images may not be projected with good quality in an extremely hot or cold environment This is not a product malfunction In order to ensure the safety in case of trouble with the projector use an electrical outlet having an earth leakage breaker to su...

Page 14: ...a bright image such as the Recycle Bin window on the full screen 2 If the screen saver is running turn it off 3 Press the AUTO POSITION button If the image is still not in the right position adjust the image position using the SIGNAL menu See page 20 Volume from the speaker Press the VOLUME S or T button to change the volume from the speaker The volume control bar will appear on the screen The vol...

Page 15: ...d correctly When OFF or BLACK BOARD WHITE BOARD is selected the density cannot be adjusted When WHITE BOARD is selected BrilliantColorTM in the Color Enhancer menu of the Image menu cannot be used Additionally Theater in the Color Enhancer menu of the Image menu has no effect and is automatically canceled when WHITE BOARD is selected 4 Press the ENTER button 5 Press the W or X button to adjust the...

Page 16: ... 2 AUTO AUTO OFF 3 75 7 5 ON OFF DISPLAY INPUT MENU ACCESS SPLASH ID 1 upper left 2 lower right FULL AUTO OFF AUTO NTSC PAL SECAM 4 43NTSC PAL M PAL N PAL 60 OFF AUTO 1280 x 768 1280 x 768RB 1360 x 768 1366 x 768 LOCK 5 5 5 5 CENTER UPPER LOWER OVER SCAN HOLD 2 USER HORIZ POSITION VERT POSITION FINE SYNC 1 2 TRACKING 2 COMPUTER INPUT 2 100 90 OFF 0 999 0 999 0 31 0 2800 AUTO RGB YCBCR YPBPR BEGIN ...

Page 17: ...sets an optimal color balance based on the input signal Use this setting for most cases PRESENTATION Makes projected images bright and crisp STANDARD Makes projected images look natural THEATER Makes projected images soft and smooth Best suited for movies USER Adjusts the gamma curve color intensity or balance See page 21 CONTRAST 30 Adjusts the contrast of projected images See page 21 BRIGHTNESS ...

Page 18: ...p is automatically lit when the power cord is plugged in the wall outlet Select ON when you set the projector at the ceiling When the lamp is off the projector is in standby Use the remote control to turn on the lamp AUTO POWER OFF OFF 5 60 min Selects a desired timer setting until the projector enters the standby mode when there is no signal input from the source IMAGE CAPTURE Use this menu to ca...

Page 19: ...when the input video signal is a video signal from a film VIDEO SIGNAL 8 options Select Auto to automatically set the appropriate video format in rela tive to the input signal If projected images aren t displayed correctly select a desired video format manually WXGA OFF AUTO 1280 x 768 1280 x 768RB 1360 x 768 1366 x 768 Select the appropriate format when the input signal is a WXGA video signal SET...

Page 20: ...d black that appears in projected images VERT SYNC AUTO OFF Use this setting to adjust projected images when the motion is not smooth Select AUTO for most cases LPF ON OFF Select this setting to enable or disable LPF SHUTTER U 0 20 Use this setting to adjust projected images when noise appears in the top part of the image SHUTTER L 0 20 Use this setting to adjust projected images when noise appear...

Page 21: ...emperature by pressing the W or X button To cancel the menu 4 Press the MENU button To adjust the tone of white To customize the color tem perature To set and store a user defined color temperature perform the fol lowing procedure See page 17 for the menu options 1 Select COLOR TEMP in the IMAGE menu 2 Press the W or X button to select USER 3 Press the ENTER button 4 Press the S or T button to sel...

Page 22: ... Every time the X button is pressed the image moves to the left When the projected image is displaced vertically adjust VERT POSITION in the SIGNAL menu Every time the W button is pressed the image moves down Every time the X button is pressed the image moves up When the top part of the image flags change the setting of HOLD in the SIGNAL menu To select ON press the ENTER button and adjust BEGIN o...

Page 23: ...p displaying a still picture for an extended period of time as the afterimages may linger on the screen Page up and page down You can go up and down the pages of a presentation projected from a computer using the remote control Switch the pages using the PAGE UP or DOWN button on the remote control Connection To manipulate images projected from the computer using the remote control connect the pro...

Page 24: ...W 4 6 Press the ENTER button If you enter a wrong password an error message appears To cancel the procedure press the MENU button Important Disable the password function by holding down the MENU and ENTER buttons on the control panel together for about three sec onds Magnify By pressing the MAGNIFY button on the remote control you can mag nify the image to view the details The MAGNIFY mode doesn t...

Page 25: ... avoid injury due to the glass fragments If the lamp should break never shake the lamp box or hold it in front of your face after removing it The lass fragments may fall out and cause injury to your eyes Be sure to use the lamp dedicated to this projector VLT XD510LP for EX51U Use of other lamps may cause a failure of the projector Do not use any other tools for replacing the spare lamp and be sur...

Page 26: ... lamp Interval of lamp replacement When the lamp shutdown notice is issued the lamp replacement is recommended even if the lamp is lit normally Decrease in lumines cence and or color brightness indicates that the lamp needs to be replaced When the lamp operation time exceeds the time elapsed until the lamp shutdown notice 1 is issued the indicator will blink alter nately green and red while the la...

Page 27: ...FF has been set to OFF If the lamp has deteriorated it may go out after a while it illuminates The screen for entering the password appears PASSWORD FUNCTION in the FEATURE menu has been set to DISPLAY INPUT to enable the password lock J Enter the password or contact the person in charge of management of the projector See page 23 NO SIGNAL is displayed Turn on the power of the connected device or ...

Page 28: ...D player game console or computer you use In such a case you can reduce such streak noise by enabling the LPF Projected images become wavy Connect the plugs of the cables to external devices securely Keep the projector away from equipment generating interfering radio waves When the keystone adjustment is carried out the image may not be displayed correctly because of the type of input signal This ...

Page 29: ...ay be wrongly operating because of noise J Press the POWER button to turn off the lamp and unplug the power cord from the wall outlet Wait about 10 minutes plug the power cord in and try again TEMPERATURE is displayed This indication appears when the ambient temperature rises high When the ambient temperature stays high the lamp goes out J Eliminate any causes of the rise in the ambient temperatur...

Page 30: ...Relocate the projector to a cooler place The protection circuit is working or the lamp is in an abnormal con dition Wait until the STATUS indicator goes out then press the POWER button If the above solution is not effective replace the lamp The lamp operation time exceeds the time elapsed until the lamp shutdown notice while the power is on See page 26 Replace the lamp Change with a new lamp if th...

Page 31: ...ility NTSC NTSC 4 43 PAL including PAL M N SECAM PAL 60 Component Video DVD HDTV 480i 576i 480p 576p 1080i 720p Speaker 2 W Mono Round type ø4 5 cm x 1 S video input Luminance signal 1 0 Vp p 75 Ω negative sync Chroma signal 0 286 Vp p 75 Ω burst signal Video input 1 0 Vp p 75 Ω negative sync Audio input 350 mVrms 10 kΩ or more Analog RGB input RGB 0 7 Vp p 75 Ω negative sync YPBPR YCBCR Y 1 0 Vp ...

Page 32: ...D CS 14 VD 15 DDC Clock pin No Spec 1 R RED CR 2 G GREEN Y 3 B BLUE CB 4 5 GND 6 GND 7 GND 8 GND 9 10 GND 11 12 13 HD CS 14 VD 15 COMPUTER IN OUT Mini D SUB 15 pin IN OUT AC power cord 1 RGB cable for PC for US 02552 0063 01 for EU 02552 0066 01 for UK 02552 0065 01 02552 0072 00 1 Remote control 1 Safety manual Quick start up 1 CD ROM 2 Battery 1 Lens cap 1 Soft case Option Not included in the bo...

Page 33: ...i 625i 15 63 50 00 1024 x 768 2 1080i 60 1125i 60 33 75 60 00 1024 x 576 2 1080i 50 1125i 50 28 13 50 00 1024 x 576 2 480p 525p 31 47 59 94 1024 x 768 2 576p 625p 31 25 50 00 1024 x 768 2 720p 60 750p 60 45 00 60 00 1024 x 576 2 720p 50 750p 50 37 50 50 00 1024 x 576 2 CGA84 640 x 400 37 86 84 13 1024 x 640 CGA85 640 x 400 37 86 85 08 1024 x 640 VGA60 640 x 480 31 47 59 94 1024 x 768 VGA72 640 x 4...

Page 34: ...ms Shanghai Ltd 12 F Hong Kong New World Tower 300 Huaihai Middle Road Shanghai 200021 China Sales Inquiries Phone 86 21 6335 3030 Ext 3007 Fax 86 21 6335 3600 Technical Inquiries Phone 86 21 6335 3030 Ext 3021 Fax 86 21 6335 3600 HONG KONG Mitsubishi Electric Ryoden Air Conditioning Visual Information Systems HongKong Ltd 7th Floor Manulife Tower 169 Electric Road North Point Hong Kong Sales Inqu...

Reviews: