background image

EN-16

Connection

When connecting a signal source to the projector, be sure to:

1.

Turn all equipment off before making any connections.

2.

Use the correct signal cables for each source.

3.

Ensure the cables are firmly inserted. 

See the owner’s guide of each device for details about its connections. 

Contact your dealer for details about its connections. 

In the connections shown below, some cables may not be included with the projector. They are commercially available 
from electronics stores.

Connecting a computer or monitor

Connecting a computer

The projector provides a RGB input socket that allows you to connect it to both IBM® compatibles and Macintosh® 
computers. A Mac adapter is needed if you are connecting legacy version Macintosh computers.

To connect the projector to a notebook or desktop computer:

1.

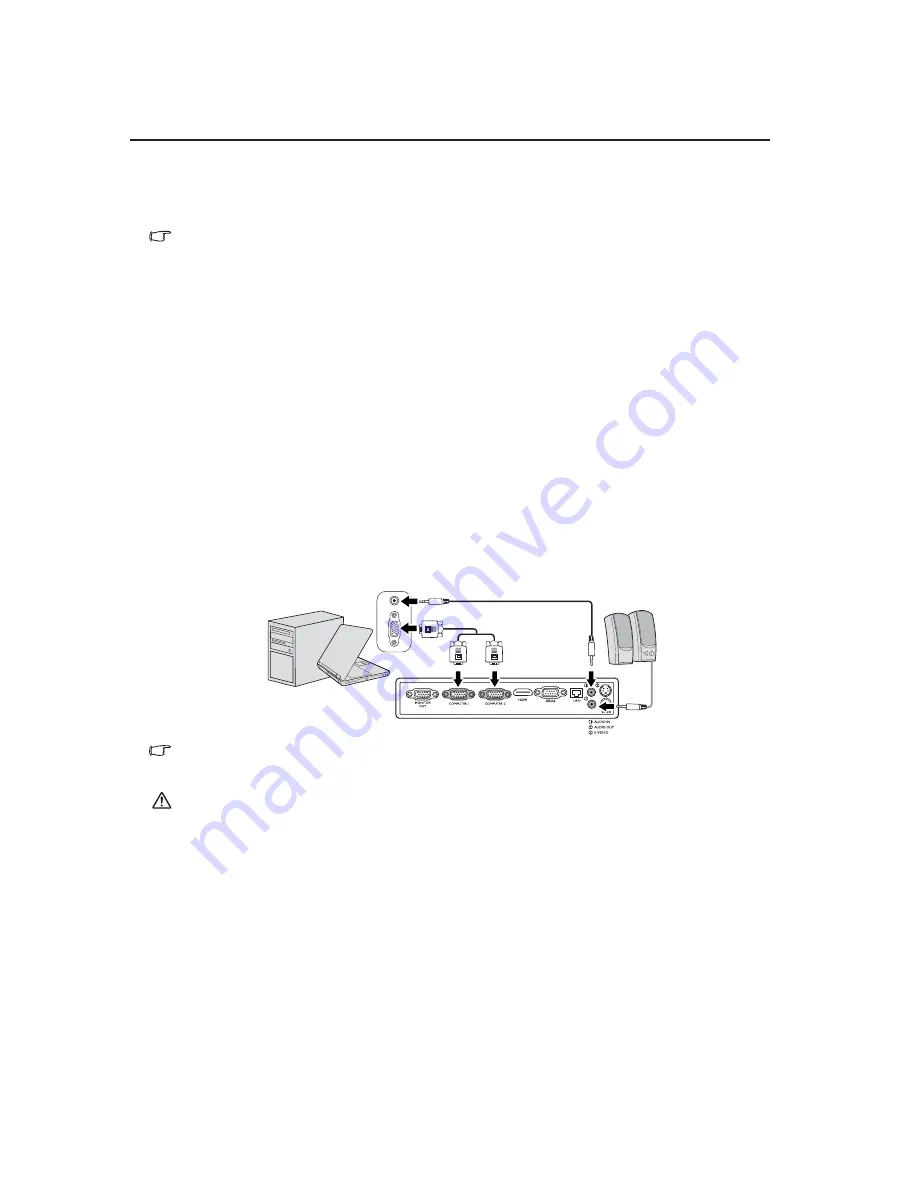
Take the supplied RGB cable and connect one end to the D-Sub output socket of the computer.

2.

Connect the other end of the RGB cable to the 

COMPUTER-1

 or 

COMPUTER-2

 signal input socket of the 

projector.

3.

If you wish to make use of the projector speaker in your presentations, take a suitable audio cable and connect 
one end of the cable to the audio output jack of the computer, and the other end to the 

AUDIO IN

 jack of the 

projector.

4.

If you wish, you can use another suitable audio cable and connect one end of the cable to the 

AUDIO OUT

 jack 

of the projector, and the other end to your external speakers (not supplied).
Once connected, the audio can be controlled by the projector On-Screen Display (OSD) menus. See 

"Adjusting 

the sound" on page 33

 for details.

The final connection path should be like that shown in the following diagram:

Many notebooks do not turn on their external video ports when connected to a projector. Usually a key combo like FN + F3 or 
CRT/LCD key turns the external display on/off. Locate a function key labeled CRT/LCD or a function key with a monitor symbol 
on the notebook. Press FN and the labeled function key simultaneously. Refer to your notebook's documentation to find your 
notebook's key combination.

When you use a longer RGB cable instead of the provided cable, the image may not be projected correctly. 

Some computers require additional connectors or analog RGB output adapters to be connected with this projector.

Notebook or desktop computer

RGB cable

or

Audio cable (option)

Speakers

Audio cable 
(option)

Summary of Contents for EW330U

Page 1: ...EX320U EW330U ENGLISH DLP PROJECTOR MODEL EX320U EW330U User Manual This User Manual is important to you Please read it before using your projector ...

Page 2: ...quirements of the EC Directive 2004 108 EC EMC Directive and 2006 95 EC Low Voltage Direc tive The electro magnetic susceptibility has been chosen at a level that gains proper operation in residential areas on business and light industrial premises and on small scale enterprises inside as well as outside of the buildings All places of operation are characterized by their connection to the public l...

Page 3: ...e ment because it may cause fire or electric shock Do not modify or alter the power cord If the power cord is modified or altered it may cause fire or electric shock Note This symbol mark is for EU countries only This symbol mark is according to the directive 2002 96 EC Article 10 Information for users and Annex IV and or to the directive 2006 66 EC Article 20 Information for end users and Annex I...

Page 4: ...rks or registered trademarks of HDMI Licensing LLC Microsoft Windows Windows XP Windows Vista and Internet Explorer are registered trademarks trademarks or trade names of Microsoft Corpo ration in the U S and or other countries Other brand or product names are trademarks or registered trademarks of their respective holders Declaration of Conformity Model Number EX320U EW330U Trade Name MITSUBISHI ...

Page 5: ...l If you are not sure of the type of power please consult your appliance dealer or local power company 11 Power cord protection Power supply cords should be routed so that they are not likely to be walked on or pinched by items placed upon or against them Pay particular attention to cords at plugs convenience recepta cles and points where they exit from the appliance Do not put the power cord unde...

Page 6: ...reakdown or other failure Place of installation For safety s sake do not use the projector at any place subjected to high temperature and high humidity Please maintain an operating tem perature humidity and altitude as specified below Operating temperature between 41 F 5 C and 95 F 35 C Operating humidity between 30 and 90 Never put any heat producing device under the projector to prevent the proj...

Page 7: ...control port 14 LAN RJ 45 port 15 Audio input jack Audio output jack 16 S Video input socket Video input socket 17 Kensington lock 18 AC power cord inlet 19 Quick release foot 20 Security bar 21 Rear adjuster foot Kensington Lock This projector has a Kensington Security Standard connector for use with Kensington MicroSaver Security System Refer to the information that came with the Kensington Syst...

Page 8: ... 22 for details 8 TEMPerature indicator light Lights up red if the projector s temperature becomes too high See Indicators on page 54 for details 9 LAMP indicator light Indicates the status of the lamp Lights up or flashes when the lamp has developed a problem See Indicators on page 54 for details 10 AUTO Automatically determines the best picture timings for the displayed image See Auto adjusting ...

Page 9: ... resulting from an angled projection See Correcting keystone on page 26 for details 9 AUTO Automatically determines the best picture timings for the displayed image See Auto adjusting the image on page 25 for details 10 Right0 Activates panel key lock See Locking control keys on page 33 for details When the On Screen Display OSD menu is activated the 3 8 and 10 keys are used as directional arrows ...

Page 10: ... the projector However the effective range might change according to screens Replacing the remote control battery 1 Pull out the battery holder Please follow the illustrated instructions Push and hold the locking arm while pulling out the battery holder 2 Insert the new battery in the holder Note the positive polarity should face outward 3 Push the holder into the remote control Risk of explosion ...

Page 11: ...ector at an altitude of less than 1500 meters 1 Front Table Select this location with the projector placed near the floor in front of the screen This is the most common way to position the projector for quick setup and portability 2 Rear Table Select this location with the projector placed near the floor behind the screen Note that a special rear projection screen is required Set Rear Table in the...

Page 12: ... 16 10 projection display area The projector should always be placed horizontally level like flat on a table and positioned directly perpendicular 90 right angle square to the horizontal center of the screen This prevents image distortion caused by angled projections or projecting onto angled surfaces The modern digital projector does not project directly forward like older style reel to reel film...

Page 13: ...e image distortion will occur Use the Keystone function to correct the distortion See Correcting keystone on page 26 for details How to determine the recommended screen size for a given distance This method can be used for situations where you have purchased this projector and would like to know what screen size will fit in your room The maximum screen size is limited by the physical space availab...

Page 14: ...406 120 305 242 6 2 315 8 0 9 23 250 635 200 508 150 381 303 7 7 394 10 0 11 29 300 762 240 610 180 457 363 9 2 472 12 0 14 34 Screen Distance from the screen L Hd Diagonal Size Width W Height H Shortest Wide Longest Tele inch cm inch cm inch cm inch m inch m inch cm 40 102 34 86 21 54 41 1 0 54 1 4 1 1 60 152 51 129 32 81 62 1 6 80 2 0 1 2 80 203 68 172 42 108 82 2 1 107 2 7 1 3 100 254 85 215 53...

Page 15: ...1 7 5 13 60 152 52 133 29 75 78 2 0 102 2 6 8 20 80 203 70 177 39 100 105 2 7 136 3 5 10 26 100 254 87 221 49 125 131 3 3 170 4 3 13 33 120 305 105 266 59 149 157 4 0 204 5 2 16 40 150 381 131 332 74 187 196 5 0 255 6 5 19 49 200 508 174 443 98 249 261 6 6 340 8 6 26 66 250 635 218 553 123 311 327 8 3 425 10 8 32 82 300 762 261 664 147 374 392 10 0 39 99 Screen Distance from the screen L Hd Diagon...

Page 16: ...resentations take a suitable audio cable and connect one end of the cable to the audio output jack of the computer and the other end to the AUDIO IN jack of the projector 4 If you wish you can use another suitable audio cable and connect one end of the cable to the AUDIO OUT jack of the projector and the other end to your external speakers not supplied Once connected the audio can be controlled by...

Page 17: ...r each provides a different level of video quality The method you choose will most likely depend upon the availability of matching terminals on both the projector and the Video source device as described below HDMI High Definition Multimedia Interface supports uncompressed video data transmission between compatible devices like DTV tuners DVD players and displays over a single cable It provides pu...

Page 18: ...r DVD player for details When you switch to HDMI input the projected picture may display wrong colors for about 1 second This is not product malfunction Connecting a Component Video source device Examine your Video source device to determine if it has a set of unused Component Video output sockets available If so you can continue with this procedure If not you will need to reassess which method yo...

Page 19: ...e computer and the other end to the AUDIO IN jack of the projector 4 If you wish you can use another suitable audio cable and connect one end of the cable to the AUDIO OUT jack of the projector and the other end to your external speakers not supplied Once connected the audio can be controlled by the projector On Screen Display OSD menus See Adjusting the sound on page 33 for details The final conn...

Page 20: ...ck of the projector 4 If you wish you can use another suitable audio cable and connect one end of the cable to the AUDIO OUT jack of the projector and the other end to your external speakers not supplied Once connected the audio can be controlled by the projector On Screen Display OSD menus See Adjusting the sound on page 33 for details The final connection path should be like that shown in the fo...

Page 21: ...ess If the projector is still hot from previous activity it will run the cooling fans for approximately 90 seconds before energizing the lamp To maintain the lamp life once you turn the projector on wait at least 5 minutes before turning it off After POWER is pressed the image may flicker before the lamp becomes stable This is not a product malfunction 4 If the projector is activated for the first...

Page 22: ...e control to turn the OSD menu on 3 Press to highlight Language and press to select a preferred language 2 Use to highlight the SYSTEM SETUP Basic menu 4 Press MENU EXIT twice on the projector or remote control to leave and save the settings The first press leads you back to the main menu and the second press closes the OSD menu Current input signal Main menu icon Main menu Sub menu Highlight Pres...

Page 23: ... password function is activated you will be asked to enter the six digit password every time you turn on the projector If you enter the wrong password the password error message as pictured to the right is displayed lasting for three seconds and the message INPUT PASSWORD follows You can retry by entering another six digit password or if you did not record the password in this manual and you absol...

Page 24: ...ly search for the signals You can also manually cycle through the available input signals 1 Press SOURCE on the projector or remote control A source selection bar is displayed 2 Press until your desired signal is selected and press MODE ENTER Once detected the selected source information will be displayed on the screen for seconds If there is multiple equipment connected to the projector repeat st...

Page 25: ...ens while the lamp is on The strong light from the lamp may cause damage to your eyes Be careful when you press the adjuster button as it is close to the exhaust vent where hot air comes from Auto adjusting the image In some cases you may need to optimize the picture quality To do this press AUTO on the projector or remote control Within 3 seconds the built in Intelligent Auto Adjustment function ...

Page 26: ... and the setting values of the keystone adjustment In such cases set the keystone adjustment values in the range where the image is displayed without noise When the keystone adjustment is carried out the image may not be displayed correctly because of the type of input signal Magnifying and searching for details If you need to find the details on the projected picture magnify the picture Use the d...

Page 27: ...al width or its vertical height This is suitable when you want to make most use of the screen without altering the image s aspect ratio 2 16 9 Scales an image so that it is displayed in the center of the screen with a 16 9 aspect ratio This is most suitable for images which are already in a 16 9 aspect like high definition TV and 16 9 aspect DVD movies as it displays them without aspect alteration...

Page 28: ...EN 28 5 Full Scales an image to full screen size 16 10 The image is projected to fit all over screen EW330U only 4 3 picture 16 9 picture 16 10 picture ...

Page 29: ...for viewing PC graphic and drawing applications such as AutoCAD For Video input signals this mode is appropriate for viewing colorful movies video clips from digital cameras or DVs 4 Theater mode Is appropriate for playing colorful movies video clips from digital cameras or DVs through the PC input for best viewing in a blackened little light environment For Video input signals this mode is suitab...

Page 30: ...values by pressing on the projector or remote control The higher the value the sharper the picture becomes The lower the value the softer the picture becomes Adjusting BrilliantColor Highlight BrilliantColor in the PICTURE menu and select by pressing on the projector or remote control This feature utilizes a new color processing algorithm and system level enhancements to enable higher brightness w...

Page 31: ...4 Press to highlight Hue and press to select its range Increase in the range will include colors consisted of more proportions of its two adjacent colors Please refer to the illustration to the right for how the colors relate to each other For example if you select Red and set its range at 0 only pure red in the projected picture will be selected Increasing its range will include red close to yell...

Page 32: ...ntation timer press and press to select On and press MODE ENTER 8 A confirmation message is displayed Highlight Yes and press MODE ENTER to confirm You will see the message Timer is On appearing on the screen The timer starts counting once the timer is turned on If you switch input signal or press AUTO when the timer is on the timer will be stopped To cancel the timer perform the following steps 1...

Page 33: ...emote control again Press and hold the key on the projector for 3 seconds You can also use the remote control to enter the SYSTEM SETUP Basic Panel Key Lock and press to select Off Keys on the remote control are still in use when panel key lock is enabled If you press POWER to turn off the projector without disabling panel key lock the projector will still be in locked status the next time it is t...

Page 34: ...tor 3 Once the cooling process finishes the POWER indicator light is a steady orange and fans stop 4 Disconnect the power cord from the wall socket if the projector will not be used in an extended period of time To protect the lamp the projector will not respond to any commands during the cooling process To shorten the cooling time you can also activate the Quick Cooling function See Quick Cooling...

Page 35: ...nstruction manual of the electronic shutter glasses for more information With the 3D option set to On contents displayed on the projector appear darker It is normal and does not mean the projector is malfunctioning With the 3D option set to On the black parts of image become slightly brighter It is normal and does not mean the projector is malfunctioning The following features cannot be used when ...

Page 36: ...g watching 3D image Stop watching 3D image if you feel fatigue or discomfort Stop watching 3D image if you see doubly blurred image or you cannot view the image stereoscopically The following people need to refrain from use as with 3D image a photosensitive patient a patient with heart disease a person in poor physical condition a sleepy person a very tired person a drunk person children Mode Reso...

Page 37: ...On 6 Press to highlight Apply and press MODE ENTER 7 Please wait for around 15 20 seconds and then re enter the LAN Control Settings page 8 The IP Address Subnet Mask Default Gateway and DNS Server settings will be displayed Note down the IP address displayed in the IP Address row If the IP Address still does not appear contact your network administrator If the LAN cables are not properly connecte...

Page 38: ... using the remote control or control panel on the projector i These buttons function the same as the ones on the OSD menus or remote control See 2 PICTURE menu on page 45 and Remote control on page 9 for details ii To switch input source click on your desired source When you use the projector control panel or remote control to change the OSD menu settings it may take a while for the web browser to...

Page 39: ...ojector i The information you entered in the Tools page will display here and these columns are empty when you use e Control for the first time ii When the projector is in abnormal conditions the following information will display When the projector is in normal conditions or in any abnormal conditions other than the ones mentioned below the Error Status column will be empty 3 Error 1 notice iii P...

Page 40: ...ase use the password projectorcontroller PJLink supported commands The table below shows commands to control the projector using the PJLink protocol Commend Description Remark Parameter POWR Power control 0 Standby 1 Power on POWR Inquiry about the power state 0 Standby 1 Power on 2 Cooling down 3 Warming up INPT Input switching 11 COMPUTER1 12 COMPUTER2 21 VIDEO 22 S VIDEO 31 HDMI INPT Inquiry ab...

Page 41: ...orrect the communication may be unavailable For the detail consult the network administrator When the Control By in the SYSTEM SETUP Advanced LAN Control Settings menu is selected RS 232C the LAN Control Settings function is not available Glossary For more detail of the glossary below refer to the technical book that is commercially available INF2 Inquiry about the model name EX320U or EW330U is r...

Page 42: ...ng Brightest Presentation Normal Theater User 1 User 2 Brightness Contrast Color Tint Sharpness BrilliantColor On Off Color Temperature T1 T2 T3 T4 3D Color Management Primary Color R G B C M Y Hue Saturation Gain Save Settings 3 SOURCE Quick Auto Search On Off Color Space Conversion RGB YUV Auto 4 SYSTEM SETUP Basic Presentation Timer Timer period 1 240 minutes Timer display Always 1 min 2 min 3 ...

Page 43: ...5 SYSTEM SETUP Advanced Quick Cooling On Off Audio Settings Mute On Off Volume Standby Audio Out On Off Standby Monitor Out Off On Menu Settings Menu display time 5 sec 10 sec 15 sec 20 sec 25 sec 30 sec Menu position Center Top Left Top Right Bottom Right Bottom Left Lamp Settings Lamp mode Standard Low Reset lamp timer Equivalent lamp hour Security Settings Change password Power on lock On Off C...

Page 44: ...keys The values shown on the lower position of the page change with every key press you made until they reach their maximum or minimum Phase Adjusts the clock phase to reduce image distortion H Size Adjusts the horizontal width of the image Magnify Magnifies or reduces the projected image See Magnifying and searching for details on page 26 for details 3D This projector features a 3D function which...

Page 45: ...and green color tones of the image See Adjusting Tint on page 30 for details The function is only available when Video or S Video with NTSC system is selected Sharpness Adjusts the image to make it look sharper or softer See Adjusting Sharpness on page 30 for details BrilliantColor Adjusts white peaking while maintaining correct color presentation See Adjusting BrilliantColor on page 30 for detail...

Page 46: ...Black screen or Blue screen Quick Cooling Selecting On enables the function and the projector cooling time will be shortened to a few seconds If you attempt to restart the projector right after the quick cooling process it may not be turned on successfully and will rerun its cooling fans Audio Settings See Adjusting the sound on page 33 for details Standby Monitor Out Selecting On enables the func...

Page 47: ... you are using a LAN cable for connection see Supervising and controlling by computer on page 37 for details If you are using a RS 232C cable for connection go to the SYSTEM SETUP Advanced LAN Control Settings Control By menu and select RS 232C And press Apply to save the settings LAN and RS 232C function cannot work spontaneously If you are using the PJLink application see Controlling the project...

Page 48: ...and unplug the power cord To remove dirt or dust wipe the case with a soft lint free cloth To remove stubborn dirt or stains moisten a soft cloth with water and a neutral pH detergent Then wipe the case Never use wax alcohol benzene thinner or other chemical detergents These can damage the case Flammable substances may ignite causing fire or breakdown while the lamp is illuminating Storing the pro...

Page 49: ...mp is a consumable item that normally can last up to 3500 5000 hours with proper usage To keep the lamp life as long as possible you can do the following settings via the OSD menu Setting Lamp mode as Low Using Low mode reduces system noise and power consumption by 20 If the Low mode is selected the light output will be reduced and result in darker projected pictures Setting the projector in Low m...

Page 50: ...ssage The lamp has been in operation for 3750 hours Install a new lamp for optimal performance If the projector is normally run with Low selected See Setting Lamp mode as Low on page 49 you may continue to operate the projector until the 4750 hour lamp warning appears The lamp has been in operation for 4750 hours A new lamp should be fitted to avoid the inconvenience when the projector runs out of...

Page 51: ...e mercury lamp as the light source The high pressure mercury lamp may explode or fail to illuminate permanently because of an impact scratch or deterioration through use The period of time until explosion or permanent failure to illuminate varies considerably from lamp to lamp depending on operation conditions Therefore the lamp may explode soon after the start of use The possibility of explosion ...

Page 52: ...sh on it children can reach it or near flammable materials Do not insert your hands into the projector after the lamp is removed If you touch the optical components inside it could cause color unevenness and distortion of the projected images 7 As shown in the figure lower the new lamp into the lamp compartment while aligning the lamp with the holes in the lamp compartment Make sure it fits in the...

Page 53: ...his projector uses a lamp that contains mercury Disposal of the lamp or the projector with the lamp may be regulated due to environmental considerations For disposal or recycling information please contact your local authorities or the Electronic Industries Alliance www eiae org For US only ...

Page 54: ...oling down Lamp events Orange Flashing Off Red The projector has shutdown automatically If you try to re start the projector it will shutdown again Please contact your dealer for assistance Off Off Red The projector needs 90 seconds to cool down Please contact your dealer for assistance Thermal events Off Red Off The projector has cooling down automatically If you try to re start the projector it ...

Page 55: ...ver Cause Remedy The projection lens is not correctly focused Adjust the focus of the lens using the focus ring The projector and the screen are not aligned properly Adjust the projection angle and direction as well as the height of the unit if necessary The lens cover is still closed Open the lens cover Cause Remedy The battery is out of power Replace the battery with a new one There is an obstac...

Page 56: ...9 mm D Not including protrusion Weight 2 5 Kg 5 5 lbs Input terminal Computer input RGB input D Sub 15 pin female x 2 Video signal input S VIDEO Mini DIN 4 pin port x 1 VIDEO RCA jack x 1 SD HDTV signal input Analog D Sub Component RCA jack x 3 through RGB input Digital HDMI Audio signal input PC audio jack x 1 Share the terminal with computer and video inputs Output terminal RGB output D Sub 15 p...

Page 57: ...00 SVGA_75 75 000 46 875 49 500 SVGA_85 85 061 53 674 56 250 SVGA_120 119 854 77 425 83 000 SVGA_120 119 972 76 302 73 250 1024 x 768 XGA_60 60 004 48 363 65 000 XGA_70 70 069 56 476 75 000 XGA_75 75 029 60 023 78 750 XGA_85 84 997 68 667 94 500 XGA_120 119 804 98 958 137 750 1280 x 800 WXGA_60 59 81 49 702 83 500 WXGA_120 119 9 101 562 146 250 1280 x 1024 SXGA_60 60 020 63 981 108 000 SXGA_75 75 ...

Page 58: ...00 SVGA_120 119 972 76 302 73 250 1024 x 768 XGA_60 60 004 48 363 65 000 XGA_70 70 069 56 476 75 000 XGA_75 75 029 60 023 78 750 XGA_85 84 997 68 667 94 500 XGA_120 119 804 98 958 137 750 1280 x 800 WXGA_60 59 81 49 702 83 500 WXGA_120 119 9 101 562 146 250 1280 x 1024 SXGA_60 60 020 63 981 108 000 SXGA_75 75 025 79 976 135 000 1280 x 960 1280 x 960_60 60 000 60 000 108 1280 x 960_85 85 002 85 938...

Page 59: ...0 00 1080i 1125i 50Hz 28 13 50 00 1080P 60Hz 67 5 60 00 1080P 50Hz 56 26 50 00 Video mode Horizontal Frequency kHz Vertical Frequency Hz Color sub carrier Frequency MHz NTSC 15 73 60 3 58 PAL 15 63 50 4 43 SECAM 15 63 50 4 25 or 4 41 PAL M 15 73 60 3 58 PAL N 15 63 50 3 58 PAL 60 15 73 60 4 43 NTSC4 43 15 73 60 4 43 AC power cord for US 2G 01111 001 for EU 2G 05921 011 for UK SG 2G 03132 001 for A...

Page 60: ...isual Information Systems Shanghai Ltd 12 F Hong Kong New World Tower 300 Huaihai Middle Road Shanghai 200021 China Sales Inquiries Phone 86 21 6335 3030 Ext 3007 Fax 86 21 6335 3600 Technical Inquiries Phone 86 21 6335 3030 Ext 3021 Fax 86 21 6335 3600 HONG KONG Mitsubishi Electric Ryoden Air Conditioning Visual Information Systems HongKong Ltd 7th Floor Manulife Tower 169 Electric Road North Poi...

Reviews: