background image


DX-VS1UE Setup Guide


12

OVERVIEW

DX-VS1UE

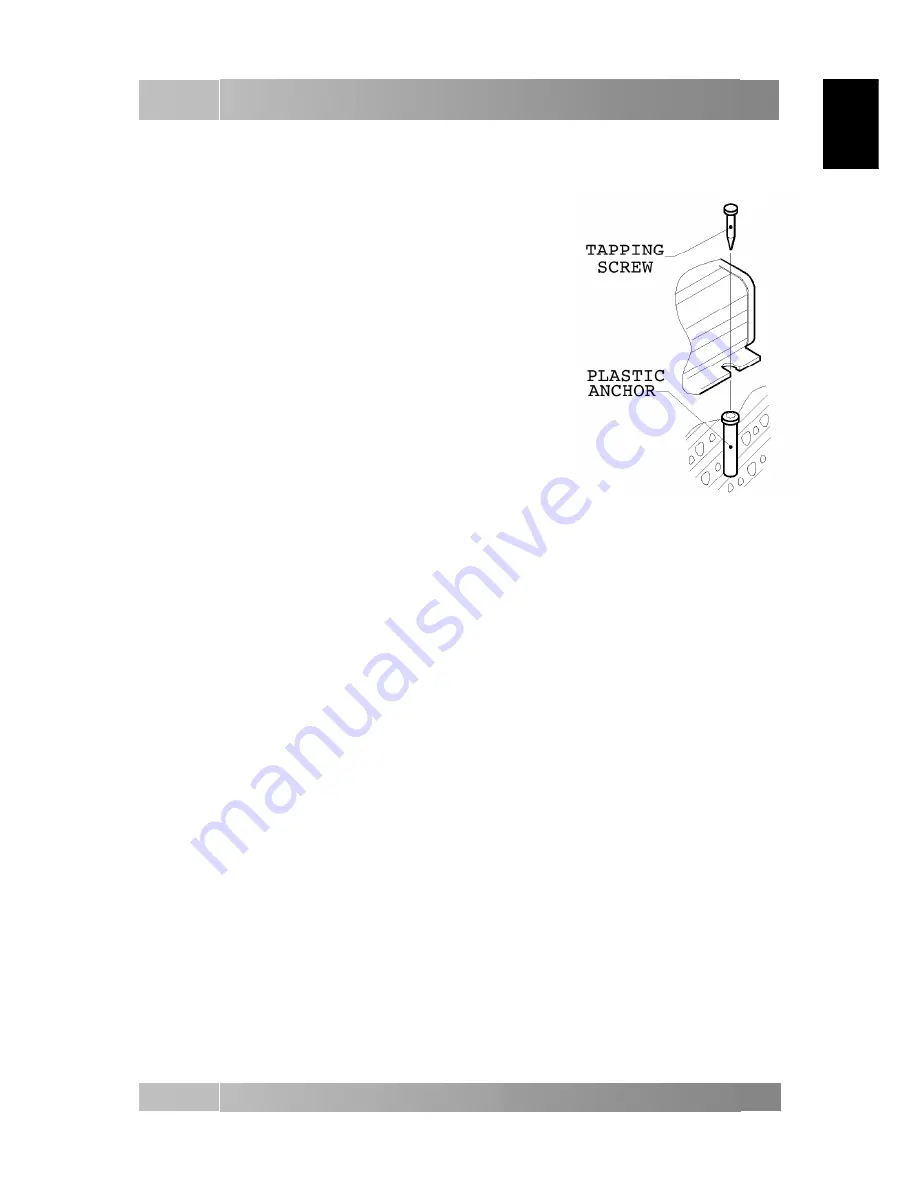
Using Tapping Screw

The following describes how to attach DX-VS1UE to 
wall or ceiling.

1)


Make a hole. (diameter:

Φ

6.5, depth:30mm or longer)

2)


Insert the supplied PLASTIC ANCHOR into the hole.

3)


Fix DX-VS1UE with the supplied TAPPING SCREW.

ENGLISH

Summary of Contents for DX-VS1UE

Page 1: ...THIS INSTRUCTION MANUAL IS IMPORTANT TO YOU PLEASE READ IT BEFORE USING YOUR VIDEO SERVER BOX Ver 1 0a VIDEO SERVER BOX DX VS1UE SETUP GUIDE ENGLISH OTHERS ...

Page 2: ......

Page 3: ...ty of their respective owners Moreover the mark and the TM mark are not described in this document Windows 98SE is an abbreviation of Microsoft Windows 98 Second Edition Windows NT4 0 WS is an abbreviation of Microsoft Windows NT Workstation Version 4 0 Windows 2000 is an abbreviation of Microsoft Windows 2000 Professional Windows Me is an abbreviation of Microsoft Windows Millennium Edition Windo...

Page 4: ...e placed near or over a radiator or heat register This product should not be placed in a built in installation such as a bookcase or rack unless proper ventilation is provided or the manufacturer s instructions have been adhered to 10 Power Sources This product should be operated only from the type of power source indicated on the marking label For products intended to operate from battery power o...

Page 5: ...roduct should be situated away from heat sources such as radiators heat registers stoves or other products including amplifiers that product heat CAUTION Changes or Modifications not expressly approved by the party responsible for compliance could void the users authority to operate the equipment NOTE This equipment has been tested and found to comply with the limits for a CLASS B digital device p...

Page 6: ...ability install in a location that is 1 Well ventilated out of direct sunlight and away from direct heat 2 A solid vibration free surface 3 Free from high humidity excessive dust and away from magnetic fields 4 Please ensure that the ventilation fan located on the unit s back panel is not blocked UNSUITABLE LOCATIONS Placing the unit in the following places might shorten the product life Extremely...

Page 7: ...ction 11 Using Tapping Screw 12 Assigning IP Address 13 Connecting DX VS1UE to Network 13 Configuring IP Address with Setup Program 14 Viewing Image through Network 16 Input Output 18 How to Make Cable 18 Connecting Power 19 Connecting Serial Cable 20 Connecting an External Sensor Device 20 DIP Switch 21 Video Input Output 21 Specification 22 Hardware 22 Video and Compression 22 Network 22 Environ...

Page 8: ...oring through network Flash memory for customizing home page Max 100 users simultaneous access support Max 64 points Preset control Group and Swing mode support RS 232C and RS 485 RS 422 port support for PTZ control Embedded Linux OS for excellent stability and less downtime Wavelet compression system for higher refresh rate 1 channel video input support 4 external sensors support S W motion detec...

Page 9: ...e supplied accessories are included 1 DX VS1UE 1 2 AC Power Adapter 1 3 AC Power Cord 1 4 CD ROM including the Setup Program and User s manual 1 5 Ethernet Cable 1 red UTP category 5 crossover cable 6 Ethernet Cable 1 white UTP category 5 straight cable OVERVIEW DX VS1UE ENGLISH ...

Page 10: ...9 DX VS1UE Setup Guide OVERVIEW DX VS1UE 7 RS 232C Serial Cable 1 For connecting to digital recorder 8 Tapping Screws 4 9 Plastic Anchors 4 ENGLISH ...

Page 11: ...rogram DX VS1Control installer exe ActiveX Program for manual installation DX VS1UE User s Guide V1 0 PDF DX VS1UE User s Manual There are both English and Japanese folders in the Acrobat reader Document and Setup folder in the attached CD ROM Please refer to English folder Preparations Adobe Acrobat Reader Version 5 0 must be installed on your computer in order to use the user s manual contained ...

Page 12: ... VS1UE Setup Guide OVERVIEW DX VS1UE Description and Function VIDEO INPUT VIDEO THROUGH OUTPUT DIP SWITCH SERIAL COMMUNICATION RS 232C RS 232C RS 422 RS 485 SENSOR INPUT x4 ETHERNET POWER DC12V AC24V ENGLISH ...

Page 13: ...E Using Tapping Screw The following describes how to attach DX VS1UE to wall or ceiling 1 Make a hole diameter Φ6 5 depth 30mm or longer 2 Insert the supplied PLASTIC ANCHOR into the hole 3 Fix DX VS1UE with the supplied TAPPING SCREW ENGLISH ...

Page 14: ...m DX VS1UE should be connected to the same local network as client s PC Connecting DX VS1UE to Network Connect DX VS1UE to client s PC directly with crossover cable or through HUB with straight cable Please refer to the following pictures Connecting client s PC to DX VS1UE directly 1 Connect DX VS1UE to Client s PC with crossover cable 2 Connect a digital recorder or an external camera to the vide...

Page 15: ...E 2 Connect Ethernet cable to the Ethernet plug of DX VS1UE firmly 3 Check the LED of DX VS1UE after supplying power After power is supplied yellow LED is on for the first 4 5 seconds and then it goes off and green LED is on for the first 1 2 seconds and then it blinks once at every one second as long as the network is connected Configuring IP Address with Setup Program 1 Insert the supplied CD RO...

Page 16: ...nge the IP address The default password is admin The password can be changed on the server configuration page 5 After entering the new IP Address you want click the OK button To view image through DX VS1UE DX VS1UE s IP address and PC s IP address should be at same local Network 6 If the IP address is changed normally the new IP address will be listed And then select it enter password and press th...

Page 17: ...web browser and enter DX VS1UE s IP address in URL field After you enter the IP address the User Login page of DX VS1UE appears 2 Enter passwords into each password field and press LOGIN button The default value of each password is not configured i e default value of each password is null string ENGLISH ...

Page 18: ...17 DX VS1UE Setup Guide INSTALLATION AND CONNECTION DX VS1UE 3 You can check image on the simple viewer page ENGLISH ...

Page 19: ...UE Input Output Electrical Connection Diagram How to Make Cable For connecting cable to terminal block do the followings Compress the cable with the appointed BLADE TERMINAL Use INSULATOR against electric shock Peel off the cover of cable and solder it ENGLISH ...

Page 20: ...to DX VS1UE properly Don t connect power cable to DX VS1UE with power being supplied DC POWER When connecting DC power be cautious of The pin with tagged 12 should be connected to the related hole and another pin should be connected to GND hole And then fix them by turning screws clockwise AC POWER Connect two pins AC24V AC24V as followings ENGLISH ...

Page 21: ...TX1 GND Connecting RS 485 Connect each pin to each entry point of No 6 9 R R T T by referring to Electric Connection Diagram Connecting RS 422 Connect each pin to each entry point of No 6 7 S S by referring to Electric Connection Diagram Connecting an External Sensor Device For example in case you connect to terminal for sensor input 1 1 1 connect to each entry point of No1 2 1 1 by referring to E...

Page 22: ...Input Output DX VS1UE has video input and output terminal To monitor image with CCTV monitor that has the changeover switch of impedance you need to set 75ohm to impedance of video input of DX VS1UE and set Hi Z to the changeover switch of impedance of the monitor like the below figure In case of CCTV monitor without the changeover switch of impedance you need to set Hi Z to impedance of video inp...

Page 23: ...put BNC Connector VIDEO THROUGH OUTPUT 1 Output BNC Connector RESOLUTION 720X486 720X243 360X243 180X121 90X60 COMPRESSION SYSTEM WAVELET COMPRESSION SYSTEM IMAGE COMPRESSION RATE 10 1 200 1 IMAGE TRANSMISSION RATE Max 30fps NTSC 25fps PAL on 360X243 Network CONNECTOR 10BASE T RJ 45 MANAGEMENT Remote system setting over network BROWSER Microsoft Internet Explorer 5 0 or above MAX SIMULTANEOUS USER...

Page 24: ...CTION Motion detection Image quality Control 10 Levels Periodical sending image through E Mail FTP ALARMS Automatic transmission of e mail Automatic transmission of image files through FTP SECURITY Layered password user authentication based IP filtering secure mode Image encryption mode PAN TILT ZOOM CAMERA CONTROL RS 232C RS 485 RS 422 x1 DIGITAL RECORDER CONTROL RS 232C x1 SENSOR 4 ch DC 4 5 13 ...

Page 25: ...1 Resolution 1024 X 768 pixel or higher Network 10 BASE T LAN POWER APPLIED ADAPTER Input AC 100 250V 50 60 Hz 0 5A Output DC 12V 1 5A CONSUMPTION ELECTRICITY 1 0A DC 12V 0 5A AC 24V CONSUMPTION VOLTAGE 12W DC 12V 12W AC 24V Mechanical DIMENSION 130 0mm X 121 0 mm X 33 0mm WEIGHT 350g Product specification and appearance may change without notice for improvement APPENDIX DX VS1UE ENGLISH ...

Page 26: ...n Tuch und reiben Sie es anschließend trocken PVC Kabel oder Leitungen sollten nicht über einen längeren Zeitraum hinweg mit dem Gehäuse in Kontakt kommen AUFSTELLUNGSORT Für exzellente Leistungsfähigkeit und anhaltende Betriebssicherheit sollte der gewählte Aufstellungsort die nachfolgend aufgeführten Merkmale aufweisen 1 Gute Ventilation nicht in direktem Sonnenlicht und fern von Wärmequellen 2 ...

Page 27: ...n puis essuyez avec un chiffon sec Des cables en PVC ou d autres cables ne devraient pas être en contact avec le produit sur une longue durée INSTALLATION SUR LES LIEUX Pour d excellentes performances et une bonne sécurité de fonctionnement 1 bien ventiler loin de la chaleur et du soleil 2 Sur une partie solide sans vibration 3 Sans une haute humidité et loin des champs magnétiques 4 Assurez vous ...

Page 28: ... caja por un período de tiempo muy largo INSTALACIÓN Para lograr un óptimo y duradero funcionamiento instalar el equipo en un lugar que esté 1 Bien ventilado y alejado de la luz directa del sol y de otras fuentes de calor 2 Una superficie exenta de vibraciones 3 Libre de excesiva humedad polvo y alejado de campos magnéticos 4 Compruebe que el ventilador situado en el panel posterior de la grabador...

Page 29: ...lizia contenenti petrolio Pulire con un panno soffice inumidito in una soluzione di acqua e sapone e passare infine con un panno asciutto I cavi ed i fili non devono stare a contatto con l estetica dell apparecchio per un lungo periodo LUOGO DI INSTALLAZIONE Per ottenere il massimo delle prestazioni ed una affidabilità che duri nel tempo installate l apparecchio in un luogo 1 ben ventilato lontano...

Page 30: ...T Voor een zo goed mogelijke werking en voor een lange levensduur dient het apparaat op een geschikte plaats te staan zoals 1 goed geventileerd uit direct zonlicht en die niet nabij hittebronnen gelegen is 2 op een stabiele ondergrond 3 vrij van een hoge vochtigheidsgraad stof en niet in de omgeving van magnetische velden 4 de ventilatie openingen niet afdekken met name de opening aan de achterkan...

Page 31: ... höljet Använd endast en mjuk trasa fuktad med vatten och tvål för rengörning torka därefter torrt Låt inte PVC kablar ligga i kontakt med höljet under lång tid detta kan orsaka missfärgning INSTALLATIONSPLATSER För allra bästa funktion och säker drift installera Video Server Boxen på 1 Väl ventilerad inte i direkt solljus eller nära värmekällor 2 En plan vibrationsfri yta 3 Fri från hög luftfukti...

Page 32: ...PRINTED IN KOREA ...

Reviews: