background image

67

Operations

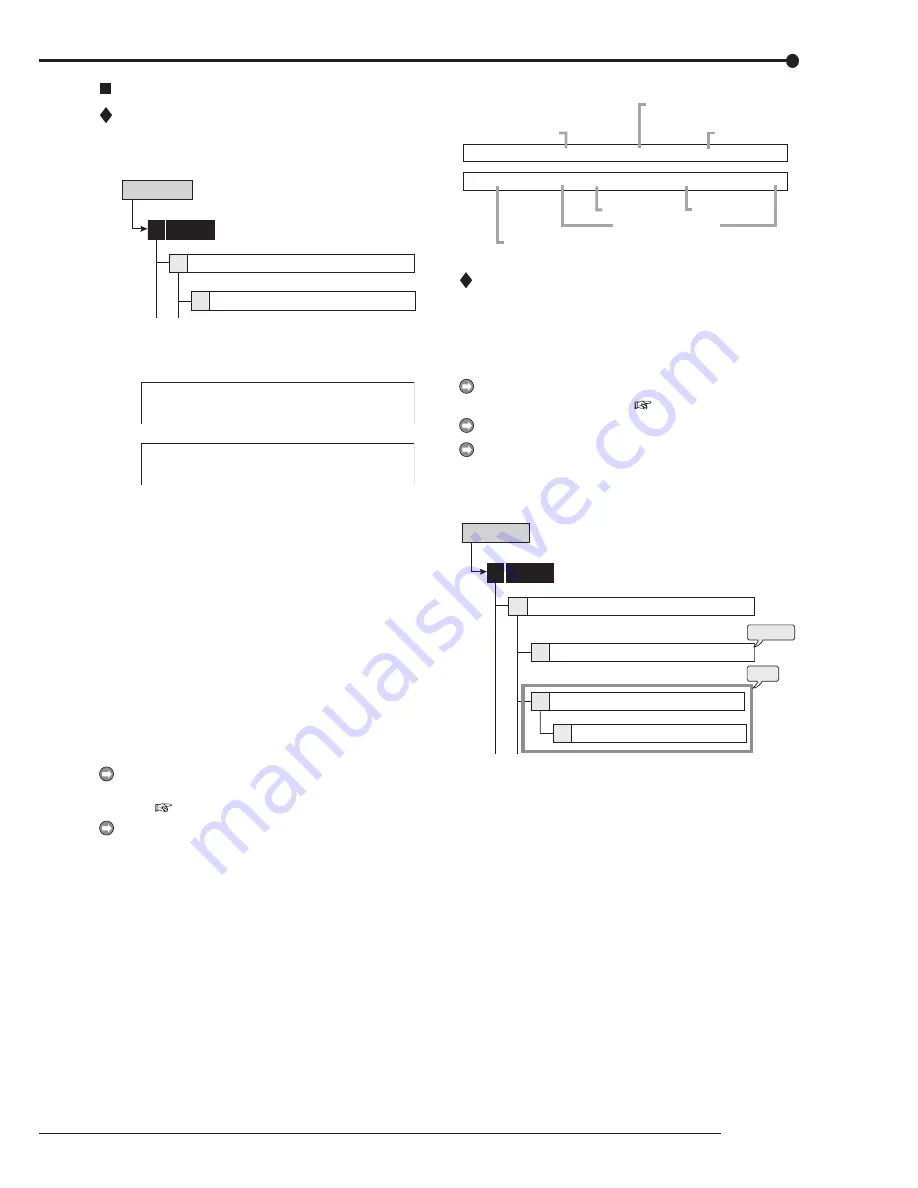
  On Screen Display Setting

  On Screen Information

This item is used to set the display mode and the location for 
the clock, triplex, and camera display on the monitor.

1

6

System

4

Setup Menu

On Screen Information

On Screen Display Setting

[Clock]

step

1.

  Select the display mode of the clock.


Mode 1:


01-01-2006   Sun  00:00:00


Mode 2:


01-01-2006  Sun
00:00:00


Mode 3:

 Does not display the clock.

step

2.

  Select the desired clock location.

[Triplex]

step

3.

  Select  the  display  mode  of  the  remaining  capacity 

and  the  operational  conditions  such  as  playback, 
recording, alarm recording, or emergency recording.


Mode 1:

 Displays the operational condition of the 

unit and the warning display.


Mode  2:

  Displays  the  remaining  capacity  of  the 

specified  device,  the  operational  condition  of  the 
unit, and the warning display.


Mode  3:

  Displays  the  remaining  capacity  of  the 

specified  device,  the  operational  condition  of  the 
unit,  and  the  HDD  being  used  for  playback  or 
recording. The warning display is not displayed.


Mode 4:

 Displays the warning display.


Mode 5:

 Displays nothing.

 The  remaining  capacity  displayed  is  the  capacity  of  the 

device  specified  in  “Device”  of  “Low  Memory Alarm  Set-
ting.” (

 page 58)

 The remaining capacity is not displayed when the “Device” 

of “Low Memory Alarm Setting” is set to “Off.”

step

4.

  Select the desired display location.

[Camera]

step

5.

  Select the display mode of the camera information.


Number:

 Displays the camera number.


Title:

  Displays  the  title  set  in  “Camera Title.” The 

title can be recorded along with the picture.


None:

 Displays nothing.

step

6.

  Select the desired display location.

  When  display  mode  is  set  to  “Title,”  title  is 

displayed on the top when display location is set 
to “Top - Left” or “Top - Right,” and it is displayed 
on  the  bottom  when  display  location  is  set  to 
“Bottom - Left” or “Bottom - Right.”

Display mode example

RECORDER1

Recorder title

Remaining capacity of the specified device

Specified device

Specified device

CAMERA1

ALERT

REM 20%

REC [A]

[SB:01]

PLAY

COPY2

COPY1

Operational conditions

Camera title
(during single screen display)

Warning

  Camera Title

This item is used to set the titles of each connected camera 
individually.  When  the  display  mode  of  the  camera  informa-
tion is set to “Title,” the title, showing the location of the cam-
era, appears on the screen for an easy-to-understand moni-
toring system.

 The  camera  titles  can  be  input  via  a  personal  computer 

by using the Web function. (

 page 101)

 Up to 16 characters can be used for the title.

 The number of characters displayed on the screen is:


First 15 or all 16 for the split 16, 13, or 10 screen display 
(varies depending on the display position)


All 16 for the split 4 or 9 screen display

2

3

D

6

4 System

steps

 1, 2

step

 3

Setup Menu

Camera Title

Camera Title Overview

Camera Title Overview

On Screen Display Setting

step

1.

  Set the camera number for which the camera title is 

set.

step

2.

  Input the camera title by using the characters shown 

on the bottom of the screen.

step

3.

  Display  the  preview  screen  to  check  the  settings 

you have set.

Summary of Contents for DX-TL4516U series

Page 1: ...1 DIGITAL RECORDER INSTALLERʼS MANUAL MODEL DX TL4516U THIS INSTRUCTION MANUAL IS IMPORTANT TO YOU PLEASE READ IT BEFORE USING YOUR DIGITAL RECORDER ...

Page 2: ...ARTS INSIDE REFER SERVICING TO QUALIFIED SERVICE PERSONNEL RISK OF ELECTRIC SHOCK DO NOT OPEN WARNING The lightning flash with arrowhead symbol within an equilateral triangle is intended to alert the user to the presence of uninsulated dangerous voltage within the product s enclosure that may be of sufficient magnitude to constitute a risk of electric shock The exclamation point within an equilatera...

Page 3: ...qui peuvent être suffisamment importantes pour conduire au risque d électrocution Le point d exclamation au sein d un triangle équilateral a pour objet de tirer l attention de l utilisateur sur le fait qu il y a des instructions de mise en service et d entretien de réparation dans les fiches descriptives de l appareil qui doivent obligatoirement être respectées AVERTISSEMENT AFIN D ÉVITER TOUT RISQU...

Page 4: ... ensure reliable operation of the product and to protect it from overheating and these openings must not be blocked or covered This product should never be placed near or over a radiator or heat register This product should not be placed in a built in installation such as a bookcase or rack unless proper ventilation is provided or the manufacturer s instructions have been adhered to 10 Power Sourc...

Page 5: ...esult in fire electric shock or other hazards 19 Safety Check Upon completion of any service or repairs to this product ask the service technician to perform safety checks to determine that the product is in safe operating conditions 20 Heat The product should be situated away from heat sources such as radiators heat registers stoves or other products including amplifiers that product heat 21 This...

Page 6: ... in use always eject the disc and turn OFF the MAIN switch CABINET CARE Never use petroleum based cleaners Clean with a soft cloth moistened with soap and water and wipe dry PVC cables or leads should not be left in contact with the cabinet surface for long periods INSTALLATION LOCATION For excellent performance and lasting reliability install in a location that is 1 Well ventilated out of direct ...

Page 7: ...e displayed on the menu screen indicate the continuous time of recording operation of this unit They indicate the period neither for product warranty nor that for reliability of used parts The user will not be indemnified for problems e g recording failure or playback failure that occur with either the unit or a connected device during operation It is recommended to back up the important recordings...

Page 8: ...hesive Store the disc in the specified casing avoiding the following places Places where it will be subjected to direct sunlight Places with excessive dust Places where it will be subjected to high temperatures or high humidity DVD movie cinema or personal recorded picture cannot be played back on this unit Only the pictures recorded on this unit can be played back Do not use the disc which has bee...

Page 9: ...dition this Product contains Apache and OpenSSL including Original SSLeay library These software programs are also excluded from Licensed Software and not covered by the following Software License Agreement For the terms and conditions for use of these software programs please see Notice about Apache software and Notice about OpenSSL software Each of Berkeley Database agetty expat and zlib contain...

Page 10: ...If the users need additional information on MENU functions just press the HELP key and instructions will appear on screen The menu supports English French and Spanish Function keys on the front panel or USB mouse can operate the menu on the DX TL4516U Recording rate up to 120 pps system Because of the new recording circuit and compression chip the maximum recording speed is 120 pps in total this m...

Page 11: ...her registered trademarks or trademarks of Microsoft Corporation in the United States and or other countries All other company and product names appearing herein are the property of their respective owners 7 Beginning ...

Page 12: ... control using the front panel buttons 48 Setup Menu Recording 49 Settings concerning normal recording and alarm recording 49 Pre alarm recording 49 Set Recording Pattern A Normal Timer to D Timer 49 Alarm Input 51 Emergency Recording Setup 52 Emergency recording 52 Long pre alarm recording 53 Audio Recording Setup 53 Timer 54 Timer 54 Overlapped timer settings 55 Motion Det 56 Set Motion Detectio...

Page 13: ...s 84 Operation example 1 84 Operation example 2 85 Operation example 3 86 Operation example 4 88 Basic operations 90 Basic multiplexer functions 90 Multiplexer buttons 90 Basic manual recording 91 Setting the recording rate and picture grade for normal recording 91 Basic playback 92 Basic search 93 Search by Time and Date 93 Search by Alarm List 94 Communications by Web Browser 95 Communications b...

Page 14: ...nsor on page 18 Connection for the alarm recording See Alarm recording connection on page 19 and Rear view on page 16 Boot up the unit When executing Setup Wizard See Setup Wizard on page 26 Only when the unit is turned on for the first time the Setup Wizard screen is displayed automatically It is not displayed next time The language present time HDD configuration and recording settings are set auto...

Page 15: ...rmal Timer to D Timer on page 49 Setting the timer program Setting the holiday Selecting the timer program number Making the timer recording settings Selecting the day of the week Selecting the start time Selecting the end time Selecting the program mode Selecting the motion detection mode Selecting the special day of the week See Timer on page 54 Timer recording is executed and completed See Warn...

Page 16: ...ssword lock is turned on 8 M DET indicator Illuminates when the motion detection function is acti vated Flashes during motion detection recording 9 PRE ALARM indicator Illuminates during pre alarm recording It also illuminates when pre alarm recording has been set 10 COPY 1 indicator Illuminates while performing copy 1 operation Flashes when starting or ending the copy 1 operation 11 COPY 2 indica...

Page 17: ...ffects both playback and search functions The menu cannot be displayed when this button is illuminated TILT button When pressing the button during PTZ mode the angle of the camera adjusts to the downward direction 17 Disc loading slot Accepts DVD disc or CD to copy back up The supported discs are DVD RW DVD R CD R and CD RW OPEN CLOSE button Opens or closes the disc loading slot BUSY indicator Fla...

Page 18: ...nu 27 SEARCH button Displays the User Menu with search menu opened 28 TIMER button Sets the unit to timer recording stand by mode and lights up the TIMER indicator When pressing this button for more than 2 seconds timer recording stand by mode is cancelled and the TIMER indicator is turned off 29 LOCK button Activates simple lock or password lock when pressing while the MAIN switch main power on t...

Page 19: ...that data on the personal computer using the supplied application software not all the personal computers or DVD CD drives are ensured for proper play back of such data Before using the DVD drive check whether that the drive supports the medium to be used It is recommended to use the DVD Multi drive when you playback the data on the personal computer 33 Operation buttons STOP button Stops playback...

Page 20: ...nals Output terminal to inform the current mode of this unit Select the mode of the unit to be output in the Mode Out Settings page 58 1 MAIN switch This is the main power switch To use this unit set this switch to ON Otherwise the front power button does not turn the unit on off 2 AC power socket Used to connect the power cord Earth terminal is used for safety Use the 100 to 240 V outlet with gro...

Page 21: ...or Output connector which sends brightness signals and colour signals separately for higher picture quality Si multaneous output along with OUTPUT A VIDEO con nector is also possible OUTPUT B VIDEO connector Output connector which sends video signal to second B monitor BNC connector page 18 12 SERIAL BUS port Input and output port for connecting to the device equipped with SERIAL BUS connector Do ...

Page 22: ... RS422 Compatible power lines ø0 32 ø0 65 mm AWG 28 22 Cut the designated area from the electric wire s outer covering vinyl portion 5 7mm Clamp the USB cable using the supplied cable clamping band in order to prevent the accidental removal of the cable See page 20 Clamp the power cord using the supplied cable clamping band in order to prevent the accidental removal of the cable See page 20 Dome c...

Page 23: ...ound of 200 ms or more 1 second or more Active When terminals are short circuited or Low Level is applied Non active Open Warning signal Photo coupler output Active Short Max Drive current 7 mA DC Non active Open Max Voltage 24 V DC Active Low Level Max Drive current 30 mA DC Non active Open Max Voltage 24 V DC Be sure to use these terminals within above rated value Interface circuit inside of the...

Page 24: ... to be clamped through the cable clamping band as illustrated below Face the serrated surface of the band inside step3 Pull the edge of the cable clamping band until it stops Connecting to an analogue video cassette recorder To VIDEO IN connector To AUDIO IN connector Analogue video cassette recorder To VIDEO OUT connector To AUDIO OUT connector Commercially available audio cable Commercially avai...

Page 25: ...corder R 2500 Wired remote controller Menu setting search and PTZ preset function are not avail able with wired remote controller Consult your dealer for the functions related to PTZ DX RM4 Rack mount adapter for digital recorder DX TL4516 series Recommended items Consult your dealer about the recommended external de vices The external device to be used may be unsuitable for the operation you want...

Page 26: ... standard USB mouse which has left and right buttons as illustrated to the left Note that you cannot use the mouse with this unit depending on the mouse connected step1 Use the left and right mouse buttons to set the menu Click the left button to open the menu or select a needed item etc Click the right button to set the active area for motion detection function page 56 The wheel on a mouse does n...

Page 27: ...Press the front panel button of the needed item number or left click on the needed item The selected item menu opens Select an item and press the number or click on the menu to open the item 100 000 000 1 Search 2 Copy 5 Protect Data 3 Information 6 PTZ Control D Next E Exit User Menu Setup Menu 1 Recording System 4 2 Timer Motion Det Menu Data 5 3 D Next E Exit 200 000 000 1 Recording 4 System 2 ...

Page 28: ...eft click on the parameter box until the item to be set appears For some items more detailed setting is required In this case an item such as D Set is displayed If necessary press the D button or left click on the Set to set more details When you close the menu press the E button or left click on Return or Exit You cannot close the menu by pressing the SET UP button on the unit Time Date Setting T...

Page 29: ...u press the 15 button or click this symbol the value of selected item decreases Menu address A unique number for each menu page You can go directly to each menu page by inputting the menu ad dress number using the front buttons of the unit For example when opening the Motion Search menu press the SET UP button and then press the cam era number button in the order of 1 6 Motion Search Main Normal E...

Page 30: ...If not select Quit When selecting Quit the clock starts running from the initial setting Beware that the menu screen cannot be exited while set ting the setup wizard Furthermore some menu screens which have already been set are not displayed again step3 When selecting Go Select the desired language The Language Selection screen appears The language of the menu can be selected in this screen Select...

Page 31: ...selecting Next By selecting Execute the unit automatically checks the condition of the picture supplied from the camera and then sets the camera number to be recorded Select Next when the setting is completed step9 Set the recording time Set the recording cycle and the recording hour per day Select Execute when the setting is completed step10 Frame field recording rate and the picture grade for th...

Page 32: ...the alarm list registered at the start of alarm recording Displays the list of alarm recording Detects the device which is used to record by inputting the recording period Displays the list of devices used to record for the specified time period Searches the desired picture by specifying a bookmark registered Searches camera picture with motions by using motion detection function during playback S...

Page 33: ...he recorded range of each group in copy 2 device Exits the Information menu Proceeds to Setup Menu Protects the recorded pictures Up to 500 areas can be protected and cannot be overwritten Shows and searches the list of protected pictures Shows and deletes the list of protected pictures Exits the Protect Data menu Activates pan or tilt of the PTZ camera connected Adjusts the zoom iris and focus of...

Page 34: ...the preview of the normal recording settings Specifies frame or field recording rate and picture grade of normal recording for each camera number individually Shows the preview of the normal recording settings Specifies the alarm recording settings Specifies frame or field recording rate and picture grade of alarm recording to the same settings for all the camera numbers Shows the preview of the a...

Page 35: ... the normal recording settings Specifies frame or field recording rate and picture grade of normal recording for each camera number individually Shows the preview of the normal recording settings Specifies the alarm recording settings Specifies frame or field recording rate and picture grade of alarm recording to the same settings for all the camera numbers Shows the preview of the alarm recording...

Page 36: ...s the preview of the normal recording settings Specifies frame or field recording rate and picture grade of normal recording for each camera number individually Shows the preview of the normal recording settings Specifies the alarm recording settings Specifies frame or field recording rate and picture grade of alarm recording to the same settings for all the camera numbers Shows the preview of the...

Page 37: ... of normal recording for each camera number individually Shows the preview of the normal recording settings Specifies the alarm recording settings Specifies frame or field recording rate and picture grade of alarm recording to the same settings for all the camera numbers Shows the preview of the alarm recording settings Specifies frame or field recording rate and picture grade of alarm recording f...

Page 38: ... detecting condition of Motion A Specifies the active area of the motion detection Motion A Tests the operation of the motion detection Motion A Specifies the detecting condition of Motion B Specifies the active area of the motion detection Motion B Tests the operation of the motion detection Motion B Exits the Motion Det menu Proceeds to System Menu Adjusts time date setting and selects daylight ...

Page 39: ...lay setting Specifies the covert camera setting Specifies the on screen display information settings Specifies the display location of clock operational condition and camera number Specifies the camera title Shows the preview screen of the camera titles Shows the preview screen of the camera titles Specifies the recorder title Specifies the monitor output settings Resets the menu settings to the f...

Page 40: ...iled alarm notification settings Exits the COM LAN menu Specifies the setting of the camera to be controlled Shows the settings you have set in the PTZ Camera Configuration screen Shows the settings you have set in the PTZ Camera Configuration screen Exits the PTZ Setting menu Shows the number date and time of the system log Shows the total operating time Shows the recorded range of each device Sh...

Page 41: ...nt of restoring Specifies the condition for restoring the data to the main device from the copy device Exits the Restore menu Registers or removes the device used as the main or copy device Registers or removes the internal HDD for main or copy 2 device Registers or removes the serial bus device for main or copy device Registers or removes the DVD CD drive for copy 1 or 2 device Specifies the repe...

Page 42: ...Alarm Recording Area page 77 Change Partition Setting is set to other than 0 LPA appears when Long Pre Alarm Area page 77 Change Partition Setting is set to other than 0 When ejecting the disc make sure to use the Media Eject on the menu screen Search by Time and Date page 93 Search by Alarm List page 94 Find data storage location This item is used to display the list of the devices used for re co...

Page 43: ...int is set to the earlier time than the recording start point the search is executed from the oldest recording point step3 Set the motion detection conditions for playback Set motion mask setting sensitivity and motion threshold See page 56 for the details of these settings The sensitivity of motion detection conditions for playback has two setting items Low and High The motion detection settings ...

Page 44: ...om Group when Long Pre Alarm Area page 77 Change Partition Setting is set to other than 0 When copying the data to DVD while Overwrite is set to On the unit clears the existing data on the disc before overwriting with new data Note that clearing the data takes about 30 to 40 minutes You cannot cancel opera tion during clearing the data of the DVD When copying the data while Copy Data is set to Ala...

Page 45: ...age 77 Change Partition Setting is set to other than 0 When copying the data to DVD while Overwrite is set to On the unit clears the existed data of the disc before overwriting with new data Note that clearing the data takes about 30 to 40 minutes You cannot cancel opera tion during clearing the data of the DVD When copying the data while Copy Data is set to Alarm the unit performs copy operation ...

Page 46: ...input source of the VCR to the external input step2 This unit Display the picture in its format single split that you want to record step3 This unit If needed use the search function to display the start position of copy step4 Analogue video cassette recorder Start recording step5 This unit Press the PLAY button to start playback step6 To stop copying press the STOP button on this unit first And th...

Page 47: ...the duration for every data to be played back Synchronized playback Select Synchro in the Playback field You can play back simultaneously the audio and picture of the data downloaded in blocks via network or the data copied together with audio by a recorder Only one playback channel is displayed in this case Audio is not played back during other than normal playback such as fast forward playback a...

Page 48: ...een those positions Repeat between A and B Put a check mark to repeat playback between Point A and Point B you specified View menu Picture Size When clicking the options of 100 75 50 and 25 appear Pictures are zoomed in or out according to the selected magnification Decode Level When clicking the options of Fine Middle and Rough appear When setting the decode level to rough the pic ture becomes roug...

Page 49: ...is set to other than 0 Partition LPA Information appears when Long Pre Alarm Area page 77 Change Partition Setting is set to other than 0 Copy devices step2 Select the device to be checked from Copy 1 Drive Information and Copy 2 Drive Information step3 Select the desired group for displaying the information Update Information Updates the recording information Media Eject Ejects the media When you...

Page 50: ...t the Protected Data Information Select the area to be displayed in the Select Source Device page 39 Search Displays the picture of the start point of the selected area Check Checks the device in which the locked area is recorded step4 To cancel the lock select Disable of the desired area in the screen of Change Protected Data Settings Search Displays the picture of the start point of the selected...

Page 51: ...he unit switches to PTZ mode and the button lights up PTZ appears on the LCD display on the front panel during PTZ mode 01 01 2006 00 00 00 PTZ The camera number to be controlled appears on the LCD display on the front panel 01 01 2006 00 00 00 PTZ CAM1 step3 Control the camera Tilt Press the TILT button to tilt the camera in the upward direction Press the TILT button to tilt the camera in the dow...

Page 52: ...arm Camera Setting and Alarm Trigger In Out Pre alarm recording Pre alarm recording is a function to start recording a few seconds before the ALARM IN terminal on the rear panel is grounded motion is detected or the alarm signal is input via LAN or RS 232C communication Records data on HDD before alarm is input Time Camera input Recording process disturbance Alarm input The PRE ALARM indicator ill...

Page 53: ...e display turns red when the total value exceeds 120 pps step3 Select motion detection recording Alarm Starts alarm recording when the motion is detected Normal Starts normal recording when the motion is detected The recording is executed at the picture grade and the recording rate set for normal recording The recording is not registered in the alarm list Data is recorded in normal recording area ...

Page 54: ...motion detection function becomes active immediately after exiting Set Recording Pattern A Normal Timer to D Timer To stop the input of alarm signals set the Alarm Input setting in the Recording menu to Off step9 Set the PTZ camera preset for the sensor of which trigger is set to External on step 8 Preset 1 to 16 When the ALARM IN terminal corresponding to the sensor is grounded the angle of corre...

Page 55: ...ividing the maximum emergency recording rate by the number of specified cameras When the LPA area is set in the main device the emergency recording data is stored in the LPA area and is automatically locked in 512 MB unit including the emergency recording data in order to prevent overwriting the data In LPA area the data is always recorded at the rate set for alarm recording regardless of an input...

Page 56: ...use the data in the LPA area is processed in 512 MB unit In the LPA area alarm list or recording data may not be stored in the chronological sequence The easier way to search the desired data is before searching the data search the oldest recording data using Search by Time and Date In the LPA area all the existed recording data is deleted and overwritten when the capacity becomes full It is recom...

Page 57: ...ion detection function during timer recording Inactive Does not perform the motion detection function during timer recording When the motion detection is set to Active in Record A the motion detection pattern of the alarm trigger which is set in Set Recording Pattern A Normal Timer is used When the alarm trigger is set to External the motion detection recording is not available in the timer record...

Page 58: ...le 1 Line 1 is set for 14 00 to 17 00 with the normal recording rate of 5 pps Line 2 is set for 15 00 to 16 00 with the normal recording rate of 1 pps Under this condition the unit gives priority to Line 2 for the duration of the overlapping period from 15 00 to 16 00 The unit operates as shown in the chart below In Line 1 recording rate is set to 5 pps time period is set from 14 00 to 17 00 1 pps...

Page 59: ... Motion detection function operates when detecting the change that exceeds the number of areas set on this step Set Motion Threshold to the number less than that of the active areas in the detection area The motion detection function does not operate when setting Motion Thresh old to a value exceeds that number step5 Set the reference interval time This item is used to set the detecting interval B...

Page 60: ...e input at the same time The M DET indicator lights up while the motion detection function is in operation The motion detection of this unit may not operate cor rectly depending on the conditions of input video signals especially when the Sensitivity is set to high setting Be careful when connecting to a system etc that is set to notify the alarm when the motion detection function of this unit is ...

Page 61: ...rm appears when Alarm Recording Area page 77 Change Partition Setting is set to other than 0 Main LPA appears when Long Pre Alarm Area page 77 Change Partition Setting is set to other than 0 System Setup Menu Time Date Setting This item is used to set the present date time and auto day light saving Auto daylight saving function is used to automati cally gain the clock of the unit an hour for the s...

Page 62: ... set to Warning Key Sound This item is used to make a sound when using the operation al buttons JOG dial and SHUTTLE ring System 4 3 Setup Menu Rear Terminal Setting step1 Set the key sound to on or off Buzzer This item is used for a buzzer to sound when the remaining main or copy 2 device capacity reaches the value set in Low Memory Alarm Setting page 58 Other than the above it is possible to set...

Page 63: ...This unit is equipped with 2 lock functions SIMPLE LOCK Does not require to enter a password when unlocking PASSWORD LOCK Requires to enter a password when un locking When the password for unlocking is not set lock function executes in SIMPLE LOCK When the password for unlocking is set lock function ex ecutes in PASSWORD LOCK When the MAIN switch on the rear panel is set to OFF or when a menu is d...

Page 64: ...evel 3 appears When the PASSWORD LOCK of levels 1 2 and 3 are set you cannot unlock only level 3 Unlock levels 1 and 2 first step2 2 Input the PASSWORD of level 3 by pressing the number buttons step2 3 Select Unlock The PASSWORD LOCK is released and the User Menu appears When the PASSWORD LOCK of levels 1 2 and 3 are set the PASSWORD LOCK of level 2 is active when un locking level 1 and level 3 is ...

Page 65: ...laying other type of split screen or pressing a camera number button 1 to 16 for displaying single screen also can cels the sequential display When a menu screen is displayed the single or split screen display does not appear In this case clear the menu screen first and then press a camera number button 1 to 16 or SPLIT button DIGITAL ZOOM button operations By pressing the DIGITAL ZOOM button durin...

Page 66: ...e Multi are switched by the switching time set in Sequence Time The corresponding camera number button lights up 2 types of SPLIT9 display set in Output A Settings Output B Settings Sequence Multi are switched by the switching time set in Sequence Time The corresponding camera number button lights up 4 types of SPLIT4 display set in Output A Settings Output B Settings Sequence Multi are switched b...

Page 67: ...d position is displayed in orange step2 When using front panel buttons press the camera number button 1 to 16 of the desired camera number to be displayed When not displaying the picture press A button to display When using the mouse left click the number until the desired camera number appears The number 1 to 16 or is displayed The same camera number cannot be set repeatedly in one split screen d...

Page 68: ...ra number to be displayed When not displaying the picture press A button to display When using the mouse left click the number until the desired camera number appears The number 1 to 16 or is displayed The same camera number cannot be set repeatedly in one split screen display When you select displays for the camera number display on the normal screen Single sequential screen Sequence Single step3...

Page 69: ...of the specified camera number not to be displayed regardless of the presence of video signals 6 9 1 2 3 10 11 13 14 15 16 12 4 8 When the picture is interrupted due to the camera trouble etc while the Covert Camera Setting is set to Off the warning message does not appear on the screen And the buzzer does not sound even when Warning is set for Buzzer setting The unit registers this error in the Sy...

Page 70: ...ays the camera number Title Displays the title set in Camera Title The title can be recorded along with the picture None Displays nothing step6 Select the desired display location When display mode is set to Title title is displayed on the top when display location is set to Top Left or Top Right and it is displayed on the bottom when display location is set to Bottom Left or Bottom Right Display ...

Page 71: ...a television for domestic use Underscan Displays underscaned picture Generally this setting is suitable for the monitor of which display range is wide such as a liquid crystal television The black line may appear on the right or left side of the picture for each camera step2 Adjust the alpha blend level The picture supplied from the camera can be viewed through the menu screen being displayed 2 1 ...

Page 72: ... step 1 can be ejected step3 Select Execute The menu settings of this unit is updated and Menu settings data is loaded appears on the screen When the medium to be used for loading the menu is not prepared Media does not exist appears on the screen When loading the data with the setting of IP Address Sub Net Mask Gateway Service Port Setting of LAN or menu language selection changed the power turns...

Page 73: ...the command code Remote C Controls this unit via a PC and this unit returns nothing Off Does not control this unit via a PC step2 Set the port settings shown below Transmission mode Data bit length Parity bit Stop bit length Delimiter Set all the settings to the same values as the PC connected COM LAN System Menu RS 485 Setting This item is used to make the settings to use this unit with optional ...

Page 74: ...en the remaining capacity reaches the value set for Call out setting Temp Fan Transmits signal when the high temperature is detected or the fan is stopped Reboot Transmits signal when the unit is rebooted Record Transmits signal when the recording is started Alarm Transmits signal when the alarm recording is started Sensor Transmits signal when the signal is input to the terminal on the rear panel...

Page 75: ...ontrol signal This item is automatically set depending on the input of the camera or the controller Device ID Setting for the address of the camera to be controlled Make the same settings as the camera or the controller Pan Reverse Reverses the pan direction depending on the installation conditions Tilt Reverse Reverses the tilt direction depending on the installation conditions Configuration Check...

Page 76: ... This item is used to check the total operating time of the system copy 1 or copy 2 device Service Info 3 2 Elapsed Operating Time System Menu step1 Check the total operating time in the Elapsed Operating Time Hr The device is not registered for that group Disk Information This item is used to check the recording range of the main copy 1 or copy 2 device Service Info 3 3 1 D D D 2 to 4 5 to 7 step...

Page 77: ...ng Area page 77 Change Partition Setting is set to other than 0 LPA appears for To Main when Long Pre Alarm Area page 77 Change Partition Setting is set to other than 0 step3 Set the start or start end points of restoring Start Sets only the start point of restoring Start End Sets the start and end points of restoring To restore from the oldest data select Set Start Time To restore to the latest d...

Page 78: ...move the USB HDD for setting the main or copy device Main Registers for the main device The numbers indicate the recording order Copy1 Registers for the copy 1 device The numbers indicate the order for writing of data Copy2 Registers for the copy 2 device The numbers indicate the order for writing of data Free Does not registered as the main or copy device The button changes in the order of Main C...

Page 79: ...and external HDDs are registered as the main device The order of the internal HDD used for recording playback is internal A internal B When all the internal HDD is used up the HDD connected to SERIAL BUS port is used for recording playback The recording order is indicated next to the device name Main Copy1 or Copy2 in External HDD USB HDD page 75 When all the serial bus HDD is used up the internal...

Page 80: ...ion page 67 is set to the mode which displays the warning recording resumes when the warning display is cleared When you set the mode which does not display warning recording resumes when recording data is cleared or repeat recording is switched to Repeat On Repeat of Alarm Recording Area can be set when Alarm Recording Area page 77 Change Partition Setting is set to other than 0 Repeat of LPA Rec...

Page 81: ... monitor connected to OUTPUT A This function does not support OUTPUT B When the picture is played back on the monitor for both of the OUTPUT A and B the image originality check play is executed for not all the playback picture on OUTPUT A This function may cause problems during recording and playback Normally set this function to Inactive Warning is also displayed for parts where recorded data is ...

Page 82: ...ent password has been registered and PASSWORD LOCK is turned on and the main de vice data deletion is executed the screen for unlock disk management appears Unlock the PASSWORD LOCK first for deleting the data Data cannot be deleted while accessing to the HDD such as playback recording copying restoring Copy 1 Copy 2 This item is used to delete the data of each group in the copy 1 or copy 2 device ...

Page 83: ...ng step1 Press the PAUSE button while holding the SHUTTLE ring in the angle for the desired playback speed step2 Let go of the SHUTTLE ring The playback speed is maintained To cancel shuttle hold press the PAUSE button The unit switches to still frame playback Frame by frame playback step1 Turn the JOG dial during still frame playback Clockwise Activates frame by frame playback in the forward dire...

Page 84: ...he unit is in stop mode The still frame playback picture around the end point of the latest recording is displayed The time lag between the latest recording point and displayed point varies depending on the recording rate that has been used at the time of recording In LPA area this function does not work For the data in LPA area the data which is recorded at the closest point to the HDD end point ...

Page 85: ...RK button does not work during split screen display The same position can be registered repeatedly with the different bookmark number The registered bookmark can be overwritten but cannot be deleted When the data of which the bookmark is registered is overwritten with the new data the bookmark is deleted however the display in the bookmark list is not deleted Picture copy step1 Follow the steps 1 ...

Page 86: ...audio of up to 6 MB just before the power failure are not recorded When the pre alarm recording time is set to other than 0 second picture and audio of up to 32 MB are not recorded When the power failure occurs during alarm or emergency recording alarm or emergency recording is cancelled after the power is restored REC ON is registered in the system log list when the recording is started but it is...

Page 87: ...in device can be stored to the copy 2 device You can prevent the accidental erasure of the re corded data caused by the crash of the main device step1 Execute camera check to automatically detect the cameras with video signal input step2 Use Auto to set 30 Day and 24 hours for Recording cycle and Recording time per day respectively step3 Register the multiple HDDs for SerialBus group of Copy 2 ste...

Page 88: ... the specified recording rate Records the data of normal and alarm recordings to the different areas in order to store the alarm recording data for long term Settings A measuring for setting the partition capacity Refer to the example below when calculating the alarm recording area capacity Example Alarm recording time is set to 15 seconds The number of alarm recordings is 80 times per day Alarm re...

Page 89: ...s with video signal input step2 Use Easy to set the desired recording rate for normal recording step3 Use Manual to set the recording rate of unnecessary cameras to step4 Execute camera check to automatically detect the cameras with video signal input step5 Use Easy to set the desired recording rate for alarm recording step6 Use Easy to set the recording rate of all the camera numbers for normal r...

Page 90: ...el 56 57 54 55 Setup Menu Set Motion Detection Pattern B Test Mode Motion Mask Settings Setup Menu Program Selection and Program Overview Configure Timer Program 1 Timer program 1 overview Line 1 Line 2 Line 3 Line 4 Day of The Week Special Special Saturday Sunday Time 08 00 18 00 18 00 08 00 08 00 08 00 08 00 08 00 Program Mode Record A Record B Record B Record B Motion Detection Inactive Active ...

Page 91: ...Execute camera check to automatically detect the cameras with video signal input step2 Use Easy to set the desired recording rate for normal recording step3 Use Easy to set the desired recording rate for alarm recording step4 Set the alarm recording trigger to MD A step5 Execute camera check to automatically detect the cameras with video signal input step6 Use Easy to set the desired recording rat...

Page 92: ...d timer recording settings as the table below step12 Check the timer recording settings and recordable time recordable days in the overview screen step13 Exit the menu screen step14 Press the TIMER button on the front panel 56 57 54 55 Set Motion Detection Pattern A Setup Menu Test Mode Motion Mask Settings Set Motion Detection Pattern B Test Mode Motion Mask Settings Setup Menu Program Selection ...

Page 93: ...ings of this display in the Multiplexer Setting page 64 Sequential display does not appear during playback The sequential display is cancelled when you press the SEQUENCE button again or display a different type of split screen or single screen Basic operations Pressing the OUTPUT A B button on the front panel switches the multiplexer video output When OUTPUT A is selected the button light indicat...

Page 94: ...easy setting step2 Set the normal recording menu Auto Automatically sets the picture grade and the recording rate by setting the recording cycle and the recording hour per day Set the desired settings and then select Execute The preview screen appears automatically when the auto setting is executed Easy Sets the frame or field recording recording rate and picture grade for normal recording to the s...

Page 95: ... DVD CD Alarm appears when Alarm Recording Area page 77 Change Partition Setting is set to other than 0 LPA appears when Long Pre Alarm Area page 77 Change Partition Setting is set to other than 0 step2 2 Press the PLAY button Playback of the selected device starts When you press the PAUSE JUMP TO END button during the playback is stopped the still frame playback picture around the end point of th...

Page 96: ...ly step2 Set the camera numbers to be searched step3 Select Search step4 To playback the searched picture press either the PLAY button or the PAUSE button step5 To stop playback or still frame playback press the STOP button To change the source device to be searched set the desired device in the Select Source Device page 39 To display the single screen display of the desired camera number when the...

Page 97: ...e stored in the alarm list and that item may be missed When the data of the camera number which is not corresponded to the alarm sensor number is copied to the external media the alarm list of that data is not exactly similar to that of listed in the digital recorder When the detection of the motion or the ground of the ALARM IN terminal occurs numerously at the same time not all the start times o...

Page 98: ...Windows XP CPU IBM PC AT compatible with an Intel Pentium series processor of at least 500 MHz RAM 256 MB or more HDD System drive with unused space of at least 200 MB Web Browser Soft Microsoft Internet Explorer 5 5 or later Display device XGA 1024 pixels x 768 pixels or higher Microsoft and Windows are registered trademarks of the Microsoft Corporation in the US and other regions The official na...

Page 99: ... and left click or press ENTER To cancel the change select clear and left click or press ENTER Main Menu This is the screen for selecting from Main Menu Live Monitoring with which live pictures are retrieved and displayed Playback with which pictures that have already been recorded are retrieved and displayed Configuration Menu which allows changes to the settings of the recorder Logout for ending...

Page 100: ...ther the display or non display of a camera number Layout For selecting from the 12 types of display patterns default 4 1 4 screen Camera Selects the camera number that you want to display and check Transfer Rate Selects one of 5 stages from Lo to Hi for picture retrieval speed default middle Save Layout The layout of the screen display is regis tered to Local PC Main Menu Returns to the Main Menu...

Page 101: ...verse direction During playback or searching press to stop play back for still frame Device Selects the HDD for playback and search default Normal The date time and the camera number for the picture ac quired are displayed in Image Information Clicking Save Image stores the picture that is still frame displayed in the PC in bit map format The following searches can be selected in single screen dis...

Page 102: ... items may not be acquired Sensor Check the desired sensor number for acquiring the alarm list items step2 Select the No desired and then click Search Click Prev number for a search in the reverse direction and click Next number for a search in the forward direction Click Refresh again to re acquire the Alarm List and click Close to hide the Alarm List Search menu Image Search Click to display the...

Page 103: ...not have Playback author ity step2 2 To change settings Select change and left click The Change Confirmation screen appears step2 3 If you want to make the change left click change If you want to cancel a change left click cancel step2 4 When you have selected change The Completed screen appears so then left click User Registration The User Registration screen reappears step2 5 When you have select...

Page 104: ... recorder and the camera titles step1 Select Recorder Title Camera Titles and left click The Recorder Title Camera Titles screen appears step2 Enter the desired recorder or camera title to New Text The recorder and the camera titles currently set are shown in the Current Text step3 Select change and left click ...

Page 105: ...ring alarm recording of which trigger is input of the rear terminal To perform this function put a check mark on Sensor When the multiple notifications are occurred at the same time notification may be delayed or not all the items may be notified When the alarm recording time is shorter than the specified delay time the picture cannot be attached When the multiple alarm signals are input at the same t...

Page 106: ... the desired time period for activating the daylight saving time function and then select set Access Mode Setup This is the screen for changing the SSL settings step1 Select the item to be changed in the Access Mode Setup Use SSL for Web Access Sets the level of the encoding function SSL No SSL Does not use the encoding function Menus only Uses the encoding function for the menus only Menus Pictur...

Page 107: ...s may take effect Change Login User This screen is for changing the logged in user step1 Select Change Login User and left click The Login screen appears step2 1 To change the logged in user In the Login or change login user settings execute step 2 1 and 2 2 in Login and change the logged in user The logged in user is changed and the Main Menu screen appears step2 2 To log in without changing the ...

Page 108: ...h 3d1h 3d16h 4d15h 6d4h 9d7h 23d6h 5d18h 6d22h 8d16h 11d14h 17d10h 43d15h 7d2h 8d13h 10d16h 14d6h 21d10h 53d16h Picture grade Number of pictures sec Picture grade Number of pictures sec Picture grade Number of pictures sec Picture grade Number of pictures sec 9d5h 11d2h 13d21h 18d13h 27d21h 69d19h 11d13h 13d21h 17d9h 23d4h 34d20h 87d6h 23d2h 27d18h 34d18h 46d9h 69d16h 174d12h 46d5h 55d13h 69d12h 9...

Page 109: ...ocus adjusted correctly Is repeat recording set to Repeat Off The recording starts after the time set for recording rate is passed Was the unit stopped during that time Is the LOCK indicator light on During normal recording alarm recording and emergency recording press the REC STOP button for more than 2 seconds Is timer recording in progress To stop timer recording press the TIMER button for more...

Page 110: ... be controlled connected correctly Is the PTZ Setting menu set correctly Is trigger for alarm recording of the camera number for which the motion detection function to be executed set to External Is the alarm recording rate of the camera number for which the motion detection function is executed set to Is the value set in Motion Threshold of the Motion Det menu larger than that of Motion Mask Sett...

Page 111: ...aining capacity of disc in Copy 2 drive has become 0 Copy data size error Check the range of copy data or the disk space of copy media Copy media error Cannot copy the data Check the copy device No disk The drive has no disk or wrong type of disk Put a proper disk into the drive The remaining capacity of disc in Copy 1 drive has become 0 Put a new disk into the drive The remaining capacity of disc...

Page 112: ...ut is set for operation Continue the operation when there is no abnormality When the error occurs continuously check the HDD media and cable and then restart the unit Restart the unit Check the unit Turn off the power and change the installation condition Turn off the power and change the installation condition Turn off the power and stop using Stop HDD recording to continue copy backup Stop HDD r...

Page 113: ...d 1 0 p p s 6 p p s 5 p p s 3 p p s 2 p p s 1 p p s 7 5 p p s 3 0 p p s 1 5 p p s 0 5 p p s 0 2 5 p p s 0 1 2 5 p p s L 6 3 0 K B L 5 2 5 K B L 4 2 0 K B L 3 1 5 K B L 2 1 0 K B L 1 4 K B L 6 3 0 K B L 5 2 5 K B L 4 2 0 K B L 3 1 5 K B L 2 1 0 K B L 1 4 K B Camera number 1 Camera number 2 Camera number 3 Camera number 4 Camera number 5 Camera number 6 Camera number 7 Camera number 8 Camera number ...

Page 114: ...er 1 Sensor number 2 Sensor number 3 Sensor number 4 Sensor number 5 Sensor number 6 Sensor number 7 Sensor number 8 Sensor number 9 Sensor number 10 Sensor number 11 Sensor number 12 Sensor number 13 Sensor number 14 Sensor number 15 Sensor number 16 2 1 3 4 5 6 7 8 9 1 0 1 1 1 2 1 3 1 4 1 5 1 6 Sensor number 1 Sensor number 2 Sensor number 3 Sensor number 4 Sensor number 5 Sensor number 6 Sensor...

Page 115: ...ra number 8 Camera number 9 Camera number 10 Camera number 11 Camera number 12 Camera number 13 Camera number 14 Camera number 15 Camera number 16 F r a m e F i e l d 1 0 p p s 6 p p s 5 p p s 3 p p s 2 p p s 1 p p s 7 5 p p s 3 0 p p s 1 5 p p s 0 5 p p s 0 2 5 p p s 0 1 2 5 p p s Camera number 1 Camera number 2 Camera number 3 Camera number 4 Camera number 5 Camera number 6 Camera number 7 Camer...

Page 116: ... Sensor number 2 Sensor number 3 Sensor number 4 Sensor number 5 Sensor number 6 Sensor number 7 Sensor number 8 Sensor number 9 Sensor number 10 Sensor number 11 Sensor number 12 Sensor number 13 Sensor number 14 Sensor number 15 Sensor number 16 2 1 3 4 5 6 7 8 9 1 0 1 1 1 2 1 3 1 4 1 5 1 6 Sensor number 1 Sensor number 2 Sensor number 3 Sensor number 4 Sensor number 5 Sensor number 6 Sensor num...

Page 117: ...ra number 8 Camera number 9 Camera number 10 Camera number 11 Camera number 12 Camera number 13 Camera number 14 Camera number 15 Camera number 16 F r a m e F i e l d 1 0 p p s 6 p p s 5 p p s 3 p p s 2 p p s 1 p p s 7 5 p p s 3 0 p p s 1 5 p p s 0 5 p p s 0 2 5 p p s 0 1 2 5 p p s Camera number 1 Camera number 2 Camera number 3 Camera number 4 Camera number 5 Camera number 6 Camera number 7 Camer...

Page 118: ... Sensor number 2 Sensor number 3 Sensor number 4 Sensor number 5 Sensor number 6 Sensor number 7 Sensor number 8 Sensor number 9 Sensor number 10 Sensor number 11 Sensor number 12 Sensor number 13 Sensor number 14 Sensor number 15 Sensor number 16 2 1 3 4 5 6 7 8 9 1 0 1 1 1 2 1 3 1 4 1 5 1 6 Sensor number 1 Sensor number 2 Sensor number 3 Sensor number 4 Sensor number 5 Sensor number 6 Sensor num...

Page 119: ...ra number 8 Camera number 9 Camera number 10 Camera number 11 Camera number 12 Camera number 13 Camera number 14 Camera number 15 Camera number 16 F r a m e F i e l d 1 0 p p s 6 p p s 5 p p s 3 p p s 2 p p s 1 p p s 7 5 p p s 3 0 p p s 1 5 p p s 0 5 p p s 0 2 5 p p s 0 1 2 5 p p s Camera number 1 Camera number 2 Camera number 3 Camera number 4 Camera number 5 Camera number 6 Camera number 7 Camer...

Page 120: ... Sensor number 2 Sensor number 3 Sensor number 4 Sensor number 5 Sensor number 6 Sensor number 7 Sensor number 8 Sensor number 9 Sensor number 10 Sensor number 11 Sensor number 12 Sensor number 13 Sensor number 14 Sensor number 15 Sensor number 16 2 1 3 4 5 6 7 8 9 1 0 1 1 1 2 1 3 1 4 1 5 1 6 Sensor number 1 Sensor number 2 Sensor number 3 Sensor number 4 Sensor number 5 Sensor number 6 Sensor num...

Page 121: ... S a t u r d a y W e d n e s d a y T h u r s d a y S p e c i a l H o l i d a y E v e r y d a y 1 2 3 4 5 6 7 8 R e c o r d A R e c o r d B R e c o r d C R e c o r d D A c t i v e I n a c t i v e S k i p C o p y 2 S u n d a y M o n d a y T u e s d a y F r i d a y S a t u r d a y W e d n e s d a y T h u r s d a y S p e c i a l H o l i d a y E v e r y d a y 1 2 3 4 5 6 7 8 Setup Menu 200 000 000 5 Em...

Page 122: ...NÇAIS ESPAÑOL M i d L o w L o w M i d M i d H i g h H i g h 0 2 5 s e c 0 5 s e c 1 s e c 2 s e c M i d L o w L o w M i d M i d H i g h H i g h 0 2 5 s e c 0 5 s e c 1 s e c 2 s e c Camera number 1 Camera number 2 Camera number 3 Camera number 4 Camera number 5 Camera number 6 Camera number 7 Camera number 8 Camera number 9 Camera number 10 Camera number 11 Camera number 12 Camera number 13 Camera...

Page 123: ...etting continued 4 Password Setting 5 Multiplexer Setting 4 System continued 4 Buzzer Sound 2 Call Out Settings 3 Key 4a 4b 9a 9b 4c 4d 10a 10b 13a 13b a b c a b c d a b a a b a a b a a b a 1 s 2 s 4 s 3 s 5 s 6 s 7 s 8 s 1 0 s 9 s 1 5 s 1 6 s 1 7 s 1 8 s 1 9 s 2 0 s 1 1 s 1 2 s 1 3 s 1 4 s 2 1 s 2 2 s 2 3 s 2 4 s 2 5 s 2 6 s 2 7 s 2 8 s 2 9 s 3 0 s Level 1 Level 2 Level 3 6 4 8 1 0 1 5 2 0 3 0 4 ...

Page 124: ...s 3 s 5 s 6 s 7 s 8 s 1 0 s 9 s 1 5 s 1 6 s 1 7 s 1 8 s 1 9 s 2 0 s 1 1 s 1 2 s 1 3 s 1 4 s 2 1 s 2 2 s 2 3 s 2 4 s 2 5 s 2 6 s 2 7 s 2 8 s 2 9 s 3 0 s C a m e r a 2 C a m e r a 1 C a m e r a 3 C a m e r a 4 C a m e r a 5 C a m e r a 6 C a m e r a 7 C a m e r a 8 C a m e r a 9 C a m e r a 1 0 C a m e r a 1 1 M u l t i 4 b M u l t i 4 a M u l t i 4 c M u l t i 4 d M u l t i 9 a M u l t i 9 b M u l ...

Page 125: ... 14 CH 15 CH 16 On Off Camera number 1 Camera number 2 Camera number 3 Camera number 4 Camera number 5 Camera number 6 Camera number 7 Camera number 8 Camera number 9 Camera number 10 Camera number 11 Camera number 12 Camera number 13 Camera number 14 Camera number 15 Camera number 16 Display Mode Recorder Title On Off M o d e 1 M o d e 2 T o p L e f t M o d e 3 T o p R i g h t B o t t o m L e f t...

Page 126: ...R e m o t e B R e m o t e C O f f 2 4 0 0 b p s 1 2 0 0 b p s 4 8 0 0 b p s 9 6 0 0 b p s 1 9 2 0 0 b p s 8 b i t 7 b i t N o n e O d d E v e n 1 b i t 2 b i t C R C R L F S l a v e I D 0 2 S l a v e I D 0 1 S t a n d a l o n e S l a v e I D 0 3 S l a v e I D 0 4 S l a v e I D 0 5 S l a v e I D 0 6 S l a v e I D 0 7 S l a v e I D 0 8 S l a v e I D 0 9 S l a v e I D 1 2 S l a v e I D 1 3 S l a v e ...

Page 127: ... Add Remove DVD CD Drive 5 Memory 1 Internal HDD 2 External HDD USB HDD Main device Copy 1 device Serial bus group DVD CD USB memory Copy 2 device Internal HDD group Serial bus group DVD CD Select using for Copy1 or Copy2 Copy1 Copy2 Check sheet continued ...

Page 128: ... Setting continued 4 Change Partition Setting continued Playback Device Repeat Setting Image Originality Check Play Auto Expire on Specified Date 5 1 0 2 0 1 5 2 5 3 0 3 5 4 0 5 0 4 5 7 5 8 0 8 5 9 0 9 5 1 0 0 5 5 6 0 6 5 7 0 5 0 1 0 2 0 1 5 2 5 3 0 3 5 4 0 5 0 4 5 7 5 8 0 8 5 9 0 9 5 5 5 6 0 6 5 7 0 5 0 1 0 2 0 1 5 2 5 3 0 3 5 4 0 5 0 4 5 7 5 8 0 8 5 9 0 9 5 5 5 6 0 6 5 7 0 A c t i v e R e p e a ...

Page 129: ...nput from all the connected cameras is recorded sequentially Approx every 0 004 second during normal recording 1 second 1 second The example when setting a setup of each channel to 1 pps Examples of time displayed during playback approx 0 004 second approx 0 004 second 12 00 01 12 00 02 12 00 03 C4 2 C3 2 C2 2 C1 2 C1 3 C4 1 C3 1 C2 1 C1 1 Motion Detection Playback Search This is a function to aut...

Page 130: ...ock adjust Output Active Low Level Max Drive current 30 mA DC Non active Open Max Voltage 24 V DC Clock adjust Output is throughout of Clock adjust Input Recording start Input Active When terminals are short circuited or Low Level voltage is applied Non active Open Recording stop Input Active When terminals are short circuited or Low Level voltage is applied Non active Open Emergency Input Active ...

Page 131: ...872C415A4 PRINTED IN MALAYSIA ...

Reviews: