background image

10

OTHERS

PRECAUTIONS

F

EA
TURES

PREP

ARA

TION

TROUBLE-

SHOOTING

CONTENTS

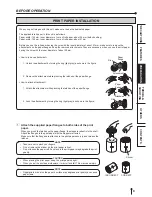
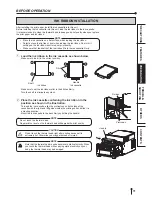
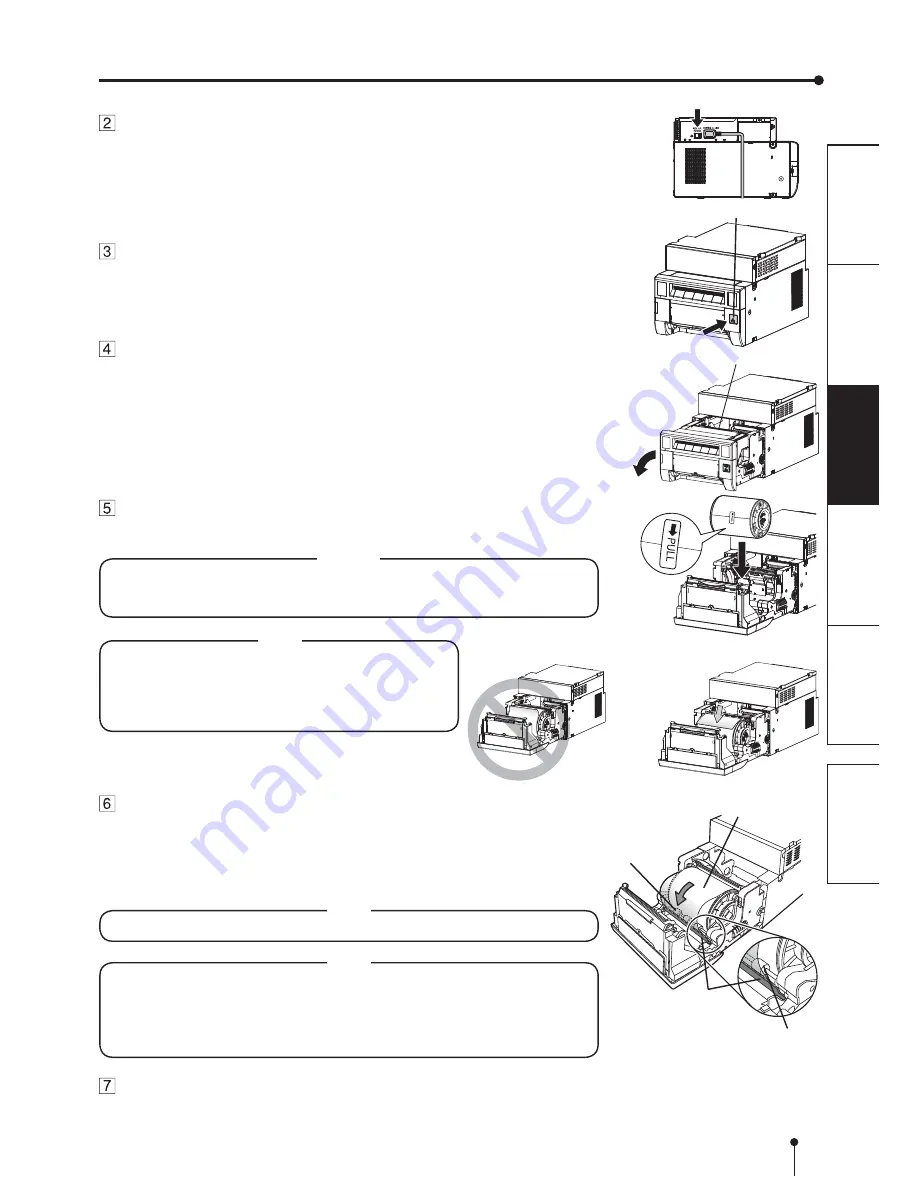
  Install the print paper into the unit.

Place the printing paper in the correct orientation.

0DNHVXUHWKHSDSHUUROOLV¿UPO\LQVWDOOHG

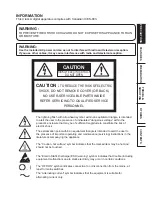
CAUTION

Do not push down on the printing unit or the door.
If you push down on the printing unit or the door when they are open, this unit may 
fall and it can cause damage or injury.

Roller

Print paper

  Remove the sticker and insert the print paper between the roller 

and guide as shown right to feed it. When the buzzer sounds, 
stop the paper feeding.

5HPRYHWKHVWLFNHUEHIRUHLQVHUWLQJWKHSULQWSDSHUEHWZHHQUROOHUDQGJXLGH0DNH

sure to insert the paper straight.
Buzzer continues to sound until the printing unit is closed.

NOTE

‡ .HHSWKHUROOHUVFOHDQ'LUWRQWKHUROOHUVPD\SURGXFHSRRUSULQWTXDOLW\

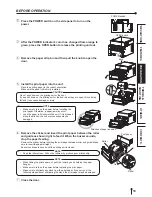
NOTE

‡ :KHQWDNLQJWKHSULQWSDSHURXWSXOOLWXSWRZDUG\RXE\KROGLQJWKHSDSHU

ÀDQJHV

‡ 0DNHVXUHWRWXUQRQWKHSRZHUEHIRUHUHSODFLQJWKHSULQWSDSHU
‡ 0DNHVXUHWRHOLPLQDWHDQ\VODFNIURPWKHSULQWSDSHU,I\RXFDUU\RXWWKH

IROORZLQJVWHSVZLWKRXWHOLPLQDWLQJWKHVODFNWKHSULQWSDSHUPD\EHGDPDJHG

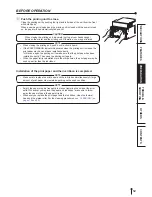
  Close the door.

Guide

  Press the POWER switch on the side panel to turn on the 

power.

  After the POWER indicator’s color has changed from orange to 

green, press the OPEN button to release the printing unit out.

  Remove the paper strip bin and then pull the knob to open the 

door.

Direction of paper insertion 

BEFORE OPERATION

 POWER switch

Knob

OPEN button

Roller

NOTE

‡ 0DNHVXUHWRWXUQRQWKHSRZHUEHIRUHLQVWDOOLQJWKH

print paper. Otherwise, a paper jam may occur.

‡ /RDGWKHSDSHUUROOVORZO\LQWRWKHXQLW,ILWLVGURSSHG

along the ditches, the unit or accessories may be 
damaged.

Summary of Contents for CP-C60DW-WE

Page 1: ...TION MANUAL IS IMPORTANT TO YOU PLEASE READ IT BEFORE USING YOUR DIGITAL COLOR PRINTER Hereby Mitsubishi Electric Corporation declares that this digital color printer is in compliance with the essential requirements and other relevant provisions of Directive 1999 5 EC ...

Page 2: ...I HOHFWULF VKRFN The exclamation point within an equilateral triangle is intended to alert the user to the presence of important operating and maintenance servicing instructions in the literature accompanying the appliance 7KH DXWLRQ KRW VXUIDFH V PERO LQGLFDWHV WKDW WKH PDUNHG LWHP PD EH KRW DQG should not be touched The Electro Static Discharge ESD warning symbol indicates that trouble including...

Page 3: ...LR DQG television reception If you use other cables it may cause interference with radio and television reception WARNING In Europe use the AC power cord according to the recommendations as below in order to comply with EN60950 1 Connect to the 230 V receptacle of the room or the host equipment The AC power cord should be VDE approved and consist of core size 0 75 mm2 or bigger length 2 m or short...

Page 4: ...r setup procedure 8 Print paper installation 9 10 QN ULEERQ LQVWDOODWLRQ 11 12 DQGOLQJ RI SDSHU LQN ULEERQ VHW 13 Connection with USB data signal equipment 14 Error messages and countermeasures 15 18 Indications on the front panel and countermeasures 15 Overcoming paper jams 16 5HSDLULQJ D WRUQ LQN ULEERQ 17 Before calling for service 18 Instructions for transportation 18 Cleaning 19 20 6SHFL FDWL...

Page 5: ...sures the unit may be damaged In the interest of safety avoid handling of liquids near the unit DO NOT REMOVE THE CABINET 7RXFKLQJ LQWHUQDO SDUWV LV GDQJHURXV EHVLGHV LW PD OHDG WR PDOIXQFWLRQ RQWDFW WKH VDOHV GHDOHU WR FDUU RXW LQWHUQDO FKHFNV and adjustments Before opening the cover for eliminating a jammed paper etc be sure to disconnect the power cord plug UNPLUG THE POWER CORD DURING A LONG A...

Page 6: ...n become a prime cause of damage PLACES THE UNIT ON A HORIZONTAL LEVEL 7KH XQLW LV OLNHO WR EH DIIHFWHG LI LW LV SODFHG LQ VODQWHG FRQGLWLRQV RU LQ DQ XQVWDEOH SODFHV PROTECT AGAINST DEW FORMATION Q H WUHPHO FROG UHJLRQV LI WKH XQLW LV PRYHG TXLFNO IURP DQ H WUHPHO FROG SODFH WR ZDUPHU RQH GHZ LV OLNHO WR EH IRUPHG I dew is formed printing is not possible OPERATING AMBIENT TEMPERATURE RANGE The op...

Page 7: ...J LV FRPSOHWHG UHPRYH WKH SULQWV I WKH SULQWV DUH QRW UHPRYHG D SDSHU MDP PD RFFXU Empty the paper strip bin frequently to prevent jamming the strips at the print outlet Do not use the printer in a place where a strong wind blows Otherwise the print paper may not be fed properly resulting in the paper jam NOTE YOUR UNDERSTANDING IS REQUESTED FOR THE LOSS OF IMAGES IN MEMORY DUE TO THE SUDDEN OCCUR...

Page 8: ...ion Carefully pull the printer up and out of the box 3XOO WKH SULQWHU VWUDLJKW XS DV VKRZQ LQ WKH JXUH NOTE 3ULQWHU ZHLJKV DERXW NJ DQGOH LW ZLWK FDUH Unwrap the packing Remove the protective materials for transportation such as protective sheet Remove the paper strip bin before carrying the printer Hold the printer by the front and rear handle as illustrated in the drawing CAUTION R QRW FDUU WKH ...

Page 9: ... DQ HUURU FRQFHUQLQJ WKH LQN ULEERQ RU SULQW SDSHU RFFXUV WKLV LQGLFDWRU LOOXPLQDWHV RU EOLQNV See page 15 1 5 3 4 2 6 7 8 POWER INDICATOR When the power is turned on the indicator illuminates W QRUPDOO LOOXPLQDWHV JUHHQ KRZHYHU EOLQNV RU illuminates orange depending on the printer status See page 15 PRINT OUTLET The printed paper comes out here OPEN BUTTON Press to release the printing unit out P...

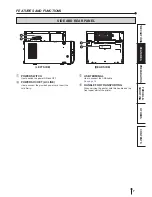
Page 10: ...FF POWER SOCKET AC LINE Use to connect the provided power cord Insert the FRUG UPO SIDE AND REAR PANEL FEATURES AND FUNCTIONS USB TERMINAL Use to connect the USB cable See page 14 HANDLE FOR TRANSPORTING When carrying the printer hold this handle and the front upper part of the printer 3 4 LEFT SIDE REAR SIDE 2 1 ...

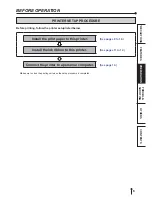
Page 11: ...EDURE Before printing follow the printer setup listed below Install the print paper to this printer See pages 9 to 10 Install the ink ribbon to this printer See pages 11 to 12 Connect the printer to a personal computer See page 14 0DNH VXUH WR FORVH WKH SULQWLQJ XQLW ZKHQ WKH VHWXS SURFHGXUH LV FRPSOHWHG ...

Page 12: ... DWWDFKPHQW ZKLOH SLQFKLQJ WKH ODWFKHV RI WKH SDSHU ÀDQJH How to attach attachment WWDFK WKH DWWDFKPHQW ZKLOH SLQFKLQJ WKH ODWFKHV RI WKH SDSHU ÀDQJH RFN WKH DWWDFKPHQW E WXUQLQJ WKH ULQJ OLJKW JUD DV VKRZQ LQ WKH JXUH WWDFK WKH VXSSOLHG SDSHU ÀDQJHV WR ERWK VLGHV RI WKH SULQW paper KHQ RX SLQFK WKH ODWFKHV RQ WKH SDSHU ÀDQJH WKH VWRSSHUV UHWUDFW LQWR WKH VKDIW WWDFK WKH ÀDQJHV WR WKH SULQW SDSHU ...

Page 13: ...S WKH UROOHUV FOHDQ LUW RQ WKH UROOHUV PD SURGXFH SRRU SULQW TXDOLW NOTE KHQ WDNLQJ WKH SULQW SDSHU RXW SXOO LW XS WRZDUG RX E KROGLQJ WKH SDSHU ÀDQJHV 0DNH VXUH WR WXUQ RQ WKH SRZHU EHIRUH UHSODFLQJ WKH SULQW SDSHU 0DNH VXUH WR HOLPLQDWH DQ VODFN IURP WKH SULQW SDSHU I RX FDUU RXW WKH IROORZLQJ VWHSV ZLWKRXW HOLPLQDWLQJ WKH VODFN WKH SULQW SDSHU PD EH GDPDJHG Close the door Guide Press the POWER ...

Page 14: ...Q WKH FRUUHFW SRVLWLRQ 3 4 1 2 3 4 1 2 QN ULEERQ Shaft QN FDVVHWWH Handle Ditch 0DNH VXUH WR VHW WKH LQN ULEERQ UROOHU WR WKH GLWFKHV UPO 7XUQ WKH VKDIW WR HOLPLQDWH DQ VODFN Place the ink cassette containing the ink ribbon in the position as shown in the illustration 7R LQVHUW WKH LQN FDVVHWWH DOLJQ WKH SURWUXVLRQV RQ ERWK VLGHV RI WKH cassette with the right and left guides inside the printing u...

Page 15: ...er may have not been installed correctly Q WKLV FDVH RSHQ WKH SULQWLQJ XQLW WR PDNH VXUH WKDW WKH SULQW SDSHU KDV EHHQ installed correctly Then close the printing unit again KHQ WKH SDSHU UROO LV UHLQVWDOOHG PRUH WKDQ WKUHH WLPHV WKH SULQW SDSHU PD EH XVHG XS HDUOLHU WKDQ WKH LQN ULEERQ Installation of the print paper and the ink ribbon is completed NOTE 0DNH VXUH WR UHSODFH WKH SULQW SDSHU DQG WK...

Page 16: ...umber of prints may not be made In addition if you replace the print paper before it is used up the indicated number of prints may not be made AFTER PRINTING I WKH SDSHU DEVRUEV QRQYRODWLOH RUJDQLF VROYHQWV DOFRKRO HVWHU NHWRQH HWF WKH SULQW PD EH GLVFRORUHG LVFRORUDWLRQ RI SULQWV LV DFFHOHUDWHG LI WKH SULQW SDSHU FRPHV LQWR FRQWDFW ZLWK VRIW YLQ O FKORULGH VXFK DV WUDQVSDUHQW tape YRLG VWRULQJ SU...

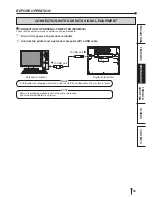
Page 17: ...CTION WITH USB DATA SIGNAL EQUIPMENT To USB port Personal computer Digital color printer To USB port NOTE 86 FDEOH LV QRW VXSSOLHG ZLWK WKLV XQLW 8VH WKH 86 FHUWL HG FDEOH RI P RU OHVV LQ OHQJWK CONNECTING TO PERSONAL COMPUTER EXAMPLE KHFN WKDW WKH SULQWHU LV WXUQHG RQ EHIRUH FRQQHFWLQJ SURFHGXUH Turn on the power of a personal computer Connect the printer and a personal computer with a USB cable ...

Page 18: ...MDPV 16 Green The temperature of the thermal head is too high or too low DLW XQWLO WKH LQGLFDWLRQ JRHV RII KHQ WKH LQGLFDWRU VWRSV EOLQNLQJ WKH SULQWHU UHVXPHV printing automatically KLOH WKH SULQWHU LV ZRUNLQJ GR QRW RSHQ WKH GRRU or turn off the power 6 Green 7KH LQN ULEERQ ZKLFK LV QRW DYDLODEOH WR WKLV printer is installed 5HSODFH WKH LQN ULEERQ ZLWK D QHZ RQH 7KH DFWXDO FRPELQDWLRQ RI LQN ULE...

Page 19: ...ctive part of the print paper with scissors NOTE 0DNH VXUH WR FXW RII WKH SULQWHG SDUW RI WKH SULQW SDSHU DLOXUH WR GR WKLV PD UHVXOW LQ WKH LQN ULEERQ VWLFNLQJ WR WKH SULQW SDSHU DQG EHLQJ WRUQ 0DNH VXUH WR FOHDQ WKH WKHUPDO KHDG DQG WKH SODWHQ UROOHU Refer to CLEANING on pages 19 and 20 Remove the print paper NOTE 5HPRYH WKH VODFN IURP WKH SULQW SDSHU FRPSOHWHO I WKH GRRU LV FORVHG ZLWK WKH SULQ...

Page 20: ...QN ULEERQ RQ D ÀDW FOHDQ VXUIDFH Place a piece of transparent adhesive cellophane tape on the center of the ink ribbon ERROR MESSAGES AND COUNTERMEASURES Wind the shaft of the ink ribbon in the direction of the arrow so that the cellophane tape is not seen Install the ink cassette in the printer Cellophane tape Direction to turn the shaft ...

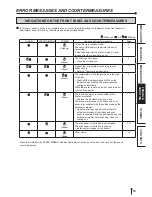
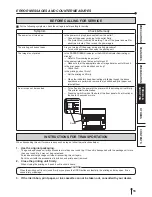
Page 21: ...H Symptom KHFN 5HPHG The power is not turned on Is the power cord plug disconnected from the outlet ĺ RQQHFW WKH SRZHU FRUG SOXJ WR WKH RXWOHW UPO ĺ 7KH SURWHFWLYH FLUFXLW PD EH ZRUNLQJ 7XUQ RII WKH SRZHU DQG ZDLW IRU about two minutes Then turn on the power again The printing unit doesn t open Are you turning off the power during printing procedure ĺ 7XUQ RQ WKH SRZHU DQG WKHQ RSHQ WKH SULQWLQJ X...

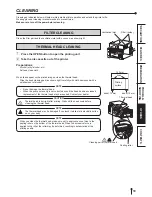
Page 22: ...ired Contact your dealer CAUTION Thermal head is hot right after printing Wait until the head cools before cleaning the thermal head NOTE The thermal head may be damaged if you touch it while static electricity builds up on your body NOTE KHQ RX FOHDQ WKH WKHUPDO KHDG PDNH VXUH QRW WR DSSO H FHVVLYH IRUFH WR WKH peeling roller on the bottom of the thermal head When the excessive force is applied t...

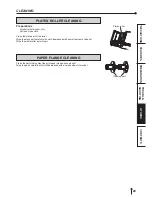
Page 23: ...lean cloth OHDQ WKH EODFN SDUW RI WKH UROOHU LSH WKH EODFN SDUW FDUHIXOO ZLWK FORWK GDPSHQHG ZLWK D VPDOO DPRXQW RI DOFRKRO Wipe the whole roller by turning it Cleaning part PAPER FLANGE CLEANING Clean the parts that contact the print paper sides as shown right Wipe the parts carefully with cloth dampened with a small amount of alcohol Platen roller ...

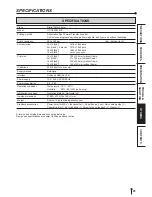
Page 24: ...52 mm without frame 51 x 152 mm without frame 152 x 203 mm without frame 152 x152 mm without frame Gradations 256 8 bits for each color Supply method Automatic Interface Hi Speed USB Ver 2 0 Power supply 100 240 V AC 50 60 Hz Power consumption 5 5 2 4 A Operating conditions Temperature 10 C 35 C Humidity 30 80 RH no dewing Installation conditions Operating attitude Horizontal 5 Outside dimensions ...

Page 25: ...rman Branch Gothaer Strasse 8 40880 Ratingen Postfach 1548 40835 Ratingen Germany Phone 49 2102 486 9250 FAX 49 2102 486 7320 Manufactured by Mitsubishi Electric Malaysia Sdn Bhd 3 2 DZDVDQ 3HULQGXVWULDQ 6HQDL 6HQDL RKRU DUXO 7DN LP 0DOD VLD Please contact the nearest Mitsubishi sales branch to get DOC Declaration of Conformity of the EC Directive 1999 5 EC WE919C182A9 ...

Reviews: