


1. Basic Setup and Operation
7
For assistance call 1(800) 332-2119
1.
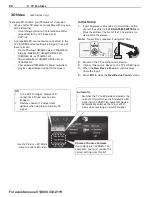
Install batteries in the remote control. See page 5 .
2.
Aim the emitter (bulb) end
of the remote control at the
TV and press the
POWER
key
. Wait for the
Welcome
screen.
3.
If you wish to change the
menu language to
Español
,
press then
ENTER
.
4.
Press to move to the
energy-mode selections.
Select
Home
.
5.
Press to highlight
EXIT
.
Press
ENTER
to clear the menu.
First-Time Power-On
Settin g Up and Using TV Inputs
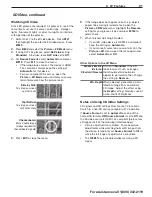
Welcome Screen Energy Options
•
Mitsubishi recommends the
Home
setting,
which produces a picture suitable for home
viewing and uses less power.
• The
Retail
setting looks best under the bright
lighting often found in commercial settings. In
this mode, the TV uses more power than when
in the
Home
setting.
This table compares energy choices offered in the
Welcome
screen.
Home
Retail
Picture Mode
Bright
Brilliant
Lamp Energy
Standard
Bright
• Use
the
Picture > Video
menu to change the
Picture Mode.
• Use
the
Setup > Energy
menu to change
Lamp Energy
.
Setting the lamp mode to Standard may extend the
life of the lamp.
The ANT ( Antenna) Input
If using an antenna or direct cable service (no cable
box), connect the incoming coaxial cable to the TV’s
ANT
input. Refer to page 16 .
You must perform a channel scan to enable recep-
tion of digital channels.
If you skip this step, the TV
can receive only analog channels
. The channel scan
will search for high-definition and standard-definition
channels available in your area.
Note:
Direct cable
service will not include scrambled or premium chan-
nels.
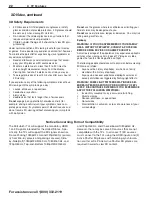
M emorizing Channels with Channel Scan
1.
Power on the TV.
2.
Press
MENU
and open the
Setup > Channel
menu.
Start channel memorization from the Setup > Channel
menu.
3.
Press to enter the menu.
4.
Highlight
Ant Air
if connected to an
over-the-air antenna. Highlight
Ant
Cable
for service over direct cable
(no cable box). Press
ENTER
to add a
check.
5.
Select the scan type.
•
For first-time setup, highlight
All channels
.
•
To scan for channels not already in memory,
highlight
Add only new channels
. Press
ENTER
to add a check.
6.
Highlight
Scan
and press
ENTER
.
Channel memorization may take up
to 15 minutes to complete.
To stop channel memorization before completion,
press CANCEL
.
The channels already memorized
before cancellation remain in the memory.
At any time after Channel Scan,
• Use
the
Setup > Channel
>
Edit
menu to add or
delete individual channels from memory.
• Repeat
the
All channels
scan if you reposition the
antenna or move the TV to a new geographic area
with a different channel line-up.
Summary of Contents for 3D DLP C12 Series
Page 39: ......


