6/40
ENGLISH
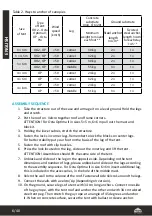
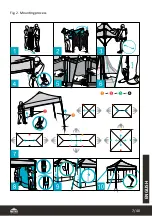
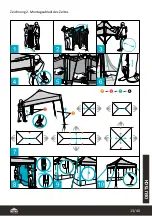
ASSEMBLY SEQUENCE
1. Take the structure out of the case and arrnage it on a level ground. Hold the legs
and stretch.
2. Put the roof on. Velcro together roof and frame corners.
ATTENTION! For Octa Optima II in sizes 5×5 m, 6×6 m pull out the mast and
block it.
3. Holding the lower sabres, stretch the structure.
4. Fasten the locks in corner legs. Remember to lock the blocks on center legs.
For better stability put your foot on the basis of the leg of the tent.
5. Fasten the roof with clip buckles.
6. Press the lock located on the leg, slide out the inner leg and lift the tent.
ATTENTION! Assemblers should lift the same side of the tent.
7. Unblock and slide out the leg on the opposite side. Depending on the tent
dimensions and number of legs, please unblock and slide out the legs according
to the assembly sequence. For Octa Optima II in size 6×6 m insert additional leg,
this is included in the accessories, in the hole of the middle mast.
8. Velcro the wall to the valance of the roof. Fasten wall side Velcro’s around the legs.
9. Connect the walls with a velcro/zip (depending on version).
10. On the ground, secure legs of a tent with 34 cm long anchors. Connect one side
of the guy rope, with the tent roof and anchor the other end with 34 cm twisted
steel tent peg. Then stretch the guy rope at an angle of 45 degrees and anchor
it. When on concrete surface, secure the tent with ballast or sleeve anchor.
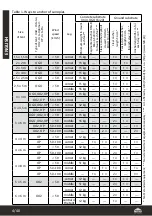
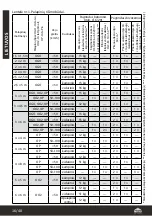
Size
of tent
Type
of tent:
OO2 – Octa
Optima II;
OP – Octa
Pro
Wind
speed
[km/h]
Leg
Concrete
substrate
(min. C16/20)
Ground substrate
Minimum
weight to mount
each foot **
Steel anchor,
length
34 cm *
Twisted
steel anchor,
length 34 cm
for each stay
45° *
3 × 3 m
OO2, OP
< 50
corner
30 kg
2 ×
1 ×
3 × 4,5 m
OO2, OP
< 50
corner
32 kg
2 ×
1 ×
3 × 6 m
OO2, OP
< 50
corner
30 kg
2 ×
1 ×
OO2, OP
< 50
middle
55 kg
3 ×
1 ×
4 × 4 m
OP
< 50
corner
24 kg
2 ×
1 ×
4 × 6 m
OP
< 50
corner
32 kg
2 ×
1 ×
4 × 8 m
OP
< 50
corner
24 kg
2 ×
1 ×
OP
< 50
middle
51 kg
3 ×
1 ×
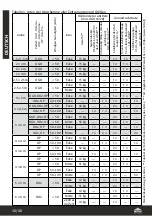
Table 2. Ways to anchor of canopies
Summary of Contents for OCTA GO
Page 7: ...7 40 ENGLISH Fig 2 Mounting process ...
Page 13: ...13 40 DEUTSCH Zeichnung 2 Montageablauf des Zeltes ...
Page 19: ...LIETUVOS 19 40 2 pav Palapinės montavimo eiga ...
Page 25: ...25 40 SLOVENSKY Obrázok 2 Priebeh montáže nožnicového stanu ...
Page 31: ...31 40 ČESKÝ Obrázek 2 Průběh montáže nůžkového stanu ...
Page 37: ...37 40 POLSKI Rys 2 Przebieg montażu namiotu ekspresowego ...
Page 39: ...39 40 POLSKI ...


