background image

8/28

DEUT

SCH

EMPFEHLUNGEN

1.  Bitte benutzen Sie zum Aufbau Arbeitshandschuhe. Achten Sie besonders beim 

Verinden der Profile darauf, dass Sie sich nicht verletzen. 

2.  Montage und Demontage des Zeltes erfordert  mindestens 2 Personen. Es wird 

empfohlen, dass 3 Personen beim Aufbau des zentralen Masts helfen. 

3.  Um die Konstruktionselemente leichter zusammen setzen zu können, sind diese 

markiert. Verbinden Sie die Elemente entsprechend den Aufklebern.

4.  Achten Sie darauf, dass das Gestell vor dem Abbauen sauber ist. Unsere Firma trägt 

keine Haftung für eventuelle Beschädigungen, die beim Ab- und Aufbauen eines 

verschmutzten Gestells entstehen.

5.  Vor dem Verpacken ist der Zeltstoff zu reinigen und zu trocknen.

SICHERHEIT

1.  Das Zelt Dome ist für die Verwendung bei starkem Wind, Schneestürmen, Hagel, 

Stürme, etc. nicht geeignet.

2.  Das Zelt darf nicht unbeaufsichtigt gelassen werden.

3.  Bei der Verwendung in den Wintermonaten mit Schneefall, ist die Schneelast auf 

dem Zeltdach zu kontrollieren. Der Schnee ist vom Zeltdach zu entfernen. Eine 

Schneehöhe von 2 cm ist zulässig. 

4.  Wasseransammlungen sind zu vermeiden und müssen entfernt werden.

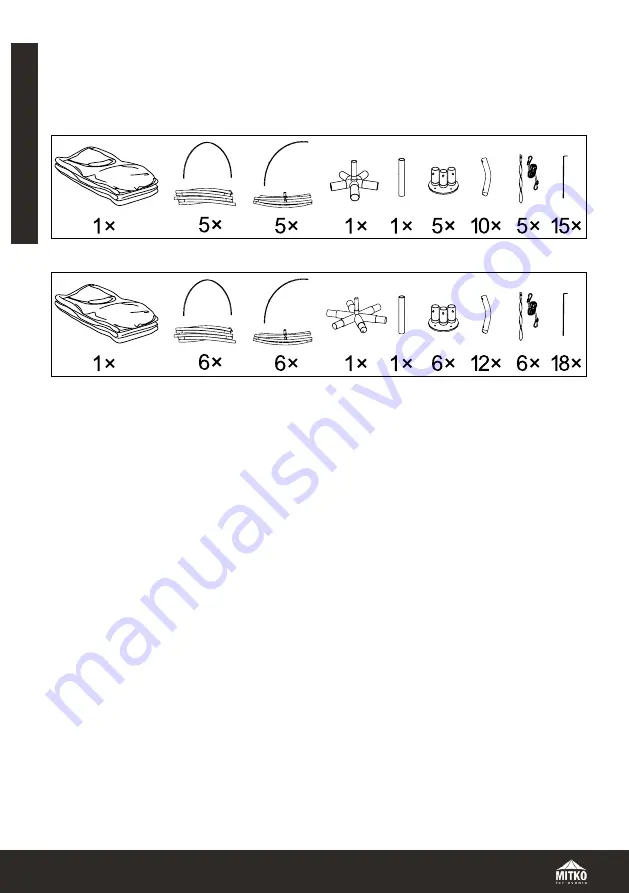
Zeichnung 1. Inhalt Dome M5

DOME – GEBRAUCHSANWEISUNG

Zeichnung 2. Inhalt Dome M6

Summary of Contents for DOME M5

Page 1: ...EN l DE l LT l CZ l PL DOME MANUAL l GEBRAUCHSANWEISUNG l INSTRUKCIJA l NÁVOD l INSTRUKCJA ...

Page 2: ... _ _ _ _ _ _ _ _ _ _ _ _ _ _ _ _ _ _ _ _ _ _ _ 8 DOME INSTRUKCIJA _ _ _ _ _ _ _ _ _ _ _ _ _ _ _ _ _ _ _ _ _ _ _ _ _ _ _ _ _ _ _ _ _ 13 DOME NÁVOD _ _ _ _ _ _ _ _ _ _ _ _ _ _ _ _ _ _ _ _ _ _ _ _ _ _ _ _ _ _ _ _ _ _ _ _ _ 18 DOME INSTRUKCJA _ _ _ _ _ _ _ _ _ _ _ _ _ _ _ _ _ _ _ _ _ _ _ _ _ _ _ _ _ _ _ _ _ _ 23 EN DE LT CZ PL ...

Page 3: ...ng as a result of folding a dirty frame 5 The fabric roof and sidewalls should be cleaned and dried before packing it into transport bags Our company does not bear any responsibility for possible stains arisen as a result of storing wet or dirty fabric 6 For care instruction see conservation manual 7 To remove the pins and anchors we recommend that you use an instrument that is not included in the...

Page 4: ... for the tent were carried out in accordance with PN EN 13782 2005 norm concerning Temporary objects tents safety The tent may be used in a zone with wind up to 28 m s 100 km h provided it is protected against wind gusts as described in table no 1 During strong wind the product should be folded immediately Mechanical damage resulting from failure to follow the above recommendations are not covered...

Page 5: ...5 28 ENGLISH Figure 3 Installation sequence of Dome M5 tent ...

Page 6: ...6 28 ENGLISH Figure 4 Installation sequence of Dome M6 tent ...

Page 7: ...gle and nail the anchor in the ground 18 On the concrete floor secure the tent with sand weights that are each 27 5 kg heavy place 2 weights on each foot of the tent pull it together with straps and fasten the clamps DISASSEMBLY SEQUENCE 1 First unzip the walls and next remove the bungee cords and the pins 2 Remove the pins fixed beside the tent legs take off the weights or unscrew the anchors 3 R...

Page 8: ...er ist Unsere Firma trägt keine Haftung für eventuelle Beschädigungen die beim Ab und Aufbauen eines verschmutzten Gestells entstehen 5 Vor dem Verpacken ist der Zeltstoff zu reinigen und zu trocknen SICHERHEIT 1 Das Zelt Dome ist für die Verwendung bei starkem Wind Schneestürmen Hagel Stürme etc nicht geeignet 2 Das Zelt darf nicht unbeaufsichtigt gelassen werden 3 Bei der Verwendung in den Winte...

Page 9: ... einer Windstärke von 28 m sek 100km h genutzt werden unter der Voraussetzung dass es gegen Windstöße geschützt ist wie in Tabelle 1 beschrieben Bei einer Windstärke über 50 km h 6 Grad Beaufort Skala empfiehlt es sich das Produkt zu demontieren zuerst sind die Wände zu demontieren dann das Dach Mechanische Schäden die aus falscher Handhabung entstanden sind fallen nicht unter die Garantie AUFBAU ...

Page 10: ...10 28 DEUTSCH Zeichnung 3 Aufbau des Dome M5 Zeltes ...

Page 11: ...11 28 DEUTSCH Zeichnung 4 Aufbau des Dome M6 Zeltes ...

Page 12: ...neleingängen 13 Blocken Sie die Verbreiterung an den angenähten Tunneln 14 Mit den Reißverschlüssen befestigen Sie nun die Wände 15 Auf erdigem Untergrund sind die Zeltfüße mit Stahlankern von 33 cm Länge zu befestigen 16 Ziehen Sie die Zugschnur durch den Knoten und dann nach Außen durch die Öffnung in der Bespannung 17 Binden Sie die Schnur an den Drehzeltanker mit der Länge 34 cm Danach spannen...

Page 13: ...ą žalą atsiradusią dėl užterštų konstrukcijos elementų rinkimo arba demontavimo 5 Stogą ir sienas reikia kruopščiai išdžiovinti ir išvalyti prieš įpakuojant juos į transportinį maišą Mūsų įmonė neatsako už medžiagos išblukimą kuris gali atsirasti dėl produkto laikymo drėgnoje ir nešvarioje būsenoje SAUGUMAS 1 Palapinė Dome nėra skirta eksploatuoti esant stipriam vėjui pūgai krušai audrai ir t t 2 ...

Page 14: ...standinačius įėjimus arkų forma Sujunkite arkų forma kilnojamus konstrukcijos elementus 4 Uždėkite kilnojamos konstrukcijos profilį ant penkiapusės jungties 5 Pakelkite rėmą rekomenduojame naudoti kopėčias Fiksaciniai mygtukai patys užsifiksuos 6 Kad gautųsi penkiakampis ir ant centrinio atramos kaiščio uždėkite kilnojamos konstrukcijos profilį 7 Karkaso vamzdelius profilius laikančius įėjimus užd...

Page 15: ...15 28 LIETUVOS Pav 3 Montavimo eiga Dome M5 ...

Page 16: ...16 28 LIETUVOS Pav 4 Montavimo eiga Dome M6 ...

Page 17: ...oriais iš kurių kiekvienas sveria po 27 5 kg padėkite po 2 svorius ant kiekvienos palapinės atramos sutraukite juostas ir užsekite sagtis DEMONTAVIMAS 1 Pirmiausia atsekite sienas tada nuimkite atotampas ir išsukite kuolelius 2 Ištraukite kuolelius prie palapinės atramų nuimkite svarelius arba išsukite inkarus 3 Nuimkite statramsčius sutvirtinančius konstrukciją 4 Atsekite užtrauktukus tuneliuose ...

Page 18: ...e zodpovědnost za jakékoliv poškození způsobené v důsledku stavby stanu se znečištěným rámem 5 Opláštění stanu střecha a bočnice by mělo být očištěno a vysušeno před každým sbalením do přepravního obalu Naše společnost nenese žádnou odpovědnost za vznik případných skvrn vzniklých v důsledku skladování vlhkého a znečištěného opláštění stanu BEZPEČNOST 1 Stany Dome nejsou konstruovány k provozu běhe...

Page 19: ... Km h za podmínky jeho zabezpečení kotvení dle tabulky 1 níže Během silného větru by měl být výrobek neprodleně složen a zabezpečen proti poškození Mechanické poškození vzniklé nedodržením výše uvedeného doporučení není kryto poskytovanou zárukou NÁVOD MONTÁŽE STANU 1 Vytáhněte všechny díly z obalu a položte je na rovný podklad 2 Profily ke spojení jsou k sobě uchyceny lany 3 Spojte do oblouků pro...

Page 20: ...20 28 ČESKÝ Obrázek 3 Montáž stanu DOME 5 ...

Page 21: ...21 28 ČESKÝ Obrázek 4 Montáž stanu DOME 6 ...

Page 22: ...45 zatlučte do země 18 Při stavbě na betonovém podkladu použijte 27 5 kg pískové závaží umístěte 2 ks na každou nohu a spojte je karabinami NÁVOD DEMONTÁŽE STANU 1 Odepněte bočnice a následně odstraňte kolíky na lanech 2 Odstraňte stanové kolíky zátěžové vaky 3 Odstraňte rozpěrné profily 4 Rozepněte zipy opláštění kolem vstupních profilů 5 Odstraňte profil napínající střechu stanu 6 Stáhněte opláš...

Page 23: ...zczonej konstrukcji 5 Dach i ściany należy dokładnie wysuszyć i wyczyścić przed spakowaniem do toreb transportowych Producent nie ponosi odpowiedzialności za ewentualne odbarwienia powstałe na skutek przechowywania wilgotnego oraz zabrudzonego produktu 6 Zapoznaj się z przepisami konserwacji materiałów 7 Do wyjmowania kotew zaleca się używania przyrządu nie będącego standardowym wyposażeniem BEZPI...

Page 24: ...ent oświadcza że oznaczone wyroby są wykonane z tkaniny nie rozprzestrzeniającej ognia a ich właściwości są zgodne z wymogami norm PN EN ISO 6940 i 6941 oraz DIN 4102 B1 7 Producent deklaruje że obliczenia statyczne namiotu przeprowadzono wg normy PN EN 13782 2005 Obiekty tymczasowe Namioty Bezpieczeństwo Namiot może być użytkowany w strefie obciążenia wiatrem do 28 m s 100 km h pod warunkiem zabe...

Page 25: ...25 28 POLSKI Rys 3 Przebieg montażu Dome M5 ...

Page 26: ...26 28 POLSKI Rys 4 Przebieg montażu Dome M6 ...

Page 27: ...odciągową przez pętlę a potem przeciągnij na zewnątrz przez otwór w poszyciu 17 Zapnij linkę do kotwy skrętnej o dł 34 cm Następnie naciągnij linkę pod kątem 45 i wbij kotwę w podłoże 18 Na podłożu betonowym zabezpiecz namiot obciążnikami piaskowymi o wadze 27 5 kg każdy umieść po 2 obciążniki na każdej stopie namiotu ściągnij taśmami i zapnij klamry INSTRUKCJA DEMONTAŻU 1 Najpierw odepnij ściany ...

Page 28: ...EN l DE l LT l CZ l PL MANUAL l GEBRAUCHSANWEISUNG l INSTRUKCIJA l NÁVOD l INSTRUKCJA DOM20190514 DOME ...

Reviews: