background image

Mitel K680i Detachable Magnetic Keyboard Installation Guide

8

OPTION B - REINFORCED CONNECTION

Follow the procedures below if you plan on using the keyboard frequently and/or prefer a more 
reinforced/secure connection between the phone and the K680i Detachable Magnetic 
Keyboard.

1.

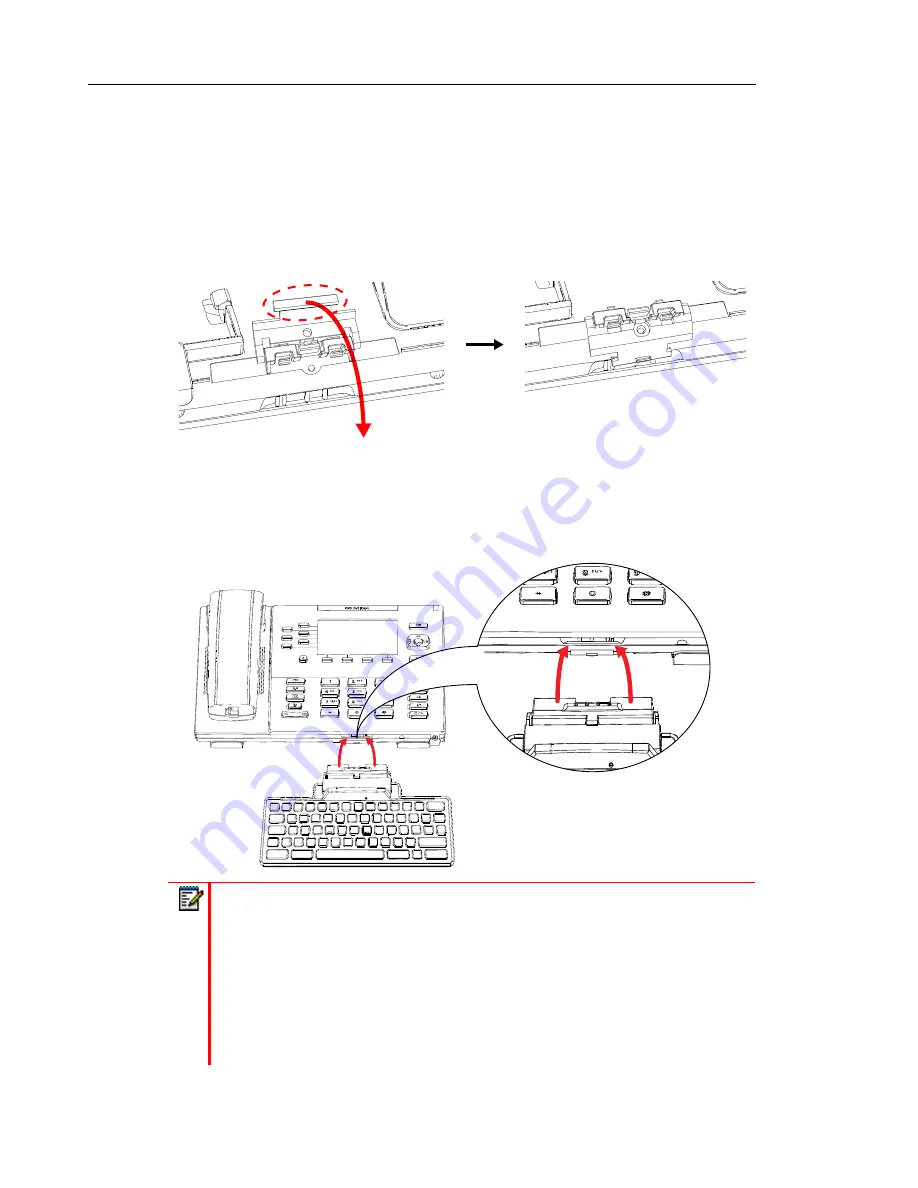
Swing the locking bar of the magnetic connector towards the front of the phone until it clicks 
in place.

2.

Position your phone back on your desk and, with the bottom of the phone slightly raised, 
slide the K680i Detachable Magnetic Keyboard connection pins in between the base of the 
phone and the locking bar.

Notes: 

1.

When the keyboard is connected the phone automatically detects the keyboard 

and the connection status LED on the keyboard will light up green indicating it 
is ready to be used. 

2.

The phone must be on for it to recognize the keyboard.

3.

If the LED does not light up or if the keyboard is not functioning correctly, detach 

the keyboard, reattach ensuring the keyboard’s connection pins are touching 
the contact area on the phone, and wait 30 seconds. If after 30 seconds, the 
LED does not light up, detachthe keyboard and try again.

Summary of Contents for K680i

Page 1: ...Mitel K680i Detachable Magnetic Keyboard 41 001519 00 REV01 INSTALLATION GUIDE ...

Page 2: ...document or new editions of it may be issued to incorporate such changes No part of this document can be reproduced or transmitted in any form or by any means electronic or mechanical for any purpose without written permission from Mitel Networks Corporation Trademarks Mitel is a trademark of Mitel Networks Corporation Other product names mentioned in this document may be trademarks of their respe...

Page 3: ...late or reduce to electronic medium or machine readable form or language derive source code without the express written consent of the Seller and its Suppliers or disseminate or otherwise disclose the Software to third parties All Software furnished hereunder whether or not part of firmware including all copies thereof are and shall remain the property of Seller and its Suppliers and are subject t...

Page 4: ...mary 2 K680i Parts 3 Hardware Features 3 Installation 4 Initial Procedures 4 Option A Magnet Only Connection 6 Option B Reinforced Connection 8 Limited Warranty 10 Exclusions 10 Warranty Repair Services 10 After Warranty Service 10 Limited Warranty Australia Only 11 Repair Notice 11 Exclusions 11 Warranty Repair Services 12 After Warranty Service 12 ...

Page 5: ...ations and more K680I FEATURES Magnetically connects to phone i e no cables required Powered by the 6867i 6869i i IP phone i e no batteries required QWERTY QWERTZ and AZERTY versions available ABOUT THIS GUIDE This manual describes how to physically install your K680i Detachable Magnetic Keyboard to your 6867i or 6869i IP phone Contact your system administrator if you have any additional questions...

Page 6: ...TENTION IF THE MAGNETS OR ANY OTHER PARTS OF THIS PRODUCT ARE SWALLOWED OR INHALED WARNING THE STRONG MAGNETIC FIELDS OF THE MAGNETS CONTAINED IN THIS PRODUCT CAN DAMAGE MAGNETIC MEDIA SUCH AS FLOPPY DISKS CREDIT CARDS MAGNETIC I D CARDS CASSETTE TAPES VIDEOTAPES AND SIMILAR ITEMS THEY CAN ALSO DAMAGE TELEVISIONS VCRS COMPUTER AND CRT MONITORS AND OTHER ELECTRONICS DO NOT PLACE THE PRODUCT NEAR AN...

Page 7: ...supplier of your phone HARDWARE FEATURES 2 6 x 6mm Screw K680i Magnetic Keyboard Phone to Keyboard Magnetic Connector Regulatory Safety Insert _ _ Backspace Tab Caps Lock Shift Shift Enter _ _ Backspace Tab Caps Lock Shift Shift Enter Navigation Keys Connection Pins Neodymium Magnets Locking Bar Screw Lock Holes QWERTY configuration QWERTZ and AZERTY available Connection Status LED ...

Page 8: ...ng bar on the phone to keyboard magnetic connector and included screw to attach the keyboard to the phone in a more secure manner Follow the procedures below to set up and attach your K680i Detachable Magnetic Keyboard for use with your phone INITIAL PROCEDURES To start using your K680i Detachable Magnetic Keyboard you must first install the phone to keyboard magnetic connector 1 On the bottom of ...

Page 9: ...ng the connection magnet insertion area 3 Insert the phone to keyboard magnetic connector into the area left vacant by the removal of the rubber cap Note The magnetic connector should be installed with the visible surfaces of neodymium magnets facing towards the bottom of the phone ...

Page 10: ... Magnetic Keyboard towards the magnetic connector until the keyboard snaps into place Notes 1 When the keyboard is connected the phone automatically detects the keyboard and the connection status LED on the keyboard will light up green indicating it is ready to be used 2 The phone must be on for it to recognize the keyboard 3 If the LED does not light up or if the keyboard is not functioning corre...

Page 11: ...Installation 7 ...

Page 12: ...lightly raised slide the K680i Detachable Magnetic Keyboard connection pins in between the base of the phone and the locking bar Notes 1 When the keyboard is connected the phone automatically detects the keyboard and the connection status LED on the keyboard will light up green indicating it is ready to be used 2 The phone must be on for it to recognize the keyboard 3 If the LED does not light up ...

Page 13: ... status LED on the keyboard is lit green You are now ready to use your K680i Detachable Magnetic Keyboard Note The locking bar and screw is not designed to permanently secure the keyboard to the phone It is used to simply reinforce the connection so that the keyboard does not become accidently dislodged by a light impact With the locking bar and screw in place the keyboard can still be knocked loo...

Page 14: ...r any damages and or long distance charges which result from unauthorized and or unlawful use Mitel shall not be liable for any incidental or consequential damages including but not limited to loss damage or expense directly or indirectly arising from the customer s use of or inability to use this product either separately or in combination with other equipment This paragraph however shall not app...

Page 15: ...s to be provided with all products returned for warranty repairs EXCLUSIONS Mitel does not warrant its products to be compatible with the equipment of any particular telephone company This warranty does not extend to damage to products resulting from improper installation or operation alteration accident neglect abuse misuse fire or natural causes such as storms or floods after the product is in y...

Page 16: ...s or the supply of equivalent goods or ii the repair of the goods or iii the payment of the cost of replacing the goods or of acquiring equivalent goods or iv the payment of the cost of having the goods repaired 1 2 Clause 1 1 is not intended to have the effect of excluding restricting or modifying a the application of all or any of the provisions of Part 5 4 of Schedule 2 to the Competition and C...

Page 17: ... ...

Reviews: