background image

GUIDE TO INSTALLATION AND OPERATION 

FXE-1501  |  

19


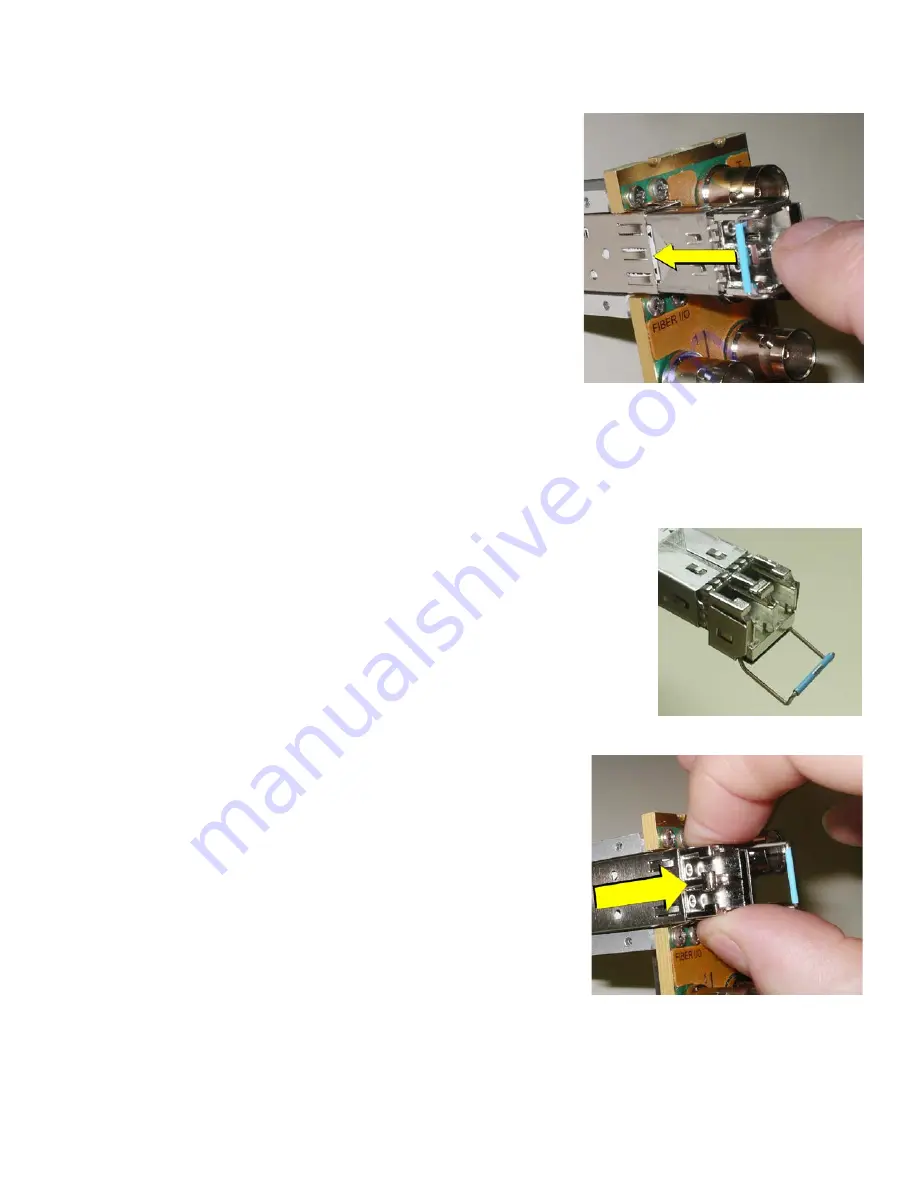
3.  Slide the module straight into the socket, and push gently until it 

clicks into position. 


Connecting the fiber optic cables 


1.  Remove the dust plug from the SFP module if present 

2.  Verify that the exposed end of the optical fiber in the LC 

connector is clean 


Carefully remove any debris if necessary. 

3.  Plug the LC-terminated fiber optic cable into the SFP module 


Removing the fiber optic cables 


1.  Grasp the LC fiber optic connector that is plugged into the SFP module, and pull it straight out to disengage 

the optical fiber from the SFP. 


Never pull the fiber optic cable itself, as catastrophic damage may occur.  

2.  Insert a dust plug into the SFP module.  


Removing the SFP module 


1.  Move the bale clasp lever to the open position. 


2.  Grasp the SFP module between your thumb and forefinger, and 

pull it straight out of the slot. 


Do NOT pull on the bale clasp lever to remove the module, as 
it is easily damaged 


You may find that you need to wiggle the module, or perhaps 
push it into the slot a bit, before it will release and slide out. 


3.  Insert a dust plug into the SFP module.  


Summary of Contents for FXE-1501

Page 1: ...hernet Transceiver Guide to Installation and Operation M909 9900 101 9 Jan 2014 Miranda Technologies 3499 Douglas B Floreani St Laurent Québec Canada H4S 2C6 Tel 514 333 1772 Fax 514 333 9828 www miranda com 2014 Miranda Technologies ...

Page 2: ...EN 55022 Class A radiated and conducted emissions EN 55024 Immunity of Information Technology Equipment EN 61000 3 2 Harmonic current injection EN 61000 3 3 Limitation of voltage changes voltage fluctuations and flicker EN 61000 4 2 Electrostatic discharge immunity EN 61000 4 5 Surge immunity EN 61000 4 11 Voltage dips short interruptions and voltage variations immunity How to contact us For techn...

Page 3: ...l panel 5 3 3 1 Overview 5 3 3 2 Menu for local control 6 3 4 Remote control using iControl 7 3 4 1 The iControl graphic interface window 7 4 Detailed Operating Procedure 9 4 1 Network Configuration 9 4 1 1 UTP Negotiation 9 4 1 2 UTP Speed 9 4 1 3 UTP Duplex 9 4 1 4 Jumbo Packet Size 10 4 1 5 Link Loss Forwarding 10 4 2 Alarms 10 4 2 1 Alarm configuration using the local menu 10 4 2 2 Alarm confi...

Page 4: ...GUIDE TO INSTALLATION AND OPERATION FXE 1501 ...

Page 5: ... for this port on the rear panel Housed in a Densité frame and easily controllable via the iControl software or the frame controller menu the FXE 1501 occupies only one slot 1 2 Features 10 100 1000BHase T Ethernet to fiber Fiber interface on SFP module for maximum flexibility Supports LLF Lost Link Forwarding Auto negotiation for 10 100 1000 Base T on the UTP port Auto crossover for MDI MDI X on ...

Page 6: ...FXE 1501 1 4 Front Card edge Interface The front card edge of the FXE 1501 incorporates two elements Status LED see section 3 2 Select Button see section 3 3 Figure 1 2 Front card edge layout Select Status FXE 1501 Status LED Select Button ...

Page 7: ...switch off the frame s power when installing or removing the card With the use of available adapters this card and its associated rear panel can be installed in a Densité 3 frame See the Densité 3 frame manual for details 2 3 Rear Connector Panel The FXE 1501 SRP single slot rear panel mounted in a Densité 2 or Densité 3 frame incorporates these connectors One socket for inserting a fiber transmit...

Page 8: ...C31 LC Optical Ethernet CWDM cartridge 1311 nm LC PC connector SFP ETH 10 RT C33 LC Optical Ethernet CWDM cartridge 1331 nm LC PC connector SFP ETH 10 RT C35 LC Optical Ethernet CWDM cartridge 1351 nm LC PC connector SFP ETH 10 RT C37 LC Optical Ethernet CWDM cartridge 1371 nm LC PC connector SFP ETH 10 RT C39 LC Optical Ethernet CWDM cartridge 1391 nm LC PC connector SFP ETH 10 RT C41 LC Optical ...

Page 9: ... on page 17 for details The factory default status is shown by a The LED will always show the most severe detected error status that it is configured to display and in the chart error severity increases from left to right with green representing no error disabled and flashing red the most severe error LED Status Error Condition Green Yellow Red Flashing Red No errors No UTP Link No Fiber Link No F...

Page 10: ...push confirms the new value ESC Cancels the effect of parameter value changes that have not been confirmed pushing ESC causes the parameter to revert to its former value Pushing ESC moves the user back up to the previous menu level At the main menu ESC does not exit the menu system To exit re push the SELECT button for the card being controlled If no controls are operated for 30 seconds the contro...

Page 11: ...fication line gives the card type and the slot number where the card is installed in its Densité frame There are three main sections in the window itself identified in figure 3 2 Section 1 The top section displays three icons on the left These icons report the status of the two interface ports of the FXE 1501 as well as the card control status Icon 1 2 3 Move the mouse over an icon and a status me...

Page 12: ...e no effect on the card Icon 2 UTP Status green Carrier detected and locked Mouse over the icon to see format details red Link down and no activity No rear Icon 3 SFP Status green Carrier detected and locked Mouse over the icon to see format details red Link down and no activity No rear Section 2 The left portion of the window contains a series of buttons which become highlighted when they are sel...

Page 13: ...work Configuration 4 1 1 UTP Negotiation When AUTO is selected The FXE 1501 will communicate with the Ethernet at the highest available rate and the UTP Speed and UTP Duplex selections will be disabled gray When MANUAL is selected the FXE 1501 will communicate with the Ethernet at the rate selected in the UTP Speed menu see the next section Available choices AUTO MANUAL 4 1 2 UTP Speed Set the Eth...

Page 14: ...own Once the failed link is repaired the LLF will detect the resumption of signal and the entire system will go back into normal operation When LLF is OFF the UTP transmitter continues to send out data packets despite the loss of input data and the return fiber link continues to operate normally Available choices OFF ON 4 2 Alarms The FXE 1501 signals the user when error conditions are detected Th...

Page 15: ...rable settings that allow the user to determine the contribution of each of the individual alarms to the Overall composite alarm This alarm determines the color of the status icon at the top left of the iControl panel for this card at the user s workstation and the status icon displayed for this card in other iControl applications such as iControl Navigator See below for a description of how to us...

Page 16: ...importance orange icon The alarm is of critical importance red icon The alarm exists but has no effect used for composite alarms Shortcut if you click in one of the Set All boxes at the top of a column you will open a pulldown that lets you assign a level to all alarms in the column simultaneously A composite alarm can assume only one value which is the value of the most significant of the contrib...

Page 17: ...fy the firmware version of both cards by looking at VERSION in the menu or by clicking Details in the iControl Info panel 5 Additional Functions 5 1 Factory Default Settings The FXE 1501 maintains a file of factory specified settings for all variable parameters These are the values that are underlined in the local menu as shown on page 17 If necessary these settings can be restored on this FXE 150...

Page 18: ...is FXE 1501 when it appears in iControl applications Short Label Type the short form label that iControl uses in some cases 8 characters Source ID Type a descriptive name for this FXE 1501 Comments Type any desired text The remaining data boxes show manufacturing information about this card including the type of rear panel and the type of SFP module that is installed The service version is shown i...

Page 19: ...ce the iControl service for this FXE 1501 to register itself on a user specified Jini lookup service using the following syntax in the data box jini ip_address where ip_address is the ip address of the server running the lookup service e g Remove select one of the services listed in the window by clicking on it and click Remove to open a query box allowing you to delete it from the window ...

Page 20: ...liant To 10BaseT 100BaseTx 1000BaseT with IEEE 802 3 IEEE 802 3u and IEEE 802 3ab speed auto sensing and auto MDI MDI X Jumbo Frame Supports up to 10000 bytes SFP Port Connector SFP compliant Compliant to IEEE 802 3z 1000 Base LX SX Overall Form factor Single slot Densité 2 Power Maximum 3 watts ...

Page 21: ...L HALF JUMBO PKT SIZE 1 5KB 2KB 10KB LINK LOSS FWD OFF ON CONFIG ALARMS NO UTP LINK ALARM LEVEL GREEN YELLOW RED FLASH RED ALARM REPORT NONE GPI NO FIBER MODULE ALARM LEVEL GREEN YELLOW RED FLASH RED ALARM REPORT NONE GPI NO FIBER LINK ALARM LEVEL GREEN YELLOW RED FLASH RED ALARM REPORT NONE GPI VERSION FXE 1501 XXX CPU BUILD XXX FACTORY DEFAULT RESTORE Note This menu appears only if NEGOTIATION i...

Page 22: ...lled DO NOT LOOK INTO AN OPERATING SFP MODULE S CONNECTORS AS EYE DAMAGE MAY RESULT The SFP module is sensitive to electrostatic discharge ESD It is recommended that you use an ESD preventive wrist strap grounded to the Densité chassis while handling the SFP module SFP modules are subject to wear and their useful lifetime is reduced each time they are inserted or removed Do not remove them more of...

Page 23: ...LC fiber optic connector that is plugged into the SFP module and pull it straight out to disengage the optical fiber from the SFP Never pull the fiber optic cable itself as catastrophic damage may occur 2 Insert a dust plug into the SFP module Removing the SFP module 1 Move the bale clasp lever to the open position 2 Grasp the SFP module between your thumb and forefinger and pull it straight out o...

Reviews: