1
INSTALLATION & USER GUIDE
These instructions must be left with the user.
THERMOSTATIC BAR VALVE
MIRA CODA PRO ERD
Page 1: ...1 INSTALLATION USER GUIDE These instructions must be left with the user THERMOSTATIC BAR VALVE MIRA CODA PRO ERD...
Page 2: ...llation or operation of your new thermostatic mixer please refer to Fault Diagnosis before contacting Kohler Mira Ltd Our contact details can be found on the back cover of this guide SAFETY WARNINGS T...
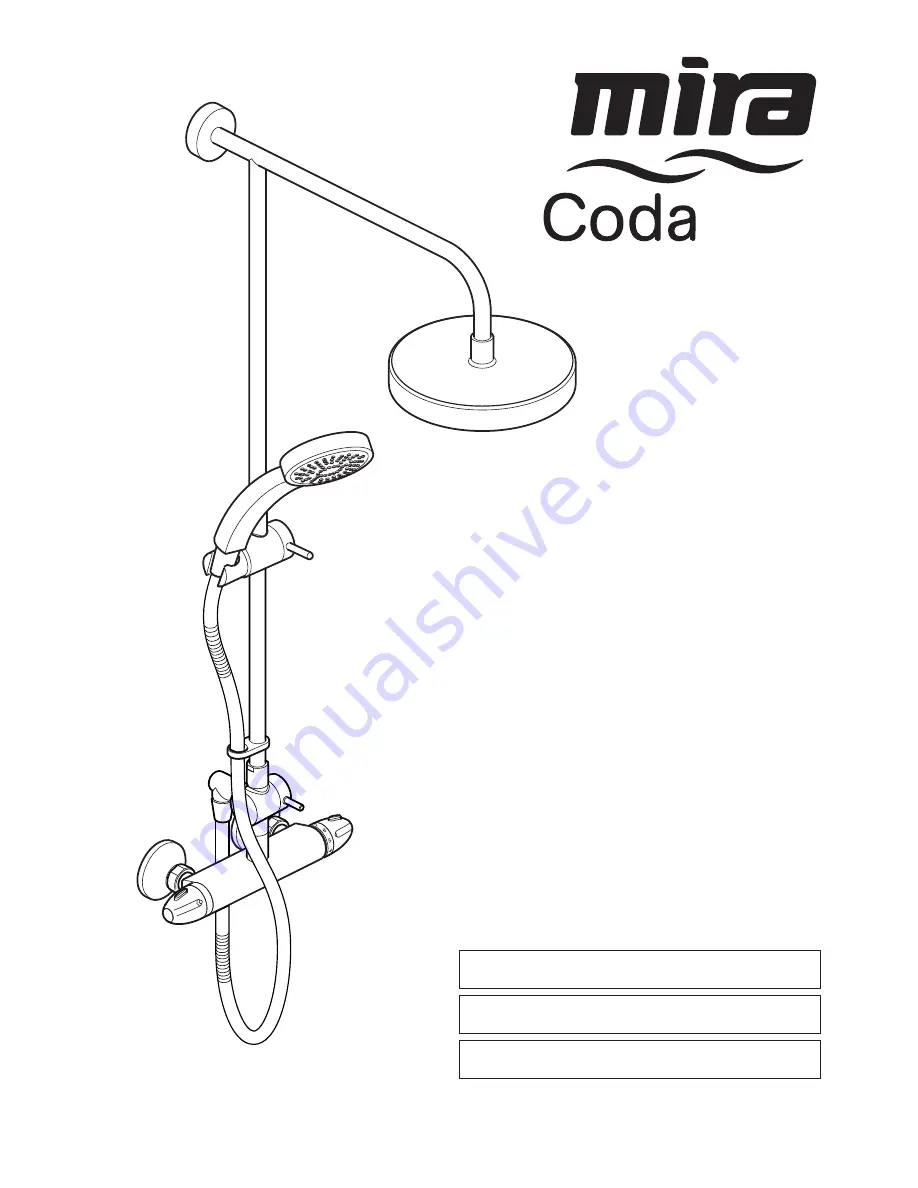
Page 3: ...racket q 1 x Securing Bracket Cover q 1 x Pin q 1 x Rigid Riser Arm q 1 x Mira Coda Pro q 1 x Rigid Riser Rail supplied in 2 parts q 1 x Fixed Showerhead Seal q 1 x Diverter Assembly inc Nut Olive M4...
Page 4: ...s Recommended Hot Supply 60 C to 65 C Note The mixing valve can operate at temperatures up to 85 C for short periods without damage However for safety reasons it is recommended that the maximum hot wa...
Page 5: ...y particular regulations and practices specified by the local water company or water undertakers Note Make sure that all site requirements correspond to the information given in section Specifications...
Page 6: ...rface 1 2 Connections are Hot Left Cold Right This is very important as the Mira Coda Pro does not allow for reversed inlets 1 3 Pipes must be straight and at 90 to the finished wall surface 2 Fit the...
Page 7: ...the wall brackets with a 6 mm drill and insert the wall plugs some wall structures may require alternative fixings not supplied Caution Take care not to drill though any concealed pipework 7 Secure t...
Page 8: ...e that the sealing washer filter is fitted offer the bar valve up to the offset connectors and tighten the nuts Caution Take care not to damage the chrome plated surfaces 12 Install the diverter and r...
Page 9: ...are pushed fully home Important Align the rigid riser arm with the securing bracket using the pin Then using a spirit level make sure that the rigid riser rail is vertical and mark the position of the...
Page 10: ...regulator into the hose then screw the hose onto the outlet of the diverter making sure that the hose seal is fitted 10 Pass the flexible hose through the hose retaining ring and screw the remaining...
Page 11: ...the concealing cap and unscrew the fixing screw 5 Pull off the temperature selector knob without disturbing the stop assembly Fixing Screw Concealing Cap Temperature Selector Knob 6 Replace the tempe...
Page 12: ...ilters are located in the inlet connector Clean or renew as necessary Lubricants Silicone based lubricants must only be used on the rubber seals Caution Oil based or other lubricant types may cause ra...
Page 13: ...1744 118 Diverter Adaptor 1744 105 Non Return Valve Housing x2 1744 115 Fixing Kit Assembly 1744 103 Non Return Valve and Filter Washers x2 1744 104 Filter Washer 1744 113 Temperature Handle Assembly...
Page 14: ...1660 161 Fixed Showerhead 1660 163 Rigid Riser Rail 1 Piece 1660 289 Rigid Riser Rail 2 Piece 1663 190 Showerhead 1660 172 Clamp Bracket 1595 073 Hose Retaining Ring 1660 178 Compression Nut Olive 16...
Page 15: ...e in or out of the showering area Folds up when not in use Maximum User Weight 127 kg 20 stone Note Must be installed onto a solid wall Premium Shower Seat White Chrome 2 1731 001 Grey Chrome 2 1731 0...
Page 16: ...help and advice If you experience problems check in this manual to see if simple home maintenance is required If you require further assistance call our Customer Services Team Extended Guarantees A s...