background image

7. Usage

MiR Shelf Lift Operating guide (en) 12/2019 - v.1.0 ©Copyright 2019: Mobile Industrial Robots A/S.

53

4.

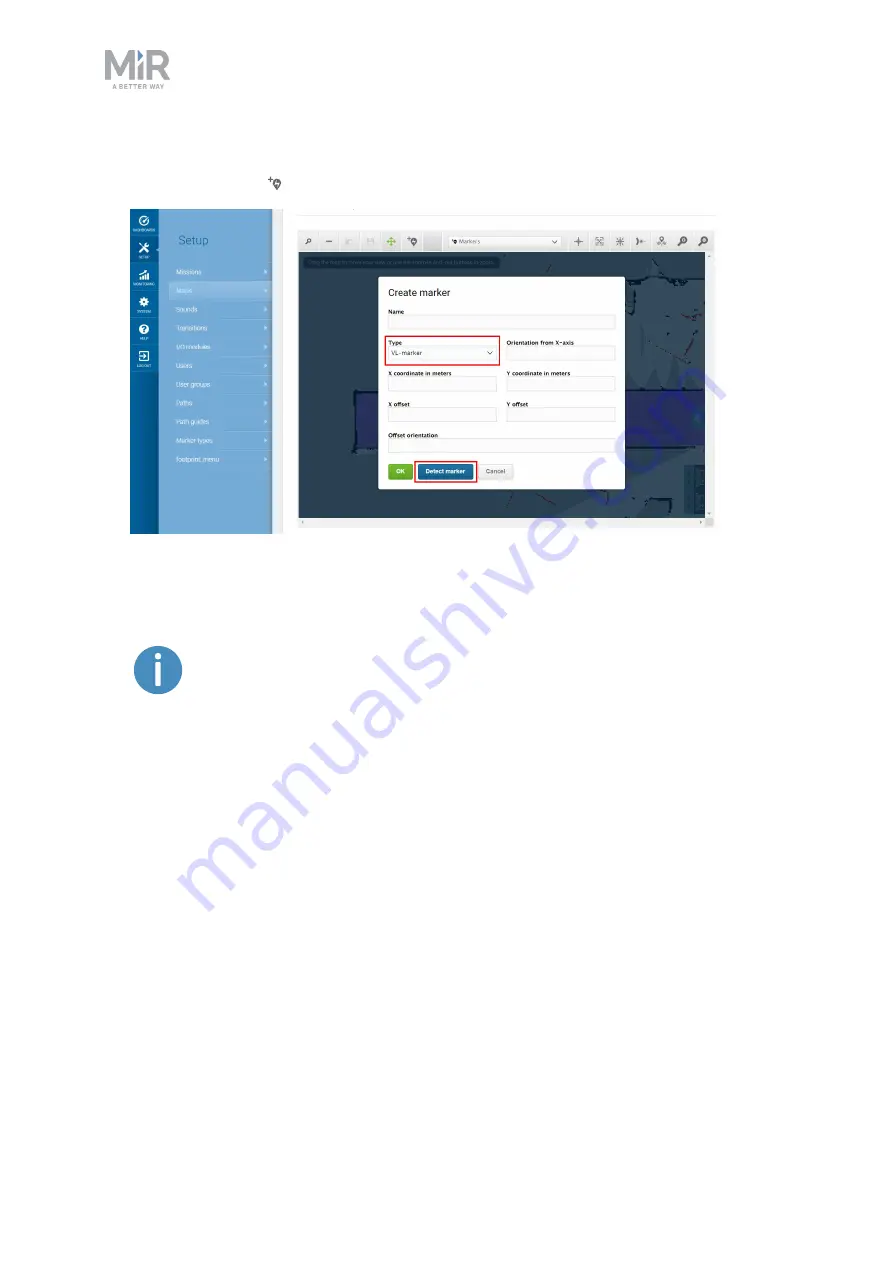
Within the editor, select

Markers

in the

Object-type

drop down menu, and then select

Draw new marker

on the editor tools bar. Choose

VL-marker

and then

Detect marker

.

The X, Y, and orientation values will automatically be filled out with the current position
of the robot. Set the offsets to 0. If you want to dock to the marker in reverse, set the

Offset orientation

to 180.

If the robot is too far from the VL-marker, a message that the robot failed
to locate the marker is displayed. Try moving the robot closer, and ensure
that the front safety laser scanner is positioned in front of the VL-marker.

5.

Select

OK

to create the marker. The marker is now visible on the map.

Docking to a VL marker in a place shelf mission

1.

In

System > Settings > Docking

, set

Relative move target when docking to markers

to

1,6 m. This will make the robot go to a position 1,6 meters in front of the marker before
docking. Select

Save changes

.

Summary of Contents for Shelf Lift

Page 1: ...Operating guide en Date 12 2019 Revision v 1 0 ...

Page 2: ... or its contents In addition the contents of the document are subject to change without prior notice Every precaution has been taken in the preparation of this manual Nevertheless MiR assumes no responsibility for errors or omissions or any damages resulting from the use of the information contained Copyright 2019 by Mobile Industrial Robots A S Contact the manufacturer Mobile Industrial Robots A ...

Page 3: ...y precautions 9 3 2 Risk assessment 11 3 3 Intended use 11 3 4 Foreseeable misuse 12 3 5 Residual risks 12 4 Product presentation 14 4 1 Shelf specifications 14 5 Getting started 19 5 1 In the box 19 5 2 Mounting MiR Shelf Lift 19 5 3 Enable MiR Shelf Lift feature 29 5 4 Testing MiR Shelf Lift 31 6 Commissioning 33 6 1 Using MiR Shelf Lift 33 6 2 Resetting Lift after turning on the robot 33 6 3 Li...

Page 4: ...ck up shelf and place shelf mission 60 7 6 Reverse docking shelf mission creating marker type 65 8 Maintenance 72 8 1 Regular weekly checks and maintenance tasks 72 8 2 Regular checks and replacements 72 9 Troubleshooting 74 9 1 Shelf options are not available in the robot interface 74 9 2 Robot docking imprecisely or not docking at all to shelf 74 9 3 Robot turning strangely when docking 74 9 4 R...

Page 5: ...obots quickly This document is in print in the box with the robots Quick starts are available in multiple languages User guides provide all the information you need to operate and maintain MiR robots User guides are available in multiple languages Risk Analysis Guides include guidelines for how to create a risk assessment of your robot solution Commissioning guides describe how to commission your ...

Page 6: ...om en account faq This page contains frequently asked questions regarding MiR products Distributor site How to http www mobile industrial robots com en account how to This page contains how to guides that describe how to perform specific tasks with MiR products Distributor site Troubleshooting https www mobile industrial robots com en account troubleshooting This page contains troubleshooting guid...

Page 7: ...to MiR Shelf Lift accessories or any other equipment due to programming errors or malfunctioning of MiR Shelf Lift 2 1 Safety message types This document uses the following safety message types WARNING Indicates a potentially hazardous situation that could result in death or serious injury Carefully read the message that follows to prevent serious injury or death CAUTION Indicates a potentially ha...

Page 8: ... braking and maneuvering Operators Operators have thorough knowledge of MiR Shelf Lift and of the safety precautions presented in the user guide of MiR500 MiR1000 and operating guide of MiR Shelf Lift Operators have the following main tasks Servicing and maintaining MiR Shelf Lift Creating and changing missions and map positions in the robot interface Direct users Direct users are familiar with th...

Page 9: ...cking to a shelf Ensure that docking positions are clearly marked as operating hazard zones with visible tape or similar marking and that all personnel are instructed not to stand close to MiR Shelf Lift when it is docking to a shelf WARNING Risk of injury damage and mechanical failure if MiR Shelf Lift is used to transport pallets or anything other than safely commissioned shelves Only use MiR Sh...

Page 10: ... similar marking and that all personnel are instructed not to stand close to MiR Shelf Lift when it is docking to a shelf WARNING Risk of serious hand injury if a person reaches in between MiR Shelf Lift and MiR500 MiR1000 when the lift is being lowered Ensure that docking positions are clearly marked as operating hazard zones with visible tape or similar marking and that all personnel are instruc...

Page 11: ... a list of significant hazards hazardous situations and events that can be used for inspiration 3 3 Intended use MiR Shelf Lift is a partly completed machine as defined in the EU machinery directive and does not have a CE mark A correctly installed MiR Shelf Lift is covered by the CE mark of MiR500 MiR1000 However a CE marked product does not guarantee a CE marked setup It is the responsibility of...

Page 12: ...anything other than safely commissioned shelves Use in medical and life critical applications Operating outside the permissible operating parameters and environmental specifications Use in potentially explosive environments Use outdoors Use in hygiene zones 3 5 Residual risks Mobile Industrial Robots has identified the following potential hazards that commissioners must inform personnel about and ...

Page 13: ... guide en 12 2019 v 1 0 Copyright 2019 Mobile IndustrialRobots A S 13 NOTICE All risks and foreseeable misuses relevant to MiR500 MiR1000 also apply to MiR Shelf Lift Refer to the MiR500 MiR1000 User guide for more information ...

Page 14: ...can be set up to run a fixed route be called on demand and perform complex missions MiR Shelf Lift picks up standalone shelves that are not required to be in a docking station pallet rack or similar MiR500 MiR1000 locate shelves solely by shelf positions on the map For increased precision when docking it is possible to use markers such as VL markers to specify an exact position where the robot can...

Page 15: ...asymmetric legs Shelves with symmetric legs create significantly larger blind spots for the robot compared to shelves with asymmetric legs because the legs interfere more with the field of view of the safety laser scanners Therefore MiR Shelf Lift is not intended to be used with shelves with symmetric legs MiR has tested the docking procedure with shelves with symmetric legs but does not deliver s...

Page 16: ...elf with asymmetric legs When building a shelf with asymmetric legs it is important to use transverse stabilizers to keep the structure from tipping Figure 4 1 To be in compliance with the intended use of MiR Shelf Lift follow these measurements when making narrow or wide shelves for MiR Shelf Lift with asymmetric legs ...

Page 17: ...e Mark potentially hazardous floor areas on page 41 Only use MiR Shelf Lift in operating hazard zones when operating with shelves with symmetric legs An operating hazard zone is a zone where the personnel detection means of the robot are reduced or muted and where persons therefore risk colliding with the robot The operating hazard zone must be clearly indicated by suitable signs or preferably flo...

Page 18: ...gs Payload The payload of MiR Shelf Lift is 1000 kg However the same payload restrictions for MiR500 MiR1000 apply when MiR Shelf Lift is mounted to it The maximum safe payload depends on the design of the shelf See Product presentation on page 14 for more information CAUTION Risk of injury if excessive or incorrectly distributed loads are fastened to MiR Shelf Lift Determine the maximum safe payl...

Page 19: ...ame for MiR500 and MiR1000 robots NOTICE Read Safety on page 7 before powering up the robot 5 1 In the box This section describes the content of the MiR Shelf Lift box The box contains 1 MiR Shelf Lift including cables 2 Four safety stickers 3 Anti slip paper 4 A MiR Shelf Lift document folder containing the following printed documents MiR Shelf Lift Mounting guide EC declaration of incorporation ...

Page 20: ...tarted MiR Shelf Lift Operating guide en 12 2019 v 1 0 Copyright 2019 Mobile IndustrialRobots A S 20 Figure 5 1 Top view of MiR500 MiR1000 Label Description Label Description 1 Left cover plate 2 Right cover plate ...

Page 21: ...5 Getting started MiR Shelf Lift Operating guide en 12 2019 v 1 0 Copyright 2019 Mobile IndustrialRobots A S 21 1 Remove the left and right cover plates 2 Unscrew the four bolts from the lifting device ...

Page 22: ...2 2019 v 1 0 Copyright 2019 Mobile IndustrialRobots A S 22 3 Screw in four M12x50 lifting eye bolts in the holes where you just removed the four bolts The bolts must be rated to carry at least 350 kg and should have a standard 1 75 mm thread pitch incline ...

Page 23: ... crane to move the lift over the robot and place the lift on four blocks of wood enabling you to reach between the lift and the robot 5 Remove the cables from the bag Notice that there are two cables for each side of the lifting device Feed the cables through the hole on the right side and vice versa with the left side ...

Page 24: ... plugs make sure to turn the plug to the left to open the plug and to the right to close it once connected to its socket The plugs only fit with their correct socket so it is not possible to connect them incorrectly Fixing MiR Shelf Lift to MiR500 MiR1000 When fixing MiR Shelf Lift to MiR500 MiR1000 it is important to check that no cables are pinched between the devices To avoid this use cable tie...

Page 25: ...ight 2019 Mobile IndustrialRobots A S 25 2 Lower the lift onto the robot 3 Place MiR Shelf Lift so that the white emergency stop chords run to the left when looking directly at the robot from the front 4 Dismount the crane remove the lifting eye bolts and remove the crane ...

Page 26: ...0 Copyright 2019 Mobile IndustrialRobots A S 26 5 Screw in one of the four M12 bolts without tightening it completely 6 Adjust the lift until the M12 mounting holes are correctly aligned and screw in the remaining bolts Ensure that all bolts are tightened completely ...

Page 27: ... MiR Shelf Lift Operating guide en 12 2019 v 1 0 Copyright 2019 Mobile IndustrialRobots A S 27 7 Screw in the four bolts that were removed for the eye bolts 8 Put the lift cover on the lifting device using suction cups ...

Page 28: ... to the lifting device Ensure the screws are plane with the lift cover If you are having difficulty screwing in the short bolts start by using a long bolt to make the others easier to screw in Remember to replace the long bolt with a short one when you are finished You can also widen the holes using a hex key or other tool 10 Put on the four safety stickers ...

Page 29: ...he sides as shown in the image 12 Four additional square pieces of anti slip paper are included with the lift It is optional to place these on the cover of the lift 5 3 Enable MiR Shelf Lift feature To access MiR Shelf Lift settings and mission menus you must first enable them 1 Sign in to the robot interface and go to System Settings Features ...

Page 30: ...5 Getting started MiR Shelf Lift Operating guide en 12 2019 v 1 0 Copyright 2019 Mobile IndustrialRobots A S 30 2 Under Shelf select True ...

Page 31: ...they have to be activated for the shelf lift to work 4 Under Pallet lift select True 5 4 Testing MiR Shelf Lift To test that the lift is mounted correctly complete the following steps Make sure the lift performs as expected in each step 1 Turn on the robot and sign into the robot interface 2 Enable the lift and I O module features as described in Enable MiR Shelf Lift feature on page 29 3 In the r...

Page 32: ...t is raised and lowered as expected in steps 6 and 7 the robot lift has been mounted and installed correctly If not go through the mounting steps again to verify that you have assembled the lift correctly If you are not able to access the I O module controls verify that you have enabled the feature as described in Enable MiR Shelf Lift feature on page 29 and restart the robot by pressing the reset...

Page 33: ...The outputs are used to control the position of the MiR Shelf Lift and the inputs are used to signal the current position and status of the MiR Shelf Lift To see the menu options for the I O modules and the shelf lift you must enable them first See Enable MiR Shelf Lift feature on page 29 for more information Output Function 0 Initiates calibration process after five seconds 1 Stops or puts the li...

Page 34: ...Setup I O modules Input 0 and input 2 will be high green 2 Set output 0 to set the input to high green Make sure it stays high for at least five seconds 3 Wait for the lift to reset It takes approximately 13 seconds and can be monitored in Monitoring System log Consider recreating these steps as a mission that you can run every time you turn on the lift ...

Page 35: ...be added to the MiR Shelf Lift for custom applications However it is important not to damage any vital parts of the lift when doing so Top plate of the lift 1 Material Steel S355 Thickness 3 mm Treatment Powder coating RAL 9005 2 Areas marked with red indicate where you are not allowed to make modifications such as drilling holes or mounting accessories ...

Page 36: ...l S355 Thickness 3 mm Treatment Powder coating RAL 7011 2 Areas marked with red indicate where you are not allowed to make modifications such as drilling holes or mounting accessories NOTICE The drawings above only show where you can make minor modifications without damaging the product You should not use it for any other measurements or calculations ...

Page 37: ...ts from product number U0001 to U0159 Both narrow and wide shelves for MiR500 from product number U0160 and higher MiR500 robots from product number U0001 to U0159 have a gearing and top speed different from the later MiR500 robots so they use different safety scanner configurations If used with shelves with symmetric legs users can adjust the safety scanners manually Follow the how to guide How t...

Page 38: ...sioning MiR Shelf Lift Operating guide en 12 2019 v 1 0 Copyright 2019 Mobile IndustrialRobots A S 38 Figure 6 1 The blind spots with an asymmetric shelf with narrow legs The small crosshairs are the shelf legs ...

Page 39: ...gure 6 2 The blind spots with an asymmetric shelf with wide legs The small crosshairs are the shelf legs Symmetric legs Shelves with symmetric legs create significantly larger blind spots for the robot than shelves with asymmetric legs because the legs interfere more with the field of view of the safety scanners ...

Page 40: ...oning MiR Shelf Lift Operating guide en 12 2019 v 1 0 Copyright 2019 Mobile IndustrialRobots A S 40 Figure 6 3 The blind spots with a symmetric shelf with narrow legs The small crosshairs represent the shelf legs ...

Page 41: ...y marking is required When docking to a shelf the robot mutes its Personnel detection means temporarily This includes turning off the protective field sets around the robot The muting starts when the robot reaches the entry position approximately one meter from the shelf marker To indicate this to people nearby MiR500 MiR1000 slows down and starts blinking yellow using the eight signal lights on t...

Page 42: ...e MiR500 MiR1000 User guide Marking the operating hazard zone The size of the operating hazard zone is based on the robot s path going to the shelf and takes into account that the robot may have to make a turn of up to 90 when docking to the shelf NOTICE The operating hazard zone and the required space for docking are not the same See Required free space on page 44 ...

Page 43: ...or markings should be for a single shelf For multiple shelves see Multiple shelves on the next page Figure 6 5 The floor around the shelf position must be marked to indicate an operating hazard zone illustrated by the striped yellow and black line The outermost black dashed line indicates the space needed to be held clear for a successful docking ...

Page 44: ...s surrounding the shelf influence the docking procedure The more free space the robot has in front of the shelf the closer the shelf can be placed to other obstacles The required free space for a successful docking is indicated in Figure 6 5 with the black dashed line NOTICE The space required for a successful docking can be larger than the operating hazard zone Multiple shelves If you have multip...

Page 45: ...VL markers on page 52 CAUTION Risk of getting trapped or crushed if standing in the operating hazard zone To fulfill the safety requirements there must be an escape route of at least 500 mm either behind the shelves or between every other shelf Figure 6 6 Multiple shelves placed close to each other using VL markers with a 500 mm escape route behind them The blue area indicates the escape route ...

Page 46: ...ing guide en 12 2019 v 1 0 Copyright 2019 Mobile IndustrialRobots A S 46 Figure 6 7 Multiple shelves placed close to each other using VL markers with a 500 mm escape route between every other shelf The blue areas indicate the escape routes ...

Page 47: ...ing a marker type below You must define the dimensions of the various types of shelves your robot transports Setting shelf positions on the map on page 50 The positions of shelves must be defined on the robot map so the robot knows where to go to pick up or place shelves Placing positions closer using VL markers on page 52 Creating footprint on page 58 You can define the dimensions of the various ...

Page 48: ...wide and narrow shelves with symmetric legs See Shelf specifications on page 14 If your shelf has different specifications or if you want to dock differently to the shelf you need to create a new marker type To make the robot interface display shelf options you must enable the feature as described in Enable MiR Shelf Lift feature on page 29 1 To create a new marker type go to Setup Marker types an...

Page 49: ...de bars of the shelf These dimensions are the same as those identified in Shelf dimension specifications and define the size of the shelf Bar distance in meters These are also defined in Shelf dimension specifications and specify the width of the shelf defined as the distance between the two bars inner side to inner side Orientation offset in degrees Is used to define the robot s position when doc...

Page 50: ...g asymmetry in meters Is used to indicate the offset between the two front legs A zero value means symmetry If the robot is not docking correctly you should try adjusting the X and Y offsets 3 Select Create marker type when you are done The shelf type is now displayed in the list of shelf types 7 2 Setting shelf positions on the map The shelf positions must be defined in the map It is only at shel...

Page 51: ...nt on the map where you want the shelf position to be placed 4 In the Create position dialog box name the position and under Type select Shelf position 5 Select OK to create the shelf position The position is now visible on the map 6 If you want to make more than one position on the map repeat the previous steps Make sure that the minimum distances between shelf position fulfill the dimensions spe...

Page 52: ...er Creating a VL marker Before creating the marker you must ensure that the robot is localized correctly on an active map If in doubt you can check if the red lines representing the laser scanner line match the black lines on the map as shown in Figure 7 1 Figure 7 1 The red lines represent the obstacles the laser scanners detect The robot is localized correctly when the red lines align with the b...

Page 53: ...o dock to the marker in reverse set the Offset orientation to 180 If the robot is too far from the VL marker a message that the robot failed to locate the marker is displayed Try moving the robot closer and ensure that the front safety laser scanner is positioned in front of the VL marker 5 Select OK to create the marker The marker is now visible on the map Docking to a VL marker in a place shelf ...

Page 54: ...ng you can reduce the amount of corrections it is allowed to make when docking under System Settings Parameter for driving more straight during docking Set the parameter to 0 03 or lower Select Save changes 3 Create a shelf position directly in front of the VL marker you created See Placing positions closer using VL markers on page 52 ...

Page 55: ...he map Then select Show entry position 5 Two entry positions appear They indicate where the robot will go to first when docking to the position The entry position furthest from the shelf position is for MiR Shelf Lift Select Edit if you want to adjust the entry position 6 Select the VL marker on the map Then select Show entry position ...

Page 56: ...on 9 Give the mission a name for example Place shelf at VL marker Select the group and site you want it to belong to Select Create mission 10 Select the following actions a In the Move menu select Docking b In the Shelf menu select the Place MiR500 1000 Shelf template mission The mission dialog should look like this The following steps describe which parameters each action should be set to To modi...

Page 57: ... Mute front to mute the safety scanners on the front when docking When docking to a VL marker the robot must mute either the front or back safety scanners depending on whether the robot docks forward or in reverse 8 Under Undocking distance select the undocking distance in meters A negative value makes the robot undock in reverse and a positive value will make the robot move forward when undocking...

Page 58: ...ng the footprint menu See the how to guide How to change the robot footprint on the Distributor site In the footprint menu you can create your own footprints to use in missions The robot interface comes with default footprints for a MiR Shelf Lift with a wide or narrow shelf If you are using a shelf with dimensions not supported by MiR see Shelf specifications on page 14 you must create your own f...

Page 59: ...ating guide en 12 2019 v 1 0 Copyright 2019 Mobile IndustrialRobots A S 59 1 In Setup Footprints select Create footprint and name the footprint 2 Select Edit height Edit footprint if you need to change the height of the footprint ...

Page 60: ... pick up shelf and place shelf mission This section describes how to create a pick up and place shelf mission To create the mission it is assumed you have completed the following Enabled the shelf feature as described in Enable MiR Shelf Lift feature on page 29 Created a shelf position as described in Setting shelf positions on the map on page 50 Placed a physical shelf at the shelf position ...

Page 61: ...n 12 2019 v 1 0 Copyright 2019 Mobile IndustrialRobots A S 61 1 Go to Setup Missions Select Create mission 2 Give the mission a name for example Pick up and place shelf Select the group and site you want it to belong to Select Create mission ...

Page 62: ... the Move menu select Move d In the Shelf menu select the Place MiR500 1000 Shelf template mission The mission dialog should look like this The following steps describe which parameters each action should be set to To modify the parameters select the gearwheel of the action in question to open the dialog of that action 4 Under Move to select the shelf position you want to dock to 5 Under Position ...

Page 63: ...elf specifications on page 14 you can create your own footprint see Creating footprint on page 58 9 Under Mute front Mute rear and Mute sides select if you want the safety scanners to be muted on the front rear or sides while undocking This can be necessary if the shelf is located near other obstacles see Mark potentially hazardous floor areas on page 41 10 Under Undocking distance choose the undo...

Page 64: ...helf is located near other obstacles see Mark potentially hazardous floor areas on page 41 The safety scanners are muted to the sides by default in the place shelf template so the robot doesn t go into protective stop when driving away from the shelf 14 Under Footprint select the footprint that matches your shelf 15 Under Undocking distance select the undocking distance in meters A negative value ...

Page 65: ... 3 Select Continue to start the mission 4 Watch the robot execute the mission and verify that it performs as expected WARNING When MiR500 MiR1000 with a MiR Shelf Lift docks to a shelf position the robot mutes Personnel detection means and blinks yellow Do not step in front of the robot and keep a safe distance to the shelf See Safety on page 7 for more information 7 6 Reverse docking shelf missio...

Page 66: ... Created a shelf position as described in Setting shelf positions on the map on page 50 Placed a physical shelf at the shelf position To dock to a shelf in reverse you first need to create a specific marker type 1 Go to Setup Marker types Select Create marker type 2 Give the marker type a name for example Reverse docking 3 Select Leg shelf marker under Marker type and put in the correct informatio...

Page 67: ...ustrialRobots A S 67 4 Under Marker type orientation offset select 180 This tells the robot to turn 180 degrees when docking to this marker type Select Create marker type to save the marker type After you have created the reverse docking marker type you need to apply it in a mission ...

Page 68: ... guide en 12 2019 v 1 0 Copyright 2019 Mobile IndustrialRobots A S 68 5 Go to Setup Missions Create Mission 6 Give the mission a name for example Reverse docking Select the group and site you want it to belong to Select Create mission ...

Page 69: ...e following steps describe which parameters each action should be set to To modify the parameters select the gearwheel of the action in question to open the dialog of that action 8 Under Move to select the shelf position you want to dock to 9 Under Position type select Entry Select Validate and close 10 Under Pick up MiR500 1000 Shelf set the Marker position to the position you want to dock to 11 ...

Page 70: ...f is located near other obstacles see Mark potentially hazardous floor areas on page 41 13 Under Undocking distance choose the undocking distance in meters A negative value makes the robot undock in reverse and a positive value will make the robot move forward when undocking Select Validate and close 14 Select Save to save the mission The mission should look like this Testing the mission To test t...

Page 71: ...s now added to the Mission queue 3 Select Continue to start the mission 4 Watch the robot execute the mission and verify that it performs as expected WARNING When MiR500 MiR1000 with a MiR Shelf Lift docks to a shelf position the robot mutes Personnel detection means and blinks yellow Do not step in front of the robot and keep a safe distance to the shelf See Safety on page 7 for more information ...

Page 72: ... Robots can not be held responsible for any damages caused to the robot accessories or any other equipment due to use of unapproved spare parts 8 1 Regular weekly checks and maintenance tasks Once a week carry out the following maintenance tasks Parts Maintenance tasks Top plate and sides Clean the MiR Shelf Lift on the outside with a damp cloth Do not use compressed air 8 2 Regular checks and rep...

Page 73: ...robot con tinues to be in emergency stop until you press the reset button Every three to four months according to EN ISO 13850 Safety of machinery Emergency stop function Safety marking on the floor Check if the safety markings around operating hazard zones are intact and visible Check every six months and replace as needed Safety stickers Check if the safety stickers on MiR Shelf Lift robot are s...

Page 74: ... it check the dimensions you specified in the marker type If the dimensions are incorrect the robot may not be able to dock The dimensions must be specified in meters See Creating a marker type on page 47 9 3 Robot turning strangely when docking If the robot turns strangely when docking to a shelf there may be an issue with the legs There are two common causes for the robot not being able to dock ...

Page 75: ...alRobots A S 75 9 5 Robot going into protective stop while driving with shelves If the robot goes into protective stop while driving with shelves it might be because the field sets of the safety laser scanners need adjustment See Adjusting the protective field sets on page 37 for more information ...

Page 76: ... Glossary C Commissioner A user group responible for comissioning the robot creating a risk assessment and determining safe payloads and methods of fastening loads O Operating hazard zone A zone where the personnel detection means of the robot are reduced or muted to a level where personnel safety is at risk ...

Reviews: