background image


English 

5.


Fully charge the battery before using your device for the first time. 

1.3


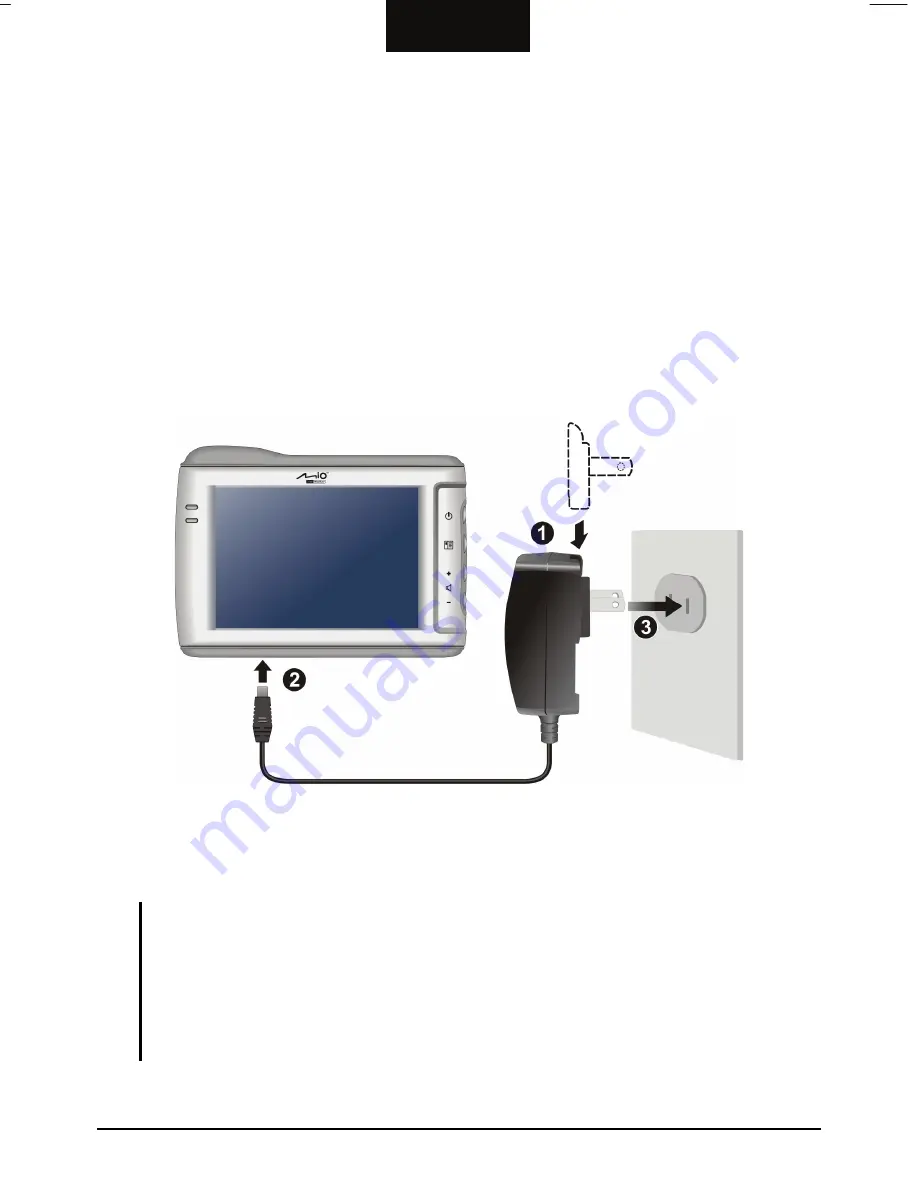
Connecting to AC Power and Charging the 
Battery 

When charging the battery for the very first time, you should charge it for at least 8 
hours. 

1.


Slide and click the connector converter onto the AC adapter. 

2.


Connect the adapter cable to the bottom of your device.  

3.


Plug the AC adapter into a wall outlet.  


Converter

The charge indicator glows amber when charging is in progress. Do not disconnect 
your device from AC power until the battery is fully charged, when the charge 
indicator turns green. This will take a couple of hours. 

NOTE:  

z


Do not immediately turn on your device after connecting the AC adapter to charge a 

power-depleted battery. If you need to turn on the device again, wait for at least one 

minute. 

z


Depending on your region of purchase, the connector converter may not look exactly the 

same as the picture shown. 

z


Your device can also be charged when it is connected to a desktop computer via the USB 

cable. 


 5 

Summary of Contents for DigiWalker C310

Page 1: ...www miogps com...

Page 2: ...ision R00 US version Feb 2006 Trademarks All brand and product names are trademarks or registered trademarks of their respective companies Note The information in this manual is subject to change with...

Page 3: ...he Battery 5 1 4 Using Your Device in a Vehicle 6 Using the Car Holder 6 Connecting the Car Charger 7 2 Operating Basics 9 2 1 Turning On and Off 9 2 2 Operating the Device 9 2 3 Main Menu 10 2 4 Inse...

Page 4: ...c 32 5 2 Mio Sync 33 Installing Mio Sync 33 Using Mio Sync 34 6 Troubleshooting and Maintenance 35 6 1 Resetting Your System 35 6 2 Troubleshooting 36 Power Problems 36 Screen Problems 36 Connection P...

Page 5: ...rheating of the battery can cause malfunction and or danger z GPS is operated by the United States government which is solely responsible for the performance of GPS Any change to the GPS system can af...

Page 6: ...ice in an appropriate place so as not to obstruct the driver s view or deployment of airbags Do not mount where the driver s field of vision is blocked Do not place unsecured on the dashboard Do not m...

Page 7: ...Side Components Ref Component Description Glows bright amber to indicate that the battery is c n harging Charge Indicator and turns green when the battery is fully charged o Touch Screen ur Displays...

Page 8: ...Ref Component Description n External Antenna Connector This connector under rubber dust cover allows use of an optional external antenna with magnetic mount which may be positioned on top of the car...

Page 9: ...D MMC Slot Accepts a SD Secure Digital or MMC MultiMediaCard card for accessing data such as MP3 music Bottom Components Ref Component Description n Reset Button Restarts your device soft reset o Head...

Page 10: ...FF switch in the ON position for normal operation 2 Your device will automatically turn on Connect the AC adapter as described in the next section 3 The Date Time screen appears Tap the appropriate ar...

Page 11: ...arge indicator glows amber when charging is in progress Do not disconnect your device from AC power until the battery is fully charged when the charge indicator turns green This will take a couple of...

Page 12: ...he driver s field of vision is blocked z If the car s windshield is tinted with a reflective coating an external antenna optional may be needed to route the antenna to the top of the car through a win...

Page 13: ...in current connect the car charger only after the car engine has been started 1 Connect one end of the car charger to the power connector of your device 2 Connect the other end to the cigarette lighte...

Page 14: ......

Page 15: ...system again it resumes 2 2 Operating the Device To communicate with your device touch the screen with your fingertip You can perform the following actions z s or select onscreen buttons z z Tap Touc...

Page 16: ...q s r Ref Button Name Description For Detailed Information n Address Allows you to specify an address as your destination o My Places Allows you to use a stored place as your destination p Food Fuel...

Page 17: ...connector pointing to the slot and its label facing the front of the device To remove a card first make sure that no application is accessing the card then slightly push the top edge of the card to r...

Page 18: ......

Page 19: ...s will remain until you change them again 3 1 Using Device Settings To open the Device Settings menu first tap the Settings button from the My Places or Map Look Feel Device Settings Settings menu men...

Page 20: ...button 3 Move the knob along the track bar to adjust the backlighting To darken the screen move the knob to the left To lighten the screen move the knob to the right 4 Tap the button to save the chang...

Page 21: ...tton 3 Move the knob along the track bar to adjust the volume To decrease the volume move the knob to the left To increase the volume move the knob to the right 4 Tap the button to save the changes an...

Page 22: ...alibrate the touch screen if it is not responding accurately to your taps 1 Tap the Device Settings button on the Settings screen 2 Tap the Screen button 3 Tap to start the calibration 4 Tap and hold...

Page 23: ...en completed tap button to return to the Device Settings screen 7 Tap the button to go back to the Settings screen 3 5 Power To check the remaining power level of your battery and or set up the power...

Page 24: ...nutes and 10 minutes 4 Tap the button to save the changes and go back to the Device Settings screen 5 Tap the button to go back to the Settings screen 3 6 Date Time To set the date and time 1 Tap the...

Page 25: ...the month or year on top of the calendar to directly change the month or year When the calendar shows the current month tap the date on the calendar 5 To set the time first tap the hour minute or sec...

Page 26: ...change the language for Device Settings and MP3 Player menus 1 Tap the Device Settings button on the Settings screen 2 Tap the Switch Language button 3 Tap the left right arrow button to select the d...

Page 27: ...and random sequence Playback of MP3 files Basic playback controls such as play pause stop next and previous 17 preset equalizer audio profiles Playback includes single selection playback repeat single...

Page 28: ...You Device Before you can play MP3 files you need to have the files ready on either your device s My Flash Disk folder or on a storage card Use Active Sync to copy MP3 files from your computer to you...

Page 29: ...e Minimize the control panel and play the music in the background To open the control panel tap the MP3 button on the Main Menu Exit Close the program and return to the map screen Play List Open play...

Page 30: ...play list You can also create your own play lists for future use Creating a Play List 1 After starting MP3 Player tap on the control panel to open the play list screen The screen shows the current pla...

Page 31: ...Back 3 Repeat the same procedure for the other songs to be added 4 To save the play list tap and then Yes 5 To return to the control panel tap Opening a Play List To open one of the play lists that y...

Page 32: ...eturn to the control panel tap 4 5 Equalizer The MP3 Player provides 17 preset audio profiles Tap to open the equalizer panel Tap or button to cycle through the available options Default Blues Classic...

Page 33: ...English Tap to save your selection and return to the control panel Tap to cancel your selection and return to the control panel To select the Default profile tap 27...

Page 34: ......

Page 35: ...nnect your device to your computer before ActiveSync is installed Compatibility ActiveSync 4 1 is compatible with the following operating systems and applications z Microsoft Windows 2000 Service Pack...

Page 36: ...your computer and insert the Application CD into the CD ROM drive of your computer 2 The autorun screen should appear Select the desired language 3 Select Install ActiveSync and follow the onscreen in...

Page 37: ...d connect the mini USB end of the USB cable to the bottom of your device and the other end to a USB port on your computer 6 When the Synchronization Setup Wizard screen appears select Cancel to connec...

Page 38: ...Deleting files of which the function is unknown can cause programs or features to malfunction Whenever you connect your device to your computer with the USB cable the Synchronization Setup Wizard scr...

Page 39: ...u can then use the address of a contact as your destination Installing Mio Sync 1 Turn on your computer and insert the Application CD into the CD ROM drive of your computer 2 The autorun screen should...

Page 40: ...versions only To copy Microsoft Outlook Contacts information from your computer to your device 1 Connect your device to your computer via the USB cable Make sure that ActiveSync is up and running 2 S...

Page 41: ...uld reset your system when it stops responding or appears to be frozen or locked up Insert a small rod such as a straightened paperclip into the reset button on the bottom of your device This is calle...

Page 42: ...r device and to AC power Then turn on your device Screen Problems Screen is off If the screen does not respond even after you press the power button try the following in order until the problem is sol...

Page 43: ...that the cable is securely plugged into the USB port on your computer and on the device Connect the USB cable directly to your computer do not run the cable through a USB hub z Reset your device befor...

Page 44: ...care not to sit on the device We advise not to carry the device in one s back pocket for that reason z The screen surface can easily be scratched Avoid touching it with sharp objects Non adhesive gen...

Page 45: ...suant to Part 15 of the FCC Rules These limits are designed to provide reasonable protection against harmful interference in a residential installation This equipment generates uses and can radiate ra...

Page 46: ...glement Canadien sur le mat riel brouileur European Notice Products with the CE marking comply with Radio Telecommunication Terminal Equipment Directive R TTE 1999 5 EEC the Electromagnetic Compatibil...

Page 47: ...ked with LPS Limited Power Source and output rated 5 V dc 1 0 A z Use a specified battery in the equipment About the AC Adapter z Do not use the adapter in a high moisture environment Never touch the...

Page 48: ...e or burns do not disassemble crush puncture or dispose of in fire or water z Important instructions for service personnel only 9 Caution Risk of explosion if battery is replaced by an incorrect type...

Reviews: