background image

2. First Use 

2.9  Photo Mode

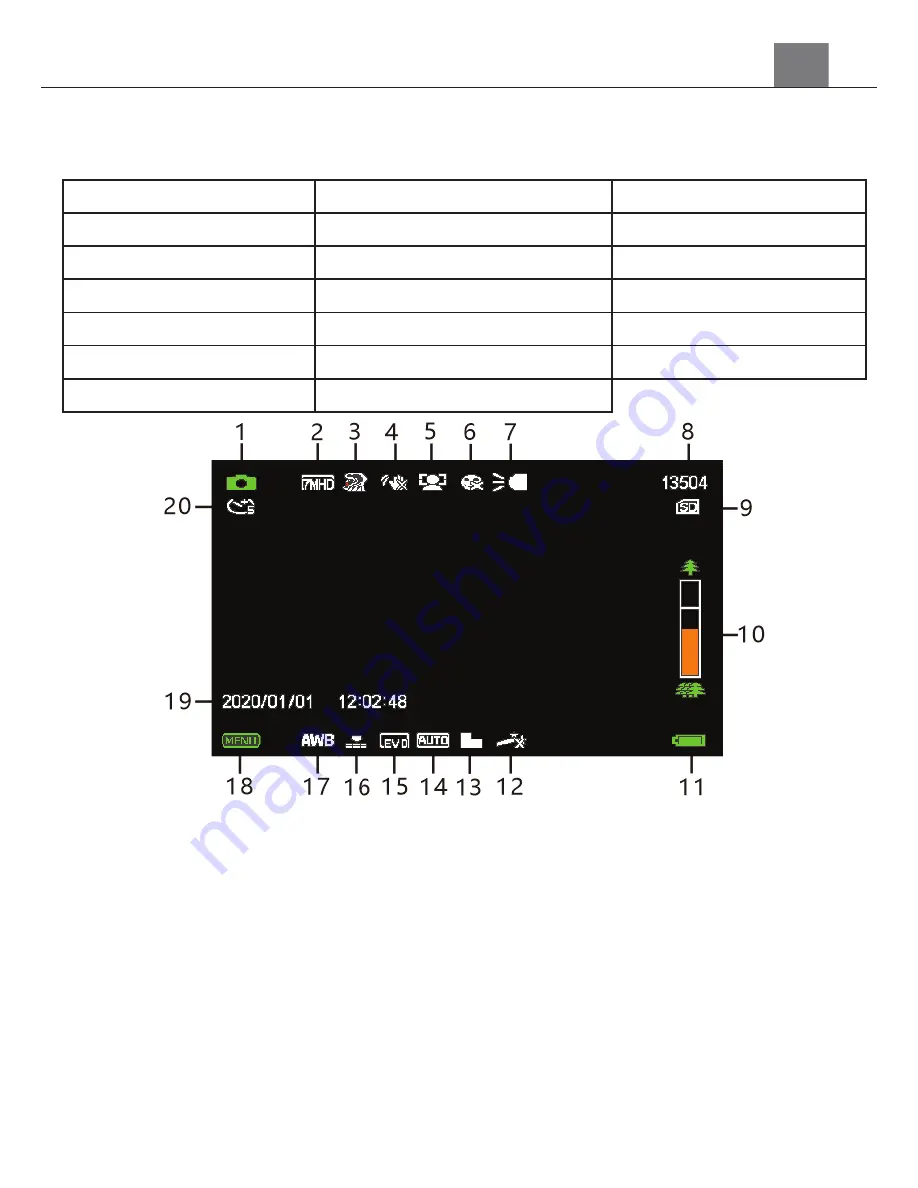
Press the MODE button to switch to Photo Mode. The meaning of each icon 
within Photo Mode is explained in the table below:

1) Photo Mode

8) Number of Photos Remaining 15) Exposure

2) Photo Size (Resolution) 9) Memory Card Inserted

16) Image Quality

3) Beauty Filter

10) Zoom Indicator

17) White Balance

4) Anti-Shake

11) Battery Level

18) Menu

5) Face Detection

12) Effect

19) Current Time and Date

6) Smile Capture

13) Sharpness

20) Self Timer

7) IR Light Indicator

14) ISO

2.10  Using the Zoom Function

This camcorder has a digital zoom function. To operate the zoom 
function, slide the ZOOM button right to zoom in closer to the subject, 
and to the left to zoom away from the subject. 

2.11  Using the IR Night Vision Mode

This camcorder has built-in infrared (IR) LEDs for night vision recording - 
giving you the ability to capture photos and videos in a dark environment. 

In Photo or Video mode, short-press the POWER/IR button once to enable 
the IR LED light. When the IR LED light is enabled, the IR LED light 
indicator on the top of the screen will be displayed.

10

Summary of Contents for MN2K10NV

Page 1: ...MN2K10NV User Manual ...

Page 2: ...terference will not occur in a particular installation If this equipment does cause harmful interference to radio or television reception which can be determined by turning the equipment off and on the user is encouraged to try to correct the interference by one or more of the following measures Reorient or relocate the receiving antenna Increase the separation between the equipment and receiver C...

Page 3: ...lease do not use the camera while you are walking driving or riding a vehicle Please handle the camera strap with care and never place the strap around the neck of an infant or child Wrapping the strap around a neck may cause suffocation Do not subject the LCD screen to impact To prevent the risk of fire or electric shock do not expose this appliance to rain or moisture Battery Information Turn of...

Page 4: ...oisture places Otherwise it may cause fire or electric shock Do not attempt to repair disassemble change or transform the adapter Avoid sudden changes in temperature which may cause condensation on the adapter s internal surfaces Please do not use it immediately in this situation Do not touch the plug with wet hands Otherwise it may cause electric shock Do not use the travel voltage converter or A...

Page 5: ...2 First Use 1 1 Camcorder Interface 4 ...

Page 6: ...he left to zoom out Photo OK In Photo Tap softly to focus the image Hard tap to capture a photo In Video Tap to pause a recording tap again to resume recording In Playback While playing a recorded video tap to pause and tap again to resume OK button in menus Tap to confirm a setting Record In Video Tap to start stop recording video In Playback Tap to play a recorded video tap again to stop the vid...

Page 7: ...down 2 Insert the memory card Ensure that the metal contacts are inserted first Push the memory card down until you hear an audible click The memory card can only be inserted in one way Do not force the card in if it will not go in smoothly 3 Close the memory card door by flipping it back into place 4 To remove the memory card simply push in and the card will eject back out NOTE x Please format th...

Page 8: ...ided for charging Open the camcorder LCD screen to access the charging port Flip down the charging port door to access the USB port Insert the small end of the USB plug into the camcorder s port and the larger end in to the included AC adaptor 2 4 Powering the Camcorder On Off Press the POWER button to power the camcorder on To power the camcorder off press and hold the POWER button for 2 seconds ...

Page 9: ...touch screen to change modes 2 6 Connecting to a Computer Your camcorder can connect to a computer to transfer photo and video files for viewing and editing as shown below Once connected and powered on the camcorder s screen will enter Mass Storage mode automatically 2 7 Connecting to a TV The camcorder can also be connected to a TV When connected the camcorder screen will turn off and the camcord...

Page 10: ...lained in the table below 1 Video Mode 7 Zoom Indicator 13 White Balance 2 Video Size Resolution 8 Battery Level 14 Menu 3 Beauty Filter Icon 9 Effect 15 Current Date and Time 4 IR Light Indicator 10 Sharpness 16 Loop Recording 5 Recording Time Remaining 11 ISO 17 External Mic Connected 6 Memory Card Inserted 12 Exposure 9 ...

Page 11: ...rpness 20 Self Timer 7 IR Light Indicator 14 ISO 2 10 Using the Zoom Function This camcorder has a digital zoom function To operate the zoom function slide the ZOOM button right to zoom in closer to the subject and to the left to zoom away from the subject 2 11 Using the IR Night Vision Mode This camcorder has built in infrared IR LEDs for night vision recording giving you the ability to capture p...

Page 12: ...hing an external microphone be sure to mount it to the hot shoe mount and also insert the 3 5mm plug into the MIC port 2 13 Remote Control Note The photos and videos taken while the IR LED is enabled will be recorded in black and white The IR LED can also be enabled or disabled during a recording 37mm Diameter Threading n V P D D F t e p Note Before using the remote remove the battery tab on the b...

Page 13: ...ons 1 In Video Mode press the MENU button 2 Select Movie Size using the ZOOM button and press the PHOTO button to enter the Movie Size submenu 3 Press the ZOOM button to navigate the menu and press the PHOTO button to confirm your selected setting 2 7K 1080P 720P 480P A higher resolution and faster frames per second rate will produce a higher quality and larger video file 3 1 2 Sharpness This func...

Page 14: ...ting Off Interval of 1 Second 5 Seconds 10 Seconds 30 Seconds 60 Seconds NOTE By selecting 10Sec the camera will capture a photo every 10 seconds and create a time lapse video To disable Time Lapse recording select Off in this submenu 3 1 5 White Balance White Balance changes the color of light in your pictures making it seem warmer or cooler depending on how the light you re shooting in affects t...

Page 15: ...ative 3 1 9 Scene Mode This function adjusts the camera s settings to predetermined values that will produce the best image for that selected scene 1 In Video Mode press the MENU button 2 Select Scene Mode using the ZOOM button and press the PHOTO button to enter the Scene Mode submenu 3 Press the ZOOM button to navigate the menu and press the PHOTO button to confirm your selected option Auto Nigh...

Page 16: ...tton 2 Select Photo Size using the ZOOM button and press the PHOTO button to enter the Photo Size submenu 3 Press the ZOOM button to select a resolution and press the PHOTO button to confirm the selected photo resolution 48 MP 30 MP 24 MP 20 MP 16 MP 12 MP 10 MP 8 MP 7 MP Wide 5 MP 3 MP 3 2 2Quality The Photo Quality function determines the level of compression the camcorder uses when saving photo...

Page 17: ... PHOTO button to confirm your selected ISO Auto 100 200 400 3 2 6 Exposure This function adjusts the frame brightness in your video 1 In Photo Mode press the MENU button 2 Select Exposure using the ZOOM button and press the PHOTO button to enter the Exposure submenu 3 Press the ZOOM button to navigate the menu and press the PHOTO button to confirm your selected exposure mode 3 2 1 0 1 2 3 3 2 7 Se...

Page 18: ...ke 1 In Photo Mode press the MENU button 2 Select Anti Shaker using the ZOOM button and press the PHOTO button to enter the Anti Shake submenu 3 Press the ZOOM button to navigate the menu and press the PHOTO button to confirm your selected option Off On 3 2 11 Scene Mode This function adjusts the camera s settings to predetermined values that will produce the best image for that selected scene 1 I...

Page 19: ...ton to navigate the menu and press the PHOTO button to confirm your selected option Off On The Smile Detect setting will enable your camera to capture a photo once a smile is detected on the faces in a scene 3 2 14 Beauty Filter This feature applies a filter effect on the people in the scene 1 In Photo Mode press the MENU button 2 Select Beauty Filter using the ZOOM button and press the PHOTO butt...

Page 20: ...he MENU button and use the ZOOM button to select Delete Press the PHOTO button to enter the Delete submenu 2 Press the ZOOM button to navigate the menu and press the PHOTO button for your selected setting This Image All 3 Press the MENU button to exit the menu without deleting any pictures or videos 3 3 2 Protect This function protects the photo video file The file will be protected from being del...

Page 21: ...e the time duration has been chosen the slideshow will start playing 4 Press the RECORD button to stop the slideshow 5 To exit the Slideshow submenu press the MENU button 3 3 5 Video Playback Videos can be played back and viewed on your camcorder 1 In Playback Mode press the ZOOM button to select the video file for playback 2 Press the RECORD button to start playing the video Press the RECORD butt...

Page 22: ...ng On Off Then press the PHOTO button to confirm your selection 3 4 3 Date and Time This function allows you to set the current Date and Time on your recorded video clips and captured photos 1 In Setup Mode use the ZOOM button to select Date and Time and press the PHOTO button to enter the Date and Time submenu 2 Press the ZOOM button to select your desired setting Date and Time Stamp On Date and ...

Page 23: ...ss the PHOTO button for your selected setting Yes No NOTE This will delete all of your media and cannot be undone 3 4 7 Restore Default Settings Factory default settings can be restored in this menu This function will not delete the media stored on the memory card and will only restore all of the menu s setting back to factory default settings 1 In Setup Mode use the ZOOM button to select Restore ...

Page 24: ...libration will be complete 5 You can perform the touch screen calibration as many times as needed Alternatively your camcorder s menus can be navigated via the touch screen Press the MENU icon in the bottom left hand corner of the screen to change chosen settings 23 ...

Page 25: ...00 LCD Monitor 3 0 Inch IPS High Resolution Touch Screen LCD Assistive Light Infrared LED for shooting in dark scenery Power Saving Mode OFF 1 Minute 3 Minutes 5 Minutes White Balance Control Auto Daylight Cloudy Fluorescent Tungsten Scene Modes Auto Night Portrait Landscape Backlight Sport Party Beach High Sensitivity Special Features Photo Burst Face Detection Color Filters Anti Shake Time Lapse...

Page 26: ...l Street 61st Floor New York NY 10005 USA Tel 800 441 1100 www minoltadigital com www elitebrands com Copyright 2021 Elite Brands Inc If you re having difficulties with your camera or would like further assistance please call our toll free technical support hotline at 800 441 1100 Please be sure to have your camera handy when calling ...

Page 27: ......

Reviews: