background image

25

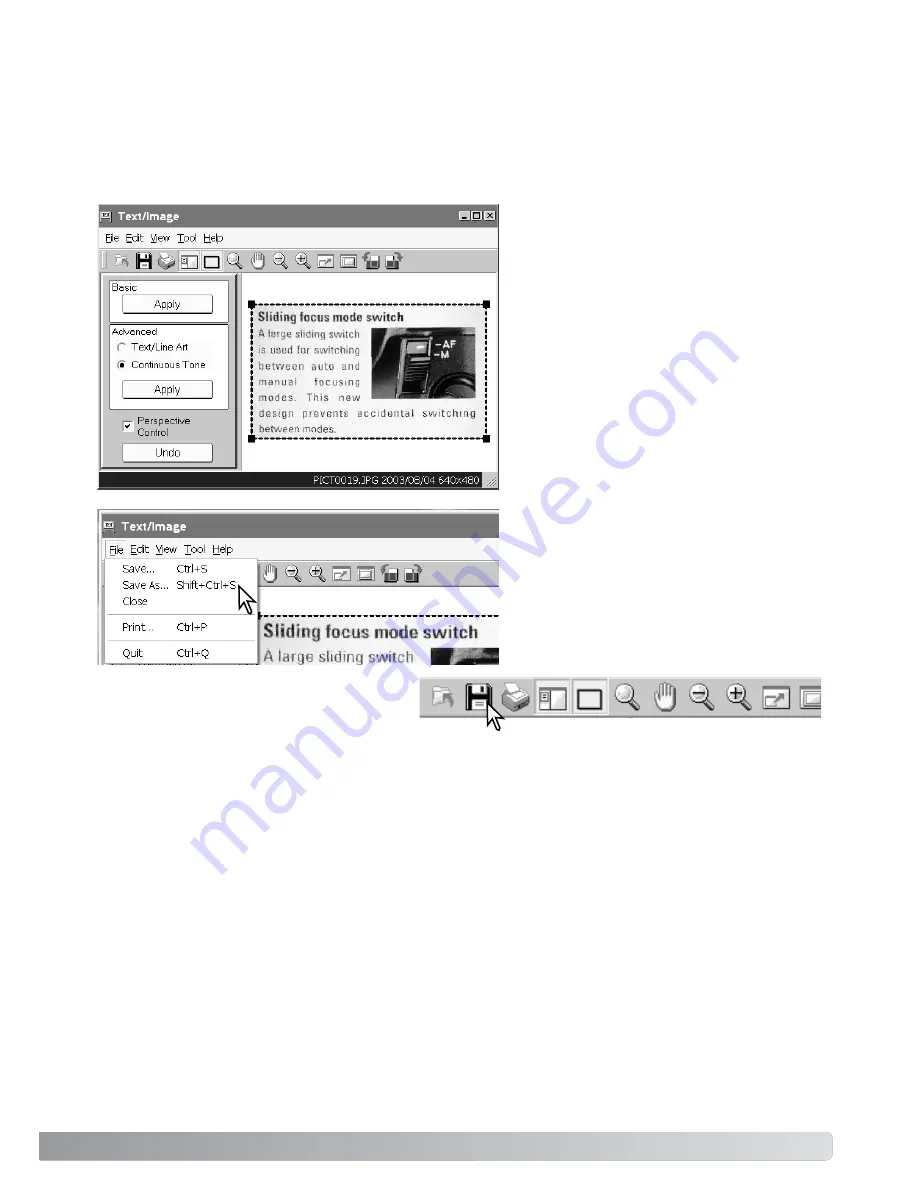
The result of the processing is applied
immediately. The illustration on the left
shows the results of perspective control. If
the result is not satisfactory, click the undo
button or select the undo option from the
edit menu.

Processing is additive. Each time an apply
button is clicked, processing is applied to
the current image. The more the process-
ing is applied, the stronger the results will
be. The undo button can only cancel the
last processing operation.

To save the image file with a different
name or in a different folder, select the
save-as option from the file menu. In the
save-as window, specify the location to
save the file, enter the file name, and
select the file type, then click the save but-
ton.

To overwrite the current file, click the save
button on the tool bar, or select the save
option from the file menu. The image will
be saved in its original location.

Basic: For images of black text on a white background. This is not appropriate for images with small
characters, fine detail, photographs, or continuous-tone illustrations.
Advanced, text/line art: For images of black text and line art on a white background. This is not
appropriate for images with photographs or continuous-tone illustrations.
Advanced, continuous tone: For images of photographs or continuous-tone illustrations on a white
background.

Summary of Contents for Dimage Dimage XtBiz

Page 1: ...INSTRUCTION MANUAL E Quick Guide 9222 2721 11 SY A308 ME 0308...

Page 2: ...ction in the basic operation of personal computers or the basic operation of Windows operating systems refer to the manuals supplied with the computer Check the packing list before using this product...

Page 3: ...ademarks or registered trademarks of their respective owners Names of parts 4 Getting up and running 5 Camera setup 5 Using the custom recording menu 7 From annotation to mailing 8 Recording main imag...

Page 4: ...tton p 13 Speaker 4 NAMES OF PARTS GETTING UP AND RUNNING NAMES OF PARTS This camera is a sophisticated optical instrument Care should be taken to keep these surfaces clean Main switch p 7 Microphone...

Page 5: ...Xt manual 4 Insert a memory card into the card slot Read the information about handling the card in the Xt manual 5 Turn on the camera 6 Turn the mode dial to the setup mode to set the date and time u...

Page 6: ...and audio files linked to it Additionally text comments can be added with the DiMAGE Biz Software mdm file An annotation file created from a main image with linked images audio tracks or text p 14 An...

Page 7: ...e Xt camera manual Press and hold the center button of the controller for one second to open the custom recording menu Use the left right and up down keys to highlight the appropriate recording mode P...

Page 8: ...eing annotated Images with voice memo or audio captions cannot be used Recording main images for annotation A live image is displayed on the monitor Compose the image and press the shutter release but...

Page 9: ...Text mode indicator the image was captured in the text recording mode Audio indicator the image has a voice memo or audio caption or it is an audio file Movie indicator the file is a movie file To ret...

Page 10: ...53 Movie clips The following files cannot be used as main images Images with voice memos or audio captions E mail Copy files Main images with ten linked images or audio tracks Audio tracks The annota...

Page 11: ...e main image must be captured before being annotated Use the left right and up down keys of the con troller to highlight the main image with the yellow border Press the center of the controller to sel...

Page 12: ...n the entire and local image areas Annotation screen When making audio recordings be careful not to touch or cover the microphone For best results hold the camera approximately 20cm 8in from your mout...

Page 13: ...utton from the main image selection screen and annotation screen For more about Quick View see the Xt manual The display button changes the display format Each time the button is pressed the display f...

Page 14: ...images An annotation series captured by the camera can be converted automatically by the DiMAGE Biz Software to an mdm annotation file See the DiMAGE Biz Software manual for installation instruc tions...

Page 15: ...notated file was not created on the camera or the mdm files have already been created Using the folder tree select the folder where the mdm files are stored If the folder is not found select the updat...

Page 16: ...e in the main window and click the annotation button or select the view comment option from the file menu Double clicking on an mdm thumbnail or dragging and dropping the image onto the annotation but...

Page 17: ...uction manual Click the desired area marquee from the tool bar 1 or select the area marquee option in the view menu To change the defined area click and drag the mouse again the previous marquee is ca...

Page 18: ...n from the file menu When the save command is used with an existing mdm file a warning to replace the file will appear Click the OK button to save changes to the file Save as To save the mdm file unde...

Page 19: ...le menu The print preview window opens Select the appropriate parameters and settings in the dialog win dow Click the print button to open the print dialog box Main image Page number Total number of p...

Page 20: ...l mdm files can be sent by e mail Only MAPI compatible e mail applications can be used and must be installed on your computer This allows mail to be sent from other applications Microsoft Outlook Expr...

Page 21: ...send the e mail Do not quit the DiMAGE Biz Software before sending the mail it may cause an error Refer to the e mail applica tion s instruction manual for details on operation When the recipient doe...

Page 22: ...mination reflections or overexposure with flash or other light sources may also prevent the software from being effective Text recording TEXT RECORDING AND PROCESSING Images of text line art or photog...

Page 23: ...e text image from the folder tree in the main window The images in the folder are displayed To open the text window select the image in the main window and click the text button or select the text ima...

Page 24: ...n processing is applied 24 TEXT RECORDING AND PROCESSING Text window Undo button Basic apply button Advanced apply button Perspective control check box Menu bar Tool bar Rubber band Display area Persp...

Page 25: ...from the file menu In the save as window specify the location to save the file enter the file name and select the file type then click the save but ton To overwrite the current file click the save bu...

Page 26: ...hree values the other two values change automatically Size to page The image is resized to fit to the paper size automatically Image information can be shown or hidden using the display image informat...

Page 27: ...be selected Click on the validation button or select the data vali dation option from the validation menu To delete the validation tag select the clear tag option from the validation menu DiMAGE Biz S...

Page 28: ...2003 Minolta Co Ltd under the Berne Convention and the Universal Copyright Convention 1AG6P1P1720 9222 2721 11 SY A308 ME 0308 Printed in Germany 0 43325 53247 4...

Reviews: