MINOLTA-QMS PagePro 4100W User Manual Download Page 94

Printer Driver and Status Display

4

PagePro 4100W

4-35

4

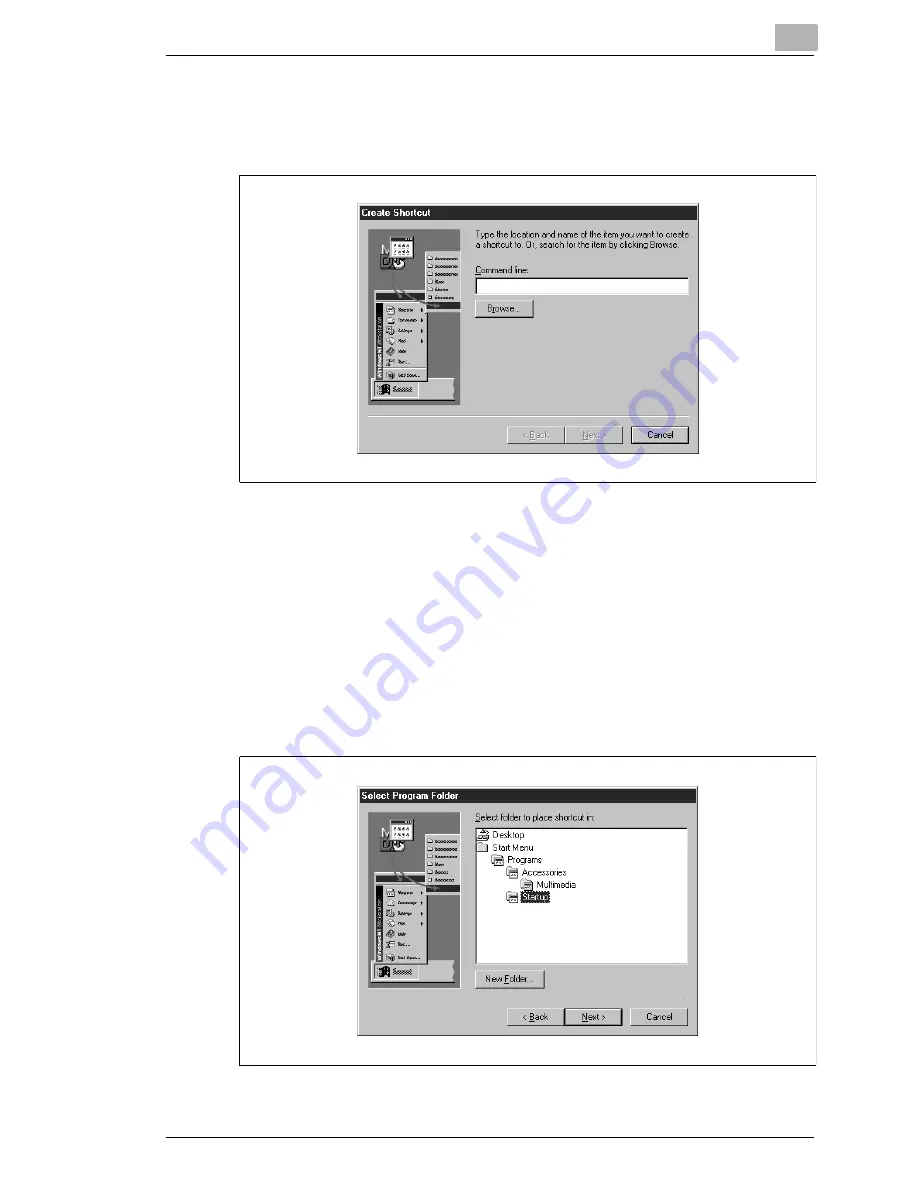
Use the [Browse] button to search for the Zjst402w file (for this 
example it is assumed that the file is installed under 
C:\Winnt\Zjst402w.exe)

5

Click the Winnt file and then click the [Open] button.

6

Click the Zjst402w file and then click [Open] to return to the Create 
Shortcut dialog.

7

Click the [Next>] button in the Create Shortcut dialog to open the 
Select Program Folder dialog.

8

Select the Startup folder from the “Select folder to place shortcut in” 
box and then click [Next>].

Summary of Contents for PagePro 4100W

Page 1: ...User Manual PagePro 4100W Documentation Documentation Documentation Documentation Documentation ...

Page 2: ...g Environment 2 4 Printer 2 4 Printer Supplies 2 6 2 3 Setting up 2 7 Installing the Face Down Tray 2 7 Installing Tray 1 2 8 Connecting the Power Cord 2 9 Loading Paper 2 10 Turning On the Printer 2 12 Connecting to a Computer 2 13 2 4 Options 2 14 SIMM Single In line Memory Module 2 14 Installing the Optional SIMM 2 15 2 5 Duplex Unit 2 20 Installing the Duplex Unit 2 20 2 6 Second Third Paper C...

Page 3: ...ter Driver from the CD ROM 4 16 To Uninstall the Printer Driver 4 26 4 4 Registering the Status Display 4 30 Registering the Status Display Under Windows 95 98 4 30 Registering the Status Display Under Windows NT 4 0 4 34 4 5 Displaying the Driver Setup Dialog Windows 95 98 NT 4 0 4 37 To Display the Driver Setup Dialog Under Windows 95 98 4 37 To Display the Driver Setup Dialog Under Windows NT 4...

Page 4: ...per Input Misfeed from Second Third Paper Cassette Unit 6 5 6 2 Paper Misfeed in the Duplex Unit 6 6 Upper Misfeed 6 6 Lower Misfeed 6 6 6 3 Print Quality Problems 6 7 Blank pages 6 7 Black pages 6 7 Printout too light 6 8 Printout too dark 6 8 Blurred background 6 8 Uneven print density 6 9 Irregularities 6 9 White or black line 6 9 Toner smudges 6 10 6 4 No output 6 10 Are you using the correct ...

Page 5: ...Unit Option 7 3 7 5 Interface Connector and Cable 7 4 7 6 SIMM Option 7 4 8 Quick Reference 8 1 The LED Display 8 1 Indicator Lights 8 1 Action Key 8 1 When the Ready LED is on 8 2 When the Error LED is on 8 4 When the Error LED is on Fatal Error 8 6 9 Glossary 10 Index ...

Page 6: ... the Minolta QMS PagePro 4100W the perfect printer for any size office l Fast 18 page per minute print speed l Powerful Windows printing technology for fast output l Real 1200 600 dpi resolution l Optional 10 100BaseT Ethernet NIC l Windows host based PostScript level 2 standard for expanded software compatibility l 250 sheet paper capacity m 1 250 sheet maximum paper holding capacity with optiona...

Page 7: ...r Cassette cover option Tray 3 500 sheet Third paper Cassette cover second cassette option option cassette unit cassette unit option option third cassette option Paper size guide Tray 1 multipurpose tray Power switch Top cover release button Power cord socket Parallel interface connector Network Interface Card NIC option Ethernet interface connector 10 100BaseT option ...

Page 8: ...Introduction 1 PagePro 4100W 1 3 Top cover Image transfer roller Fusing unit Imaging cartridge ...

Page 9: ...tridge is empty BLINKING The imaging cartridge is almost empty OFF Normal Paper Empty LED ON The selected paper tray is empty OFF Normal Ready LED ON The printer can receive print jobs BLINKING The printer is warming up OFF The printer is off line Action Key Press this key if an error should occur in order to have the current condition of the printer displayed through the LED Error amber Toner emp...

Page 10: ...out details of the printer s status by checking the information that appears on your computer screen Action Key The LED display will change as you press the Action key The appearance of this icon throughout this manual indicates when you need to press the Action key Examples of the messages that can be displayed by the LED are presented on the following page Blinking Off On ...

Page 11: ...ntroduction 1 6 PagePro 4100W When the Ready LED is on LED Display Description Response Required Initializing Power on initializing Warming Up Printer is warming up Ready Printer is ready and able to print ...

Page 12: ...to see which tray is out of paper For details see page 6 12 Size Mismatch The wrong size of paper has been detected in Tray 1 Tray 2 or Tray 3 Load the specified size of paper into the appropriate tray or press and hold the Action key for about 10 seconds until all of the LED s are on to cancel the print job see page 3 4 LED Display Description Response Required ...

Page 13: ...dy a new imaging cartridge For details see page 5 1 No Cassette No Tray No Cassette The casstte for Tray 2 or Tray 3 is not in place Press the Action key to see which cassette is not in place see page 6 12 No Tray A print job was sent using the Tray 2 or Tray 3 setting in the printer driver even though Tray 2 or Tray 3 is not installed on the printer Press the Action key to see which tray is not i...

Page 14: ...print job by pressing the Action key and change the paper size setting in the driver see page 3 4 and see page 6 16 Paper Misfeed A paper misfeed occurred near the Multipurpose tray Tray 2 Tray 3 Manual feeding tray Lower duplex unit Drum unit Fuser or Upper duplex unit Press the Action key to see where the paper misfeed occurred For details see page 6 16 Replace Imaging Cartridge The imaging cart...

Page 15: ...1 Introduction 1 10 PagePro 4100W ...

Page 16: ... other organic gases being generated in the area á The power outlet you plan to connect to should be nearby and unobstructed á Make sure that the printer is not exposed to direct sunlight á Avoid areas in the direct airflow of air conditioners heaters or ventilators and areas subjected to temperature and humidity extremes á Choose a sturdy level surface where the printer will not be exposed to str...

Page 17: ...ter or any other object Í If any other electrical equipment is plugged into the same outlet make sure that the capacity of the outlet is not exceeded Í If you use an extension cord make sure its capacity is greater than the power consumption of the printer Using an extension cord with a lower capacity creates the danger of fire Í Never use a multiple socket to connect other appliances or machines ...

Page 18: ...3 4 300 mm or more 4 100 mm or more 33 836 mm or more 11 3 4 300 mm or more 600 mm or more or more 34 1 4 867 mm or more 6 150 mm or more 11 3 4 300 mm or more 1 028 mm or more 46 1 2 1 178 mm or more When equipped with an optional second cassette unit When equipped with an optional third cassette unit When equipped with an optional duplex unit 24 3 4 632 mm or more 29 1 2 746 mm 40 1 2 23 1 2 ...

Page 19: ...power cord before moving the printer Failure to do so can damage the power cord creating the danger of fire or electrical shock l Always unplug the power cord if you do not plan to use the printer for a long time l Never try to remove any secured panel or cover The interior of the printer contains high voltage circuitry which creates the danger of electrical shock when exposed l Never try to modif...

Page 20: ...ectrical shock l Whenever the printer emits unusually high amounts of heat smoke an unusual odor or noise immediately turn it off unplug it and contact your dealer Failure to take this immediate action creates the danger of fire or electrical shock NOTE Í Be sure to locate the printer in a well ventilated location A minimal amount of ozone is generated during normal operation of this printer Becau...

Page 21: ...ected to high humidity m Areas subjected to large amounts of dust l Keep paper that has been removed from its wrapper but not yet loaded onto the printer tray in a sealed plastic bag and store it in a cool dark location l Only use imaging cartridges that are expressly specified for this printer l Keep supplies out of the reach of children l Should your hands become soiled with toner immediately wa...

Page 22: ...an result in radio interference with data Í Keep all the boxes and packing materials that the printer comes in for later use when transporting the printer Installing the Face Down Tray With both hands gently bend the face down tray inwards and insert one of its tabs into its holder on the upper portion of the printer Continue to bend the face down tray so that it curves enough for the second tab t...

Page 23: ... 8 PagePro 4100W Installing Tray 1 1 Using the left and right slots in the printer as guides gently push Tray 1 until it cannot be inserted any further as shown in the illustration 2 Attach the tray cover onto Tray 1 ...

Page 24: ... 2 9 Connecting the Power Cord 1 Make sure that the printer s power switch is in the O Off position 2 Connect one end of the power cord that comes with the printer to the power cord socket Plug the other end into a power outlet ...

Page 25: ...2 Setting up 2 10 PagePro 4100W Loading Paper 1 Remove the tray cover from Tray 1 2 Open all three of the paper size guides ...

Page 26: ...he tray print side up Secure the stack by adjusting the paper size guides NOTE Í A maximum level mark on the paper size guide shows how high you can stack paper on Tray 1 Make sure that paper is stacked no higher than this mark 4 Replace the tray cover onto Tray 1 ...

Page 27: ...that the printer is warming up In about 23 seconds only the ready indicator remains lit indicating that the printer is ready to print NOTE Í The printer automatically enters a power saving mode if it receives no print commands for about 15 minutes Whenever the printer receives a print command while in the power saving mode it starts to warm up again and takes about 23 seconds before it is ready to...

Page 28: ...are both turned off 2 Connect one end of the interface cable to the parallel port of the computer 3 Connect the other end of the cable to the parallel connector on the back of the printer Secure the cable using the two clips on the parallel connector For cable specifications and pin assignments see page 7 4 of this User s Manual ...

Page 29: ...crease memory capacity to up to 16 MB by installing an optional 8 or 16 MB SIMM into the memory connector located inside of the printer NOTE Í Memory capacity can be increased to 16 MB by installing a 16 MB SIMM into the printer The successful installation of the expansion memory can be confirmed by displaying the Printer Information in the Printer Status Display For details see page 4 53 Displayi...

Page 30: ...er that is not directly specified for removal in the User s Manual 1 Turn off the printer and unplug the power cord 2 Disconnect the parallel cable from the printer 3 Press the top cover release button and open the top cover 4 Using a screwdriver loosen and remove the two screws that secure the exterior side cover to the printer ...

Page 31: ... the exterior side cover until the clips release see illustration CAUTION Í Do not touch any part of the main circuit inside of the printer 6 With the exterior side cover removed the internal side cover of the printer is exposed With the screwdriver loosen and remove the four screws that secure the internal side cover ...

Page 32: ... main circuit 8 Being careful not to touch the connection points along the edge of the SIMM insert the SIMM into the socket on the main circuit m Insert the SIMM at an angle as shown and gently swing it into the socket m Apply pressure until the SIMM locks into place SIMM socket ...

Page 33: ... up 2 18 PagePro 4100W 9 Make sure both clips on the socket are pushed through the holes on the SIMM 10Replace the internal side cover using the four screws 11Replace the external side cover using the two screws ...

Page 34: ...at the above steps making sure that the SIMM is installed correctly For details see page 4 53 Displaying Printer Information NOTE Í To release the SIMM from the socket push out on the metal taps on each side of the socket Í Installation of an optional SIMM will increase the memory capacity of your printer However the memory of the optional SIMM will not be combined with the initial 2 MB that came ...

Page 35: ... of the paper through the printer software For more information see page 3 14 l Take the duplex unit out of the shipping box l Remove the plastic bag and all shipping materials l Turn the printer off and then disconnect the power cord and interface cable from the printer Installing the Duplex Unit 1 With a screwdriver or similar instrument remove the flat clip that is attached to the back of the m...

Page 36: ...gn the L shaped duplex unit to the back of the main unit of the printer so that the bottom of the L is inside of the opening at the bottom of the printer NOTE Í Make sure that the connector of the unit is inserted into the printer securely ...

Page 37: ... with your hand during installation until it is secured to the printer with the screws 4 Connect the power cord to the printer and then turn the printer on Connecting the Power Cord see page 2 9 Turning On the Printer see page 2 12 5 Select the Printer Information in the Printer Status Display to verify that duplex unit is displayed in the Printer Information dialog For details see page 4 53 Displ...

Page 38: ...econd Third Paper Cassette Unit l Take the paper cassette unit out of the shipping box l Remove the plastic bag and all shipping materials l Turn the printer off and then disconnect the power cord and interface cable from the printer 1 Place the paper cassette unit in the location you have chosen see page 2 1 Selecting a Location for the Printer Pull out the paper tray 2 Set the printer onto the p...

Page 39: ...2 Setting up 2 24 PagePro 4100W 3 Insert Tray 2 or Tray 3 into the paper cassette unit Second paper cassette unit Third paper cassette unit Tray 2 Tray 3 ...

Page 40: ... unit 4 Connect the power cord to the printer and then turn the printer on Connecting the Power Cord see page 2 9 Turning On the Printer see page 2 12 5 Select the Printer Information in the Printer Status Display to verify that Tray 2 or Tray 3 is displayed in the Printer Information dialog For details see page 4 53 Displaying Printer Information ...

Page 41: ...eT network interface card that is supported by this printer For details please see the User s Manual for the Network Interface Card Installing the Optional Network Interface Card 1 Turn the printer off and unplug the power cord from the printer Disconnect the cable from the interface connector ...

Page 42: ...t you do not misplace the cover panel or screws when you remove them The screws will be used after the optional NIC is installed 3 Take the NIC out of its carton NOTE Í When the NIC is taken out of its conductive bag or off its mat hold it by its edges to avoid touching the terminals or the patterned surfaces 4 Insert the NIC as shown in the diagram ...

Page 43: ...same screws that were used to hold the cover panel NOTE Í Follow the NIC s installation procedure in reverse to remove the NIC 6 Connect the power cord to the printer and then turn the printer on Connecting the Power Cord see page 2 9 Turning On the Printer see page 2 12 ...

Page 44: ...aper weighing 60 to 90 g m 2 16 to 24 lbs Special Paper Recycled Paper weighing 60 to 90 g m 2 16 to 24 lbs Transparency Sheet Labels Letterhead Envelopes J Post Postcard size 100 148 mm 4 5 3 4 Thick Paper weighing 90 to 163 g m 2 24 to 43 lbs Tray 1 m m m m m m m m Tray 2 m m None None None None None None Tray 3 m m None None None None None None Manual Feed Tray m m m m m m m m ...

Page 45: ... A4 210 297 mm 8 1 4 11 3 4 JIS B5 182 257 mm 7 1 4 10 A5 148 210 mm 5 3 4 8 1 4 Legal 216 356 mm 8 1 2 14 Letter 216 x 279 mm 8 1 2 11 Executive 184 267 mm 7 1 4 10 1 2 Invoice 140 216 mm 5 1 2 8 1 2 Tray 1 m m m m m m m Tray 2 m m None m m m None Tray 3 m m None m m O None Manual Feed Tray m m m m m m m Paper Feeding Port Env Com10 105 x 241mm 4 1 8 9 1 2 Env DL 110 220mm 4 5 16 8 11 16 Env C5 1...

Page 46: ...per heat sensitive paper and pressure sensitive paper m Sheets of various sizes m Paper not cut on right angles m Paper bound by glue staples or clips m Paper affixed with labels which are easy to peel m Post cards that are warped or bent Í Envelopes should meet the following requirements m Sharp folds and edges m General mailing envelopes without seals on the glued portion m Having flaps the full...

Page 47: ...ilable as optional paper sources See the section of this User s Manual entitled Loading Paper onto Tray 2 Tray 3 for details on using these trays Always remember that paper storage conditions greatly affect print quality Store paper in its original package Keep paper out of areas subject to extreme temperatures or humidity Loading Paper onto Tray 1 You can load up to 250 sheets of standard paper o...

Page 48: ...t and the right sides of the paper stack are secure NOTE Í A maximum level mark on the paper size guide shows how high you can stack paper on Tray 1 Make sure that paper is stacked no higher than this mark Í Do not load additional paper until the paper currently loaded onto Tray 1 is completely used 4 Replace the tray cover onto Tray 1 ...

Page 49: ...er to Chapter Setting up 1 Slide Tray 2 Tray 3 out of the second third paper cassette unit as illustrated NOTE Í The cassette is designed to remain in the unit during the normal loading and operation of the printer To remove Tray 2 Tray 3 from the unit pull it out as far as it will go without force Then gently raise the forward end up and remove Tray 2 Tray 3 from the unit Í Tray 2 and Tray 3 are ...

Page 50: ... cover from Tray 2 Tray 3 3 Press down on the paper lifting plate located inside of Tray 2 Tray 3 until it locks 4 Place a stack of up to 500 sheets of paper into Tray 2 Tray 3 so that the side that was facing up when the paper was unwrapped is still facing up ...

Page 51: ...ray 2 Tray 3 shows how high you can stack paper Make sure that paper is stacked no higher than this mark Í Tray 2 Tray 3 does not support landscape oriented paper feeding Í Do not load additional paper until all the paper currently on Tray 2 Tray 3 is completely used up Maximum level mark ...

Page 52: ...Using the Printer 3 PagePro 4100W 3 9 5 Replace the cassette cover and insert Tray 2 Tray 3 into the second third paper cassette unit Tray 2 Tray 3 ...

Page 53: ...ePro 4100W Loading Paper onto Manual Feed Tray 1 Make sure that the tray cover is properly attached to Tray 1 2 Open the paper size guides 3 Insert the sheet of paper into the manual feed tray with the side to be printed facing up ...

Page 54: ...Using the Printer 3 PagePro 4100W 3 11 4 Adjust the paper size guides so that both sides of the paper are secure NOTE Í Insert only one sheet of paper or one envelope at a time when feeding manually ...

Page 55: ...side to be printed facing up on the tray The flap of the envelope should be facing down and to the left 2 Make sure that the envelope is placed in the center of the tray and that it is secured by the paper size guides NOTE Í Because there is great variation in the quality of paper used for envelopes we suggest that you produce test prints of various types before purchasing any envelope in large qu...

Page 56: ...ard sealing that sticks after it is moistened l Use envelopes of which flaps run the entire length of the envelope Envelopes that seal at one end will not feed properly l Do not use envelopes that have a window Such envelopes can seriously damage the printer l Do not use envelopes that are wrinkled l Never use envelopes that have clasps or any other type of fastener that can damage the printer l D...

Page 57: ...h sides of a sheet of paper Installation of the optional duplex unit is required to perform duplex printing You can choose either Long Edge Binding or Short Edge Binding when generating duplex documents 1 Long Edge Binding 2 Short Edge Binding A A A A Portrait Landscape A A A A Landscape Portrait ...

Page 58: ... use special paper transparencies labels envelopes letterhead J Post and thick paper for duplex printing l Paper Size A4 A5 JIS B5 Letter Legal Executive Invoice Remember the following points when generating duplex documents l The size of both original documents that will be used to make one duplex document must be the same l The original document that is loaded first into the duplex unit will be ...

Page 59: ...3 Using the Printer 3 16 PagePro 4100W ...

Page 60: ... to download the updated printer driver please contact a Minolta QMS dealer 4 1 System Requirements The following describes the minimum system requirements for running the Minolta QMS PagePro 4100W printer driver Operating System Microsoft Windows 95 Windows 98 or Windows NT 4 0 Personal Computer IBM compatible PC with at least a 486DX 66MHz CPU Pentium processor recommended Disk Drive One CD ROM ...

Page 61: ...quipped with at least 16 MB Windows 95 98 or 32 MB Windows NT 4 0 of RAM Additional RAM beyond the recommended 32 MB Windows 95 98 or 64 MB Windows NT 4 0 will allow your printer to provide you with the high standards of performance for which it was designed If your computer s current memory capacity is less than 16 MB Windows 95 98 or 32 MB Windows NT 4 0 the installation of additional memory is ...

Page 62: ... Turn on your computer and start up Windows 95 or Windows 98 2 Insert the Printer Driver CD ROM into your computer s CD ROM drive In this example we will assume that D is the name of the CD ROM drive 3 Open the Windows Explorer browse to the CD ROM drive and navigate to D DRIVER WIN95NT GB 4 Double click setup exe to start up the installer NOTE Í The printer driver must be installed using the CD R...

Page 63: ...s Display 4 4 PagePro 4100W 6 Select Local printer if the printer is connected directly to your computer or Network printer if the printer is connected through a network and click OK 7 Select an installation option and click OK ...

Page 64: ...t using Masquerade Í For a detailed description of ZScript see the Zenographic s ZScript User s Guide file name ZScript pdf from the Manual folder in the CD ROM Displaying Zenographic s ZScript User s Guide File 1 After you complete installation of the GDI Printer Driver insert the Printer Driver CD ROM into your computer s CD ROM drive If you have just installed the printer driver the CD ROM shou...

Page 65: ... as default printer if you want to use the printer as this default printer or leave this option unchecked if you do not want it as the default 10Click the OK button to display the next dialog 11Rename the printer if you want and then click OK To proceed without renaming the printer just click OK ...

Page 66: ... 4 7 12Change the directory name if you want or leave the default directory name Next click Install to start actual GDI Printer Driver installation 13Click Yes recommended to print a test page or No if you want to proceed without printing a test page ...

Page 67: ...E Í The Masquerade icon is not displayed if you did not select the PostScript Support option in Step 6 Í If you selected the PostScript Support option in Step 6 make sure to continue from step 15 to install PostScript Driver ZScript Í If you did not select the PostScript Support option Step 14 completes your installation of the GDI Printer Driver 15On the Installer screen click the Quit button 16T...

Page 68: ...ro 4100W 4 9 17In the Non PostScript Printers area select Minolta QMS PagePro 4100W on LPT1 and then click the Install button 18After a few moments the Minolta QMS PagePro PSCRIPT Properties dialog appears 19Click OK to display the next dialog ...

Page 69: ... ZScript Printers area of the Masquerade dialog 21Click the Exit button to complete installation of PostScript Driver ZScript 22On the taskbar click Start point to Settings and then click Printers 23Confirm that two icons named Minolta QMS PagePro 4100W and Minolta QMS PagePro PSCRIPT are shown in the Printers dialog ...

Page 70: ...e Printers dialog if you do not perform Steps 15 through 20 to install PostScript Driver ZScript Print Test Page Example An example of the test page is shown below Make sure that Minolta QMS PagePro 4100W is indicated as the printer model on the test page This confirms that the printer driver has been correctly installed ...

Page 71: ...ript Driver ZScript installed on your computer 1 Turn on your computer and start up Windows 95 or Windows 98 2 To start uninstallation of PostScript Driver ZScript click Start on the taskbar point to Programs point to Minolta QMS Printer Utilities and then click Masquerade 3 In the Installed ZScript Printers area click Minolta QMS PagePro PSCRIPT and then click Remove ...

Page 72: ...d Status Display 4 PagePro 4100W 4 13 4 Click Exit 5 On the taskbar click Start point to Settings and then click Printers 6 Confirm that the Minolta QMS PagePro PSCRIPT icon is no longer displayed in the Printers dialog ...

Page 73: ...rt uninstallation of the GDI Printer Driver click Start on the taskbar point to Programs point to Minolta QMS Printer Utilities and then click Uninstall 8 Select Minolta QMS PagePro 4100W 9 Click Uninstall to proceed with the uninstall operation or Cancel to abort ...

Page 74: ...o 4100W 4 15 10In the next dialog that appears click Yes to restart the computer 11On the taskbar click Start point to Settings and then click Printers 12Confirm that the Minolta QMS PagePro 4100W icon is no longer shown in the Printers dialog ...

Page 75: ... computer and start up Windows NT 4 0 2 Insert the Printer Driver CD ROM into your computer s CD ROM drive In this example we will assume that D is the name of the CD ROM drive 3 Open the Windows Explorer Browse to the CD ROM drive and navigate to D DRIVER Win95NT GB 4 Double click setup exe to start up the installer NOTE Í The printer driver must be installed using the CD ROM s setup exe Do not u...

Page 76: ...us Display 4 PagePro 4100W 4 17 5 Follow the instructions that appear on your computer screen to complete the installation 6 Select Local Printer 7 Click the OK button to display the next dialog 8 Select installation options ...

Page 77: ...ipt using Masquerade Í For a detailed description of ZScript see the Zenographic s ZScript User s Guide file name ZScript pdf from the Manual folder in the CD ROM Displaying Zenographic s ZScript User s Guide File 1 After you complete installation of the GDI Printer Driver insert the Printer Driver CD ROM into your computer s CD ROM drive If you have just installed the printer driver the CD ROM sh...

Page 78: ...r printer is connected to a network we recommend consulting your network administrator and referring to the Network Interface Card Manuals 10If you plan to use the printer as a network printer type in a name for Share Name Example PP4100W NOTE Í Skip Step 7 if you do not check the Server Install option in Step 8 11Click OK to display the next dialog 12Select the appropriate port ...

Page 79: ...is option unchecked if you do not want it as the default 14Click the OK button to display the next dialog 15Rename the printer if you want and then click OK To proceed without renaming the printer just click OK 16Change the directory name if you want or leave the default directory name Next click Install to start actual GDI Printer Driver installation ...

Page 80: ...agePro 4100W Status and Uninstall If you selected the PostScript Support option in Step 7 of this procedure it also has a Masquerade icon NOTE Í The Masquerade icon is not displayed if you did not select the PostScript Support option in Step 7 Í If you selected the PostScript Support option in Step 7 make sure to continue from Step 19 to install PostScript Driver ZScript Í If you did not select th...

Page 81: ...r screen click the Quit button 20To start installation of PostScript Driver ZScript double click the Masquerade icon in the Minolta QMS Printer Utilities dialog 21In the Non PostScript Printers area select Minolta QMS PagePro 4100W on LPT1 and then click the Install button ...

Page 82: ...Pro 4100W 4 23 22After a few moments the Minolta QMS PagePro PSCRIPT Properties dialog appears 23Click OK to display the next dialog 24Confirm that Minolta QMS PagePro PSCRIPT is in the Installed ZScript Printers area of the Masquerade dialog ...

Page 83: ...Confirm that two icons named Minolta QMS PagePro 4100W and Minolta QMS PagePro PSCRIPT are shown in the Printers dialog NOTE Í The Minolta QMS PagePro PSCRIPT icon does not appear in the Printers dialog if you do not perform Steps 19 through 24 to install PostScript Driver ZScript Í The printer driver must be installed using the CD ROM s installer Do not use the Add Printer wizard from the Printer...

Page 84: ...ePro 4100W 4 25 Print Test Page Example An example of the test page is shown below Make sure that Minolta QMS PagePro 4100W is indicated as the printer model on the test page This confirms that the printer driver has been correctly installed ...

Page 85: ...ostScript Driver ZScript installed on your computer 1 Turn on your computer and start up Windows NT 4 0 2 To start uninstallation of PostScript Driver ZScript click Start on the taskbar point to Programs point to Minolta QMS Printer Utilities and then click Masquerade 3 In the Installed Zscript Printers area click Minolta QMS PagePro PSCRIPT and then click Remove ...

Page 86: ...d Status Display 4 PagePro 4100W 4 27 4 Click Exit 5 On the taskbar click Start point to Settings and then click Printers 6 Confirm that the Minolta QMS PagePro PSCRIPT icon is no longer displayed in the Printers dialog ...

Page 87: ...rt uninstallation of the GDI Printer Driver click Start on the taskbar point to Programs point to Minolta QMS Printer Utilities and then click Uninstall 8 Select Minolta QMS PagePro 4100W 9 Click Uninstall to proceed with the uninstall operation or Cancel to abort ...

Page 88: ...o 4100W 4 29 10In the next dialog that appears click Yes to restart the computer 11On the taskbar click Start point to Settings and then click Printers 12Confirm that the Minolta QMS PagePro 4100W icon is no longer shown in the Printers dialog ...

Page 89: ...ment For further details please refer to the documentation that came with your version of Windows NOTE Í The Status Display allows you to monitor the operating status of the printer only when the printer is locally directly connected to the host computer via a parallel interface cable Registering the Status Display Under Windows 95 98 The screen images that appear in this section are examples of S...

Page 90: ...ialog that appears 3 Click the Add button that is located in the Customize Start Menu box to open the Create Shortcut dialog 4 Use the Browse button to search for the Zjst402w file for this example it is assumed that the file is installed under C Windows Zjst402w exe 5 Click the Windows file and then click the Open button ...

Page 91: ...utton in the Create Shortcut dialog to open the Select Program Folder dialog 8 Select the StartUp folder from the Select folder to place shortcut in box and then click Next 9 Enter a name for the shortcut to the Status Display into the Select a Title for the Program dialog and click Finish 10Click the OK button in the Taskbar Properties 11Restart the computer ...

Page 92: ...rinter Driver and Status Display 4 PagePro 4100W 4 33 12Make sure that the Minolta QMS PagePro 4100W Status Display appears on your desktop and that the Status Display icon appears on the Windows taskbar ...

Page 93: ...wed only after the successful installation of the printer driver 1 Click on the Start button go to the Settings menu and click on the Taskbar item 2 Click on the Start Menu Programs tab in the Taskbar Properties dialog that appears 3 Click the Add button that is located in the Customize Start Menu box to open the Create Shortcut dialog ...

Page 94: ...talled under C Winnt Zjst402w exe 5 Click the Winnt file and then click the Open button 6 Click the Zjst402w file and then click Open to return to the Create Shortcut dialog 7 Click the Next button in the Create Shortcut dialog to open the Select Program Folder dialog 8 Select the Startup folder from the Select folder to place shortcut in box and then click Next ...

Page 95: ...atus Display into the Select a Title for the Program dialog and click Finish 10Click the OK button in the Taskbar Properties 11Restart the computer 12Make sure that the Minolta QMS PagePro 4100W Status Display appears on your desktop and that the Status Display icon appears on the Windows taskbar ...

Page 96: ...95 Windows 98 or Windows NT 4 0 To Display the Driver Setup Dialog Under Windows 95 98 1 Click Start point to Settings and then click Printers to display the Printers dialog 2 In the Printers dialog click the Minolta QMS PagePro 4100W icon 3 In the Printers dialog select Properties from the File menu 4 On the Å32 bit SuperDriver Setup tab of the Properties dialog the following dialog appears ...

Page 97: ...play 4 38 PagePro 4100W To Display the Driver Setup Dialog Under Windows NT 4 0 1 Click Start point to Settings and then click Printers to display the Printers dialog 2 In the Printers dialog click the Minolta QMS PagePro 4100W icon ...

Page 98: ...Printer Driver and Status Display 4 PagePro 4100W 4 39 3 In the Printers dialog select Document Defaults from the File menu 4 The following dialog appears ...

Page 99: ...ill become the default settings for the printer driver The dialog is opened from the Windows 95 98 NT 4 0 Printers folder NOTE Í The screen images that appear in this section show the printer driver operating in a Windows 95 based environment Common Buttons The following buttons appear at the bottom of each tab l OK Click to exit the properties dialog saving any changes made l Cancel Click to exit...

Page 100: ...er that are supported by your printer are displayed in the drop down list Select the appropriate size l Paper m Letter 8 1 2 11 inches m Legal 8 1 2 14 inches m Invoice 5 1 2 8 1 2 inches m Executive 7 1 4 10 1 2 inches m A4 210 297 mm m A5 148 210 mm m JIS B5 182 257 mm m J Post 100 148 mm l Envelopes m COM10 4 1 8 9 1 2 inches m DL 110 220 mm m C5 162 229 mm m Monarch 3 7 8 7 1 2 inches ...

Page 101: ...pe documents are printed widthwise horizontally relative to the page l Paper Source The Paper Source item specifies the tray from which paper is fed from the printer To change this setting just select the desired paper source from the drop down list If the desired tray is an option and does not appear as a paper source make sure that it has been added in the Device Option tab l Default Click the D...

Page 102: ... selections m Off This default setting specifies one document per sheet of paper m 2 up This setting will print two documents onto one sheet of paper m 4 up This setting will print four documents onto one sheet of paper m 6 up This setting will print six documents onto one sheet of paper m 9 up This setting will print nine documents onto one sheet of paper m 16 up This setting will print sixteen d...

Page 103: ...tc Through the driver you can specify several guidelines that effect the style content and placement of watermarks The Watermark drop down list catalogs the menu of watermarks that have been entered into the printer s memory You can add and delete watermarks from this list through the Watermark pop up dialog Watermarks can be specified to appear on the first page only of a multi page document by c...

Page 104: ...The name that you wish to use to identify the watermark in the Watermark list is entered here m String The contents of the watermark that you wish to create are entered here m Shading The density of the watermark that will appear on the document is specified here m Style These settings can be used to specify the style of the watermark s font m Font The typeface and size of the watermark is specifi...

Page 105: ...e maximum percentage of reduction is 50 NOTE Í The Scaling feature of the printer driver cannot be used when printing N up documents l Duplex The Duplex feature enables your printer to support double sided printing From the drop down list select Short Edge Binding to print documents in a calendar style format Long Edge Binding to print documents in a book style format or Off for one sided printing...

Page 106: ...inting documents that will be sent via facsimile l Enhance Contrast This setting enhances the definition between dark and light l Resolution The resolution setting determines the dots per inch dpi used when a document is printed Document printing quality will increase as the value of dpi increases Please note however that printing time may also increase when high resolution settings are selected R...

Page 107: ...ness and Sharpness Usually the median values toward the center of the bars will provide the best display To fine tune these settings click hold and move the sliders in order to make left and right adjustments Value changes are reflected in the view window as you make them The factory defaults for these settings are 50 for Contrast 50 for Brightness and 20 for Sharpness l Default Click the Default ...

Page 108: ... to the Installed Options list select the option and click the Add button The Installed Options list catalogs the optional accessories that have been added to your printer To remove an option from the Installed Options list select the option and click the Remove button Removed options can be reinstalled using the add procedure About This tab displays version and copyright information about this pr...

Page 109: ...planation for registering the Status Display see page 4 30 Opening the Printer Status Display Before opening the Printer Status Display make sure that the printer is connected to your computer with the parallel interface cable Use the procedure below to open the Printer Status Display l To Open the Printer Status Display Click Start point to Programs point to Minolta QMS Printer Utilities and then...

Page 110: ...eed to do in order to correct problems and recover from error conditions l Warning Status This area displays text messages that warn you of such conditions as low toner l Printer Status figure This area shows a graphic representation of the printer and indicates where there is a problem l Printing Status These items indicate the status of an ongoing print job Job Name shows the name of the job whi...

Page 111: ...ight it and then click Add l To move an error condition from the Activate Popup list to the Inactivate Popup list click on the error condition to highlight it and then click Delete l After you are finished click OK to register your settings or Cancel to close the dialog without entering any changes Switching Between the Expanded and Reduced Views You can use the following procedure to switch betwe...

Page 112: ...nstalled will be displayed here to indicate when a second cassette unit has been installed onto the printer l Tray 3 Tray 3 Installed will be displayed here to indicate when a third cassette unit has been installed onto the printer l Printer Memory This counter displays the amount of memory that is currently available to the printer NOTE Í Installation of an optional SIMM will increase the memory ...

Page 113: ...4 Printer Driver and Status Display 4 54 PagePro 4100W ...

Page 114: ...istribute the toner remaining in the cartridge Prepare a new imaging cartridge as a replacement l When the imaging cartridge runs out of toner Imaging Cartridge Empty message is displayed in the Status Display It is recommended that you change the imaging cartridge as soon as possible NOTE Í The Imaging Cartrige Low message appears in the Warning Status window of the Status Display as a reminder t...

Page 115: ... during operation Do not touch the area to avoid injury 1 Turn the printer off and then disconnect the power cord and interface cable from the printer 2 Close the face down tray and press the top cover release button to open the top cover NOTE Í Be sure to close the face down tray before opening the top cover to prevent injuries ...

Page 116: ...e shutter of the imaging cartridge to avoid causing damage to the drum unit When handling the imaging cartridge always use the handle 4 Take a new imaging cartridge out of the box Holding it with both hands shake it 4 or 5 times in the direction of the arrows to distribute the toner evenly ...

Page 117: ... 5 Install the imaging cartridge securely into the printer by sliding the pins on each side of the cartridge along the grooves of the cartridge guide 6 Close the top cover and press it down gently but firmly until it locks into place ...

Page 118: ...y hot during operation Do not touch the area to avoid injury Wait for at least 10 minutes after the printer has been turned off and make sure that the fusing unit has cooled before cleaning the interior of the printer Cleaning the Outside of the Printer Wipe the outside of the printer with a soft cloth moistened with a neutral household detergent Cleaning the Paper Transport Roller 1 Turn off the ...

Page 119: ...opening the top cover to prevent injuries 3 Remove the imaging cartridge NOTE Í Immediately wrap the imaging cartridge with a cloth to protect it from overexposure to light 4 Pull back on the cover that protects the paper transport roller located at the bottom of the printer chamber ...

Page 120: ...ance 5 PagePro 4100W 5 7 5 Use a soft cloth to wipe the paper transport roller 6 Reinstall the imaging cartridge see page 5 2 7 Close the top cover and press it down gently but firmly until it locks into place ...

Page 121: ...5 Maintenance 5 8 PagePro 4100W ...

Page 122: ...e a misfed paper from inside the printer CAUTION Í The fusing unit inside the printer can become very hot during operation Do not touch the area to avoid injury 1 Close the face down tray and press the top cover release button to open the top cover NOTE Í Be sure to close the face down tray before opening the top cover to prevent injuries ...

Page 123: ...e the imaging cartridge NOTE Í Immediately wrap the imaging cartridge with a cloth to protect it from overexposure to light 3 Pull the end of the paper that is visible straight out of the printer CAUTION Í Do not touch the image transfer roller ...

Page 124: ...Troubleshooting 6 PagePro 4100W 6 3 4 Reinstall the imaging cartridge see page 5 2 5 Close the top cover and press it down gently but firmly until it locks into place ...

Page 125: ...feed Pull the misfed paper straight out of the printer Paper Input Misfeed from Tray 1 Remove the tray cover and pull the misfed paper straight out of the printer Paper Input Misfeed from Manual Feed Tray Pull the misfed paper straight out of the printer ...

Page 126: ...Unit Remove the cassette cover and pull out Tray 2 Tray 3 from the second third paper cassette unit Press down on the stack of paper until the paper lifting plate locks Remove the stack of paper from the tray and pull the misfed paper straight out of the printer Tray 3 Tray 2 Tray 2 Tray 3 ...

Page 127: ...ePro 4100W 6 2 Paper Misfeed in the Duplex Unit Upper Misfeed Open the duplex upper cover and pull out the misfed paper Lower Misfeed Open the duplex lower cover and remove the misfed paper Duplex upper cover Duplex lower cover ...

Page 128: ...rtridge and rock it left and right a few times to distribute remaining toner If the problem persists replace the imaging cartridge see page 5 2 l The imaging cartridge may be defective Remove the imaging cartridge and check it for damage Replace the imaging cartridge if necessary see page 5 2 Black pages l The imaging cartridge may be defective Remove the imaging cartridge and check it for damage ...

Page 129: ...imaging cartridge may be defective Remove the imaging cartridge and check it for damage Replace the imaging cartridge if necessary see page 5 2 Printout too dark l The imaging cartridge may be defective Remove the imaging cartridge and check it for damage Replace the imaging cartridge if necessary see page 5 2 Blurred background l The imaging cartridge may be defective Remove the imaging cartridge...

Page 130: ...ng cartridge and check it for damage Replace the imaging cartridge if necessary see page 5 2 Irregularities l The paper may have absorbed some moisture due to high humidity or because of direct contact with water Since toner will not adhere well to damp paper replace the paper you are using with dry paper and try printing again White or black line l The imaging cartridge may be defective Remove th...

Page 131: ...ck the following points to see if you can correct the problem If problems persist contact your dealer Are you using the correct type of printer cable Save the data you are trying to print and close all the applications currently open on your computer Next reset your computer to send a break signal to the printer Now check your printer cable against the specifications in Chapter Specifications of t...

Page 132: ... Í The appearance of this icon throughout this manual indicates when you need to press the Action key LED Status For the explanation On or blinking Ready LED see page 6 12 On or blinking Error LED see page 6 12 Error amber Toner empty amber Paper empty amber Ready green Action key Indicator lights Off On Blinking ...

Page 133: ...ubleshooting 6 12 PagePro 4100W When the Ready LED is on LED Display Description Response Required Initializing Power on initializing Warming Up Printer is warming up Ready Printer is ready and able to print ...

Page 134: ... is low on toner but printing is still possible Prepare to replace the imaging cartridge with a new one see page 5 1 Wait Action Press the Action key in the event of a paper size error or when operating in the manual mode Press the Action key Printing will begin LED Display Description Response Required Slowly blinking ...

Page 135: ...aper see page 3 6 Tray 3 Paper Empty The paper supply of Tray 3 is empty Size Mismatch The wrong size of paper has been detected in Tray 1 Tray 2 or Tray 3 Load the specified size of paper into the appropriate tray or press and hold the Action key for about 10 seconds until all of the LED s are on to cancel the print job see page 3 1and see page 4 41 LED Display Description Response Required ...

Page 136: ...No Tray 3 The cassette for Tray 3 is not in place Check the trays to make sure that all cassettes are securely in place see page 2 23 A print job was sent using the Tray 3 setting in the printer driver even though Tray 3 is not installed on the printer Change the Paper Source setting in the printer driver and resend the print job see page 4 41 Duplex Unit Not Available A duplex print job has been ...

Page 137: ... of memory installed in the printer and resend the print job Cover Open The cover is open Paper Size Error The paper size setting of the printer driver does not match the size of paper that has been detected in the tray Load the correct size of paper or cancel the print job by pressing the Action key and change the paper size setting in the driver see page 3 1 and see page 4 41 Paper Misfeed 1 A p...

Page 138: ...fed sheet of paper For details see Clearing a Paper Misfeed see page 6 1 Paper Misfeed 3 A paper misfeed occurred near Tray 3 Paper Misfeed 4 A paper misfeed occurred near the manual feeding tray Paper Misfeed 5 A paper misfeed occurred near the lower duplex unit LED Display Description Response Required ...

Page 139: ...ove the misfed sheet of paper For details see Clearing a Paper Misfeed see page 6 1 Paper Misfeed 7 A paper misfeed occurred near the fuser Paper Misfeed 8 A paper misfeed occurred near the upper duplex unit Cover Open Duplex Unit The cover of the duplex unit is open LED Display Description Response Required ...

Page 140: ...pecified size of paper into the correct tray see page 3 14 Video Under Run The buffer cannot handle the volume of data being sent Cancel the print job through the printer driver Turn the printer off then on again and resend the print job Lower the resolution setting and resend the print job I O Error Parallel A controller error occurred at the parallel port Turn the printer off then on again If th...

Page 141: ...sts contact your dealer Replace Imaging Cartridge The imaging cartridge is out of toner Replace the imaging cartridge see page 5 1 Fatal Error HSYNC Abnormal An engine error has occurred Turn the printer off then on again If the problem persists contact your dealer Fatal Error Polygonal Mirror Motor LED Display Description Response Required ...

Page 142: ...rror has occurred Turn the printer off then on again If the problem persists contact your dealer Fatal Error Fuser Low Temperature Fatal Error Fuser Overheat Fatal Error SRAM DRAM ROM Engine I F CPU A controller error has occurred LED Display Description Response Required ...

Page 143: ...or occurred at the fusing unit Turn the printer off then on again If the problem persists contact your dealer Fatal Error Fuser Fan An error occurred at the fan for the fusing unit Fatal Error P H Fan An error occurred at the fan LED Display Description Response Required ...

Page 144: ...ead labels envelopes postcards thick paper 90 to 163 g m2 24 to 43 lbs Paper feeding Tray 1 Multipurpose tray manual feed Tray 2 500 sheet second cassette option Tray 3 500 sheet third cassette option Input capacity Tray 1 Multipurpose tray 250 sheets Tray 2 Second cassette option 500 sheets Tray 3 Third cassette option 500 sheets Manual Feed Tray one sheet at a time Output capacity 250 sheets fac...

Page 145: ...assette unit Third paper cassette unit Duplex unit DRAM SIMM NIC Network Interface Card options available from your dealer Specifications Paper feeding system One way system Paper types Ordinary plain paper 60 to 90 g m2 16 to 24 lbs recycled paper 60 to 90 g m2 16 to 24 lbs Paper cassettes A4 Option JIS B5 Letter Legal Executive Tray capacity Up to 500 sheets plain and recycled paper Operating te...

Page 146: ...rature 10 to 35 C Operating humidity 15 to 85 External dimensions Height 4 3 4 120 mm Width 17 1 4 436 mm Depth 13 3 4 351 mm Weight Approximately 10 lbs 4 5 kg not including the Legal Cassette Tray Specifications Paper feeding system One way system Paper types Ordinary plain paper 64 to 90 g m2 17 to 24 lbs recycled paper 64 to 90 g m2 17 to 24 lbs Paper size A4 A5 JIS B5 Letter Legal Executive I...

Page 147: ...el interface cable 1 5 m long 7 6 SIMM Option You can expand printer memory by adding a single in line memory module SIMM SIMMs are available from your dealer Specifications Length Less than 10 feet 3 meters Connectors Printer Parallel 36 pin connector PC EIA 25 pin connector Cable type Shielded Each signal and ground pair should be twisted Pin assignments IEEE 1284 type B Specifications Capacity ...

Page 148: ...r printer Use the LED display in combination with the Troubleshooting chapter of this manual to maintain the high level of performance that your printer was engineered to provide Indicator Lights Action Key The LED display will change as you press the Action key The appearance of this icon throughout this manual indicates when you need to press the Action key On Off Blinking ...

Page 149: ...2 Warming Up see page 6 12 Ready see page 6 12 Power Save see page 6 12 Toner Low see page 6 12 and see page 5 1 Wait Action see page 6 12 Tray 1 Paper Empty see page 2 10 and see page 3 4 Tray 2 Paper Empty see page 3 6 and see page 6 12 Tray 3 Paper Empty see page 3 6 and see page 6 12 ...

Page 150: ...0W 8 3 Size Mismatch see page 3 1 and see page 4 41 Tray 2 No Cassette No Tray 2 see page 2 23 and see page 4 41 Tray 3 No Cassette No Tray3 see page 2 23 and see page 4 41 Duplex Unit Not Available see page 4 43 and see page 4 49 ...

Page 151: ... 2 Paper Size Error see page 3 1 and see page 4 41 Paper Misfeed 1 see page 6 16 and see page 6 4 Paper Misfeed 2 see page 6 16 and see page 6 5 Paper Misfeed 3 see page 6 16 and see page 6 5 Paper Misfeed 4 see page 6 16 and see page 6 4 Paper Misfeed 5 see page 6 16 and see page 6 6 Paper Misfeed 6 see page 6 16 and see page 6 1 ...

Page 152: ... Deplex Unit see page 6 16 and see page 6 6 Wrong Media Duplex Unit see page 6 16 and see page 3 14 Wrong Size Duplex Unit see page 6 16 and see page 3 14 Video Under Run see page 6 16 I O Error Parallel see page 6 16 and see page 2 12 I O Error Network see page 6 16 and see page 2 12 Replace Imaging Cartridge see page 6 16 and see page 5 1 ...

Page 153: ... HSYNC Abnormal see page 6 16 Polygonal Mirror Motor see page 6 16 Main Motor see page 6 16 Fuser Low Temperature see page 6 16 Fuser Overheat see page 6 16 SRAM DRAM ROM Engine I F CPU see page 6 16 Fuser Warm UP see page 6 16 Fuser Fan see page 6 16 P H Fan see page 6 16 ...

Page 154: ...nel A bank of indicators that show the current status of the printer Panel buttons that are located on the control panel make it possible to perform a variety of different operations default Settings that are preset in the absence of user specified settings dialog box A box that appears in order for the user to input information or settings required for the printer to operate display What appears ...

Page 155: ...ack to white used to add detail to photo or scanned images etc halftone A printing technique using a pattern of dots to compose an image Also known as dithering icon A graphic image on the screen that represents an element image transfer roller The part inside a page printer that transfers the image from the photoconductive drum to the paper imaging cartridge Contains the toner that is used to pri...

Page 156: ...he computer and its peripheral devices such as the printer output tray SEE face down tray paper basis weight The standard for specifying paper weight The metric standard applicable to all grades of paper is gm m paper size guide s Three adjustable holders that secure paper in the paper tray from the left right and front paper transport roller A rolling mechanism that carries the paper through the ...

Page 157: ...re file that manages commands to the printer Print Manager An application that manages the print queue and the print file RAM Acronym for random access memory resolution SEE dpi ROM Acronym for read only memory screen font A typeface that can be displayed on the computer s monitor second paper cassette unit option An available option for your printer that expands printing capacity A tray unit that...

Page 158: ...E top cover Tray 1 A tray that can hold up to 250 sheets of paper for feeding into the printer Tray 2 option Five types of optional Tray 2 cassettes can be installed into the second paper cassette unit SEE second paper cassette unit Each cassette can hold up 500 sheets of one of the following paper sizes A4 JIS B5 Legal Letter and Executive Tray 3 option Five types of optional Tray 3 cassettes can...

Page 159: ...9 Glossary 9 6 PagePro 4100W ...

Page 160: ...from Second Third Paper Cassette Unit 6 5 Paper Input Misfeed from Tray 1 6 4 Paper Output Misfeed 6 4 Common Buttons 4 40 Connecting the Power Cord 2 9 Connecting to a Computer 2 13 Control Panel 1 2 1 4 Controlling Pop Up Messages 4 52 D Device Option 4 49 Displaying Printer Information 4 53 Displaying the Driver Setup Dialog Windows 95 98 NT 4 0 4 37 Duplex Printing 3 14 Duplex Unit 2 20 7 3 E ...

Page 161: ...2 10 3 4 Loading Paper onto Manual Feed Tray 3 10 Loading Paper onto Tray 1 3 4 Loading Paper onto Tray 2 Tray 3 3 6 M Manual feed tray 1 2 Messages 6 11 N Network Interface Card NIC 1 2 2 26 No output 6 10 O On line Help 4 53 Opening the Printer Status Display 4 50 Operating Environment 2 4 Operational Precautions 2 4 Options 2 14 P Page Layout 4 43 Paper 3 1 4 41 Size 3 2 Type 3 1 Paper Misfeed ...

Page 162: ... 3 Specifications Duplex Unit Option 7 3 Interface Connector and Cable 7 4 PagePro 4100W Printer 7 1 Second Paper Cassette Unit Option 7 2 SIMM Option 7 4 Third Paper Cassette Unit Option 7 3 Switching Between the Expanded and Reduced Views 4 52 System Requirements 4 1 T The LED Display 8 1 Third Paper Cassette Unit 7 3 To Display the Driver Setup Dialog Under Windows 95 98 4 37 To Display the Dri...

Page 163: ...00W Tray cover 1 2 Turning On the Printer 2 12 U Using the Printer Driver Under Windows 95 98 NT4 0 4 40 Using the Printer Status Display 4 50 4 51 W When the Error LED is on 1 9 6 16 8 4 When the Ready LED is on 1 6 6 12 8 2 ...

Reviews: