14
General Settings
DYNO SETUP
SETUP MODE
7
8
9
10
11
12
14
5
4
3
2
1
5. Factory reset your dyno settings
6. Set sample rate (Frequency)
7. Set the units of your dyno
8. Set the type of flywheel
9. Set the type of dyno
10 Set the flywheel pulley
11. Set the motor pulley (power source)
12. Number of flywheel markers (black tape on the flywheel)
13. Set the current sensor used
14. Voltage Adjustment
15. Port #1: for LCD
16. Port #2: for IR Temp.
17. Port T1: for Loop Temp. Sensor (Temp #1)
18. Port T2: for Loop Temp. Sensor (Temp #2)
19. Setting Switches
20. Reset Button
19
20
Electronic Board
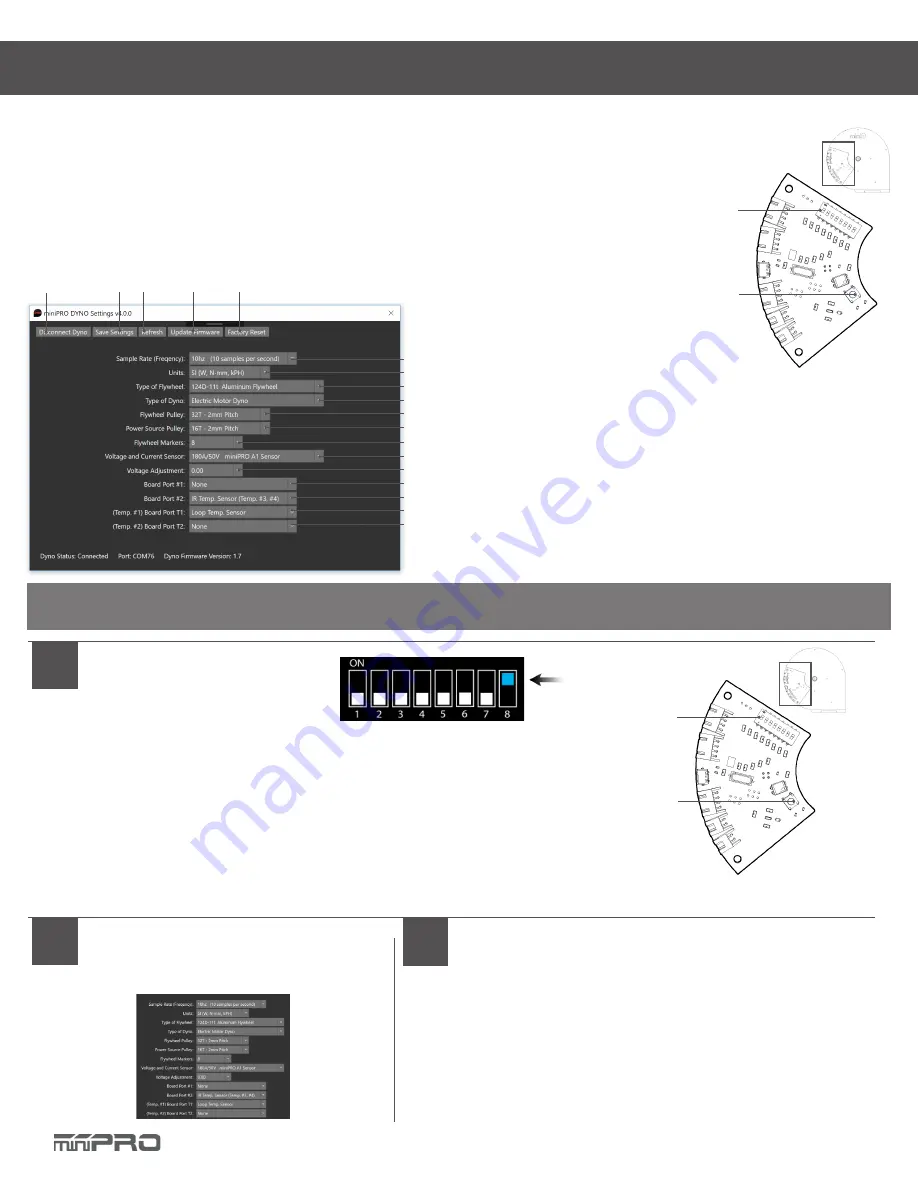
To access the settings of your dyno, you must open the main application and select “ Dyno Settings.”
1
Enter Setup Mode
1.1. Open the main application
1.2. Select “Connect Dyno”
1.3. Change
only
Switch #8 or #3 to ON.
1.4. Press the Reset button 1-2 times on the board.
1.5. The Settings application should load automatically.
1.6. (Optional) If the settings application did not load automatically, select “Dyno Settings”
and follow the screen instructions.
Electronic Board
Switches
Reset Button
NOTE:
Make sure you have firmware v1.7 or later, and installed the latest application of
miniPRO Dyno before you continue.
3
Change your Settings
4
Change your Switches
3.1. Select your desired settings
3.2 Select “Save” to complete your settings.
4.1. When finished, select “Disconnect.”
4.2. Change
only
Switch #8 to OFF.
4.3. Close the Settings Application.
4.4. Done! The main application should load auto-
matically.
13
15
16
17
18
6
1. Connect/Disconnect the dyno to setup mode
2. Save the settings of your dyno
3. Refresh (re-load) the settings of your dyno
4. Update Firmware Icon
Summary of Contents for Slot Car Dyno
Page 1: ...SLOT CAR DYNO Instruction Manual V1 2...
Page 2: ......
Page 4: ......
Page 19: ......
Page 20: ......
Page 21: ...SLOT CAR DYNO www minipro com 2022 MINIPRO LLC All Rights Reserved...


