background image


Test Solutions - User Guide 

Page 29 

RCM Series Compact Modular Test Systems 

4-Oct-17 (A3)


HTTP port

: This parameter represents a port for communicating with the RCM unit using 

HTTP protocol.  The default value for this port is 80.   

Telnet port: 

This parameter represents a port for communicating with the RCM unit using 

Telnet protocol.  The default value for this port is 23. 

Telnet prompt: 

By default, the RCM unit will prompt for each Telnet command with a new 

line character when communicating programmatically or through a Telnet client.  Check 
the “Send model name with prompt in response to all Telnet commands” option in order 
to see a complete prompt based on the model name (for example “

RCM-100>

”).  This 

feature requires firmware C0 or later. 

Use Password: 

Checking this box implements a password requirement to connect to the 

RCM unit via Ethernet.  Enter your desired password in the field below, and record it for 
your own reference.   

NOTE: IF YOU LOSE YOUR PASSWORD, YOU CAN RECOVER IT BY CONNECTING 
TO THE RCM UNIT BY USB AND OPENING THE ETHERNET CONFIGURATION 
WINDOW. 


7.5.


Updating Firmware 

All products are shipped with the latest available firmware and an update is usually not required. 
Mini-Circuits occasionally makes firmware update files available as a courtesy to add additional 
features or correct known issues. Please contact [email protected] for details. 


Caution: interruption of firmware upgrade process (due to USB disconnection, or 

power failure) may render the unit unresponsive. 


NOTE: The firmware information and upgrade option are only available via the USB    
             connection. 


1)


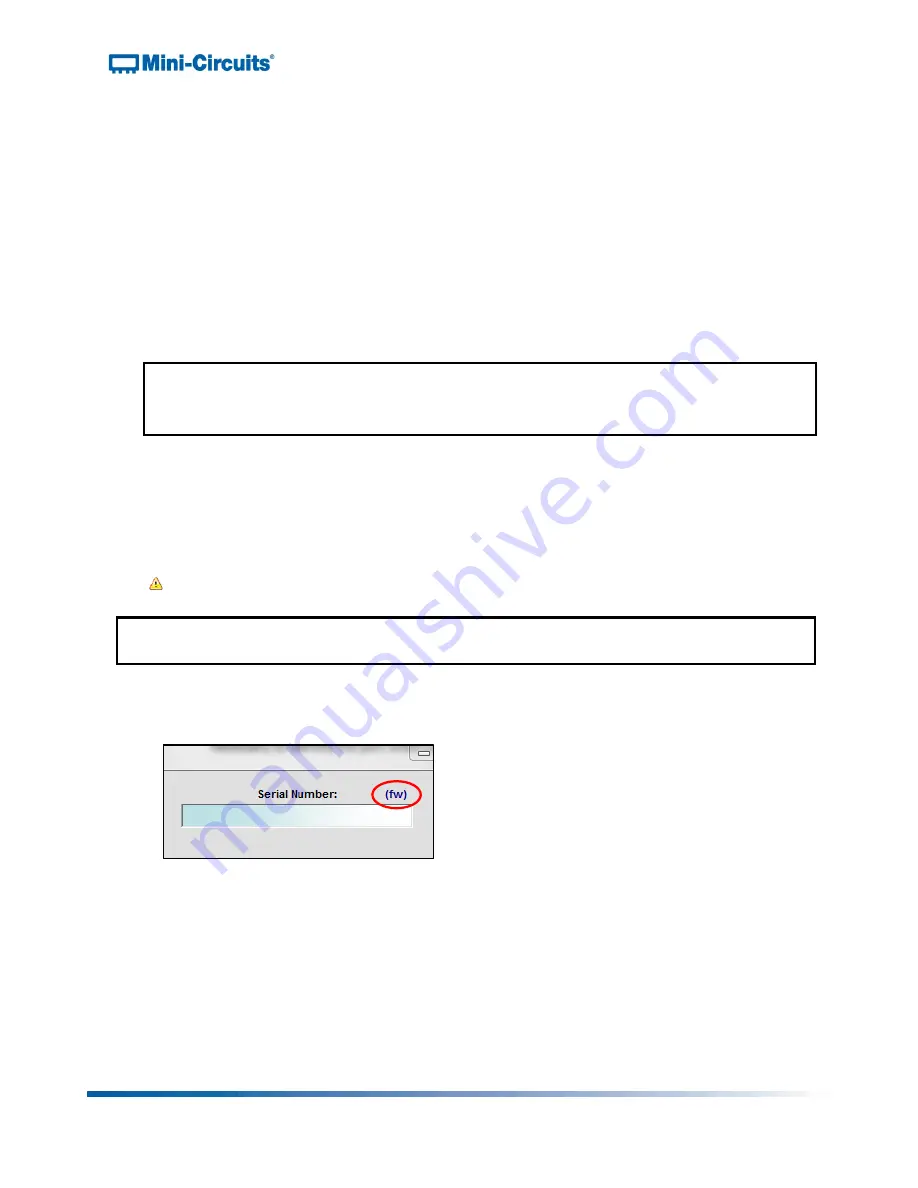
To check your firmware version and update firmware when new versions are available, 
click the “(fw)” icon above the Serial Number field of the GUI Main Control.  


Figure 25: Firmware update Icon 


Summary of Contents for RCM-100-6

Page 1: ...Test Solutions User Guide RCM 100 RCM 200 Series Compact Modular Test Systems RCM 100 Series Programmable Attenuator Modules RCM 200 Series Multi Function Switching Systems...

Page 2: ...e used as a guideline only Trademarks Microsoft Windows Visual Basic Visual C and Visual C are registered trademarks of Microsoft Corporation LabVIEW and CVI are registered trademarks of National Inst...

Page 3: ...5 2 RF Specifications 10 6 UNPACKING 11 6 1 Unpacking 11 6 2 Package Contents 11 7 SOFTWARE 12 7 1 Software Overview 12 7 2 Installing Mini Circuits GUI Software 12 7 3 Connecting to the Hardware 15 C...

Page 4: ...taken when installing and handling your RCM unit and to provide instruction on installing and using the control software for this unit on your PC This manual applies to RCM 100 Series Multi Channel P...

Page 5: ...d mains cable should be used Ensure that the cable and connections are in good condition and only use with a grounded AC main supply 2 2 Additional Precautions Opening Tampering This equipment is desi...

Page 6: ...power supply AC mains adapter included USB and Ethernet connections for software control and a hardware power switch The identification sticker at the left edge contains the model name serial number a...

Page 7: ...pply AC mains adapter included USB and Ethernet connections for software control and a hardware power switch The identification sticker at the left edge contains the model name serial number and contr...

Page 8: ...ents are larger than the standard RCM Series windows the SP8T switch models cannot be combined with other models The rear panel of the unit includes inputs for a standard 24V DC power supply AC mains...

Page 9: ...B or Ethernet HTTP and Telnet Protocols allowing setup flexibility and easy remote test management All units come supplied with Mini Circuits user friendly Graphical User Interface GUI software and DL...

Page 10: ...fs RUDAT 6000 30 pdf Programmable Attenuator 0 60 dB https www minicircuits com pdfs RUDAT 6000 60 pdf Programmable Attenuator 0 90 dB https www minicircuits com pdfs RUDAT 6000 90 pdf Programmable At...

Page 11: ...a pink anti static bubble bag 6 2 Package Contents The box contains 6 items which are listed below in table 2 Table 2 Package contents Item Description Quantity RCM Series Unit 1 AC DC 24 3W1 AC DC 24...

Page 12: ...inux operating systems This section will cover the features of Mini Circuits GUI program in detail For detailed instructions on programming please refer to section 8 6 which provides a link to Mini Ci...

Page 13: ...4 Oct 17 A3 4 The software license agreement will appear Review the agreement select I agree and click Continue Figure 5 Software license agreement 5 Be sure all your work in other applications has be...

Page 14: ...r and record the full destination address for your records Then click the large button at the left of the window to continue Figure 7 Destination directory prompt 7 The program group prompt will then...

Page 15: ...ing to the Hardware When starting up the GUI software a window will pop up prompting you to choose how the computer will connect to your RCM Series unit You have the option to connect via USB Ethernet...

Page 16: ...thernet Search Results o This field displays information about the device selected including serial number and IP parameters You may use this field to identify the RCM Series unit if multiple Mini Cir...

Page 17: ...r Telnet you wish to use to communicate with the device and click Start to start open the GUI main control Figure 12 Control type window Ethernet Control 7 3 2 a Firewall Access If your computer firew...

Page 18: ...ws the user to explore the GUI program features for demonstration without actually connecting to the equipment To explore the GUI in demo mode select the RCM Series radio button and choose one of the...

Page 19: ...age 19 RCM Series Compact Modular Test Systems 4 Oct 17 A3 7 4 Using the GUI Controls The Main Control Window Figure 15 Example GUI main control window for RCM 100 6 Figure 16 Example GUI main control...

Page 20: ...ram o This button opens the Direct Mode Control window to enter and send specific commands directly to the RCM hardware See section 8 4 3 for more information about these functions Show User Defined L...

Page 21: ...of the slider bar Note that attenuation values must be entered in multiples of 0 25 dB Figure 18 Attenuator display Auto o Clicking the button on any Attenuator Display opens the Attenuator Sequencing...

Page 22: ...lue for the sweep Step dB Sets the step size for the sweep Dwell Time Sets the time interval over which attenuation will remain at each step in the sweep You can set dwell times as short as 5 ms altho...

Page 23: ...ttenuator will repeat the sweep or hop for a set length of time specified by the user No of Cycles The attenuator will complete a specified number of full sweeps or hop sequences Attenuation on Power...

Page 24: ...icking the Save Test Profile button allows the user to save a specified attenuation sequence to his or her computer A browse window will appear prompting the user to select a directory location to sav...

Page 25: ...umber of times that the common port has been connected to it Figure 21 Switch control displays for SP4T switch pair of SPDT switches and SP6T switch Switch Power Up Settings o The switch power up sett...

Page 26: ...isplays the RCM unit model name when connected Serial Number This field displays the RCM unit 11 digit serial number when connected Send Commands This field displays the list of commands sent to the R...

Page 27: ...he RCM unit The commands are sorted into the following groups RUDAT Contains queries that return the maximum attenuation level of a specified attenuator the current attenuation level of a specified at...

Page 28: ...ill cause the RCM unit to derive the IP address network gateway and subnet mask settings automatically from the server to which it is connected Unchecking this box disables the automatic mode so that...

Page 29: ...requirement to connect to the RCM unit via Ethernet Enter your desired password in the field below and record it for your own reference NOTE IF YOU LOSE YOUR PASSWORD YOU CAN RECOVER IT BY CONNECTING...

Page 30: ...o window 3 Once you ve downloaded the latest firmware version provided by Mini Circuits you can begin updating by clicking Update Firmware in the firmware info window Figure 29 Click Update Firmware t...

Page 31: ...ries Compact Modular Test Systems 4 Oct 17 A3 Figure 270 Firmware browse menu 5 A status indicator will appear on screen and advise when the update is complete The RCM unit will then automatically res...

Page 32: ...commands and other information about programming your RCM unit is included in the programming manual available for download from the Mini Circuits website This manual includes detailed instructions a...

Page 33: ...t Solutions support using the information on page 4 You may also contact our Sales Department at 1 718 934 4500 sales minicircuits com or your local Mini Circuits sales representative They will review...

Reviews: