background image

© 2011 MIMAKI ENGINEERING CO.,LTD.

5.2.2

P.1

1

2

3

4

5

6

7

8

R.1.0

 MAINTENANCE MANUAL > Test Items > Other Test > Checking Damage of the Print Heads

Model

TS34-1800A

Issued 2011.10.17 Revised

F/W ver

1.20

Remark

1.0

Rev.

5.2.2 Checking Damage of the Print Heads

Outline

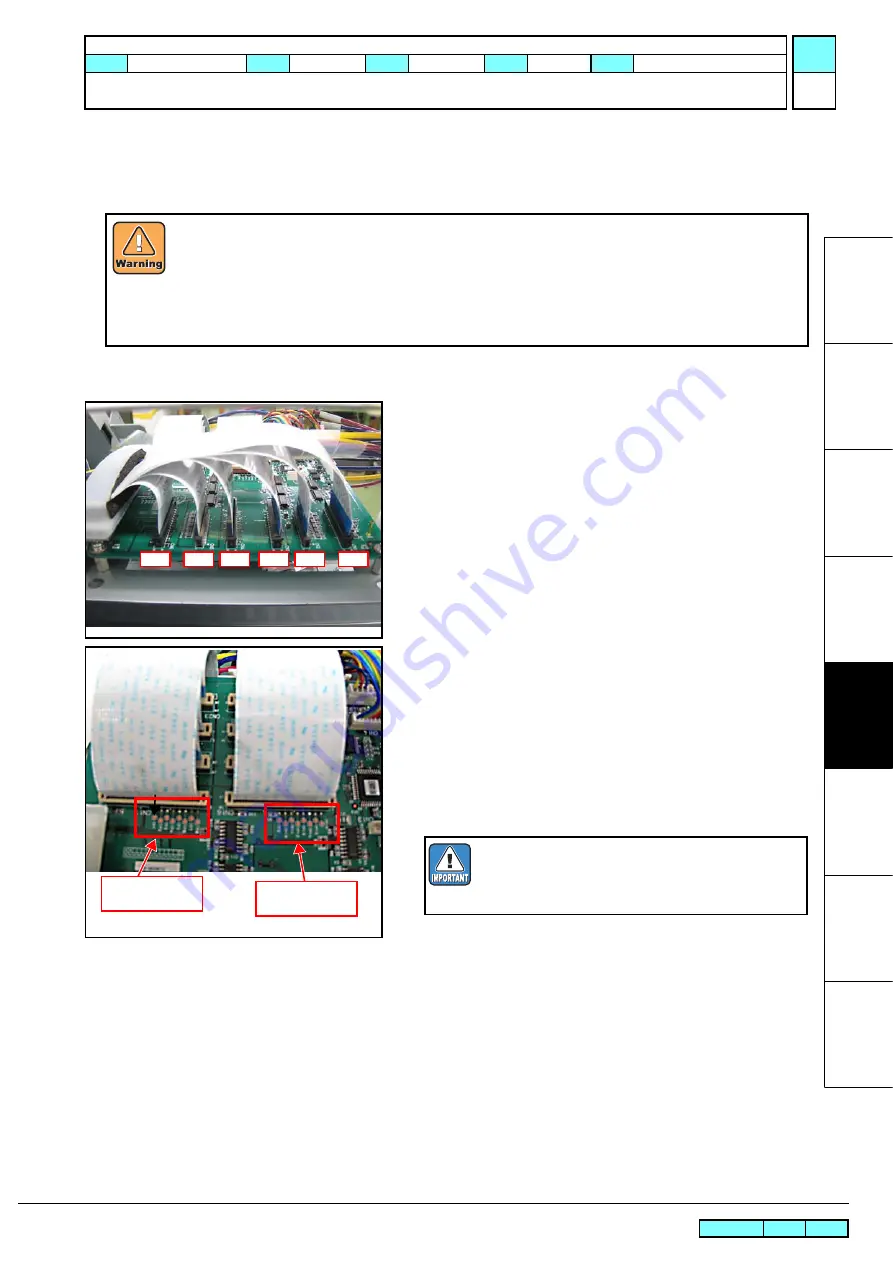
Check whether the COM line between the print head and the slider PCB has trouble or not.

Procedure

1. Release the locks on both sides of the HDC_FFC  ASSY con-

nected to CN1 to CN6 on the slider PCB ASSY. And then pull 
out the HDC_FFC ASSY.

Measure a resistance between the test pin TP1 to 16 and GND 
on the ink slider PCB to determine the value. Connect the nega-
tive terminal of the tester to the GND test pin (TPG 1) and mea-
sure the resistance by getting the positive terminal touch to TP1 
to 16.
When the result of TP1 to 8 is 10M

Ώ

 and more, the head 2 has 

no defect.
When the result of TM9 to 16 is 10M

 and more, the head 1 

has no defect.

After turning off the sub and main power switches in order, unplug the power code. 
Check if no electric charge is remaining in the PCB.
Refer to the "4.4.2 Electric charge checking when replace the Electrical Parts"
It is very dangerous if sleep mode functions mistakenly during the operation. 
Moreover, the PCB may be damaged in case electric charge still remains inside. 
Also there is a possibility of electric shock because of high power voltage applied the high-pressure part
of the power supply PCB assy. Take care to avoid contact with it.

CN1

CN2

CN3

CN4

CN5

CN6

TP1

6

TP1

5

TP1

4

TP1

3

TP1

2

TP1
1

TP1

0

TP9

TP8

TP7

TP6

TP5

TP4

TP3

TP2

TP1

If any of the head COM line defect is found, the print
head may be broken. Replace the print heads first.
Connecting the normal main PCB without replacing
the broken head will break the PCB continuously.

Summary of Contents for TS34-1800A

Page 1: ...MIMAKI ENGINEERING CO LTD URL http eng mimaki co jp Service Documents D500673 11 MAINTENANCE MANUAL ...

Page 2: ...hange Tracking P 1 Date 2013 11 13 Manual Ver 1 10 Remark Status Index Rev Changes Revised 4 2 6 R 1 1 inner end of the pinch roller edge of the media Supplement Version 1 0A is added Revised 5 2 6 R 1 1 List was revised Revised 5 2 7 R 1 1 List was revised Date 2011 10 17 Manual Ver 1 00 Remark Status Index Rev Changes Released New issued ...

Page 3: ... Station PCB Assy 2 3 6 X axis Motor Relay PCB Assy 2 3 7 HDC PCB Assy 2 3 8 Slider PCB Assy 2 3 9 Head Memory PCB Assy 2 3 10 LED PCB Assy 2 3 11 Keyboard PCB Assy 2 3 12 Take up PCB Assy 2 3 13 Encoder PCB Assy 3 Workflow 3 1 Ink Related Parts 3 1 1 Replacement of the Head Unit 3 1 2 Replacement of the Cartridge Assy 3 1 3 Replacement of the Wiper Unit 3 1 4 Replacement of the Cutter Assy 3 2 Dr...

Page 4: ...E IC CHECK 5 2 Other Test 5 2 1 Determining COM short circuit 5 2 2 Checking Damage of the Print Heads 5 2 3 Checking Damage of the Main PCB ASSY 5 2 4 Checking Damage of the HDC PCB ASSY 5 2 5 Checking Damage of the Slider PCB 5 2 6 Checking Conduction of HDC FFC COM Line 5 2 7 Checking Conduction of HDC FFC Data Line 6 Disassembly and Reassembly 6 1 Covers 6 1 1 Cover Layout 6 2 Ink related Part...

Page 5: ...7 1 1 Concerning Errors and Malfunctions 7 1 2 List of Error Messages 7 1 3 List of Warning Messages 7 2 Detailed Methods of Coping with the Malfunctions 7 2 1 Electrical Troubleshooting 8 Operation Flow 8 1 Basic Operation 8 1 1 Start 8 1 2 Initial Filling 8 1 3 Media Detection 8 2 Print Mode 8 2 1 LOCAL REMOTE 8 2 2 SETUP 8 2 3 MAINTENANCE 8 2 4 MACHINE SETUP 8 3 Common Setting 8 3 1 INFORMATION...

Page 6: ... 2011 MIMAKI ENGINEERING CO LTD 1 2 3 4 5 6 7 8 1 Operating Principle 1 1 Basic Operation 1 2 Maintenance Function 1 3 Ink System MAINTENANCE MANUAL Operating Principle Basic Operation ...

Page 7: ...nection status of the print head In the malfunction ERROR07 HEAD or ERROR07 VOLTAGE is displayed and the system goes down 7 3 Checks on the print head memory 1 Check the contents of the memory PCB assy of the print head In the malfunction ERROR200 HEAD MEMORY is displayed and the system goes down 7 4 Checks on PRAM 1 Check the PRAM size 512 MB is needed as its size If the size is zero or insuffici...

Page 8: ...setting 1 Execute the configuration of PDC and HDC In the malfunction ERROR09 FPGA ERROR is displayed and the system goes down When the fuse F13 of the main PCB assy is blown the system shuts down displaying ERROR205 42V HEAD VOLTAGE 5 Version information display 1 Machine model name and main body firmware version are displayed 2 Revision and Boot PDC HDC version are also displayed during the serv...

Page 9: ...urs during the service mode try the operation again by pressing the key ENTER Pressing the key FUNCTION is also workable 2 Detection of the Y origin 1 Drive the Y axis motor to detect the Y origin When it cannot be detected ERROR51 Y ORIGIN is displayed and the system goes down 3 Capping 1 Move the head carriage back to the Y origin and carry out capping A display at the start of the operation PLE...

Page 10: ... ERROR8 Detailed Information Direction The of the linear encoder counter is reversed Count Linear encoder count number error Sensor Count not possible If the media width cannot be detected it is ERROR50 Cancelled by Lever UP Move the carriage back to the Y origin and turn the cap ON Media detection executes automatic distance accuracy adjustment 3 Media length input If MEDIA RESIDUAL for the maint...

Page 11: ... ID and Print head memory 4 Motor OFF 1 Turn off servo and drive motor power 5 Sub power LED blinking 1 Indicates sub power off by sub power LED blinking 6 Power OFF Step Processing Description 1 Saving parameters 1 Save the running parameter values In service mode the buzzer sounds when the parameter values have been stored successfully Turn off sub power to implement the sleeve operation for the...

Page 12: ... 2011 MIMAKI ENGINEERING CO LTD 1 2 3 4 5 6 7 8 MAINTENANCE MANUAL Basic Operation Maintenance Function Operating Principle 1 1 Basic Operation 1 2 Maintenance Function 1 3 Ink System ...

Page 13: ... maintenance is displayed It is terminated by ENTER 3 End 1 After the wiper moves to its origin move the print head carriage then perform the initial machine operation See 1 1 3 Initial Machine Operation Out of Service mode a warning beep sounds at an interval of 30 seconds during carriage out operation to prevent the nozzle surface and the inside of the cap from getting dry Display during mainten...

Page 14: ...TER 3 End 1 After the wiper moves to its origin move the print head carriage then perform the initial machine operation See 1 1 3 Initial Machine Operation After completion of this operation clear the executed wiping count one of the running parameters Out of Service mode a warning beep sounds at an interval of 30 seconds during carriage out operation to prevent the nozzle surface and the inside o...

Page 15: ...ng a dropper infuse the cap with washing liquid 4 Input the waiting time Waiting for ENTER input Setting value 1 99 min unit 1 min 5 After moving the print head carriage and performing Initial machine operation 1 1 3 wait for the set time to elapse 4 End 1 Executing cleaning 2 End Out of Service mode a warning beep sounds at an interval of 30 seconds during carriage out operation to prevent the no...

Page 16: ...ting for the end of maintenance is displayed It is terminated by ENTER 3 End 1 After moving the print head carriage perform initial machine operation See 1 1 3 Initial Machine Operation Out of Service mode a warning beep sounds at an interval of 30 seconds during carriage out operation to prevent the nozzle surface and the inside of the cap from getting dry Display during maintenance CR MAINTENANC...

Page 17: ... cartridge valve and starting the ink suction motor 2 The filling operation is to be discontinued if a warning about the ink cartridge is detected 3 The cartridge with less amount of remaining ink is used first Only for the 4 color ink set 3 End 1 Stopping the pump motor Display during maintenance HD MAINTENANCE FILL UP INK ent Display during maintenance FILLING UP 00 00 MAINTENANCE MANUAL Operati...

Page 18: ...g liquid cartridges from all the slots Monitored with cartridge sensors 2 Open the cartridge valve and drive the ink suction pump motor to discharge washing liquid 3 When a waste ink tank warning occurs the warning message is displayed For details see 1 2 7 Waste Ink Tank Warning 4 Repeating 1 Executing 2 to 3 again 5 Operation selection 1 Select processing as below Re WASH Step 3 4 are executed a...

Page 19: ... operation 2 If REPLACE is selected the present operation is continued The counter value in the firmware is cleared 3 Waste ink tank reaches full 1 Replace the waste ink tank or dispose of ink 2 The present operation is continued by depressing ENTER key The counter value in the machine is cleared If you select REPLACE in the operation as above when the waste ink tank is near full or full be sure t...

Page 20: ... 2011 MIMAKI ENGINEERING CO LTD 1 2 3 4 5 6 7 8 MAINTENANCE MANUAL Operating Principle Ink System Operating Principle 1 1 Basic Operation 1 2 Maintenance Function 1 3 Ink System ...

Page 21: ... is used put Bl on C and put Lbl on Lc below When filling 4 color ink set When filling 6 color ink set Ink cartridge slot Ink switching valve Ink bridge Print head Ink cartridge slot Ink switching valve Print head MAINTENANCE MANUAL Operating Principle Ink System Configuration Model TS34 1800A Issued 2011 10 17 Revised F W ver 1 20 Remark 1 0 Rev ...

Page 22: ...F A B C D E F G H E B G H A C D F A B C D E F G H 2 1 2 3 2 5 2 7 2 2 2 4 2 6 2 8 1 1 1 3 1 5 1 7 1 2 1 4 1 6 1 8 1 8 Nozzle orders Piping Head1 Damper Nozzle orders Piping Head2 Damper Ink tube tag R 1 0 MAINTENANCE MANUAL Operating Principle Ink System Configuration Model TS34 1800A Issued 2011 10 17 Revised F W ver 1 20 Remark 1 0 Rev ...

Page 23: ...signed to 1 path it cannot be replaced during printing 3 Ink supply system The ink filling method uses a suction system with a roller pump and a pressure damper with a self sealing valve Ink is supplied with a siphon during printing The damper sealing valve opens to supply ink when the discharge pressure drops and the sealing valve closes when the damper ink chamber is filled The sealing valve red...

Page 24: ...ot been executed 2 INK END error X X Errors occurred in both cartridges and printing suction operation can not be executed 3 INK NEAR END error X Errors occurred in both cartridges and suction operation can not be executed Machine returns to LOCAL mode every completion of printing one file 4 Waste Ink Tank X X X When the amount of waste ink counted by the firmware increases to a certain amount aft...

Page 25: ...ridge is as follows 220 cc cartridge 20 cc 440 cc cartridge 40 cc Initial filling is not allowed but printing and cleaning are allowed 2 Cartridge ink end Displayed when use of a certain amount of ink is detected after the near end detection Neither printing nor initial filling is allowed but cleaning is allowed 3 INK REMAIN ZERO Only for the 4 color ink set Displayed when the amount of remaining ...

Page 26: ...nk supply occurs under any of the following conditions INK END during printing INK NEAR END during filling Ink IC warning When the cartridge is removed When executing Ink use up cleaning 2 Except for the 4 color ink set filling 6 color ink set Since there is 1 ink cartridge per supply system all 8 cartridges are supply cartridges LED Status Explanation Green Lit Supply cartridge Red Blink INK END ...

Page 27: ...er discharge nor suction is allowed Ink end error Discharge is allowed but suction not allowed Ink near end error Conditions for changing the supply cartridge No Cartridge status Discharge operation 2 Suction operation 2 1 Normal cartridge 2 Cartridge near end 3 Cartridge ink end X 4 Residual quantity 0 cartridge X X 5 No cartridge X X 6 Ink IC 1 X X Cartridge 2 Cartridge 1 Normal cartridge Cartri...

Page 28: ...g to priority No operation by the condition as above during cleaning Cartridge ink end Residual quantity 0 cartridge No cartridge Ink IC 1 Sub cartridge Control cartridge Normal cartridge Cartridge near end Cartridge ink end Residualquantity 0 cartridge No cartridge Ink IC 1 R 1 0 MAINTENANCE MANUAL Operating Principle Ink System Supply Cartridge Control and Selection Model TS34 1800A Issued 2011 ...

Page 29: ...s has occurred Cartridge near end Cartridge ink end One month has passed since the expiration date of the ink Lit An error has occurred Lighting signifies that one of the following errors has occurred Residual quantity 0 cartridge No cartridge Ink IC 1 Event For the 4 color ink set Except for the 4 color ink set Cartridge 1 Cartridge 2 Cartridge 1 Control LED Error LED Control LED Error LED Contro...

Page 30: ...e near end No change No change 5 Cartridge 1 Removed for replacement No change No change CLOSE 6 Cartridge 1 A normal cartridge has been set CLOSE OPEN OPEN 7 Cartridge 2 Cartridge ink end Cartridge 1 is the control cartridge OPEN CLOSE 8 Online printing has been completed All valves closed CLOSE CLOSE CLOSE Timing to open close the supply valves Instruction to open close the supply valve Flushing...

Page 31: ...he amount of remaining ink The amount of remaining ink will be updated and written onto the ink IC chip at the timing shown below Motion Ink consumption through one supply path cc SOFT cleaning 0 7 NORMAL cleaning 2 5 HARD cleaning 9 No Timing for updating Execution conditions 1 At pre capping operation Ink has been used for printing or flushing At capping chiefly after completion of printing 2 At...

Page 32: ...umed When one cartridge is a normal one at the start of cleaning ink is sucked from the cartridge with residual ink first and then switching to the normal cartridge takes place to continue cleaning When the residual ink is used up software counter INK REMAIN ZERO error is displayed disabling the cartridge Ink use up cleaning control is only effective in NORMAL cleaning mode It cannot be executed i...

Page 33: ...charge mechanism is as shown below Outline flow In initial filling for the 4 color ink set to eject air completely from the ink paths the suction is divided into 2 stages filling up to the coupler and filling up to the nozzle Each uses the sub cartridge and control cartridge Print Head CAP Ink Suction Pump Flow of ink To waste ink tank When filling 4 color ink set Except when filling the 4 color i...

Page 34: ... filling the 4 color ink set 1 Open all of the cartridge valves and fill the ink up to the damper head Filling will not be executed if a warning about the ink cartridge is displayed When a waste ink tank warning occurs the warning message is displayed If a cartridge warning is displayed after completion of filling ink up to the coupler and before completion of filling ink up to the damper head swi...

Page 35: ... 2011 MIMAKI ENGINEERING CO LTD 1 2 3 4 5 6 7 8 2 Electrical Parts 2 1 Block Diagram 2 2 Operation Explanation 2 3 Circuit Board Specifications MAINTENANCE MANUAL Electrical Parts Block Diagram ...

Page 36: ...E300474 AC Switch Cable E104896 Rocker Switch AJ921002WW3F E104903 Main DC Cable CN5 CN4 Linear Encoder Scale 3126 E300671 DC5V 4 2A DC24V 5 0A DC42V 4 0A HEATER CTRL AC90V 180V 2 7A 5 4A AC100V 200V 3A 6A AC120V 240V 3 6A 6 6A DC5VB 1 0A DC3 3VB 5 5A 1 2 CN3 CN1 CN2 Sensor Head Hight Sensor Encoder PCB CN6 CN5 4 Head 460 Head memory cable Assy E106506 Mini memory PCB E106508 CN16 CN18 CN20 CN22 C...

Page 37: ...ble L E104908 E104998 E106498 Cover Sensor Cable R E104909 E104921 E104913 E105695 E104539 E300482 E106536 Main PCB 260 20624 ẅ FWR TN2 P 1 0 L1 28 30 3200 4 10BLUL X Motor Relay FFC4180 1 20624 ẅ FWR TN2 P 1 0 L1 28 30 3200 4 10BLUL X Motor Relay FFC180 2 E104939 E300630 E300588 X Motor Driver Relay Cable 260 E105692 Y Moto Relay Cable E106091 E105693 Composite Cable 260 E106504 E104905 CN12 Stat...

Page 38: ...dy 1 2 3 4 5 6 7 8 E106495 HDC PCB CN5 CN6 CN2 CN1 E300643 Cutter Driver ᾕᾕᾒ 4 6 5 ᵆᵲᶍᴾᵡᵬᵔᵇ ᵆᵲᶍᴾᵡᵬᵓᵇ ᵆᵲᶍᴾᵡᵬᵖᵇ ᵆᵲᶍᴾᵡᵬᵏᵎᵇ R 1 0 MAINTENANCE MANUAL Electrical Parts Block Diagram Connection Diagram Inside the Main Body Model TS34 1800A Issued 2011 10 17 Revised F W ver 1 20 Remark 1 0 Rev ...

Page 39: ...ont side of the main unit Rear Exhaust Fan Junction Cable WIND Mark DRY Mark EXH1 mark External unit relay cable assy Take up Motor Switch SK Brushless Motor SK Take up Motor Motor Cable SK PCB SK Take up Motor Unit Dry Fan Unit Dry Fan Cable Dry Fan Cable Branch PCB Dry Fan Branch Cable Assy Dry Fan 1 x4 Dry Fan 2 x4 Dry Fan Cable Branch PCB 3 MAINTENANCE MANUAL Electrical Parts Block Diagram Con...

Page 40: ... 2011 MIMAKI ENGINEERING CO LTD 1 2 3 4 5 6 7 8 MAINTENANCE MANUAL Electrical Parts Operation Explanation Electrical Parts 2 1 Block Diagram 2 2 Operation Explanation 2 3 Circuit Board Specifications ...

Page 41: ...ay be ejected The main PCB assy has FPGA PDC which takes charge of image processing and controls the SDRAM picture memory PRAM PRAM is mounted on PRAM PCB assy and the PRAM PCB assy has a capacity of 512MB Of the data output from the host PC the command part is analyzed by the CPU and the image part is transferred to the memory The PRAM is a ring memory and when data for one scanning session has b...

Page 42: ...011 MIMAKI ENGINEERING CO LTD 1 2 3 4 5 6 7 8 MAINTENANCE MANUAL Electrical Parts Circuit Board Specifications Electrical Parts 2 1 Block Diagram 2 2 Operation Explanation 2 3 Circuit Board Specifications ...

Page 43: ...del number JST B03P VL Media heater power input Fuse rating Input AC100 120V AC220 240 50 60Hz Output 3 3SBV 5 5A 5SBV 1 0A 5V 4 2A 24V 5 0A 42V 4 0A Pin Terminal name Kinds 1 AC L AC input supply 2 NC NC 3 AC N AC input supply Pin Terminal name Kinds 1 AC L AC input supply 2 NC NC 3 AC N AC input supply F1 T6 3AH 250V φ5x20 mm Input line to DC output circuit F3 T15AH 250V φ6 3x30 mm Input line to...

Page 44: ...D 12 0V GND 4 0V GND 13 0V GND 5 5V DC power source 14 5V DC power source 6 5SBV DC power source 15 R C ON OFF DC power source 7 3 3SBV DC power source 16 3 3SBV DC power source 8 0V GND 17 0V GND 9 0V GND 18 0V GND Voltage No Adjustable range Kinds 3 3SBV VR1 3 28 3 32 During standby or for main control 5SBV VR2 4 98 5 02 5V VR4 4 98 5 02 For I O control 24V 42V VR3 41 0 41 2 For discharge or mot...

Page 45: ...main PCB assy also has X Y axis motor driving circuit and other I O control circuits Flash ROM 32Mb 2 SRAM 16Mb 2 Main PCB CPU SH 7790S 131MHz RTC Batt Power source 42V 24V 5V 3 3VSB 5VSB PDC PLL 24 576 MHz X motor Y motor USB M66592 PDC IOC EP2C20F484C8N NW DMA 8 16 16 Flash ROM 4MB 32Mb 16 PRAM PCB 8 XTAL 8 192 MHz Station 4 4 16 FW debug Serial I F Heater control X axis motor relay G A servo ad...

Page 46: ...tor Relay PCB Assy CN17 10 Regenerative Resistivity PCB Assy CN18 2 HDC Fan CN19 2 AUX Not installed CN20 3 AUX Not installed CN21 7 Connector recognizing that no heater exists Short connector CN22 4 Serial Debug Monitor AUX CN23 100 Debug Board FW program writing CN24 18 Power Supply PCB Assy CN25 5 Y axis Motor Encoder CN26 8 G A Debug Monitor AUX CN27 2 Y axis Motor CN28 4 AUX Not installed CN2...

Page 47: ... Test point Fuse rating Terminal name Purpose GND2 6 GND TP1 8 COM voltage 1 8 F13 0 375A 125V 42 V power supply for heads R 1 0 MAINTENANCE MANUAL Electrical Parts Circuit Board Specifications Main PCB Assy Model TS34 1800A Issued 2011 10 17 Revised F W ver 1 20 Remark 1 0 Rev ...

Page 48: ...ocated on the main PCB assy inside the electrical box 512 MB picture memory is mounted List of connectors CN No Pin Connected to Remarks CN1 80 Main PCB Assy CN2 80 AUX CN1 CN2 MAINTENANCE MANUAL Electrical Parts Circuit Board Specifications PRAM PCB Assy Model TS34 1800A Issued 2011 10 17 Revised F W ver 1 20 Remark 1 0 Rev ...

Page 49: ...ve voltage by supplying the electrical power to the motor via this PCB List of connectors Test point CN No Pin Connected to Remarks CN1 10 Main PCB Assy Power supply to the X and Y axis motors Terminal name Purpose TP1 42V TP2 Power supply voltage of the motor TP2 TP1 CN1 MAINTENANCE MANUAL Electrical Parts Circuit Board Specifications Regenerative Resistivity PCB Assy Model TS34 1800A Issued 2011...

Page 50: ...h CN5 2 AUX CN6 4 Washing Cartridge ID Contact PCB CN032 Assy CN7 2 P Head Lock Solenoid CN8 18 External Unit Output Take up Exhaust Fan Dry Fan LED Unit CN9 10 Vacuum Fan CN10 4 Washing Cartridge Sensor CN11 Not used CN12 7 Paper Sensor CN13 9 Clamp Sensor Y origin Sensor CN14 4 AUX CN15 3 AUX CN16 3 AUX CN17 8 Wiper Unit Wiper Motor Wiper origin CN18 9 Pump Motor CN19 6 AUX CN1 CN20 CN5 CN8 CN9 ...

Page 51: ...30 Main PCB Assy CN4 4 Ink Cartridge 1 CN5 4 Ink Cartridge 2 CN6 4 Ink Cartridge 3 CN7 4 Ink Cartridge 4 CN8 4 Ink Cartridge 5 CN9 4 Ink Cartridge 6 CN10 4 Ink Cartridge 7 CN11 4 Ink Cartridge 8 CN12 16 Ink Solenoid 1 8 CN13 18 Ink ID 1 8 CN14 6 X axis Motor Encoder CN15 5 Not equipped AUX CN16 2 AUX CN17 2 AUX CN18 3 AUX AUX CN19 6 Not equipped AUX CN20 2 AUX AUX CN21 2 AUX 1 2 3 4 5 6 7 8 CN1 CN...

Page 52: ...nectors Test point Fuse rating CN No Pin Connected to Remarks CN1 30 Main PCB Assy Power supply CN2 50 Main PCB Assy Control CN3 30 For debug CN4 30 AUX CN5 35 Slider PCB Assy Com driving CN6 31 Slider PCB Assy Head signal CN7 4 AUX Terminal name Purpose GND1 GND TP1 TP8 COM voltage 1 8 F3 0 375A 125V Head 42V at source CN2 CN1 CN5 CN6 MAINTENANCE MANUAL Electrical Parts Circuit Board Specificatio...

Page 53: ... Head control Head2 CN6 30 HDC PCB Assy COM waveform Head2 CN7 4 Paper width sensor CN8 6 AUX CN9 3 Head Height Sensor CN10 5 Encoder PCB Assy CN11 2 LED pointer CN12 3 Cutter CN13 6 For debug CN14 12 Mini memory PCB Assy Head memory CN15 2 AUX CN16 29 Print Head1 Front CN3 CN17 29 Print Head2 Front CN3 CN18 29 Print Head1 Front CN4 CN19 29 Print Head2 Front CN4 CN20 29 Print Head1 Front CN4 CN21 ...

Page 54: ...5 6 7 8 Test point CN24 2 AUX Terminal name Purpose GND1 GND TP1 TP8 COM voltage 1 8 CN No Pin Connected to Remarks R 1 0 MAINTENANCE MANUAL Electrical Parts Circuit Board Specifications Slider PCB Assy Model TS34 1800A Issued 2011 10 17 Revised F W ver 1 20 Remark 1 0 Rev ...

Page 55: ...oard name Mini Memory PCB Assy Stores Head ID information Head memory List of connectors CN No Pin Connected to Remarks CN1 6 Slider PCB Assy CN1 MAINTENANCE MANUAL Electrical Parts Circuit Board Specifications Head Memory PCB Assy Model TS34 1800A Issued 2011 10 17 Revised F W ver 1 20 Remark 1 0 Rev ...

Page 56: ...he X axis relay PCB assy is connected to this PCB The LEDs green red corresponding to each slot of the cartridge is displayed on the LED PCB assy List of connectors CN No Pin Connected to Remarks CN1 20 X axis Motor Relay PCB Assy CN2 6 None AUX CN2 CN1 MAINTENANCE MANUAL Electrical Parts Circuit Board Specifications LED PCB Assy Model TS34 1800A Issued 2011 10 17 Revised F W ver 1 20 Remark 1 0 R...

Page 57: ... characters and key switches It is connected to the station PCB assy with a keyboard cable List of connectors CN No Pin Connected to Remarks CN1 16 LCD PCB Assy Control CN2 24 Station PCB Assy CN1 CN2 MAINTENANCE MANUAL Electrical Parts Circuit Board Specifications Keyboard PCB Assy Model TS34 1800A Issued 2011 10 17 Revised F W ver 1 20 Remark 1 0 Rev ...

Page 58: ...rs It is used inside the take up motor unit as a junction between the station PCB assy and take up motor List of connectors CN No Pin Connected to Remarks CN1 9 External Connector Cable Station PCB Assy Power source CN2 5 Start direction changing switch CN3 6 Take up Motor CN3 CN1 CN2 MAINTENANCE MANUAL Electrical Parts Circuit Board Specifications Take up PCB Assy Model TS34 1800A Issued 2011 10 ...

Page 59: ...cations Encoder PCB Assy Model TS34 1800A Issued 2011 10 17 Revised F W ver 1 20 Remark 1 0 Rev R 1 0 2 3 13 Encoder PCB Assy Outline Board name Encoder PCB Assy One is used on the back side of the slider for the linear scale List of connectors CN No Pin Connected to Remarks CN1 5 Slider PCB Assy For linear scale CN1 ...

Page 60: ... 2011 MIMAKI ENGINEERING CO LTD 1 2 3 4 5 6 7 8 MAINTENANCE MANUAL Workflow Ink Related Parts 3 Workflow 3 1 Ink Related Parts 3 2 Driving Parts 3 3 Electrical Parts ...

Page 61: ...manually when necessary Normally manual entry is not necessary because writing is carried out automatically 4 2 10 Ink 5 Ink charge into the head Fill the head with ink and carry out test plotting Check for any nozzle outs or flight deflection of ink droplets Check 6 Head slant adjustment Mechanically adjust the replaced head 4 2 1 7 Correction of dot position Press the key ADJUST Adjust dot locat...

Page 62: ...e cables of corresponding cartridges from the connector to remove the cartridges 5 Mounting of the cartridge Mount the cartridge 6 Mounting of the joint Mount the joint which has been removed Check 7 Check on the sensors Check whether the exist non exist sensor the near end sensor and the contact PCB assy of corresponding cartridges function normally by conducting ink cartridge test It is preferab...

Page 63: ... is set at 0 5 mm 6 3 6 4 3 6 4 Adjustment of wiper height Make adjustment so that while head height is set low wiper units are kept parallel and wiper is in contact with the tip of the nozzle by 1 5 mm Confirm that wiping operation is possible even when the head height is set high 4 3 3 Adjustment 5 Capping adjustment Carry out CAPPING adjustment to confirm that each center of the wiper and the h...

Page 64: ...edures Item Work operation Description Ref Covers 1 Removal of covers etc Remove the front cover P cover U P cover L C cover and Y cover F 6 1 1 Cutter Unit LED Pointer 2 Remove the cutter unit Remove the cutter unit 6 2 7 3 Mounting of the cutter unit Mount the cutter unit 4 Removal of the LED pointer Remove the LED pointer 6 2 7 5 Mounting of the LED pointer Mount the LED pointer Covers 6 Mounti...

Page 65: ... 2011 MIMAKI ENGINEERING CO LTD 1 2 3 4 5 6 7 8 MAINTENANCE MANUAL Workflow Driving Parts Workflow 3 1 Ink Related Parts 3 2 Driving Parts 3 3 Electrical Parts ...

Page 66: ... 1 X axis Motor 2 Removal of the X axis motor Remove the X axis motor 6 3 1 3 Mounting of the X axis motor Mount the X axis motor Adjustment 4 Adjustment of the belt tension Adjust the tension of the belt 5 Adjustment of the motor current If a hunting noise occurs while the motor is being driven adjust the X axis motor current 4 2 13 Covers 6 Mounting of the covers Mount the covers that have been ...

Page 67: ...cover and D BKT cover 6 1 1 Y axis Motor 2 Removal of the Y axis motor Remove the Y axis motor 6 3 2 3 Mounting of the Y axis motor Mount the Y axis motor Adjustment 4 Adjustment of the motor current If a hunting noise occurs while the motor is being driven adjust the Y axis motor current 4 2 13 Covers 5 Mounting of the covers Mount the covers that have been removed 6 1 1 Be sure to wear protectiv...

Page 68: ...scription Ref Covers 1 Removal of covers etc Remove the front cover Y cover F and head cover 6 1 1 Y Drive Belt 2 Removal of the Y drive belt Remove the Y drive belt 6 3 4 3 Mounting of the Y drive belt Mount the Y drive belt Covers 4 Mounting of the covers Mount the covers that have been removed 6 1 1 Be sure to wear protective glasses and working gloves during the operation Ink may get into your...

Page 69: ... Removal of the linear encoder scale Remove the linear encoder scale 6 3 5 3 Removal of the protective film Peel off the protective film from the encoder 4 Mounting of the linear encoder scale Mount the linear encoder scale Pay attention to the location of the encoder PCB assy Check 5 Encoder check Carry out the encoder check to confirm it functions normally 4 3 4 5 1 26 Covers 6 Mounting of the c...

Page 70: ... 2011 MIMAKI ENGINEERING CO LTD 1 2 3 4 5 6 7 8 MAINTENANCE MANUAL Workflow Electrical Parts Workflow 3 1 Ink Related Parts 3 2 Driving Parts 3 3 Electrical Parts ...

Page 71: ...pload Before the printed circuit board is replaced upload its parameter to the PC Covers 2 Removal of covers etc Remove the electrical box cover 6 1 1 Main PCB Assy 3 Removal of the main PCB assy Remove the main PCB assy 6 4 2 4 Mounting of the main PCB assy Mount the main PCB assy Check 5 Parameter download Download the parameters which were uploaded in operation 1 6 Adjustment of the motor curre...

Page 72: ... 2011 MIMAKI ENGINEERING CO LTD 1 2 3 4 5 6 7 8 4 Adjustment Items 4 1 Operation Matrix 4 2 Adjustment Function 4 3 Mechanical Adjustment MAINTENANCE MANUAL Adjustment Items Operation Matrix ...

Page 73: ...nsor test 5 1 13 Slant adjustment 4 2 1 Drop position adjustment 4 2 4 Adjustment of Capping Registration of part replacement 4 2 17 Adjustment of the wiper height 4 3 3 Firmware update 1 2 Cutter assy removal or replacement Head PCB assy replacement Main PCB replacement 1 X axis motor assy removal or replacement Y axis motor assy removal or replacement Power supply unit Head removal or replacemen...

Page 74: ... 2011 MIMAKI ENGINEERING CO LTD 1 2 3 4 5 6 7 8 MAINTENANCE MANUAL Adjustment Items Adjustment Function Adjustment Items 4 1 Operation Matrix 4 2 Adjustment Function 4 3 Mechanical Adjustment ...

Page 75: ...its it 2 Select SLANT ADJUST from the operation menu to execute adjustment pattern drawing 3 Move the head over the platen using the JOG key Adjusting Lever Adjusting Lever LOCAL 1 01 FUNCTION ADJUST ENT ADJUST HEAD ADJUST ent HEAD ADJUST SLANT ADJUST ent SLANT ADJUST PRINT START ent FUNCTION Adjustment pattern drawing SLANT ADJUST HEAD SELECT 12 MAINTENANCE MANUAL Adjustment Items Adjustment Func...

Page 76: ...e columns a the pattern is reversed Perform an averaging adjustment The standard color for each column is M for columns a and C for columns b Move the adjustment lever and adjust the slant In the diagram on the left the columns b are aligned while the columns a are misaligned In this case move b columns slightly so that the degrees of scattering of a and b columns are equal Intermediate adjustment...

Page 77: ...d 7 Fix the screws x3 8 Repeat the procedures in the Step 2 to 7 until you can adjust 9 Move the adjusting lever to the left edge For fix 1 For fix 3 For fix 1 For fix 2 For fix 2 For fix 3 Fix the screws after adjustment in the order of 1 2 and 3 R 1 0 MAINTENANCE MANUAL Adjustment Items Adjustment Function HEAD ADJUST SLANT ADJUST Model TS34 1800A Issued 2011 10 17 Revised F W ver 1 20 Remark 1 ...

Page 78: ...ttern The pattern is drawn in only A Magenta raw of each head Procedure 1 Move the adjusting lever to the right until the adjusting cam hits it It is necessary to perform SLANT adjustment before STAGGER adjustment After adjusting the stagger adjust the slant Align this row of each head Adjustment pattern Head 1 Heda 2 Adjusting Lever MAINTENANCE MANUAL Adjustment Items Adjustment Function HEAD ADJ...

Page 79: ...en the Head 1 and 2 is about 140µm LOCAL 1 01 FUNCTION ADJUST ENT ADJUST HEAD ADJUST ent HEAD ADJUST STAGGER ADJUST ent STAGGER ADJUST PRINT START ent FUNCTION Adjustment pattern drawing Stagger confirmation point Head 1 Head 2 Scope Image Rotate the adjustment lever counter clockwise The position of Head 2 moves backward Rotate the adjusting screw clockwise The position of Head 2 moves forward 約 ...

Page 80: ...agger of the head 7 Fix the screws x3 8 Repeat the procedures in the Step 2 to 7 until you can adjust 9 Move the adjusting lever to the left edge For fix 1 For fix 1 For fix 1 Fix the screws after adjustment in the order of 1 2 and 3 R 1 0 MAINTENANCE MANUAL Adjustment Items Adjustment Function HEAD ADJUST STAGGER ADJUST Model TS34 1800A Issued 2011 10 17 Revised F W ver 1 20 Remark 1 0 Rev ...

Page 81: ...from the operation menu to execute adjustment pattern drawing 3 Move the head over the platen using the JOG key Adjusting Lever Adjusting Lever Adjusting Lever LOCAL 1 01 FUNCTION ADJUST ENT ADJUST HEAD ADJUST ent HEAD ADJUST AVERAGING ADJ ent AVERAGING ADJ PRINT START ent FUNCTION Adjustment pattern drawing AVERAGING ADJ HEAD SELECT 12 MAINTENANCE MANUAL Adjustment Items Adjustment Function HEAD ...

Page 82: ...ft For the columns a the pattern is reversed Perform an averaging adjustment The standard color for each column is M for columns a and C for columns b Move the adjustment lever and adjust the slant In the diagram on the left the columns b are aligned while the columns a are misaligned In this case move b columns slightly so that the degrees of scattering of a and b columns are equal Intermediate a...

Page 83: ...ws x3 5 Repeat the common procedure 2 and the slant adjustment procedures 1 to 4 until you can adjust 6 Move the adjusting lever to the left edge For fix 1 For fix 3 For fix 1 For fix 2 For fix 2 For fix 3 Fix the screws after adjustment in the order of 1 2 and 3 R 1 0 MAINTENANCE MANUAL Adjustment Items Adjustment Function HEAD ADJUST AVERAGING ADJUST Model TS34 1800A Issued 2011 10 17 Revised F ...

Page 84: ... of each column Adjust it so that 4 nozzles each for both edges of the head to be adjusted may be overlapped in alignment in the X direction P e r f o r m a n a v e r a g i n g a d j u s t m e n t Perform an averaging adjustment Adjust it so that 4 nozzles each for both edges of column a and column b may be overlapped on average in the X direction It is necessary to perform SLANT adjustment before...

Page 85: ... 4 Fix the screws x3 5 Repeat the common procedure 2 and the stagger adjustment procedures 1 to 4 until you can adjust 6 Move the adjusting lever to the left edge For fix 1 For fix 1 For fix 1 Fix the screws after adjustment in the order of 1 2 and 3 R 1 0 MAINTENANCE MANUAL Adjustment Items Adjustment Function HEAD ADJUST AVERAGING ADJUST Model TS34 1800A Issued 2011 10 17 Revised F W ver 1 20 Re...

Page 86: ...tches scan speed ENTER Finalizes To Next 3 Select a resolution to be used as a standard Selection item DRAFT 540 dpi FINE 720 dpi DRAFT2 540 dpi FINE2 720 dpi Switches Resolution ENTER Finalizes To Next Adjustment Value Return Path Outward Path LOCAL 1 01 FUNCTION ADJUST ENT ADJUST HEAD ADJUST ent HEAD ADJUST DROP POS ADJUST ent FUNCTION Make sure to check the HEAD HEIGHT Head height is adjusted a...

Page 87: ...ttern drawing Adjustingitem Head1 1 Adjustingvalue 50 0 50 0 dot unit 0 1 dot FINE Y Si FINE Y Re Input the adjusting value of the D row of each head based on the D row of the head 1 Use only the D row of each head for pattern drawing Adjustingitem Head1 2 Adjustingvalue 50 0 50 0 dot unit 0 1 dot DROP POS HsLgDRFT ADJUST Y Si Y Re Y Bi FINE Y Si FINE Y Re FINE Y Bi DROP POS HsLgDRFT Y Bi DRAW ent...

Page 88: ...tem Head1 1 Adjustingvalue 50 0 50 0 dot unit 0 1 dot 6 Enter the adjustment value DROP POS HsLgDRFT Y Bi H1 H1 0 0 When this adjustment has been made previously adjusted value of DROP POScorrect is cleared R 1 0 MAINTENANCE MANUAL Adjustment Items Adjustment Function HEAD ADJUST DROP POS Model TS34 1800A Issued 2011 10 17 Revised F W ver 1 20 Remark 1 0 Rev ...

Page 89: ... pattern drawing LevelSurfaceCHK HEAD SELECT 12 Pattern parts that confirm the parallel of the front and rear parts of the head against the face of the platen It is OK that the dot position lines up parallel back and forth It is OK that it does not vary gradually on B H nozzle Outward print Homeward Print 70µ 1in 360dpi Pattern parts that confirm the parallel of the right and left parts of the hea...

Page 90: ...of dot position misalignment become opposite 130µ 110µ 90µ 70µ As the dot position is inclined it looks like V shaped in both directions 70µ pitch becomes wider and wider little by little Platen Platen Condition of front slant Condition of right slant R 1 0 MAINTENANCE MANUAL Adjustment Items Adjustment Function HEAD ADJUST LevelSurfaceCHK Model TS34 1800A Issued 2011 10 17 Revised F W ver 1 20 Re...

Page 91: ...for adjustment Without drawing 3 Check the adjustment pattern 4 Enter the adjustment value For adjustment input actual values obtained by measuring from the edge of the media to the pattern Adjusting value 0 0 to 45 0 mm unit 0 1 mm Use the inside of pinch roller as a positive The backlash of the pinch roller may produce an error of approx 0 5 mm Changes adjustment values END Cancellation of input...

Page 92: ...tes drawing To the screen for adjustment Without drawing END Completes drawing and inputs compensation value 3 Check the adjustment pattern 4 Enter the compensation value Compensation value 500 to 500 Changes adjustment values END Cancellation of input Draw by 2 Heads and feed by 2 Heads at a time 1 2 3 LOCAL 1 01 FUNCTION ADJUST ENT ADJUST MEDIA COMP 2 ent MEDIA COMP 2 PRINT START ent Pattern dra...

Page 93: ...ment pattern and adjust the location of the LED pointer and print origin Nozzle A Column Procedure 1 Select POINTER OFFSET from the operation menu 2 Make necessary adjustments ENTER Starts drawing After drawing is completed LED pointer movement Align the LED pointer to the pattern position shown on the left intersection of the straight lines ENTER Settings END Cancellation of input LOCAL 1 01 FUNC...

Page 94: ...the cap base Horizontally shifts the cap ENTER Finalizes To Next 3 Make adjustment so that the head is located exactly at the point where the head is in contact with rubber portion left end of the cap head Shifts the cap ENTER Finalizes To Next 4 Make adjustment so that the clearance between the head and left end of the cap is set at 1 mm Shifts the cap ENTER Finalizes To Next LOCAL 1 01 FUNCTION ...

Page 95: ...t the 2nd head in the same way Horizontally shifts the wiper ENTER Finalizes END Completes CAPPING FlushingPOS2 0 0mm If the screw is positioned in the steeply inclined groove impact noise will be generated at the time of refreshing The screw is positioned right in front of the steeply inclined slot OK No Good The screw is positioned in the steeply inclined slot CAPPING Wiper Home 0 Adjust it to t...

Page 96: ...tion value ID in 24 digits is written is attached on a head at the factory shipment This head ID is stored in the machine using the parameters so that print quality is consistent Manual input of the ID information is required in the following cases In a case that the ID information is not stored in the mini memory PCB assy HEAD ID Un input is displayed on the panel at power on Pay attention when r...

Page 97: ...t the washing liquid cartridges into all the slots clean the inside of the tube and then carry out head vibration 5 Remove all the washing liquid cartridges and then discharge the liquid inside During the cleaning sequence the cartridge sensor in the machine monitors the insertion and removal of each cartridge When the sensor detects the cartridge specified on the screen or when the sensor detects...

Page 98: ...g 9 Clean inside the ink channels using washing liquid 10 Select the next operation Head wash completed in this sequence Discharge of the maintenance washing liquid To the next operation 11 Remove the maintenance washing liquid cartridges and discharge the liquid inside Set WashingCartridges 12345678 ABSORPTION 00 00 Remove Cartridges 12345678 DISCHARGE 00 00 Clean a Wiper COMPLETED ent END CONTIN...

Page 99: ...to end the operation Head wash completed in this sequence Discharge of the maintenance washing liquid Only at factory shipment RANS Liquid END ABSORB R 1 0 MAINTENANCE MANUAL Adjustment Items Adjustment Function HEAD WASH Model TS34 1800A Issued 2011 10 17 Revised F W ver 1 20 Remark 1 0 Rev ...

Page 100: ...head WASH from the operation menu 2 Cap OFF 3 Press ENTER to execute suction operates the corresponding pump motor Filling will not be executed if a waste ink tank warning is displayed 4 Select END to end the operation LOCAL 1 01 FUNCTION ADJUST ENT ADJUST MANUALhead WASH ent MANUALhead WASH SUCTION START ent MAINTENANCE MANUAL Adjustment Items Adjustment Function MANUALhead WASH Model TS34 1800A ...

Page 101: ...e ENTER Executes END Returns Procedures for X MOVING ADJUST 1 Select MOTOR CURRENT X MOVING ADJUST from the operation menu Changes items ENTER Finalizes To the next compensation screen 2 Input the following test conditions and execute the function Speed S 5 to 10 mm s Acceleration A 0 2 G Length X About 50 to 100 mm 3 Adjust the value so that the hunting sound during the X motor running is minimiz...

Page 102: ... running is minimized Check the hunting sound of the Y motor at right side 4 Press END several times to complete the Y axis motor current adjustment Changes the value Moves ENTER Executes END Returns LOCAL 1 01 FUNCTION ADJUST ENT ADJUST MOTOR CURRENT ent MOTOR CURRENT Y MOVING ADJUST ent Y MOVING ADJUST S 50 A 0 10 X 100 Y axis continuous drive Y axis motor drive Y MOVING ADJUST 140 0 Carriage ou...

Page 103: ...ized Procedure 1 Select SERIAL No from the operation menu 2 Enter Confirm the serial number Change the numerals Moves the cursor When the cursor is in the left or the right end key input does not work ENTER Finalizes END Cancellation of input LOCAL 1 01 FUNCTION ADJUST ENT ADJUST SERIALNo ent FUNCTION SERIAL No 00000000 If the serial number has been set it cannot be changed MAINTENANCE MANUAL Adju...

Page 104: ...from the operation menu 2 Enter Confirm the dealer number Change the numerals Moves the cursor When the cursor is in the left or the right end key input does not work ENTER Finalizes END Cancellation of input LOCAL 1 01 FUNCTION ADJUST ENT ADJUST DEALER No ent FUNCTION DEALER No MAINTENANCE MANUAL Adjustment Items Adjustment Function DEALER No Model TS34 1800A Issued 2011 10 17 Revised F W ver 1 2...

Page 105: ...ctable 2 MAINTENANCEparameter Initialize the parameter in question 3 CUSTOMIZE PARAMETER Initialize the parameter in question 4 RUNNING PARAMETER Initialize the parameter in question 5 EXCHANGE PARAMETER Initialize the parameter in question 6 INK SYSTEM PARAMETER Initialize the parameter in question LOCAL 1 01 FUNCTION ADJUST ENT ADJUST DEFAULT SET ent FUNCTION DEFAULT SET SETUP PARAMETER ent MAIN...

Page 106: ...Type Contents of registration PUMP Enter the date and the pump No CAP Enter the date and the cap No DAMPER Enter the date head No and the damper No The position of the damper and the print head Top view of head B A B A Damper Head 1 Head 2 Pump Cap Damper Pump 1 Pump 2 Cap 1 Cap 2 The position of the cap Top view of cap The position of the pump Front view of machine LOCAL 1 01 FUNCTION ADJUST ENT ...

Page 107: ...ory To see the part replacement history select HISTORY in Step 2 and make the appropriate part displayed DAMPER 0 11 01 01 No 2 B Switches the display of the parts Head No Damper No R 1 0 MAINTENANCE MANUAL Adjustment Items Adjustment Function REPLACE PARTS Model TS34 1800A Issued 2011 10 17 Revised F W ver 1 20 Remark 1 0 Rev ...

Page 108: ... 2011 MIMAKI ENGINEERING CO LTD 1 2 3 4 5 6 7 8 MAINTENANCE MANUAL Adjustment Items Mechanical Adjustment Adjustment Items 4 1 Operation Matrix 4 2 Adjustment Function 4 3 Mechanical Adjustment ...

Page 109: ...ecking the location Procedure 1 Use the cutter unit screws x3 to temporarily fix the unit Tighten the screws just enough to support the unit 2 Push down the clamp lever 3 Set the jig on the platen Set the bin x3 on the bottom of the jig to the platen media plate front and back fitting 4 Attach the jig to the head Slide the jig toward the head until it attaches stopping position Cutter Unit If the ...

Page 110: ...ing The fitting area is wider than the actual cutter blade Therefore alignment should be made within that area If the jig is not available press the cutter blade assy down to the platen surface and adjust it until it fits the platen On rare occasions the blade comes out of the slot because of assembly errors or fluctuation in part accuracies In such a case adjust again to the back front optimum po...

Page 111: ...or station base adjustment 3 Loosen the hexagon socket head screws and make an adjustment to set their thickness gauge at 5 mm then tighten the nuts 4 Tighten up two loosened screws used for station base adjustment and fix them at 5 mm in thickness gauge Loosen 5mm 5mm MAINTENANCE MANUAL Adjustment Items Mechanical Adjustment Adjustment of the Station Height Model TS34 1800A Issued 2011 10 17 Revi...

Page 112: ...iniature clamp lever on the P cover U front and then tighten the screws while holding the height adjustment lever in the lowest position to fix the head in place 3 Move the wiper base 34 and adjust the wiper so that there is approximately 1 5 mm from the nozzle surface 8 mm Wiper base BKT34 Wiper base 34 1 5 mm Nozzle surface Wiper MAINTENANCE MANUAL Adjustment Items Mechanical Adjustment Adjustme...

Page 113: ...the left end on the main body The upper part of the linear encoder scale is not in touch with the L sensor The exposed lens of the L sensor is not over the height of the linear encoder scale Linear Encoder Scale NG The linear encoder scale must not be in touch with the L sensor The linear encoder scale must be positioned so that the lens of the L sensor is hidden by it After fixing the L sensor BK...

Page 114: ...p side face to face 2 In case their axes are not aligned make adjustment after loosening the screws of the bushing 3 After the both axes have been aligned tighten up screws and check for any misalignment of axis at the right left and central part of the main body Bad example The axes of the right or left side of the roller holder are out of alignment Good example The axes of the roller holder are ...

Page 115: ...wiper drive link Procedure 1 After setting the clearance between the motor base and the wiper drive link at 0 5 mm check whether the wiper moves smoothly Wiper Drive Link 0 5 mm MAINTENANCE MANUAL Adjustment Items Mechanical Adjustment Positioning of the Wiper Drive Link Model TS34 1800A Issued 2011 10 17 Revised F W ver 1 20 Remark 1 0 Rev ...

Page 116: ... 2011 MIMAKI ENGINEERING CO LTD 1 2 3 4 5 6 7 8 5 Test Items 5 1 Test Function 5 2 Other Test MAINTENANCE MANUAL Test Items Test Function ...

Page 117: ... 16 4 8 16 32 540x900 5 10 20 40 5 10 20 40 540x1080 3 6 12 24 6 12 24 48 720x540 3 6 12 24 3 6 12 24 720x720 2 4 8 16 4 8 16 32 720x1080 3 6 12 24 6 12 24 48 720x1440 4 8 16 32 8 16 32 64 1440x1440 8 16 32 16 32 64 4 Drawing size selection X size 10 mm paper length unit 10 mm Roll paper 500000 mm Y size 10 mm paper width unit 10 mm 5 Drawing color selection 4 colors M C Y K M B Y K with Sublimati...

Page 118: ... 4 8 16 32 540x900 5 10 20 40 5 10 20 40 540x1080 3 6 12 24 6 12 24 48 720x540 3 6 12 24 3 6 12 24 720x720 2 4 8 16 4 8 16 32 720x1080 3 6 12 24 6 12 24 48 720x1440 4 8 16 32 8 16 32 64 1440x1440 8 16 32 16 32 64 4 Drawing size selection X size 10 mm paper length unit 10 mm Roll paper 500000 mm Y size 10 mm paper width unit 10 mm 5 Drawing color selection 4 colors M C Y K M B Y K with Sublimation5...

Page 119: ...2 24 6 12 24 48 720x540 3 6 12 24 3 6 12 24 720x720 2 4 8 16 4 8 16 32 720x1080 3 6 12 24 6 12 24 48 720x1440 4 8 16 32 8 16 32 64 1440x1440 8 16 32 16 32 64 5 Drawing size selection X size 10 mm paper length unit 10 mm Roll paper 500000 mm Y size 10 mm paper width unit 10 mm 6 Start of drawing Waiting for key input ENTER Starts drawing TEST Executes test drawing JOG Sets JOG operation mode Press ...

Page 120: ...x1080 3 6 12 24 6 12 24 48 720x540 3 6 12 24 3 6 12 24 720x720 2 4 8 16 4 8 16 32 720x1080 3 6 12 24 6 12 24 48 720x1440 4 8 16 32 8 16 32 64 1440x1440 8 16 32 16 32 64 4 Drawing size selection X size 10 mm paper length unit 10 mm Roll paper 500000 mm Y size 10 mm paper width unit 10 mm 5 Start of drawing Waiting for key input ENTER Starts drawing TEST Executes test drawing JOG Sets JOG operation ...

Page 121: ...ck patterns are drawn in the block Check pattern Reference page Slant adjusting pattern 4 2 1 Y impact position adjusting pattern DRAFT FINE DRAFT2 FINE2 Four patterns in total 4 2 4 MAINTENANCE MANUAL Test Items Test Function ALL PATTERN Model TS34 1800A Issued 2011 10 17 Revised F W ver 1 20 Remark 1 0 Rev ...

Page 122: ...n Selects acceleration Set value 0 01 2 00 G unit 0 01 G 3 Moving amount designation Selects moving amount Set value 1 mm paper length width unit 1 mm When media is not detected 1 mm 500000 mm 4 Test start ENTER Repeats reciprocating motion in the X direction with designated conditions 5 End END Returns to the motion starting position and executes capping to end the test MAINTENANCE MANUAL Test It...

Page 123: ...et value 0 05 2 00 G unit 0 05 G 3 Moving amount designation Selects moving amount Set value 1 mm paper length width unit 1 mm When media is not detected 1 mm Mechanical limit size 4 Cap OFF Only after media detection 5 Test start ENTER Repeats reciprocating motion in the Y direction with designated conditions 6 End END Returns to the motion starting position and executes capping to end the test M...

Page 124: ...00 mm s unit 1 mm s Selection of items 4 6 ENTER Transits to the following step END Transits to the X direction setting 2 5 Y acceleration designation Selects acceleration Set value 0 05 2 00 G unit 0 05G 6 Y moving amount designation Selects moving amount Set value 1 mm paper width unit 1 mm When media is not detected 1 mm Mechanical limit size 7 Cap OFF Only after media detection 8 Test start EN...

Page 125: ... items 1 3 2 WAIT designation Designates operation interval Set value 0 60 sec unit 1 sec 3 Count designation Designates No of operation Set value CONTINUE 1 1000 count unit 1 count 4 Test start ENTER Drives the motor with designated conditions When CONTINUE is selected from the count setting press END to finish the test 5 End Return the wiper to the original position MAINTENANCE MANUAL Test Items...

Page 126: ...e Motor state selection FUNCTION Carriage motor state at test selection menu is displayed Carriage IN Executes at cap position OUT Executes after carriage out MOTOR ON Executes with Y axis motor ON OFF Executes with Y axis motor OFF 5 Test start ENTER Removes the cap and moves the carriage to maintenance position Drives the pump motor with designated conditions END Ends the test During operation o...

Page 127: ...uted Operation Procedures Step Item Description Remarks 1 Test start ENTER Drives take up motor SW of winding device enables switching of winding direction or operation stop 2 Test end END Completes the test MAINTENANCE MANUAL Test Items Test Function MOTOR TEST TAKE UP MOTOR Model TS34 1800A Issued 2011 10 17 Revised F W ver 1 20 Remark 1 0 Rev ...

Page 128: ...tor option Set value ON OFF Y CUTTER Description Operation test of media cutter Set value UP DOWN FUNCTION Sets operation interval of Y cutter Sets operation interval Set value 0 7200 sec unit 1 sec ENTER Repeats UP and Down at the set interval Number count is displayed during the execution LED POINTER Description Operation test of LED pointer Set value ON OFF HDC FAN Description Operation test of...

Page 129: ...lay of wiper sensor ON OFF 5 Front cover State display of the cover sensor Front and maintenance LR 6 HEAD HEIGHT State display of head height sensor ON OFF 7 Main PCB ID Judgment of main PCB 800 and more 8 Head Voltage 1 Judgment of the voltage of Head 1 If it is 800 and below the voltage may drop or fuse may be melt down due to the head defect 800 and more 9 Head Voltage 2 Judgment of the voltag...

Page 130: ...ction of all optional devices is checked OFF is displayed when not connected and ON is displayed when the respective device is connected in the correct location List of options LCD display Options REEL Take up device EXH Exhaust fan DRY Dry fan Since the shape of all the connectors is the same they can be connected to any optional devices However if they are connected to the wrong devices the devi...

Page 131: ...he keyboard LEDs is executed The LEDs are controlled according to the ON OFF designation List of LEDs LED Kinds HEAT LED Pre Print and Post heat LEDs Constant LED ACTIVE LED ACTIVE LED MAINTENANCE MANUAL Test Items Test Function KEYBOARD LED Model TS34 1800A Issued 2011 10 17 Revised F W ver 1 20 Remark 1 0 Rev ...

Page 132: ...er sensor is tested Remove the cap move the station to its lowest point and then display the paper sensor read value Sensor read value during SLOP ON Sensor read value during SLOP OFF Difference between and The sensor read value is updated regularly every 150 msec Moves the head Moves alternately between the media right end position with paper and without paper END After the cap is put back on the...

Page 133: ... tested When a panel SW is pressed name of the SW is displayed on LCD When no key is pressed NONE is displayed When END is pressed END TEST is displayed and the keyboard test ends MAINTENANCE MANUAL Test Items Test Function KEYBOARD TEST Model TS34 1800A Issued 2011 10 17 Revised F W ver 1 20 Remark 1 0 Rev ...

Page 134: ...n Characters are displayed on LCD When the LCD Test is started scrolling of character code of 0x21 0xFF in one line is repeated The test is completed by pressing END MAINTENANCE MANUAL Test Items Test Function LCD TEST Model TS34 1800A Issued 2011 10 17 Revised F W ver 1 20 Remark 1 0 Rev ...

Page 135: ... time becomes an error Machine setting Same as the time setting Set value 20YY MM DD HH MM 00 YY 00 50 MM 01 12 DD 01 31 HH 00 23 MM 00 59 Returning to the last setting is allowed by pressing FUNCTION in the Date Time Display State not the Entering State However the time elapsed after the setting change is added MAINTENANCE MANUAL Test Items Test Function TIMER CHECK Model TS34 1800A Issued 2011 1...

Page 136: ... ENTER Restarts feeding Cut jig function After the Skew check starts feed distance is not designated the following operation starts the cut jig function REMOTE FUNCTION The cut jig function repeats media cut feed in feed distance and number of cut times designated Number of cut times is displayed in count down during cut Feed distance 10 10000 mm unit 10 mm Default 500 mm Number of cut times 1 100...

Page 137: ...address 0 of F ROM is 0001F000h 2 that is counted as 1 and repeat the process until END is input If the SUM value is not 0001F000h the check process is discontinued and an error is displayed HEAD EEPROM 1 Read Write check of HEAD EEPROM Select a head unit to be checked Before starting the checking save contents of EEPROM in S RAM head unit parameter area In the checking the following process is co...

Page 138: ...nvironment temperature of head is displayed A D value is also displayed A unit selected in the UNIT SETUP of the MACHINE SETUP is used in the display of head temperature MAINTENANCE MANUAL Test Items Test Function TEMP CHECK HEAD TEMP Model TS34 1800A Issued 2011 10 17 Revised F W ver 1 20 Remark 1 0 Rev ...

Page 139: ...1 23 TEMP CHECK NOZZLE TEMP Function Nozzle temperature error check is executed At Normal OK is displayed At error NG is displayed MAINTENANCE MANUAL Test Items Test Function TEMP CHECK NOZZLE TEMP Model TS34 1800A Issued 2011 10 17 Revised F W ver 1 20 Remark 1 0 Rev ...

Page 140: ...rature of HDC board heat sink is displayed A D value is also displayed A unit selected in the UNIT SETUP of the MACHINE SETUP is used in the display of heat sink temperature MAINTENANCE MANUAL Test Items Test Function TEMP CHECK HEAT SINK TEMP Model TS34 1800A Issued 2011 10 17 Revised F W ver 1 20 Remark 1 0 Rev ...

Page 141: ...5 TEMP CHECK SLIDER TEMP Function Temperature read from the thermistor on the slider PCB assy is displayed A D value is also displayed MAINTENANCE MANUAL Test Items Test Function TEMP CHECK SLIDER TEMP Model TS34 1800A Issued 2011 10 17 Revised F W ver 1 20 Remark 1 0 Rev ...

Page 142: ... 100 mm Maximum actual operation limit unit 100 mm LCD display is as follows M Y axis motor encoder E linear encoder Moving distance M E unit 0 1 mm Difference in encoder values between before and after moving Mc Ec unit 0 1 mm Encoder values before movement Ms Es Encoder values after movement Mm Em Encoder values after having moved by designated distance Mr Er Be careful about the carriage which ...

Page 143: ...ridge exist non exist sensor and end sensor are displayed A slot number on which an error NO CARTRIDGE INK NEAR END is found is displayed PACK 1234 5678 END 1234 5678 Example of LCD display MAINTENANCE MANUAL Test Items Test Function INK CARTRIDGE PACK END SENSOR Model TS34 1800A Issued 2011 10 17 Revised F W ver 1 20 Remark 1 0 Rev ...

Page 144: ...TRIDGE CARTRIDGE VALVE Function Open close of cartridge valve is checked Executes all OPEN all CLOSE of valves by pressing FUNCTION key MAINTENANCE MANUAL Test Items Test Function INK CARTRIDGE CARTRIDGE VALVE Model TS34 1800A Issued 2011 10 17 Revised F W ver 1 20 Remark 1 0 Rev ...

Page 145: ...IDGE INK IC CHECK Function Ink cartridge IC is checked IC chip data is read and the number of error occurrence at each cartridge is displayed MAINTENANCE MANUAL Test Items Test Function INK CARTRIDGE INK IC CHECK Model TS34 1800A Issued 2011 10 17 Revised F W ver 1 20 Remark 1 0 Rev ...

Page 146: ... INK CARTRIDGE CARTRIDGE LED Function On Off of cartridge LED is tested Use FUNCTION to move the cursor in ERROR or ACTIVE status MAINTENANCE MANUAL Test Items Test Function INK CARTRIDGE CARTRIDGE LED Model TS34 1800A Issued 2011 10 17 Revised F W ver 1 20 Remark 1 0 Rev ...

Page 147: ... SENSOR Function The state of the cartridge exist non exist sensor and end sensor are displayed PACK END SENSOR PACK ON END OFF Example of LCD display MAINTENANCE MANUAL Test Items Test Function WASH CARTRIDGE PACK END SENSOR Model TS34 1800A Issued 2011 10 17 Revised F W ver 1 20 Remark 1 0 Rev ...

Page 148: ... 4 5 6 7 8 R 1 0 5 1 32 WASH CARTRIDGE CARTRIDGE VALVE Function Open close of cartridge valve is checked MAINTENANCE MANUAL Test Items Test Function WASH CARTRIDGE CARTRIDGE VALVE Model TS34 1800A Issued 2011 10 17 Revised F W ver 1 20 Remark 1 0 Rev ...

Page 149: ...RIDGE IC CHECK Function Maintenance washing liquid cartridge IC is checked IC chip data is read and the number of error occurrence is displayed MAINTENANCE MANUAL Test Items Test Function WASH CARTRIDGE IC CHECK Model TS34 1800A Issued 2011 10 17 Revised F W ver 1 20 Remark 1 0 Rev ...

Page 150: ... 2011 MIMAKI ENGINEERING CO LTD 1 2 3 4 5 6 7 8 Test Items 5 1 Test Function 5 2 Other Test MAINTENANCE MANUAL Test Items Other Test ...

Page 151: ...he sub and main power switches in order unplug the power code Check if no electric charge is remaining in the PCB Refer to the 4 4 2 Electric charge checking when replace the Electrical Parts It is very dangerous if sleep mode functions mistakenly during the operation Moreover the PCB may be damaged in case electric charge still remains inside Also there is a possibility of electric shock because ...

Page 152: ...result of TP1 to 8 is 10MΏ and more the head 2 has no defect When the result of TM9 to 16 is 10MΩ and more the head 1 has no defect After turning off the sub and main power switches in order unplug the power code Check if no electric charge is remaining in the PCB Refer to the 4 4 2 Electric charge checking when replace the Electrical Parts It is very dangerous if sleep mode functions mistakenly d...

Page 153: ...uld be in the range of 17K ohms to 18K ohms 3 Measure the resistance on both ends of F13 fuse to check the blown fuse Measured value of the fuse should be less than 5 ohms After turning off the sub and main power switches in order unplug the power code Check if no electric charge is remaining in the PCB Refer to the 4 4 2 Electric charge checking when replace the Electrical Parts It is very danger...

Page 154: ...od or not When the measured result is 14KΩ and more the motor driving circuit has not defect F13 If the power supply cannot be turned on it is possible that the impedance between the motor driving power K1 42V and GND in the main PCB has abnormally dropped R 1 0 MAINTENANCE MANUAL Test Items Other Test Checking Damage of the Main PCB ASSY Model TS34 1800A Issued 2011 10 17 Revised F W ver 1 20 Rem...

Page 155: ...he resistance on both ends of F3 fuse to check the blown fuse Measured value of the fuse should be less than 5 ohms After turning off the sub and main power switches in order unplug the power code Check if no electric charge is remaining in the PCB Refer to the 4 4 2 Electric charge checking when replace the Electrical Parts It is very dangerous if sleep mode functions mistakenly during the operat...

Page 156: ...ce by getting the positive terminal touch to 1 pin of CN13 Measured value of each test pin should be more than 5K ohms After turning off the sub and main power switches in order unplug the power code Check if no electric charge is remaining in the PCB Refer to the 4 4 2 Electric charge checking when replace the Electrical Parts It is very dangerous if sleep mode functions mistakenly during the ope...

Page 157: ...ntact with it M Y K C C K Y M M Lc Y M C K C Lm M Y Lc W C K Lm W Signal Test pin on the ink slider PCB Test pin on the main PCB Normal conduction Nozzle line COM 11 TP9 TP1 Less than 3 ohms A COM 12 TP10 TP2 Less than 3 ohms B COM 13 TP11 TP3 Less than 3 ohms C COM 14 TP12 TP4 Less than 3 ohms D COM 15 TP13 TP5 Less than 3 ohms E COM 16 TP14 TP6 Less than 3 ohms F COM 17 TP15 TP7 Less than 3 ohms...

Page 158: ...C COM line as the figure on the left Main PCB Head1 side HDC PCB Head2 side Slider PCB Tester 1 6Ω HDC FFC The resistance undergoes a little bit change with the probe location or temperature R1 0 MAINTENANCE MANUAL Test Items Other Test Checking Conduction of HDC FFC COM Line Model TS34 1800A Issued 2011 10 17 Revised F W ver 1 20 Remark 1 0 Rev ...

Page 159: ...6 U46 6 Less than 22ohms B SID12 U5 7 U46 5 Less than 22ohms SID13 U5 10 U46 10 Less than 22ohms C SID13 U5 9 U46 11 Less than 22ohms SID14 U5 14 U46 14 Less than 22ohms D SID14 U5 15 U46 13 Less than 22ohms SID15 U7 2 U47 2 Less than 22ohms E SID15 U7 1 U47 3 Less than 22ohms SID16 U7 6 U47 6 Less than 22ohms F SID16 U7 7 U47 5 Less than 22ohms SID17 U7 10 U47 10 Less than 22ohms G SID17 U7 9 U47...

Page 160: ...color ink set 6 color ink set 6 color white ink set A line C line E line G line B line D line F line H line A line C line E line G line B line D line F line H line A line C line E line G line B line D line F line H line Main PCB Head1 side HDC PCB Head2 side Slider PCB Tester 1 6Ω HDC FFC The resistance undergoes a little bit change with the probe location or temperature R 1 1 MAINTENANCE MANUAL T...

Page 161: ... MIMAKI ENGINEERING CO LTD 1 2 3 4 5 6 7 8 MAINTENANCE MANUAL Disassembly and Reassembly Covers 6 Disassembly and Reassembly 6 1 Covers 6 2 Ink related Parts 6 3 Drive System 6 4 Electrical Parts 6 5 Sensors ...

Page 162: ...t Cover Maintenance Cover Bottom MS Cover 260 Take up cover S Platen Cover F160 Double Ink Guard Cartridge Holder B D BKT Cover YCover F P Cover L P Cover U C Cover Left Cover DI Left Cover U Drying Fan Cover Station Cover U34 PC Cartridge Cover A MAINTENANCE MANUAL Disassembly and Reassembly Covers Cover Layout Model TS34 1800A Issued 2011 10 17 Revised F W ver 1 20 Remark 1 0 Rev ...

Page 163: ...rew Y Cover R ICU Cover F Wiring Cover Power Unit Box Cover Platen Cover R160 Left Cover ICU Cover R X Pulley Cover The washer of the screw is outside of the cover The washer of the screw is inside of the cover Good example Bad example R 1 0 MAINTENANCE MANUAL Disassembly and Reassembly Covers Cover Layout Model TS34 1800A Issued 2011 10 17 Revised F W ver 1 20 Remark 1 0 Rev ...

Page 164: ...KI ENGINEERING CO LTD 1 2 3 4 5 6 7 8 Disassembly and Reassembly 6 1 Covers 6 2 Ink related Parts 6 3 Drive System 6 4 Electrical Parts 6 5 Sensors MAINTENANCE MANUAL Disassembly and Reassembly Ink related Parts ...

Page 165: ...ssy and wrap with waste cloth 8 Place the waste cloth around the head unit so as not to contaminate the platen LOCAL 1 01 FUNCTION ADJUST ENT ADJUST DAMPER DISCHG ent DAMPER DISCHG DISCHARGE END DAMPER DISCHG START ent P Cover BKT Damper lock spring Damper Do not touch the film of the damper assy Remove the damper lock spring before removing the damper joint Assy If the damper joint Assy is moved ...

Page 166: ... damper Perform vacuum absorption valve release normal cleaning automatically Damper Do not mess up the orders of ink tube tag Confirm 1 3 1 Configuration LOCAL 1 01 FUNCTION ADJUST ENT ADJUST DAMPER DISCHG ent DAMPER DISCHG FILLUP END DAMPER FILLUP START ent R 1 0 MAINTENANCE MANUAL Disassembly and Reassembly Ink related Parts Damper Model TS34 1800A Issued 2011 10 17 Revised F W ver 1 20 Remark ...

Page 167: ... your work easy 6 Loosen the screws at two locations on the right and left to remove the P cover BKT 7 Remove the damper lock spring LOCAL 1 01 FUNCTION ADJUST ENT ADJUST DAMPER DISCHG ent END DAMPER DISCHG START ent P Cover BKT Damper lock spring Damper Do not touch the film of the damper assy Remove the damper lock spring before removing the damper joint Assy If the damper joint Assy is moved wi...

Page 168: ... not to contaminate the platen 10 Remove the screws and the head 11 Remove the damper 12 Remove the 34 print head cover 13 Remove the mini memory PCB Wrap with waste cloth Damper Joint Assy Damper Mini memory PCB 34 print head cover R 1 0 MAINTENANCE MANUAL Disassembly and Reassembly Ink related Parts Head Unit Model TS34 1800A Issued 2011 10 17 Revised F W ver 1 20 Remark 1 0 Rev ...

Page 169: ...UP INK and fill ink in the damper FFC Do not mess up the orders of ink tube tag Confirm 1 3 1 Configuration LOCAL 1 01 FUNCTION MAINTENANCE ENT MAINTENANCE HD MAINTENANCE ent HD MAINTENANCE FILL UP INK ent FILLING UP 00 00 R 1 0 MAINTENANCE MANUAL Disassembly and Reassembly Ink related Parts Head Unit Model TS34 1800A Issued 2011 10 17 Revised F W ver 1 20 Remark 1 0 Rev ...

Page 170: ...er to 6 2 4 4 Remove the stepping motor together with the pump assy 5 Reverse the disassembly procedure for reassembly Protrude the pump tube of the discharge side from tube end by 5 to 9 mm Pump Motor Take care not to pollute the surroundings with waste ink or washing liquid Pump Motor Screw R 1 0 MAINTENANCE MANUAL Disassembly and Reassembly Ink related Parts Pump Motor Model TS34 1800A Issued 2...

Page 171: ... tube connected to the cap head 4 Remove the pump motor assy connector and then remove the pump assy 6 2 4 Pump Assy Take care not to pollute the surroundings with waste ink or washing liquid R 1 0 MAINTENANCE MANUAL Disassembly and Reassembly Ink related Parts Pump Assy Model TS34 1800A Issued 2011 10 17 Revised F W ver 1 20 Remark 1 0 Rev ...

Page 172: ...ace and then remove the tube from the upper side of the main body 6 Reverse the disassembly procedure for reassembly Protrude the pump tube of the discharge side from tube end by 5 to 9 mm R 1 0 MAINTENANCE MANUAL Disassembly and Reassembly Ink related Parts Pump Assy Model TS34 1800A Issued 2011 10 17 Revised F W ver 1 20 Remark 1 0 Rev ...

Page 173: ... base 1H 4 Remove the tube cap SPG and cap stopper from the cap head assy 5 Reverse the disassembly procedure for reassembly Turn the main power OFF when turning the power OFF It is very dangerous if sleep mode functions mistakenly during the operation Cap Head Assy Cap Head Assy Cap base 1H Tube Cap SPG Cap Stopper R 1 0 MAINTENANCE MANUAL Disassembly and Reassembly Ink related Parts Cap Head Ass...

Page 174: ...erse the disassembly procedure for reassembly Be sure to wear protective glasses and working gloves during the operation Ink may get into your eyes depending on the working condition or hand skin may get rough if you touch the ink Ink Cartridge Solenoid Assy Valve N 3 M6 Assy Link Snap pin A Cartridge Solenoid BKT A Screw Valve N 3 M6 Assy RS O ring Joint Screw Tube Take care not to contaminate th...

Page 175: ...NCE CARRIAGE OUT 2 Turn the main power OFF 3 Remove the front cover 4 screws Y cover F 4 screws and head cover 2 screws Refer to 6 1 1 4 Loosen the screws x3 and remove the cutter unit 5 Remove the connector from the PCB and then remove the LED pointer 6 Install using the reverse of the disassembly procedure 7 Refer to 4 3 1 for more information on installation position adjustments LED pointer Cut...

Page 176: ... cap head assy 6 2 5 Cap Head Assy 4 Remove the screw and remove the cap base 1H Turn the main power OFF when turning the power OFF It is very dangerous if sleep mode functions mistakenly during the operation Cap base 1H Cap Head Assy Cap Base 1H R 1 0 MAINTENANCE MANUAL Disassembly and Reassembly Ink related Parts Cap Base Model TS34 1800A Issued 2011 10 17 Revised F W ver 1 20 Remark 1 0 Rev ...

Page 177: ...sembly procedure for reassembly When attaching the cap base 1H while hitting it against the direction indicated with an arrow tighten the screw R 1 0 MAINTENANCE MANUAL Disassembly and Reassembly Ink related Parts Cap Base Model TS34 1800A Issued 2011 10 17 Revised F W ver 1 20 Remark 1 0 Rev ...

Page 178: ... shipment but it is possible to change to other colors by coupler opening and closing This section describes the procedures to change to six colors Ink supply path 4 color fill at factory shipment Ink supply path 6 color fill Joint R 1 0 MAINTENANCE MANUAL Disassembly and Reassembly Ink related Parts Changing Joint Model TS34 1800A Issued 2011 10 17 Revised F W ver 1 20 Remark 1 0 Rev ...

Page 179: ...0 5 mm between the coupler and screw Be sure to wear protective glasses and working gloves during the operation Ink may get into your eyes depending on the working condition or hand skin may get rough if you touch the ink Joint Screw Tube O ring Rubber Plugs Make sure that O ring is not remaining in the joint screws m m 5 0 When clamping the joint screws do not clamp them too much R 1 0 MAINTENANC...

Page 180: ...IMAKI ENGINEERING CO LTD 1 2 3 4 5 6 7 8 MAINTENANCE MANUAL Disassembly and Reassembly Drive System Disassembly and Reassembly 6 1 Covers 6 2 Ink related Parts 6 3 Drive System 6 4 Electrical Parts 6 5 Sensors ...

Page 181: ...Motor Assy Work procedures 1 Remove the following covers Mainte Cover L Left Cover 2 Remove the screws x2 attached to the XM bracket 3 Remove the X axis motor connector 4 Remove the spring and remove the XM bracket and X axis motor from the main unit Turn the main power OFF when turning the power OFF It is very dangerous if sleep mode functions mistakenly during the operation X axis Motor X axis m...

Page 182: ...ched to the XM bracket and remove the X axis motor assembly 6 Reverse the disassembly procedure for reassembly The belt tension does not need to be adjusted R 1 0 MAINTENANCE MANUAL Disassembly and Reassembly Drive System X axis Motor Assy Model TS34 1800A Issued 2011 10 17 Revised F W ver 1 20 Remark 1 0 Rev ...

Page 183: ...ve the keyboard assy 3 Manually move the print head carriage on the platen and remove the D BKT cover Turn the main power OFF when turning the power OFF It is very dangerous if sleep mode functions mistakenly during the operation Y axis Motor KB BKT R 1 0 MAINTENANCE MANUAL Disassembly and Reassembly Drive System Y axis Motor Model TS34 1800A Issued 2011 10 17 Revised F W ver 1 20 Remark 1 0 Rev D...

Page 184: ...ssembly procedure for reassembly Loosen YM Top Plate YM Stud 33 Y axis motor total assy 33 Slanting Horizontal in the middle Shifted lower Horizontal but upper Good Example Good Example Bad Example Bad Example Mount the Y axis motor so that the belt is horizontal and centered on the Y drive pulley upper side is also acceptable After mounting the motor if the hunting sound is heard when the motor d...

Page 185: ...B BKT screws disconnect the connector and then remove the keyboard assy Turn the main power OFF when turning the power OFF It is very dangerous if sleep mode functions mistakenly during the operation KB BKT R 1 0 MAINTENANCE MANUAL Disassembly and Reassembly Drive System Y Drive Pulley Model TS34 1800A Issued 2011 10 17 Revised F W ver 1 20 Remark 1 0 Rev Y Drive Pulley ...

Page 186: ... belt 5 Remove the screw from the top of the Y drive pulley 6 Slide out the connection point of the Y drive belt and remove either the left or right belt holder from the belt holder Do not remove the screws Belt Holder Belt Holder Do not remove the Y drive belt from the slider R 1 0 MAINTENANCE MANUAL Disassembly and Reassembly Drive System Y Drive Pulley Model TS34 1800A Issued 2011 10 17 Revised...

Page 187: ...en O ring Y Drive Pulley Assy Take care not to lose the O ring Slanting Horizontal in the middle Shifted lower Horizontal but upper Good Example Bad Example Bad Example Good Example Mount the Y axis motor so that the belt is horizontal and centered on the Y drive pulley upper side is also acceptable After mounting the motor if the hunting sound is heard when the motor drives make adjustments makin...

Page 188: ...m the belt holder 4 Loosen the screws from the Y SP plate on the left side of the main body and release the tension of the Y drive belt Turn the main power OFF when turning the power OFF It is very dangerous if sleep mode functions mistakenly during the operation Y Drive Belt Y Drive Belt 33 Loosen Y SP Plate R 1 0 MAINTENANCE MANUAL Disassembly and Reassembly Drive System Y Drive Belt Model TS34 ...

Page 189: ... rear side of the slider 10 Align the belt holder and the teeth on the left and right belt ends and attach the belt holder while engaging the teeth Then tighten the screw 11 Connect the left and right belt holders with the belt holder 12 Attach the belt holder and slider using a screw 13 Loosen the screws on the Y SP plate on the left side of the main body and increase the Y drive belt tension 14 ...

Page 190: ... 5 Remove the scale hook and scale holder L from the linear encoder scale Turn the main power OFF when turning the power OFF It is very dangerous if sleep mode functions mistakenly during the operation While at work be sure not to attach fingerprints or oil to the linear encoder scale Also pay attention not to break or scratch it If contaminated clean the scale with a neutral detergent Linear Enco...

Page 191: ...cale hook with the scale base L through a spring and mount the linear encoder scale while peeling off the protection film 9 Reverse the disassembly procedure for the subsequent reassemblies While at work be sure not to attach fingerprints or oil to the linear encoder scale Also pay attention not to break or scratch it If contaminated clean the scale with a neutral detergent R 1 0 MAINTENANCE MANUA...

Page 192: ... Release the clamp under the station and disconnect the wiper motor connector 4 Disconnect the wiper origin sensor connector Turn the main power OFF when turning the power OFF It is very dangerous if sleep mode functions mistakenly during the operation Wiper Unit Wiper Unit R 1 0 MAINTENANCE MANUAL Disassembly and Reassembly Drive System Wiper Unit Model TS34 1800A Issued 2011 10 17 Revised F W ve...

Page 193: ... and the screws to detach the motor The clearance between the motor and base should be 0 5 mm when the motor is replaced 6 Reverse the disassembly procedure for reassembly Wiper Drive Link R 1 0 MAINTENANCE MANUAL Disassembly and Reassembly Drive System Wiper Unit Model TS34 1800A Issued 2011 10 17 Revised F W ver 1 20 Remark 1 0 Rev ...

Page 194: ... the screws and then remove the brushless motor SK 6 Reverse the disassembly procedure for reassembly Brushless Motor SK M Motor BKT S Si Loosen M Gear BKT S Si M Gear Shaft S Si Brushless Motor SK When fixing the motor shaft and M gear shaft S Si with fixing screws be sure to tighten the screws at the plane port of the motor shaft D cut point Good example Bad example Fixing Screw M Gear shaft Mot...

Page 195: ...AKI ENGINEERING CO LTD 1 2 3 4 5 6 7 8 MAINTENANCE MANUAL Disassembly and Reassembly Electrical Parts Disassembly and Reassembly 6 1 Covers 6 2 Ink related Parts 6 3 Drive System 6 4 Electrical Parts 6 5 Sensors ...

Page 196: ...s before restarting the operation It is very dangerous if sleep mode functions mistakenly during the operation Moreover the PCB may be damaged in case electric charge still remains inside Also there is a possibility of electric shock because of high power voltage applied to the high pressure part of the power supply PCB assy Take care to avoid contact with it Power Supply PCB Assy Screw Before mou...

Page 197: ... all connectors on PCB If it is impossible to upload the parameters conduct Parameter Draw to note the setting values Then manually register the values after replacing the main PCB assy After turning off the sub and main power switches unplug the power cord Make sure to take 15 minutes before restarting the operation It is very dangerous if sleep mode functions mistakenly during the operation More...

Page 198: ...e the following from the removed main PCB assy PRAM PCB Assy Connector recognizing that no heater exists 8 Reverse the disassembly procedure for reassembly Regenerative Resistance PCB Assy Main PCB Assy Screw HDC PCB BKT PRAM PCB Assy Connector recognizing that no heater exists R 1 0 MAINTENANCE MANUAL Disassembly and Reassembly Electrical Parts Main PCB Assy Model TS34 1800A Issued 2011 10 17 Rev...

Page 199: ...fore restarting the operation It is very dangerous if sleep mode functions mistakenly during the operation Moreover the PCB may be damaged in case electric charge still remains inside Also there is a possibility of electric shock because of high power voltage applied to the high pressure part of the power supply PCB assy Take care to avoid contact with it PRAM PCB Assy An inter PCB connector is us...

Page 200: ... the mini memory PCB Assy Then remove all cables 4 Reverse the disassembly procedure for reassembly Turn the main power OFF when turning the power OFF It is very dangerous if sleep mode functions mistakenly during the operation Mini Memory PCB Assy Mini Memory PCB Assy R 1 0 MAINTENANCE MANUAL Disassembly and Reassembly Electrical Parts Mini Memory PCB Assy Model TS34 1800A Issued 2011 10 17 Revis...

Page 201: ...y 3 Reverse the disassembly procedure for reassembly Turn the main power OFF when turning the power OFF It is very dangerous if sleep mode functions mistakenly during the operation LED PCB Assy LED PCB Assy LED BKT Screw Screw R 1 0 MAINTENANCE MANUAL Disassembly and Reassembly Electrical Parts LED PCB Assy Model TS34 1800A Issued 2011 10 17 Revised F W ver 1 20 Remark 1 0 Rev ...

Page 202: ...ws and then remove the station PCB assy 4 Reverse the disassembly procedure for reassembly Turn the main power OFF when turning the power OFF It is very dangerous if sleep mode functions mistakenly during the operation Station Station PCB Assy R 1 0 MAINTENANCE MANUAL Disassembly and Reassembly Electrical Parts Station PCB Assy Model TS34 1800A Issued 2011 10 17 Revised F W ver 1 20 Remark 1 0 Rev...

Page 203: ...ect the connector 3 Reverse the disassembly procedure for reassembly Turn the main power OFF when turning the power OFF It is very dangerous if sleep mode functions mistakenly during the operation Paper Sensor Paper Sensor R 1 0 MAINTENANCE MANUAL Disassembly and Reassembly Electrical Parts Paper Sensor Model TS34 180A Issued 2011 10 17 Revised F W ver 1 20 Remark 1 0 Rev ...

Page 204: ...otor relay PCB assy 4 Reverse the disassembly procedure for reassembly Turn the main power OFF when turning the power OFF It is very dangerous if sleep mode functions mistakenly during the operation X axis Motor Relay PCB Assy Screw X axis Motor Relay PCB Assy R 1 0 MAINTENANCE MANUAL Disassembly and Reassembly Electrical Parts X axis Motor Relay PCB Assy Model TS34 1800A Issued 2011 10 17 Revised...

Page 205: ... Unlock the connector and pull and remove the X motor junc tion FFC 180 1 and 180 2 Turn the main power OFF when turning the power OFF It is very dangerous if sleep mode functions mistakenly during the operation X Motor Junction FFC X Motor Junction FFC R 1 0 MAINTENANCE MANUAL Disassembly and Reassembly Electrical Parts X Motor Junction FFC 180 1 and 180 2 Model TS34 1800A Issued 2011 10 17 Revis...

Page 206: ...he electrical box 6 Tilt the electrical box toward the front and remove the X motor junction FFC 180 1 and 180 2 from the back of the box 7 Reverse the disassembly procedure for reassembly Electrical Box Bottom Cover X Motor Junction FFC R 1 0 MAINTENANCE MANUAL Disassembly and Reassembly Electrical Parts X Motor Junction FFC 180 1 and 180 2 Model TS34 1800A Issued 2011 10 17 Revised F W ver 1 20 ...

Page 207: ...ed F W ver 1 20 Remark 1 0 Rev 6 4 10 HDC FPC 180 Assy Work procedures 1 Remove the following covers Y cover R Wiring cover Power unit box cover 2 Unlock the connector and pull and remove the six HDC FFC 180 assy Turn the main power OFF when turning the power OFF It is very dangerous if sleep mode functions mistakenly during the operation HDC FFC 180 Assy HDC FFC 180 Assy R 1 0 ...

Page 208: ...0 assy from the back of the box 6 Loosen the four FFC fixing metal screws remove the block core on the center of the main body and then remove the HDC FFC 180 assy from the center of the main body 7 Reverse the disassembly procedure for reassembly Electrical Box Bottom Cover HDC FFC 180 Assy Block core HDC FFC 180 Assy Screw R 1 0 MAINTENANCE MANUAL Disassembly and Reassembly Electrical Parts HDC ...

Page 209: ...plug the power cord Make sure to take 15 minutes before restarting the operation It is very dangerous if sleep mode functions mistakenly during the operation Moreover the PCB may be damaged in case electric charge still remains inside Also there is a possibility of electric shock because of high power voltage applied to the high pressure part of the power supply PCB assy Take care to avoid contact...

Page 210: ...n remove the keyboard PCB assy 4 Reverse the disassembly procedure for reassembly Turn the main power OFF when turning the power OFF It is very dangerous if sleep mode functions mistakenly during the operation Keyboard PCB Assy KB panel KB Panel Keyboard PCB Assy Key Top R 1 0 MAINTENANCE MANUAL Disassembly and Reassembly Electrical Parts Keyboard PCB Assy Model TS34 1800A Issued 2011 10 17 Revise...

Page 211: ... two locations on the right and left to remove the P cover BKT 3 Insert a driver through the gap of the damper to loosen the screws remove the encoder PCB assy together with L sensor BKT and then release the connector 4 Remove the screws and then remove the encoder PCB assy 5 Reverse the disassembly procedure for reassembly Turn the main power OFF when turning the power OFF It is very dangerous if...

Page 212: ... screwdriver disconnect the connector and remove the adsorption fan assy 5 Reverse the disassembly procedure for reassembly Turn the main power OFF when turning the power OFF It is very dangerous if sleep mode functions mistakenly during the operation Absorption Fan Assy FAN Duct V1 Adsorption Fan Assy R 1 0 MAINTENANCE MANUAL Disassembly and Reassembly Electrical Parts Fan Motor Model TS34 1800A ...

Page 213: ... S 2 Disconnect all connectors and then remove the take up motor PCB assy 3 Reverse the disassembly procedure for reassembly Take up Motor PCB Assy Take up Motor PCB Assy R 1 0 MAINTENANCE MANUAL Disassembly and Reassembly Electrical Parts Take up Motor PCB Assy Model TS34 1800A Issued 2011 10 17 Revised F W ver 1 20 Remark 1 0 Rev ...

Page 214: ...0 17 Revised F W ver 1 20 Remark 1 0 Rev 6 4 16 ID Contact PCB CN032 Assy Work procedures 1 Remove the ICU Cover F R 2 Remove the cartridge holder B 3 Remove cartridge base U related to the right or left side 4 Remove the relevant cartridge guide IDContact PCB CN032 Assy Cartridge Holder B LED PCB FFC is connected Pay attention to handling Cartridge Base U Cartridge Guide R 1 0 ...

Page 215: ...tact PCB CN032 assy 6 Remove the screws and then remove the ID contact PCB CN032 assy 7 Reverse the disassembly procedure for reassembly ID Contact PCB CN032 Assy Loosen IDContact PCB CN032 Assy R 1 0 MAINTENANCE MANUAL Disassembly and Reassembly Electrical Parts ID Contact PCB CN032 Assy Model TS34 1800A Issued 2011 10 17 Revised F W ver 1 20 Remark 1 0 Rev ...

Page 216: ...nd then remove cartridge frame 3 Remove the detector assy I C Y from the cartridge guide 4 Reverse the disassembly procedure for reassembly Exist non exist Sensor Near End Sensor Releasing of the hook Cartridge Frame Near End Sensor Exist non exist Sensor R 1 0 MAINTENANCE MANUAL Disassembly and Reassembly Electrical Parts Detector Assy I C Y Model TS34 1800A Issued 2011 10 17 Revised F W ver 1 20...

Page 217: ...unplug the power cord Make sure to take 15 minutes before restarting the operation It is very dangerous if sleep mode functions mistakenly during the operation Moreover the PCB may be damaged in case electric charge still remains inside Also there is a possibility of electric shock because of high power voltage applied to the high pressure part of the power supply PCB assy Take care to avoid conta...

Page 218: ...place the Electrical Parts 3 Remove the fuse from socket using longnose plier Precaustion Make sure to follow the flow at 7 2 1 Electrical Troubleshooting first and then replace the fuse After turning off the sub and main power switches in order unplug the power code Check if no electric charge is remaining in the PCB Refer to the 4 4 2 Electric charge checking when replace the Electrical Parts It...

Page 219: ...se to the socket using longnose plier Check if the fuse is set in proper position of the socket while visual checking and touching with fingures R 1 0 MAINTENANCE MANUAL Disassembly and Reassembly Electrical Parts Replacement procedure for fuse of the Main PCB Model TS34 1800A Issued 2011 10 17 Revised F W ver 1 20 Remark 1 0 Rev ...

Page 220: ... the Electrical Parts 3 Remove the fuse from socket using longnose plier Precaustion Make sure to follow the flow at 7 2 1 Electrical Troubleshooting first and then replace the fuse After turning off the sub and main power switches in order unplug the power code Check if no electric charge is remaining in the PCB Refer to the 4 4 2 Electric charge checking when replace the Electrical Parts It is v...

Page 221: ...se to the socket using longnose plier Check if the fuse is set in proper position of the socket while visual checking and touching with fingures R 1 0 MAINTENANCE MANUAL Disassembly and Reassembly Electrical Parts Replacement procedure for fuse of the HDC PCB Model TS34 1800A Issued 2011 10 17 Revised F W ver 1 20 Remark 1 0 Rev ...

Page 222: ... MIMAKI ENGINEERING CO LTD 1 2 3 4 5 6 7 8 MAINTENANCE MANUAL Disassembly and Reassembly Sensors Disassembly and Reassembly 6 1 Covers 6 2 Ink related Parts 6 3 Drive System 6 4 Electrical Parts 6 5 Sensors ...

Page 223: ...Paper Sensor Y origin Sensor Wiper Origin Sensor Clamp Sensor Maintenance Cover Sensor Front Cover Sensor L Paper Width Sensor LED Pointer Front Cover Sensor Linear Encoder Sensor Head Height Sensor MAINTENANCE MANUAL Disassembly and Reassembly Sensors Sensor Layout Model TS34 1800A Issued 2011 10 17 Revised F W ver 1 20 Remark 1 0 Rev ...

Page 224: ...ENGINEERING CO LTD 1 2 3 4 5 6 7 8 7 Troubleshooting 7 1 Details on Errors and Malfunctions 7 2 Detailed Methods of Coping with the Malfunctions MAINTENANCE MANUAL Troubleshooting Details on Errors and Malfunctions ...

Page 225: ...puter Hardware Broken wire or faulty contact of cables Software Transmission by improper application setting The standard priority of this machine is the Host Check the settings on the host computer to see if there is any improper parameter setting START Rough identification of error source Execute appropriate functions or use test functions of this machine Precautions in maintenance See 7 1 2 Lis...

Page 226: ...sage and judge whether the trouble lies on the host computer side or on the printer side Has any of the interface conditions printer model setting command etc been changed Does the trouble occur under specific conditions Does the same trouble occur repeatedly 3 Failure on the printer side Take the following steps to repair the printer Replace the defective part sensor etc or make the necessary adj...

Page 227: ...ed in the right way 3 Replace the head 4 Slider PCB Assy 6 4 11 5 Replacement of the Main PCB Assy 3 3 1 6 HDC PCB Assy 6 4 18 ERROR 07 VOLTAGE An error was detected in the head connection Abnormal voltage was detected 08 ERROR 08 LinearENCODER SENSOR An error occurred in detection by the linear encoder Counting impossible Turn off the main power and turn it on a little later If the error occurs a...

Page 228: ... account concerning the operating condition modification and the inoperative function 40 ERROR 40 MOTOR ALARM X Excessive load to the X motor Turn off the main power and turn it on a little later If the error occurs again carry out the followings 1 Check friction of X Y axis motor 2 Make sure that the media is not sticking X OVER CURRENT 3 Replace the X Y axis motor 4 Replace the regenerative resi...

Page 229: ... the customer use 1 Make sure that the ROM file is transmitted 80 E80 ROM0 ERASE ROM0 Erase error This does not occur during the customer use 1 Replacement of the Main PCB Assy 3 3 1 81 E81 ROM1 ERASE ROM1 Erase error 82 E82 h ROM0 Write error 83 E83 h ROM1 Write error 84 E84 h Verify error 85 E85 ROM HASH Hash check error 90 E90 h ROM Erase error 92 E92 h ROM Write error 95 E95 MODE SHIFT Transit...

Page 230: ...hooting and replace the following parts if it has damaged Check the head FFC cable Replace the head Replacement of the Main PCB Assy 3 3 1 Replace the fuse Main PCB F13 HDC PCB Assy 6 4 18 Replace the fuse HDC PCB F3 207 ERROR 207 SLEW RATE Trouble with COM wave 1 Restart 2 Upload event log 3 Report what it happened to SIGN GRAPHIC development department ERROR 207 OVERFLOW ERROR 207 UNDERFLOW 208 ...

Page 231: ...nk for one supply path has been nearly used up Replace the cartridge corresponding to the color displayed Printing is permitted without replacing the ink cartridge until INK END is displayed However the machine returns to local mode every completion of printing one file 7 REMOTE 1 01 NEAR END MBYK 8 LOCAL 1 01 INK END KYBM Ink for one supply path has been completely used up Replace the cartridge c...

Page 232: ... one 22 Expiration The specified expiration date of an ink cartridge has passed Replace the cartridge generating the warning with a new one The ink cartridge may still be used until one month passes after the specified expiration date 23 Expiration 1MONTH The specified expiration date of an ink cartridge has passed One month has passed after the specified expiration date Replace the cartridge gene...

Page 233: ...ERING CO LTD 1 2 3 4 5 6 7 8 Troubleshooting 7 1 Details on Errors and Malfunctions 7 2 Detailed Methods of Coping with the Malfunctions MAINTENANCE MANUAL Troubleshooting Detailed Methods of Coping with the Malfunctions ...

Page 234: ...c charge still remains inside Also there is a possibility of electric shock because of high power voltage applied the high pressure part of the power supply PCB assy Take care to avoid contact with it Cause of head PCB damage Countermeasures 1 Disconnection of HDC_FFC Fix moving part of the HDC FFC Applied to all machines Please refer to the documents below for more detail Maintenance Manual 5 2 6...

Page 235: ...the condition of electric charge remains When replace the head and PCB with electric charge remains in 42V circuit head and PCB damage may increase Before replacement make sure to check if electric charge is not remaining inside of PCB when turning off the power each time For replacement procedure and precautions please refer to the attached document 4 4 2 Electric charge checking when replace the...

Page 236: ...pplied the high pressure part of the power supply PCB assy Take care to avoid contact with it Problem occurred Check HDC FFC disconnection and replace the disconnected FFC See 5 2 6 5 2 7 Finish Determine COM short circuit See 5 2 1 NG OK NG OK A Check damage of Print head See 5 2 2 Check damage of Main PCB ASSY See 5 2 3 Check damage of Slider PCB See 5 2 5 Replace Head and Head FFC Return to A R...

Page 237: ... 2011 MIMAKI ENGINEERING CO LTD 1 2 3 4 5 6 7 8 MAINTENANCE MANUAL Operation Flow Basic Operation 8 Operation Flow 8 1 Basic Operation 8 2 Print Mode 8 3 Common Setting 8 4 Service Mode ...

Page 238: ...s open F W UPDATING TRANSMIT START F W UPDATING RECEIVE F W UPDATING DOWNLOADING F W UPDATING MECA LOAD v Firmware update function Ready for ROM data reception ROM data being received ROM data being overwritten F W update completed UP DOWNLOAD READY UPLOADING DOWNLOADING UP DOWNLOAD END POWER OFF Parameter Up Download Ready for Up Download Uploading Downloading Up Download successfully completed R...

Page 239: ...E WAIT INK SPECIFICATION SOLVENT INK spec Choose an ink type SB52 Choose an ink set 4 Color MMBBYYKK Sb52 4Color MMBBYYKK FILLING UP 00 00 LOCAL 01 Filling up isn t yet May I stop it ent 1 If AQUEOUS INK 10 1 1 1 2 3 AQUEOUS INK spec 4 Changes the selection ENTER To the next step END Quit When ink filling has not been performed ENTER To the ink type select screen END Back to the last operation Whe...

Page 240: ...ia Detection Model TS34 1800A Issued 2011 10 17 Revised F W ver 1 20 Remark 1 0 Rev 8 1 3 Media Detection Lever down LOCAL 01 MEDIA SELECT ROLL LEAF DETECTING MEDIA NOW PLEASE WAIT MEDIA Y 1000 X Input of MediaLength MEDIA LENGTH 50 0m To LOCAL when MEDIA RESIDUAL ON Detection has been completed Displayed momentarily ...

Page 241: ... 2011 MIMAKI ENGINEERING CO LTD 1 2 3 4 5 6 7 8 MAINTENANCE MANUAL Operation Flow Print Mode 8 Operation Flow 8 1 Basic Operation 8 2 Print Mode 8 3 Common Setting 8 4 Service Mode ...

Page 242: ... UP ORIGIN TEST PRINT FEED DIR ENT TEST PRINT CLEANING TYPE NORMAL CLEANING ACTIVE 00 00 DATA CLEAR ENT DATA CLEAR USER TYPE CHANGE TYPE 1 2 ent 1 to 4 REMOTE 1 01 0 00m Sb52INK MMBBYYKK REMAIN 99999999 HEAD HEIGHT Thin MEDIA WIDTH 1000mm TS34 1800A V MRL III V NON ORIGINAL INK MMBBYYKK To the next screen To the previous screen END To LOCAL SOFT HARD END To LOCAL Not displayed when target temperat...

Page 243: ...D COMPENSATION 0 0 Sb52INK MMBBYYKK REMAIN 99999999 REMOTE 1 540x1080 NEAR END MBYK FEED COMPENSATION SAVE ent LOCAL 01 WIDTH 1000mm Displayed alternately Displayed alternately when NEAR END is detected Data reception FUNCTION ENTER REMOTE R 1 0 MAINTENANCE MANUAL Operation Flow Print Mode LOCAL REMOTE Model TS34 1800A Issued 2011 10 17 Revised F W ver 1 20 Remark 1 0 Rev ...

Page 244: ...i D 1 PRINT MODE LOGICAL SEEK ent 1 PRINT MODE LOGICAL SEEK HOST ON OFF SCAN DrawEnd HOST HOST 1 DRYING TYME ent 0to 19 9s 0 to 999s 1 AUTO CUT SETUP HOST 1 AUTO CUT ent ON OFF 1 PRINT MODE ScanDIRECTION Bi D 1 PRE FEED SETUP HOST 1 PRE FEED ent ON OFF TYPE 1 to TYPE 4 Disabled when using the tension bar of heavy duty take up device FUNCTION FUNCTION FUNCTION FUNCTION FUNCTION ENTER Drawing END To...

Page 245: ...N WIDTH LEFT EDGE RIGHT EDGE NONE 10 to 10000mm SOFT HARD The feed speed during bidirectional plotting is modified The acceleration is not modified The speed reflected to an actual feed operation is limited to 150 when using heavy duty feeding take up device FUNCTION FUNCTION FUNCTION FUNCTION FUNCTION FUNCTION FUNCTION FUNCTION Initial operation only for the type currently selected Only when SETU...

Page 246: ... 00 00 MAINTENANCE HD MAINTENANCE ent HD MAINTENANCE DISCHARGE WASH ent Remove InkCartridge MMBBYYKK DISCHARGE 00 00 Set WashingCartridge 12345678 ABSORPTION 00 00 Remove WashingCartridge 12345678 DISCHARGE 00 00 Set WashingCartridge 12345678 ABSORPTION 00 00 Remove Maint Wash 12345678 DISCHARGE 00 00 SELECT END Re WASH CR MAINTENANCE CARRIAGE OUT ent Close a cover Close a cover Close a cover Clos...

Page 247: ... InkTankExchange EXCHANGE ent MAINTENANCE InkTankExchange ent MEDIA RESIDUAL SETUP OFF MAINTENANCE MEDIA RESIDUAL ent ON OFF 1 to 168h FUNCTION FUNCTION FUNCTION FUNCTION FUNCTION Displayed momentarily when washing liquid filling has not been completed SOFT HARD HEAD SELECT SELECT 12 MAINTENANCE HEAD SELECT ent FUNCTION AUTO MAINT Sub INK WARNING ent AUTO MAINT Sub INK WARNING 72h FUNCTION This is...

Page 248: ...by press of FUNCTION with Stamp set to ON only in mainte nance OPEN mode FUNCTION FUNCTION FUNCTION FUNCTION FUNCTION CONFIRM FEED FEED ON CONFIRM FEED BACK FEED ON MACHINE SETUP CONFIRM FEED ent OFF TEMP LENGTH C mm MACHINE SETUP UNIT SETUP ent TIME SET 2011 10 05 21 36 00 MACHINE SETUP TIME SET ent TIME SET 2011 10 05 21 36 00 TIME SET DoYou change it ent 2008 10 04 21 36 2011 10 05 21 36 00 OFF...

Page 249: ... 2011 MIMAKI ENGINEERING CO LTD 1 2 3 4 5 6 7 8 MAINTENANCE MANUAL Operation Flow Common Setting 8 Operation Flow 8 1 Basic Operation 8 2 Print Mode 8 3 Common Setting 8 4 Service Mode ...

Page 250: ...29 08 18 LIST PRINTING INFORMATION LIST ent TS34 1800A V MRL III V INFORMATION VERSION ent FPGA PDC V FPGA HDC V S N 00000000 D N 00000000 INFORMATION Serial DealerNo ent 05 09 29 09 57 0 0823 01 01 2000 0000 INFORMATION EVENT LOG ent REPLACE COUNTER CART 1 0 INFORMATION REPLACE COUNTER ent REPLACE COUNTER SCAN 0 Drawing has been completed REPLACE COUNTER TIME 0h FUNCTION FUNCTION FUNCTION FUNCTIO...

Page 251: ...0H00M CNT SLEEP TUBE 0H00M CNT REPLACE COUNTER INK PIC 1 0 REPLACE COUNTER WIPER 0 Displayed the same way for cartridges 1 to 8 Displayed the same way for nozzles A to H H1A ALL 123 456 789 Ldot 13 579 135 H1A ALL 123 456 789 Sdot 13 579 135 R 1 0 MAINTENANCE MANUAL Operation Flow Common Setting INFORMATION Model TS34 1800A Issued 2011 10 17 Revised F W ver 1 20 Remark 1 0 Rev ...

Page 252: ... 2011 MIMAKI ENGINEERING CO LTD 1 2 3 4 5 6 7 8 MAINTENANCE MANUAL Operation Flow Service Mode 8 Operation Flow 8 1 Basic Operation 8 2 Print Mode 8 3 Common Setting 8 4 Service Mode ...

Page 253: ... M 0 C 0 C 0 Y 0 Y 0 K 0 K 0 HeadcondCONFIRM X POS CONFIRM ent HeadcondCONFIRM Y POS CONFIRM ent X POS CONFIRM PRINT START ent Y POS CONFIRM PRINT START ent Pattern drawing FUNCTION ADJUST ENT Pattern drawing Pattern drawing DROP POS HsHg DRFT Y Bi H1 H1 0 0 DROP POS HsHg DRFT Y Bi H1 H1 0 0 Pattern drawing Pattern drawing Modifies the compensation value ENTER Finalizes To the next compensation sc...

Page 254: ...a wiper COMPLETED ent END CONTINUE V Re WASH Set TRANS Liquid 12345678 ABSORPTION 00 00 Remove TRANS Liquid 12345678 DISCHARGE 00 00 ADJUST POINTER OFFSET ent POINTER OFFSET PRINT START ent POINTER OFFSET X 0 0 Y 0 0 Pattern drawing CAPPING WiperPOS 1 0 FUNCTION FUNCTION FUNCTION FUNCTION FUNCTION ADJUST EDGE ADJUST ent EDGE ADJUST CLEAR PRINT EDGE ADJUST L 15 0 R 15 0 Pattern drawing ADJUST 500mm...

Page 255: ...S REGISTRATION ent EXCHANGE PARTS PARTS PUMP PUMP 00 00 No 1 Various parameters DEFAULT SET HIPPING SETUP ent ToSHIPPING condition Set up OK ent EXCHANGE PARTS PARTS CAP CAP 00 00 No 1 EXCHANGE PARTS PARTS DUMPER DUMPER 00 00 No 1 A EXCHANGE PARTS HISTORY ent HEAD 0 06 10 10 No 2 There is no HISTORY FUNCTION FUNCTION FUNCTION FUNCTION Only at the factory When there is no history ADJUST DAMPER DISC...

Page 256: ... MOTOR ent X SERVO RUNNING COUNT 0 X SERVO MOTOR S 500 A 0 50 X 1000 MOTOR TEST Y SERVO MOTOR ent Y SERVO RUNNING COUNT 0 Y SERVO MOTOR S 500 A 0 50 X 1000 MOTOR TEST XY SERVO MOTOR ent XY servo RUNNING COUNT 0 S 500 A 0 50 X 1000 S 500 A 0 50 X 1000 MOTOR TEST WIPER MOTOR ent WIPER RUNNING COUNT 0 SPEED WAIT COUNT 100 0 CONT WIPER RUNNING 100 0 CONT MOTOR TEST PUMP MOTOR ent PUMP MOTOR COUNT 0 PU...

Page 257: ...y JOG Changes items in a loop SENSOR TEST Main PCB ID 800 SENSOR TEST Head Voltage 1 700 SENSOR TEST Head Voltage 2 700 Switchable from any screen L o P o Y x W x C o H o PR x CJ x PJ o FUNCTION TEST KEYBOARD LED ent HEAT ooo CONST ooo ACTIVE o TEST KEYBOARD TEST ent KEYBOARD TEST Key NONE ent KEYBOARD TEST Key USER TYPE KEYBOARD TEST END END TEST TEST LCD TEST ent FUNCTION FUNCTION FUNCTION Displ...

Page 258: ...ess h WriteData h Road Data h TEST SKEW CHECK ent SKEW CHECK FEED 3m SKEW CHECK FEED 3m TEST TEMP CHECK ent TEMP CHECK HEAD TEMP ent HEAD TEMP HEAD 1 30 C TEMP CHECK NOZZLE TEMP ent NOZZLE TEMP HEAD 1 OK HEAD 2 OK TEMP CHECK HEAT SINK TEMP ent HEAT SINK TEMP HEAD 1 30 C TEMP CHECK SLIDER TEMP ent SLIDER TEMP 30 C Motion TEST LINEAR ENCODER ent LINEAR ENCODER ActiveWIDTH 1900mm M 0000 0 E 0000 0 Mc...

Page 259: ...1234 5678 TEST WASH CARTRIDGE ent WASH CARTRIDGE PACK END SENSOR ent PACK END SENSOR PACK ON END OFF WASH CARTRIDGE CARTRIDGE VALVE ent CARTRIDGE VALVE OPEN WASH CARTRIDGE IC CHECK ent IC CHECK CHECK START ent IC CHECK CNT 1 NG 0 IC CHECK NO CARTRIDGE IC CHECK CNT 1 NG 0 FUNCTION FUNCTION Turns on off all valves Pressing FUNCTION moves the cursor to ERROR or ACTIVE When there is no ERROR Counting ...

Page 260: ...METER RUNNING PARAM ent RUNNING PARAMETER INITIALIZE ent EXCHANGE PARAMETER 000 Hd nn01 0 3 000 Hd nn01 0 PARAMETER EXCHANGE PARAM ent INK SYSTEM PARAMETER 000 LEVELsw 0 1 000 LEVELsw 0 PARAMETER INKSYSTEM PARAM ent INK SYSTEM PARAMETER INITIALIZE ent INK INFOR PARAMETER 000 VERSION 100 101 000 VERSION 100 PARAMETER INKinfor PARAM ent INKsequencePARAMETER 000 POWON F 0 12345 000 POWON F 0 PARAMETE...

Page 261: ...AD CRCT HEAD CORRECT PARAM SELECT Hi SPEED Lo HEAD CORRECT HsLo SELECT MODE 1 ADJUST PARMETER 000 RESERVE 0 PARAMETER ADJUST PARAM ent 0 000 RESERVE 0 TYPE 1 to TYPE 4 1 000 M1NRGL 0 0 000 RESERVE 0 FAST Hi Normal Lo Norimal Hi Ybase HEAD CRCT HsLo MD 1 000 RESERVE 0 0 000 RESERVE 0 MODE 1 to MODE 4 HEADunit PARAM HEAD SELECT UNIT 1 HEADunit 1 PARAM RANGE SEL 0 511 PARAMETER HEADunit PARAM ent 1 0...

Page 262: ...D500673 11 13112013 MIMAKI ENGINEERING CO LTD 2011 WK FW 1 2 ...

Reviews: