


- 2.25 -
Plotting an Image from source data
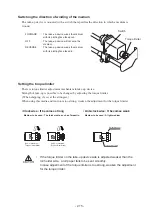
Starting the plotting operation
The following describes the mode selection for data reception from the computer and LCD display
during plotting.
For various function settings necessary for plotting, refer to “CHP4 Setting Function”.
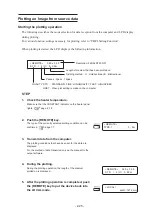
When plotting is started, the LCD displays the following information.
STEP
1.
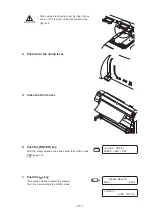
Check the heater temperature.
Make sure that the CONSTANT indicator on the heater panel
rights.
page .2.18
2.
Push the [REMOTE] key.
The type of the currently selected plotting condition can be
confirmed.
page 1.7
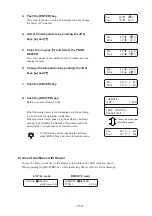
3.
Transmit data from the computer.
The plotting conditions that have been set for the data are
displayed.
For the method of data transmission, see the manual for the
output software.
4.
During the plotting.
During the plotting operation, the length of the medium
plotted on is displayed.
5.
After the plotting operation is completed, push
the [REMOTE] key to put the device back into
the LOCAL mode.
∗
REMOTE
∗
TYPE. 1
0. 0 m
∗
REMOTE
∗
3 6 0 x 3 6 0
S T D / 4 / U / 0. 5 0 m
Resolution: 360/540/720 DPI
Passes : 2pass - 16pass
QUALITY STD
: STANDARD, FINE : HIGHQUALITY, FAST : HIGHSPEED
HOST : When plot setting is made on the computer
∗
REMOTE
∗
3 6 0 x 3 6 0
S T D / 4 / U / 0. 5 0 m
< LOCAL >
width : 1272 mm
Length of medium that has been plotted on
Dividing method : U : Unidirectional, B : Bidirectional
Summary of Contents for JV3 S SERIES
Page 2: ......
Page 62: ... 2 30 ...
Page 84: ... 4 14 ...
Page 108: ... 5 24 ...
Page 118: ... 6 10 ...
Page 124: ... A 6 ...
Page 129: ......
Page 130: ...PrintedinJapan MIMAKI ENGINEERING Co Ltd 2004 ...


