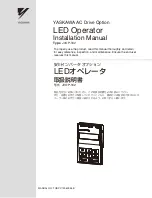
background image

RED 
LEADWIRE

BLACK

LEADWIRE

NEGATIVE

TERMINAL

POSITIVE TERMINAL (NOT SHOWN)

14

12    
13

1

2    
3

4

2    

 15

BULLETIN NO.

54-42-2400

SERVICE PARTS LIST 


  FIG. 

PART NO. 

DESCRIPTION OF PART 

NO. REQ.

 1 

23-30-0095  Motor 

assembly 

(1)


44-66-0155 

Motor mount plate 

(1)

 3 

05-81-0205  Screw 

(2)

 4 

14-29-0095  Gearcase 

assembly 

(1)


23-66-1095 

Electronics module assembly 

(1)

 6 

06-82-2400  Screw 

(5)

 7 

06-82-2395  Screw 

(4)

 8 

42-70-0055  Housing 

clip 

(1)

 9 

45-24-0095  Forward/reverse 

button 

(1)

 10 

12-20-2400  Service 

nameplate 

(1)

 11 

10-15-0955  Warning 

label 

(1)

  12 

10-20-0760 

Fuel gauge label 

(1)

 13 

22-09-0075  Fuel 

gauge 

(1)

 14 

31-50-2400  Housing 

assembly 

(1)

 15 

---------------  Metal 

pin 

(2)

CATALOG NO. 

 2401-20

REVISED BULLETIN

SPECIFY CATALOG NO. AND SERIAL NO. WHEN ORDERING PARTS

M12™ Sub-Compact 1/4" Hex Driver

STARTING 
SERIAL NO. 

WIRING INSTRUCTION

B30A  

SEE NOTES

DATE

Nov. 2009

MILWAUKEE ELECTRIC TOOL CORPORATION

13135 W. Lisbon Road, Brookfi eld, WI 53005

Drwg. 3

NOTES:


1,2,4 

IMPORTANT: See the back side of this bulletin if 
servicing the motor assembly (1) or the gearcase 
assembly (4). 

  5, 1 

Solder red lead wire from electronics module assem-
bly (5) to positive terminal (red) of Motor Assembly. 
Solder black lead wire from electronics module as-
sembly (5) to negative terminal of Motor Assembly.

 5, 13 


Insert the fuel gauge (13) wire assembly into the 
electronics module assembly.


EXAMPLE:

Component Parts (Small #) Are Included 
When Ordering The Assembly (Large #).

0

00

Summary of Contents for 2401-20

Page 1: ...AL AFIN DE RÉDUIRE LE RISQUE DE BLESSURES L UTILISATEUR DOIT LIRE LE MANUEL DE L UTILISATEUR PARA REDUCIR EL RIESGO DE LESIONES EL USUARIO DEBE LEER EL MANUAL DEL OPERADOR 14 10 12 HEAVY DUTY 12 V COMPACT DRIVER TOURNEVIS COMPACT ROBUSTE DE 12 V DESTORNILLADOR COMPACTO DE 12 V PARA SERVICIO PESADO Cat No No de Cat 2401 20 ...

Page 2: ...RE Do not force the power tool Use the correct power tool for your application The correct power tool will do the job better and safer at the rate for which it was designed Do not use the power tool if the switch does not turn it on and off Any power tool that cannot be controlled with the switch is dangerous and must be repaired Stay alert watch what you are doing and use common sense when operat...

Page 3: ...packs Use of any other battery packs may create a risk of injury and fire When battery pack is not in use keep it away from other metal objects like paper clips coins keys nails screws or other small metal objects that can make a connection from one terminal to another Shorting the battery termi nals together may cause burns or a fire Under abusive conditions liquid may be eject ed from the batter...

Page 4: ...talling Bits Always remove the battery before inserting or removing bits Select the proper style and size bit for the type of screw you are using 1 To install the bit press the bit into the socket until the collar snaps back and the bit is locked into place 2 To remove the bit pull out the collar then pull out the bit Fig 1 Release buttons NOTE It is not necessary to hold the collar out when insta...

Page 5: ...m screws in softwood or small screws in hardwood Large screws in softwoods Medium screws in hardwood or large screws in hardwood with pilot hole For forward clockwise rotation push in the control switch from the right side of the tool Check the direction of rotation before use For reverse counterclockwise rotation push in the control switch from the left side of the tool Check direction of rotatio...

Page 6: ...rs Cleaning Clean dust and debris from charger and tool vents Keep tool handles clean dry and free of oil or grease Use only mild soap and a damp cloth to clean the tool battery pack and charger since certain cleaning agents and solvents are harmful to plastics and other insulated parts Some of these include gasoline turpentine lacquer thinner paint thinner chlorinated cleaning solvents ammonia an...

Page 7: ...r for any defective battery free of charge Thereafter customers will also receive an additional warranty on a pro rata basis up to the earlier of the first 2000 charges or five 5 Years from the date of purchase first charge This means that every customer gets an additional 1000 charges or three 3 years of pro rata warranty on the V technology Li Ion Battery Pack 18 volts or above depending upon th...

Page 8: ...e qui compte le plus En cas de problèmes d utilisation de l outil ou pour loca liser le centre de service ventes ou le centre d entretien le plus proche appelez le 416 439 4181 fax 416 439 6210 Milwaukee Electric Tool Canada Ltd 755 Progress Avenue Scarborough Ontario M1H 2W7 Notre réseau national de distributeurs agréés se tient à votre disposition pour fournir l aide technique l outillage et les...

Page 9: ...Housing assembly 1 15 Metal pin 2 CATALOG NO 2401 20 REVISED BULLETIN SPECIFY CATALOG NO AND SERIAL NO WHEN ORDERING PARTS M12 Sub Compact 1 4 Hex Driver STARTING SERIAL NO WIRING INSTRUCTION B30A SEE NOTES DATE Nov 2009 MILWAUKEE ELECTRIC TOOL CORPORATION 13135 W Lisbon Road Brookfield WI 53005 Drwg 3 NOTES 1 2 4 IMPORTANT See the back side of this bulletin if servicing the motor assembly 1 or th...

Page 10: ...motor mount with the original nylon motor mount plate from the original motor before installing it to the gearcase and vice versa if the original motor has a aluminum motor mount then replace the service replacement MOTOR ASSEMBLY nylon motor mount with the original aluminum before installing to the gearcase _ A dab of red paint indicates positive terminal NOTE Highlighted small tab of Motor Mount...

Reviews: