background image

Synthwave Knobs

Synthwave Knobs

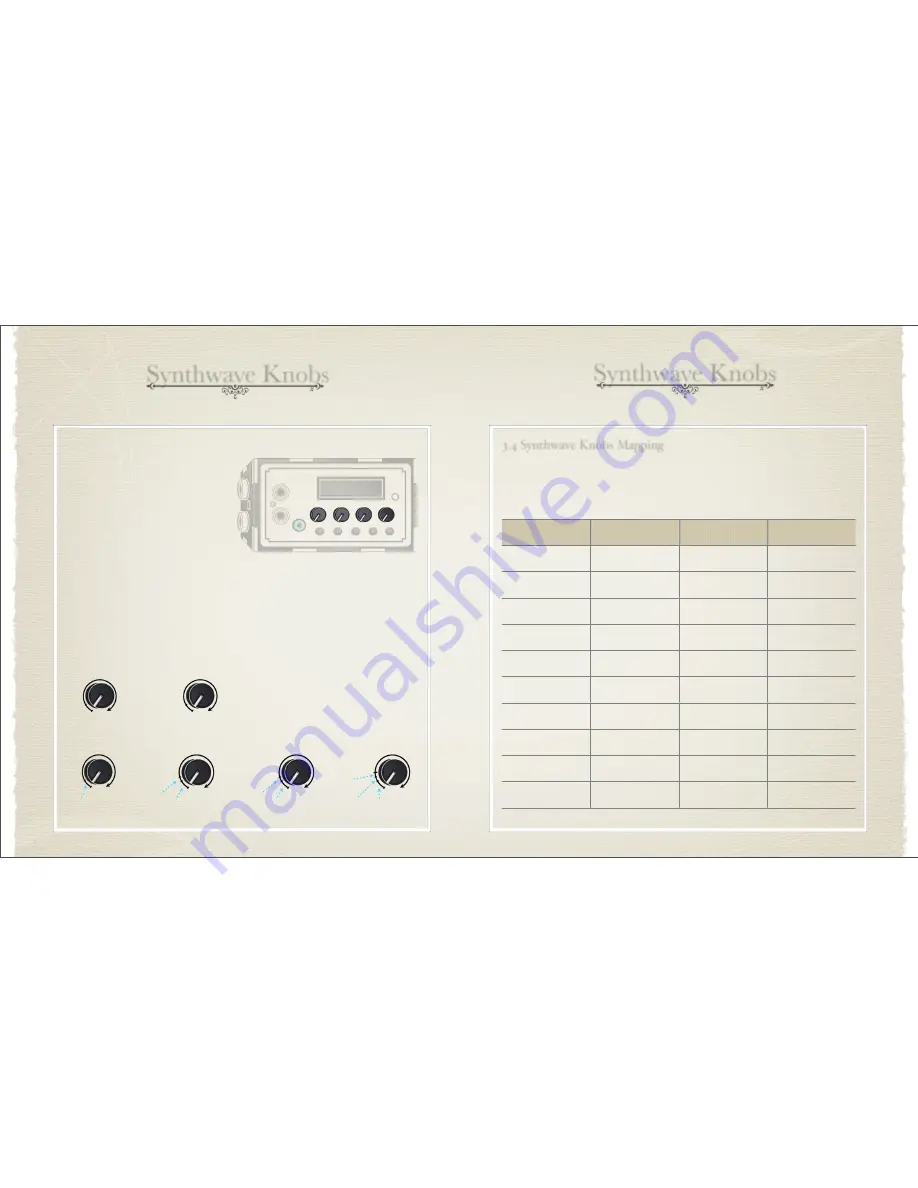
The functionality of each of the four knobs can be modified by holding the shift button 

and the button of the knob you would like to change. The table below shows what each 

knob can be assigned to in synthwave mode.  

Knob 1

Options

Knob 2

Options

Knob 3

Options

Knob 4

Options

Inst 1 Note or Air 1 

Delta

 Inst 1 Volume

 Inst 1 Volume

BPM

 Inst 1 Volume

Inst 2 Note or Air 2 

Delta

 Inst 2Volume

 Inst 2Volume

Inst 1 Wavetype

 Inst 2Volume

Inst 3 Note

 Inst 3Volume

Attack Time

Inst 2 Wavetype

 Inst 3Volume

Release Time

Inst 2 Note O

set

Inst 3 Wavetype

Sweep &  Random 

Arp Range

Decay Time

Inst 3 Note O

set

Tremelo Speed

Susatin Level

Tremelo Speed

Tremelo Depth

Sweep &  Random 

Arp Range

3.4 Synthwave Knobs Mapping

3. 3 Synthwave Knobs

Knob 1

Knob 2

Knob 3

Instrument 1

Instrument 2

Instrument 3

Note 

follow

Instrument 1

 O

Instrument 2 

O

Note 

follow

Instrument 3 

O

Knob 4

Air 1

 Note Delta

Air 2 

Note Delta

* Air Mode Enabled

15

16

The LCD display shows the 

functionality of the knobs on the 

bottom row and the notes being 

played on top. To change the number 

of instruments press button 4 or 

navigate to menu  “Synthwave

-

>Num 

Instruments”. The knob functionality 

is changed when changing the 

number of instruments as shown in 

the table of the previous page. 

The default functionality of the knobs in Synthwave mode are shown below. Instrument 

2 & 3 will play an interval o

set from Instrument 1 when knobs 2 & 3 are set to “Note 

Follow” position as shown below. The note o

set can be changed in Synthwave menu.

BPM 

Tap

Tap Tempo

Tempo

Follow

Knob 1

Knob 2

Monday, December 15, 2014

Summary of Contents for Air Synth& MIDI Controller

Page 1: ...trademark of Bahu Music LLC All other trademarks included herein are the property of their respective owners Design and specifications are subject to change without notice Contact Website http www mil...

Page 2: ...you enjoy it Please let us know what you think of the m lTone We want to grow a community of developers and tinkerers to push and see what the limit are on this device What will you make it do How wil...

Page 3: ...1 Hulusi Display 19 4 2 Hulusi Buttons 20 4 Hulusi Mode 19 4 3 Hulusi Knobs 21 4 4 Hulusi Air 22 Index 6 1 m lTone Mode 33 6 2 Load Instrument Preset 33 10 Settings 33 6 3 Save Instrument Preset 33 6...

Page 4: ...Controls The m lTone comes with three modes Synthwave Hulusi and Harmonizer mode The buttons and knobs have di erent functionality depending on the mode selected The Up to 2 ultrasonic Air sensors 4...

Page 5: ...t 1 3 of a second to return to the previous menu or submenu Hold the menu button for at least 1 5 seconds to return to the main menu Rotary Encoder Button 2x16 LCD Display The functionality of each of...

Page 6: ...lue displayed on the screen shows the index delta in millimeters Moving the knob all the way to the left automatically sets the index delta so that all notes can be played depending on the scale and t...

Page 7: ...ween the modes in the SynthWave or Hulusi modes You can also navigate to menu item Air Controls Air Mode and select the desired mode Air Controls Hold Up is the same as Normal Up except the index valu...

Page 8: ...to menu Air Controls Air Min Distance to modify the closest distance to the Air sensor registers The distance can be changed from 128 to 2048 Air Bend Center only applies to Air Mode Bend Use the rot...

Page 9: ...ypes Instrument 2 3 Note O set 5 to 10 Sine Square 1 Pulse Saw Tri Dist Triangle Organ Noise Instrument MIDI Channel 1 to 16 Disable Synthwave Buttons Air 2 On O Air 1 Mode Toggle Change Number of Not...

Page 10: ...andom Arp Range 3 4 Synthwave Knobs Mapping 3 3 Synthwave Knobs Knob 1 Knob 2 Knob 3 Instrument 1 Instrument 2 Instrument 3 Note follow Instrument 1 O Instrument 2 O Note follow Instrument 3 O Knob 4...

Page 11: ...Air Controls Air Enable in the menu and toggle Air 1 and Air 2 3 5 Synthwave Air O b j e c t Air 2 On O Air 1 On O The led will flash green to indicate that the handsfree sensor is on Knobs 1 and 2 w...

Page 12: ...the instrument The Hulusi consists of three pipes the first of which is able to play notes in the scale The 2nd and 3rd pipes act as resonators that play an interval of the key of the instrument Two...

Page 13: ...2 Volume Instrument 2 Volume BPM 4 3 Hulusi Knobs Instrument 3 Volume Instrument 2 Volume Instrument 1 Air 1 Delta BPM 4 4 Hulusi Air O b j e c t Navigate to Air Controls Air 1 Enable in the menu and...

Page 14: ...the buttons being played on the bottom row of the LCD When the sustain button main button is pressed an s will appear in the leftmost bottom corner 23 24 5 2 Harmonizer Buttons The functionality of th...

Page 15: ...Press button 1 or 2 to enable and disable Air 1 and 2 respectively Navigate to Air Controls Air 1 Enable in the menu and enable or disable Air 1 5 4 Harmonizer Air O b j e c t The LED will flash gree...

Page 16: ...nu 6 Scale Scale TET Tempo BPM is the number of beats notes played in one minute The beats per minute can be set from 10 to 1022 Use the BPM knob to set the BPM modes like shown above Tempo Multiplier...

Page 17: ...selected using knob Mod Hold shift and button 3 or 4 to cycle to Mod Arpeggiator chain is explained in detail on the following page Arpeggiator Arpeggiator is explained in detail on the following pag...

Page 18: ...owed by 4 and repeats etc C5 Major Pentatonic C5 D5 E5 G5 A5 C6 Example 9 3 Arp Pattern There are a total of 90 arpeggiator patterns that can be selected Change the arp e ect to Arpeggiator to use the...

Page 19: ...m lTone is equipped with 32 presets of which 16 can be saved Saving an instrument preset saves the instrument s wavetype MIDI channel ADSR tremelo speed tremelo depth arpeggiator bank index and arpegg...

Page 20: ...add9 Major add 9 eg F add9 Major b7 Chord eg Ab7 Major b7 Chord eg C7 Major b7 Chord eg D7 Major b7 Chord eg F7 Maqam Hijaz Maqam Shaddaraban Marva or Marvi Messiaen Mode 3 Messiaen Mode 3 Inverse Mes...

Page 21: ...the backpanel notch 3 Place the hex nut in the etched well and seat it until it is secure 4 Put the threaded part of the mic stand through the hole in the bottom cover and make sure it secures tightl...

Reviews: