background image

OM-2243 Page 21

SECTION 5 

 OPERATION

5-1. Controls

229 450-A

1

6

7

4

8

2

3

5

1

Power Switch

This unit is equipped with a fan motor that
is thermostatically controlled and only

runs when cooling is needed (fan-on-de-

mand). If unit is not equipped with fan-on-

demand, fan motor runs when power is

on.

2

Voltmeter (see Section 5-2)

3

Ammeter (see Section 5-2)

4

Mode Switch

Use Mode switch to determine both process

and output On/Off control. Orange areas

highlight “contactor on” positions.
For air carbon arc cutting (CAC-A) and goug-

ing, place Mode switch in Stick position. For

best results, place Inductance/DIG control in

the maximum position.
5

Panel/Remote Control Switch

For front panel control, place switch in Panel

position, and use the V/A Adjust control to set

amperage or voltage, depending on Mode

switch selection.
For remote control, make connections to Re-

mote 14 receptacle (see Section 4-11), and

place switch in Remote position. In TIG

modes, output available through the remote

control is a percent of the V/A Adjust control

setting. Value selected on V/A Adjust control

is maximum output available through the re-

mote control. In the MIG, Pulsed MIG, and V-

Sense feeder modes, a remote control pro-

vides full range of unit output regardless of

V/A Adjust  control setting. A remote control

is not functional in the Stick mode. If connec-

tion to Remote 14 receptacle is removed, and

Panel/Remote control switch remains in Re-

mote position, output is controled with the V/A

Adjust control.
6

V/A (Voltage/Amperage) Adjust Control

With Mode switch in any Stick or TIG position,

use control to adjust amperage from 5 to 500

amps. With Mode switch in a V-Sense Feeder

or MIG position, use control to adjust voltage

from 10 to 38 volts. In a Pulsed MIG mode,

wire feed speed is set with the wire feeder,

and the V/A Adjust control is used to set an

arc power that corresponds to the wire feed

speed (30-780 ipm).
7

Inductance/Dig Control

Control adjusts Dig when Stick mode is se-

lected on mode switch. When set towards

minimum, short-circuit amperage at low arc

voltage is the same as normal welding am-

perage. When set to max, control increases

short-circuit amperage at low arc voltage.

This allows the operator to use a very short

arc length without sticking the electrode. As

control is adjusted, the amount of Dig se-

lected is displayed on the amps meter as a

percentage (0 to 100%) of full range, and 

dig

is displayed on the volts meter.
For air carbon arc cutting (CAC-A) and goug-

ing, place Inductance/DIG control in the max-

imum position.
Control adjusts inductance when a MIG or V-

Sense Feeder mode is selected. Inductance

determines the “wetness” of the weld puddle.

As setting is increased towards maximum,

“wetness” (puddle fluidity) increases. As con-

trol is adjusted, the amount of inductance se-

lected is displayed on the amps meter as a

percentage (0 to 100%) of full range, and 

ind

is displayed on the volts meter.
 This control is not functional when one of the

TIG modes is selected.
Change control setting to best suite

application.

Units without Inductance/Dig control
have Inductance/Dig factory set at 20%.

8

Pulse Program Select Switch

Use control to select one of ten programs,

each with different preset pulsing parame-

ters, including welding wire diameter and

type.

Summary of Contents for NT 456 CC

Page 1: ...NT 456 CC CV Processes Description Multiprocess Welding Arc Welding Power Source OM 2243 212 113T 2007 10 File Multiprocess Visit our website at www MillerWelds com ...

Page 2: ...ntinue the tradition They re just as committed to providing equipment and service that meets the high standards of quality and value established in 1929 This Owner s Manual is designed to help you get the most out of your Miller products Please take time to read the Safety precautions They will help you protect yourself against potential hazards on the worksite We ve made installation and operatio...

Page 3: ...mbols 11 SECTION 4 INSTALLATION 12 4 1 Specifications 12 4 2 Duty Cycle And Overheating 12 4 3 Volt Ampere Curves 13 4 4 Selecting A Location 14 4 5 Dimensions And Weights 15 4 6 Tipping 16 4 7 115 VAC Receptacle And Circuit Breakers 16 4 8 Weld Output Terminals And Selecting Cable Sizes 17 4 9 Connecting Weld Output Cables 17 4 10 Remote 14 Receptacle Information 18 4 11 Connecting Remote Control...

Page 4: ...Notes ...

Page 5: ...affolds when in cramped positions such as sitting kneeling or lying or when there is a high risk of unavoid able or accidental contact with the workpiece or ground For these conditions use the following equipment in order presented 1 a semiautomaticDC constant voltage wire welder 2 a DC manual stick welder or 3 an AC welder with reduced open circuit volt age In most situations use of a DC constant...

Page 6: ...es unless they are properly prepared according to AWS F4 1 see Safety Standards Do not weld where the atmosphere may contain flammable dust gas or liquid vapors such as gasoline Connect work cable to the work as close to the welding area as practical to prevent welding current from traveling long possibly unknown paths and causing electric shock sparks and fire hazards Do not use welder to thaw fr...

Page 7: ...s Keep all doors panels covers and guards closed and securely in place Have only qualified persons remove doors panels covers or guards for maintenance as necessary Reinstall doors panels covers or guards when maintenance is finished and before reconnecting input power READ INSTRUCTIONS Read Owner s Manual before using or servic ing unit Use only genuine replacement parts from the manufacturer H F...

Page 8: ...York NY 10036 8002 phone 212 642 4900 website www ansi org Standard for Fire Prevention During Welding Cutting and Other Hot Work NFPA Standard 51B from National Fire Protection Association P O Box 9101 Quincy MA 02269 9101 phone 617 770 3000 web site www nfpa org OSHA Occupational Safety and Health Standards for General Indus try Title 29 Code of Federal Regulations CFR Part 1910 Subpart Q and Pa...

Page 9: ...ctrique à courant électrique s avère nécessaire se servir de la fonction de télécommande si l appareil en est équipé D autres consignes de sécurité sont nécessaires dans les condi tions suivantes risques électriques dans un environnement humideou si l on porte des vêtements mouillés sur des structures métalliquestelles que sols grilles ou échafaudages en position coincée comme assise à genoux ou c...

Page 10: ...ottes de protection Le soudage effectué sur des conteneurs fermés tel que des réservoirs tambours ou des conduites peu provoquer leur éclatement Des étincelles peuven être projetées de l arc de soudure La projection d étincelles des pièce chaudes et des équipements chauds peut provoquer des incendies e des brûlures Le contact accidentel de l électrode avec des objet métalliquespeut provoquer des é...

Page 11: ...pour usage ultérieur Utiliser les équipements corrects les bonnes procédures et suffi samment de personnes pour soulever et déplacer les bouteilles Lire et suivre les instructions sur les bouteilles de gaz comprimé l équipement connexe et le dépliant P 1 de la CGA Compressed Gas Association mentionné dans les principales normes de sécu rité 2 3 Dangers supplémentaires en relation avec l installati...

Page 12: ...erférences L énergie électromagnétique risque de provo quer des interférences pour l équipement élec tronique sensible tel que les ordinateurs et l é quipement commandé par ordinateur tel que les robots Veiller à ce que tout l équipement de la zone de soudage soit compatibleélectromagnétiquement Pour réduire la possibilité d interférence maintenir les câbles de soudage aussi courts que possible le...

Page 13: ...Pittsburgh PA 15250 7954 téléphone 1 866 512 1800 il y a 10 bureaux régionaux le télépho ne de la région 5 Chicago est 312 353 2220 site Internet www osha gov 2 6 Information EMF Considérationssur le soudage et les effets de basse fréquence et des champs magnétiques et électriques Le courant de soudage pendant son passage dans les câbles de sou dage causera des champs électromagnétiques Il y a eu ...

Page 14: ...OM 2243 Page 10 ...

Page 15: ...shock from welding electrode or wiring can kill 3 Sparks from arcing electrode can cause explosion or fire disconnect cable for process not in use 4 Read Owner s Manual for connection procedures 5 Electric shock from wiring can kill 6 Disconnect input power before working on unit or making terminal strip connections Nameplate D 179 389 1 2 3 4 5 6 1 ...

Page 16: ...0 Duty Cycle 10 38V In CV Mode 78 VDC In CV Mode 1 66 0 83 0 66 0 66 0 26 While idling 4 2 Duty Cycle And Overheating Duty Cycle is percentage of 10 min utes that unit can weld at rated load without overheating If unit overheats thermostat s opens output stops and cooling fan runs Wait fifteen minutes for unit to cool Reduce amperage or duty cycle before welding NOTICE Exceeding duty cycle can dam...

Page 17: ...rage output capabilities of unit Curves of other settings fall be tween curves shown va_curve1 4 95 212 111 A 212 112 A A CC Mode B CV Mode 0 10 20 30 40 50 60 70 80 90 0 100 200 300 400 500 600 700 800 DC Current DC Voltage 0 10 20 30 40 50 60 70 80 90 0 100 200 300 400 500 600 DC Current DC Voltage ...

Page 18: ...d forks beyond opposite side of unit 3 Rating Label Use rating label to determine input power needs 4 Line Disconnect Device Locate unit near correct input pow er supply Special installation may be required where gasoline or volatile liquids are present see NEC Article 511 or CEC Section 20 4 18 in 460 mm 18 in 460 mm OR 1 2 Movement Location 3 ...

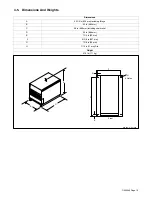
Page 19: ...ons A 32 1 2 in 826 mm including lift eye B 23 in 585 mm C 38 in 966 mm including strain relief D 35 in 889 mm E 1 1 4 in 32 mm F 21 1 8 in 537 mm G 1 1 8 in 29 mm H 7 16 in 11 mm Dia Weight 376 lb 171 kg 800 453 A 801 530 D E F G H 4 Holes A B C Front ...

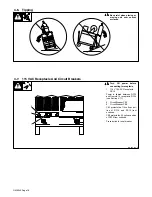
Page 20: ... power before connecting to receptacle 1 115 V 15 A AC Receptacle RC15 Power is shared between RC15 and Remote 14 receptacle RC14 see Section 4 11 2 Circuit Breaker CB1 3 Circuit Breaker CB2 CB1 protects the 115 volts ac por tion of RC14 and RC15 from overload CB2 protects the 24 volts ac portion of RC14 from overload Press button to reset breaker 1 3 2 ...

Page 21: ...4 0 3 4 0 4 4 0 Weld cable size AWG is based on either a 4 volts or less drop or a current density of at least 300 circular mils per ampere Contact your distributor for the mm2 equivalent weld cable sizes S 0007 E 4 9 Connecting Weld Output Cables 803 778 B Turn off power before connecting to weld output terminals Failure to properly connect weld cables may cause excessive heat and start a fire or...

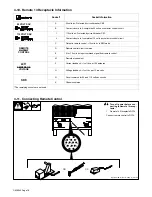
Page 22: ...e REMOTE OUTPUT D Remote control circuit common OUTPUT CONTROL E 0 to 10 volts dc input command signal from remote control M Remote mode select A V AMPERAGE F Current feedback 1 volt dc per 100 amperes AMPERAGE VOLTAGE H Voltage feedback 1 volt dc per 10 arc volts GND G Circuit common for 24 and 115 volts ac circuits GND K Chassis common The remaining sockets are not used 4 11 Connecting Remote Co...

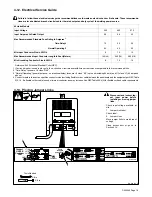
Page 23: ...curves comparable to the recommended fuse 2 Time Delay fuses are UL class RK5 3 Normal Operating general purpose no intentional delay fuses are UL class K5 up to and including 60 amp and UL class H 65 amp and above 4 Conductor data in this section specifies conductor size excluding flexible cord or cable between the panelboard and the equipment per NEC Table 310 16 If a flexible cord or cable is u...

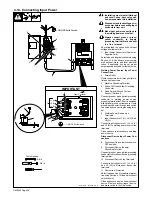
Page 24: ... Ground Current Sensor Optional Connect green or green yellow grounding conductor to welding power source groundingterminal first If unit is equipped with optional ground current sensor route groundingconductor through reed switch two times and connect to grounding termi nal 6 Welding Power Source Line Terminals 7 Input Conductors L1 U L2 V And L3 W Connect input conductors L1 U L2 V and L3 W to w...

Page 25: ...th Mode switch in any Stick or TIG position use control to adjust amperage from 5 to 500 amps With Mode switch in a V Sense Feeder or MIG position use control to adjust voltage from 10 to 38 volts In a Pulsed MIG mode wire feed speed is set with the wire feeder and the V A Adjust control is used to set an arc power that corresponds to the wire feed speed 30 780 ipm 7 Inductance Dig Control Control...

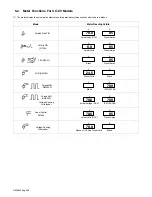
Page 26: ...s OCV Preset Amps V A 78 0 85 Lift Arc TIG GTAW V A Actual Volts Preset Amps 8 0 85 TIG GTAW Blank Preset Amps V A 85 MIG GMAW Preset Volts Blank V A 24 5 Pulsed MIG GMAW P Blank IPM 30 780 V A 780 Pulsed MIG GMAW P Voltage Sensing Wirefeeder Actual Voltage OCV IPM 30 780 V A 78 0 780 Panel Control SMAW Actual Volts OCV Preset Amps V A 78 0 85 Voltage Sensing Wirefeeder Flashes OCV And Preset Volt...

Page 27: ...wly lift electrode An arc will form when electrode is lifted Normal open circuit voltage is not present before tungsten electrode touches workpiece only a low sensing voltage is present between electrode and workpiece The solid state output contactor does not energize until after electrode is touching workpiece This allows electrode to touch workpiece with out overheating sticking or getting conta...

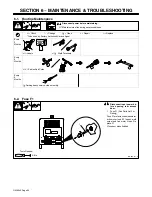
Page 28: ...uthorized Service Agent Every 3 Months Labels Weld Terminals Every 3 Months Δ Cables And Cords Every 6 Months Durning heavy service clean monthly 6 2 Fuse F1 Ref 800 101 C Disconnect input power be fore opening rear access door 1 Fuse F1 See Parts List For Rating Fuse F1 protects control transform er from overload If F1 opens weld output and fan motor stops Re place F1 Close door when finished 1 T...

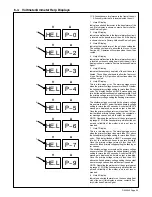
Page 29: ...urs when the primary voltage drops more than 20 below the linked primary voltage setting for more than 30 seconds A constant HELP 6 message is displayed and weld output is disabled Once the primary voltage returns to less than 10 be low the linked primary voltage setting the constant er ror message ceases and weld output is enabled NOTE Operating the welder out of the normal operat ing range 12 of...

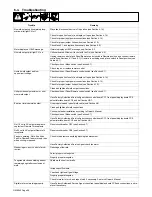
Page 30: ...mote control switch see Section 5 1 Have Factory Authorized Service Agent check control board PC1 front panel display board PC2 pulser interface board PC3 and hall device HD1 Erratic or improper weld output Use proper size and type of weld cable see Section 4 8 Clean and tighten all weld connections Check wire feeder installation according to Owner s Manual Check position of Mode switch see Sectio...

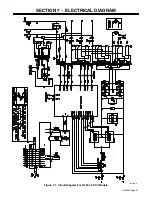
Page 31: ...OM 2243 Page 27 SECTION 7 ELECTRICAL DIAGRAM 223 809 D Figure 7 1 Circuit Diagram For NT 456 CC CV Models ...

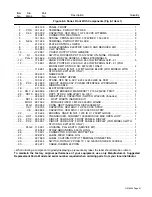
Page 32: ...Quantity 1 Fig 8 2 PANEL Front w Components 1 2 217 136 LABEL WARNING ELECTRIC SHOCK 2 3 179 432 PANEL SIDE 2 4 179 431 COVER TOP 1 5 213 898 BAFFLE AIR UPPER IGBT ASSY 1 6 162 830 LIFT EYE 1 7 177 279 GASKET LIFT EYE 1 8 162 820 BAR MTG LIFT EYE 2 9 Fig 8 4 PANEL REAR 1 10 C21 22 23 163 906 CAPACITOR 3 11 159 034 HOLDER FUSE MINTR 10 3MM X 33 3 TO 38 1MM PANEL MT 1 12 F1 156 065 FUSE CRTG 5 AMP 6...

Page 33: ...MBLY 2 22 179 276 BUSHING SNAP IN NYL 1 000 ID X 1 375 MTG HOLE CENT 1 23 Fig 8 3 ASSEMBLY IGBT CAPACITOR 1 24 234 503 COVER IGBT CAPACITOR ASSEMBLY 1 25 057 358 BUSHING SNAP IN NYL 1 000 ID X 1 375 MTG HOLE 1 26 190 512 STAND OFF NO 6 32 X 640 LG 250 HEX AL FEM 6 27 PC1 222 309 CIRCUIT CARD ASSY CONTROL 1 PLG8 RC2131 204 HOUSING PLUG SOCKETS 1 PLG4 RC4 115 093 HOUSING PLUG SOCKETS 1 PLG5 RC5 115 ...

Page 34: ...rdware is common and not available unless listed Hardware is common and not available unless listed 1 2 3 4 5 3 4 7 6 8 9 10 22 23 22 24 11 13 12 15 16 18 19 20 21 17 14 25 26 27 28 29 12 30 Figure 8 2 Panel Front With Components ...

Page 35: ... BOX 1 19 CB 1 2 093 995 CIRCUIT BREAKER MAN RESET 1P 15A 250VAC FRICT 2 20 RC15 604 176 RCPT STR DX GRD 2P3W 15A 125V 1 21 229 500 RECEPTACLE CAPACITOR SWITCH W LEADS Includes 1 RC14 143 976 RCPT W SKTS SERVICE KIT 1 MOD 1 227 590 MODULE FILTER 1MF X 9 500VDC W GND 1 PLG1 200 952 CONN RECT INSULATION DISPLACEMENT 1 C6 7 136 735 CAPACITOR CER DISC 1 UF 500 VDC STRIP 2 C8 080 894 CAPACITOR CER DISC...

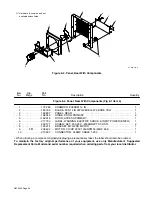
Page 36: ...OM 2243 Page 32 Hardware is common and not available unless listed 803 937 C 1 2 2 3 4 5 6 9 10 11 12 7 13 8 14 Figure 8 3 IGBT Capacitor Assembly ...

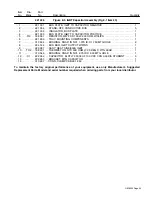
Page 37: ...010 494 BUSHING SNAP IN NYL 1 375 ID X 1 750 MTG HOLE 2 8 224 144 BUS BAR IGBT OUTPUT W FINS 1 9 223 387 ASSY HEAT SINK 600A IGBT 1 10 TH2 188 431 THERMISTOR NTC 30K OHM 25 DEG C 27IN LEAD 1 11 010 546 BUSHING SNAP IN NYL 375 ID X 500 MTG HOLE 1 12 C1 222 654 CAPACITOR ELCTLT 35000 UF 100 VDC CAN 3 00DIA STUDMNT 3 13 222 653 BRACKET MTG CAPACITOR 1 14 010 467 CONN CLAMP CABLE 1 250 1 To maintain t...

Page 38: ...ARY 2 5 162 818 DOOR ACCESS PRIMARY 1 6 217 733 LABEL WARNING ELECTRIC SHOCK INPUT POWER EN FR 1 7 602 177 SCREW SET 250 20 X 250KNRLPT SCH STL 2 8 124 274 BRACKET MTG FAN MOTOR 1 9 FM 208 402 MOTOR 1 12HP 230V 1550RPM 50 60HZ 83A 1 10 010 467 CONNECTOR CLAMP CABLE 1 250 1 When ordering a component originally displaying a precautionary label the label should also be ordered To maintain the factory...

Page 39: ...Induction Heating Coils and Blankets Cables and Non Electronic Controls APT SAF Model Plasma Cutting Torches Remote Controls Accessory Kits Replacement Parts No labor Spoolmate Spoolguns Canvas Covers Miller s True Blue Limited Warranty shall not apply to 1 Consumable components such as contact tips cutting nozzles contactors brushes slip rings relays or parts that fail due to normal wear Exceptio...

Page 40: ...d retain with your personal records Always provide Model Name and Serial Style Number Contact a DISTRIBUTOR or SERVICE AGENCY near you Welding Supplies and Consumables Options and Accessories Personal Safety Equipment Service and Repair Replacement Parts Training Schools Videos Books Technical Manuals Servicing Information and Parts Circuit Diagrams Welding Process Handbooks Contact the Delivering...

Reviews: