362019
18
Figure 29
Secure the Stabilizing Straps
to Ladder
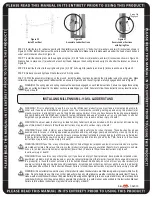
STEP 3: Clear the area on which you plan on placing the treestand. Remove all leaves, sticks, rocks and debris in a 5’ to 6’ perimeter.
NOTE: The bottom section of the ladderstand will be placed here on the cleared, clean, level area.
STEP 4: Position the bottom ladder section in this cleared area (approximately 5’ from the base of the tree trunk) and have one (1) adult
stand on bottom rung of the bottom ladder section. The adult who is positioned on the bottom rung must control the stabilizing straps
and the treestand as it is erected. The two (2) other adults shall gently walk the treestand assembly up and into position as shown in
Figure 30. Once erect, make certain the tree blade is centered on the tree trunk as shown in Figure 31.
STEP 5: Make sure the ladder is not straight, but has about 15 degrees of angle as shown in Figure 32. This will put the bottom of ladder
approximately 5 feet from the tree as shown in Figure 32. NOTE: The seat and standing platforms must be level for a proper and safe
installation.
Figure 30
Walk Treestand Up
(Representative ladderstand shown)
Figure 31
Tree Blade Centered
WARNING! You must check the ground under the treestand to make sure it is firm and level. Sloping ground or uneven
surfaces (e.g., one foot on a rock) can cause your ladder to tilt or shift off the tree as you climb. Failure to follow these
instructions may result in serious injury or death!
WARNING! DO NOT use this, or any other Millennium product(s) to climb utility poles, telephone poles, structural columns or
any other man-made structures. Never use this or any other Millennium product(s) around power generation (e.g., transformers,
generators, substations, etc.) and/or power transmission equipment. Failure to follow these instructions will result in serious
injury or death!
Figure 32
Treestand Set Correctly
STEP 6: Have one (1) adult place their weight on the bottom ladder rung. Doing so shall seat the ladder into the ground. NOTE: The
bottom ladder rung shall be flush with the ground for safe operation.
STEP 7: With the top stabilizer straps already installed as outlined, slip the tree belt through the loops on the bottom of the stabilizing
straps (as shown in Figure 33), thread the cam buckle as shown in Figure 34 and cinch the tree belt tight. Make certain the tree belt
is not twisted and is very tight. With the tree belt installed and tightened, and while standing on the ground, pull the two (2) stabilizing
straps tight. Do not over-tighten.
Figure 33
Stabilizer Straps Installed
Figure 34
Thread Cam Buckle
5 Feet
Summary of Contents for L-110-SL
Page 15: ......
Page 21: ...362019 21...


