MP-SC-5D
Compact Scaler Switcher
All Rights Reserved
Version: MP-SC-5D_2016V1.0
User Manual
Page 1: ...MP SC 5D Compact Scaler Switcher All Rights Reserved Version MP SC 5D_2016V1 0 User Manual ...
Page 2: ...running the working environment should be maintained fine ventilation in case of damage caused by overheat 4 Cut off the general power switch in humid weather or left unused for long time 5 Before following operation ensure that the alternating current wire is pull out of the power supply Take off or reship any components of the equipment Take off or rejoin any pin or other link of the equipment 6...
Page 3: ... 3 5 Application 7 4 System Operations 7 4 1 Operations of Buttons 7 4 1 1 Resolution Adjusting 7 4 1 2 Switching Operations 8 4 1 3 Software Updating 9 4 1 4 Volume Adjusting 9 4 1 5 Operations in OSD Menus 9 4 2 Operations of IR 10 4 2 1 IR Remote 10 4 3 Operations of CEC Function 11 4 4 Operations of RS232 Control 11 4 4 1 Installation uninstallation of RS232 Control Software 12 4 4 2 Basic Set...
Page 4: ...Compact Scaler Switcher 4 5 4 Setup 23 4 6 Instructions of VGA Converting Cable 24 5 Specification 26 6 Panel Drawing 27 7 Troubleshooting Maintenance 28 8 After sales Service 30 ...
Page 5: ...is function Supports video source auto switching function Output resolutions selectable to assure preferred output and supports various output resolutions such as 1920x1200 1920x1080 1600x1200 1360x768 1280x800 1280x720 1024x768 VGA video supports C video YPbPr and VGA Supports online software upgrading 48V phantom power to support condenser microphone MIC port supports balance unbalance signal su...
Page 6: ...rly between HDMI1 HDMI2 HDMI3 VGA1 and VGA2 The LCD screen will show the name of selected source Use as switching mode selection button press and hold on for 7 seconds or more to enter in Auto switching mode press and hold on for 7 seconds or more again to enter in Manual switching mode Note Setting any VGA port to AV or YPbPr in Manual switching mode the system will not be able to enter in Auto s...
Page 7: ...ds or more to enter in software updating procedure VOL Volume down button press it to turn down the volume Use as direction button NEXT when in menus MIC MIC volume up button press it to turn up the volume of the microphone Use as direction button MOVE UP when in menus VOL Volume up button press it to turn up the volume Use as direction button PREVIOUS when in menus MIC MIC volume down button pres...
Page 8: ...h as a computer to control MP SC 5D 12V DC Power port connect with the 12V DC power adapter MIC a MIC port connect with microphone b MIC Dial switch 3 levels 48V phantom power mode connect with condenser microphone MIC mode connect with dynamic microphone and LINE mode connect with wireless microphone or line audio VIDEO INPUT Video input ports includes 3 HDMI inputs 2 VGA inputs VGA ports support...
Page 9: ...D Step5 Connect control device e g PC to the RS232 port of MP SC 5D Step6 Select MIC level and connect right microphone to the MIC input port MIC audio will be transmitted to AUDIO OUTPUT port and mixed with source audio Step7 Connect DC12V power adaptor to the power port 3 4 Connection of Microphone MP SC 5D provides one 3 level microphone input to accommodate different microphone input modes inc...
Page 10: ... used for connecting with dynamic microphone There are two different connections 1 Unbalanced connection and connect to ground and connects to signal and connect to ground and connects to signal 2 Balanced connection connects to positive connects to negative and connects to ground LINE input When switch to LINE It has a low frequency characteristics and wide frequency ...
Page 11: ...nd 3 5 Application MP SC 5D has a good application in various occasions such as computer realm monitoring conference room big screen displaying television education command control center and smart house etc 4 System Operations 4 1 Operations of Buttons The buttons can be used for output resolution adjusting switching operations software updating volume adjusting and operations in menus 4 1 1 Reso...
Page 12: ...ting Once rebooting MP SC 5D will automatically enter in auto switching mode and then detect all inputs and memorize their connection status for future rebooting using And if the signal last displayed is still available then MP SC 5D will output the signal If not there will be no signal on outputs Signal removing principle Once removing the current display signal MP SC 5D will detect all input sig...
Page 13: ...isk The Operation is 1 Copy the file MERGE_51D bin to the root directory of a USB flash disk Make sure the file is copied to the root directory for normal use 2 Plug the USB flash disk to the MP SC 5D USB port on its front panel 3 Press the button MENU for 7 seconds or more to update the software automatically Or press this button for 1 second to open the OSD menu Option Select Software Update to ...
Page 14: ...NE MUTE mute unmute line audio Menu operation buttons MENU press to enter in OSD menu or used to return to previous menu EXIT exit OSD menu OK confirm button Navigation buttons UP DWON LEFT RIGHT button for value setting or page turn Buttons in area a are also able to work in CEC mode to enter the menu of HDMI source device P P ZOOM S M shortcut button to select display mode Resolution selection b...
Page 15: ...working status related to CEC and STANDBY is showed as below Situation Working Status CEC on Standby on Press STANDBY button on IR remote MP SC 5D enters in standby mode so do all HDMI source devices Press STANDBY button again on IR remote MP SC 5D exits standby mode only the HDMI source device switched to starts working CEC on Standby off Press STANDBY button on IR remote MP SC 5D enters in stand...
Page 16: ...llation Copy the control software file to the computer connected with MP SC 5D Uninstallation Delete all the control software files in corresponding file path 4 4 2 Basic Settings First to connect MP SC 5D with all input devices and output devices needed then to connect it with a computer which is installed with RS232 control software Double click the software icon to run this software Here we tak...
Page 17: ...tion Feedback Example Switch Commands 50701 Switch to HDMI 1 input Switch to HDMI 1 50702 Switch to HDMI 2 input Switch to HDMI 2 50703 Switch to HDMI 3 input Switch to HDMI 3 50704 Switch to VGA 1 YPbPr 1 AV 1 input Switch to VGA 1 YPbPr 1 AV 1 50705 Switch to VGA 2 YPbPr 2 AV 2 input Switch to VGA 2 YPbPr 2 AV 2 50680 Select VGA 1 for INPUT 4 Input 4 Set Switch to VGA 1 50681 Select YPbPr 1 for ...
Page 18: ...wn LINE Volume xx 50720 Mute LINE audio MIC audio LINE Mute MIC Mute 50721 Unmute LINE audio MIC audio LINE Unmute MIC Unmute 50722 Mute MIC audio MIC Mute 50723 Unmute MIC audio MIC Unmute 50694 Enable Mic precedence Mic precedence enable 50695 Disable Mic precedence Mic precedence disable 50696 Check Mic precedence status Mic precedence XXXX 50724 MIC volume up MIC Volume xx 50725 MIC volume dow...
Page 19: ... 720P Resolution 1280x720 50628 Change the resolution to 1280X800 WXGA Resolution 1280x800 50629 Change the resolution to 1920X1080 1080P Resolution 1920x1080 50620 Change the resolution to1920X1200 WUXGA Resolution 1920x1200 50621 Change the resolution to1600X1200 UXGA Resolution 1600x1200 Setup Commands 50604 Lock the front panel buttons Front Panel lock 50605 Unlock the front panel buttons Fron...
Page 20: ...io Output enable 50649 Disable HDMI embedded audio output Embedded Audio Output disable 50761 Not display mute icon of LINE audio LINE Mute Icon disable 50762 Display mute icon of LINE audio LINE Mute Icon enable 50763 Not display mute icon of MIC audio MIC Mute Icon disable 50764 Display mute icon of MIC audio MIC Mute Icon enable 50765 Display freeze icon Freeze Icon enable 50766 Not display fre...
Page 21: ...ion 1920x1080 50697 Exit standby mode Wake up 50797 Enter standby mode Go to standby 50698 Software update 50617 Reset to factory defaults Factory Reset Menu Commands 50609 OK for OSD selection Key ok 50610 LEFT button Key left 50611 RIGHT button Key right 50612 UP button Key up 50613 DOWN button Key down 50616 MENU button enter OSD OSD Enter 50618 EXIT button exit OSD OSD Exit Inquire Commands 50...
Page 22: ...XXX port 50751 Check whether the LINE audio is mute or not LINE Mute Unmute 50752 Check whether the MIC audio is mute or not MIC Mute Unmute 50753 Check the freeze status Freeze enable disable 50754 Check the panel locked status Front Panel Lock UnLock 50783 Display statues including MIC LINE audio Resolution Output Audio on off Manual Auto switching modes Line Volume XX Mic Volume XX Source XXXX ...
Page 23: ...djust xx 50676 Stretch upwards from top side increase image height Output Height Adjust xx CEC Commands 50687 Disable CEC HDMI CEC OFF 50686 Enable CEC HDMI CEC ON 50901 Play pause CEC cmd play pause 50902 Stop CEC cmd stop 50903 Menu CEC cmd menu 50904 Retreat CEC cmd rev 50905 Forward CEC cmd fwd 50906 Up CEC cmd up 50907 Down CEC cmd down 50908 Left CEC cmd left 50909 Right CEC cmd right 50910 ...
Page 24: ...tive whether output source is with HDCP depends on input source If the input source is with HDCP so is the output and vice versa b When HDCP is set to Manual whether the output is with HDCP depends on the statue of HDCP Turn off HDCP then the output is without HDCP and vice versa 2 Screen output adjusting avails only when the screen output adjusting is on Send command 50678 to turn on 3 CEC comman...
Page 25: ...signal VGA 2 VGA signal and YPbPr 2 Component video signal Use ENTER button to select the desired source format For INPUT4 INPUT5 when change for new format signal 1 Firstly please select a format through this menu the signal format changed while the video source is still the same 2 Secondly switch off the present signal channel e g switch to another channel 3 Thirdly switch to channel INPUT4 INPU...
Page 26: ... picture below Picture mode Includes Dynamic Standard Mild and User Only in User mode will it be able to set the image contrast brightness color and sharpness Color Temperature Includes Cool Medium Warm and User And only in User mode it is able to set values for Red Green and Blue RGB Aspect Ratio Includes Auto 4 3 16 9 Zoom1 Zoom2 Just Scan Panorama and Point To Point VGA format only supports 4 3...
Page 27: ... 5 3 Sound Including Sound Mode Surround Sound and EQ Please check the picture below Sound mode Includes Standard Music Movie Sports and User Only User mode supports to set treble and bass Surround Sound Includes Off and Surround EQ To adjust the sound balance 4 5 4 Setup Including OSD Language Blending HDMI CEC and OSD Duration ...
Page 28: ... MP SC 5D provides with 2 VGA converting cables to compliant with these signals When need to select these signals as input source please switch to channel INPUT 4 or INPUT 5 and then set the signal type in OSD And then switch to other input channel and connect INPUT 4 or INPUT 5 with corresponding source device At last please switch to INPUT4 or INPUT 5 again Connect with Component Video YPbPr Sou...
Page 29: ...urce A Operation Examples 1 Via front panel buttons OSD Press MENU button on front panel to enter in OSD and then enter in OPTION setting menu set INPUT 4 Select to AV1 and INPUT 5 Select to AV2 After setting press SOURCE AUTO button on front panel to switch to AV1 or AV2 source 2 Via RS232 commands Send command 50682 or 50685 to switch to YPbPr1 or YPbPr2 source 3 Via IR remote OSD Press MENU but...
Page 30: ...20 1280x800 1920x1080 1600x1200 1920x1200 Bandwidth HDMI 4 95Gbps 1 65Gb ps per color C Video 150MHz YPbPr 170MHz VGA 375MHz Maximum Pixel Clock 165MHz Video Impedance 75Ω Gain 0dB Input Output Level 0 5V 2 0Vp p HDCP Compliant with DVI HDMI 1 3 standards Audio Input Audio output Input 3 Dual mono stereo audio for HDMI 2 Dual mono stereo audio for VGA Support C VIDEO YPbPr VGA Output 1 stereo Inpu...
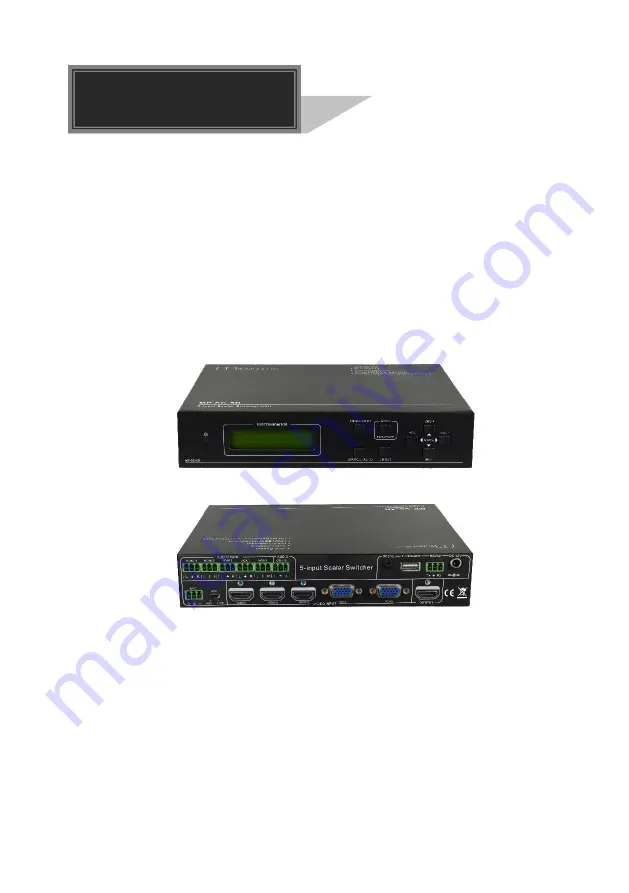
Page 31: ...x 44x 148mm Weight 0 65Kg 6 Panel Drawing MP SC 5D 5 input Scaler Switcher CEC Control Smart EDID Management Full HD Resolution up to 1920 x 1200 HDCP Compliant Auto Switching RESO AUTO SOURCE AUTO MENU ENTER MENU VOL VOL SYSTEM MONITOR MP SC 5D FW UPDATE MIC MIC OUTPUT VIDEO INPUT VGA 2 RS232 FIRMWARE HDMI 1 AUDIO INPUT VGA 2 HDMI 1 HDMI 2 HDMI 3 HDMI 2 OUTPUT R L HDMI 3 VGA 1 VGA 1 Tx Rx AUDIO R...
Page 32: ...tion Fail connection of power cord Make sure the power cord connection is good EDID management does not work normally The HDMI cable is broken at the output end Change for another HDMI cable which is in good working condition There is a blank screen on the display when switching The display does not support the resolution of the video source Switch again Manage the EDID data manually to make the r...
Page 33: ...ort The front panel buttons are locked Send command 50605 to unlock the front panel buttons Cannot control the device by RS232 IR remote front panel buttons The device has already been broken Send it to authorized dealer for repairing If your problem persists after following the above troubleshooting steps seek further help from authorized dealer or our technical support ...
Page 34: ...ear warranty which starts from the first day you buy this product The purchase invoice shall prevail 4 Any problem is same with one of the following cases listed we will not offer warranty service but offer for charge Beyond the warranty Damage due to incorrectly usage keeping or repairing Damage due to device assembly operations by the maintenance company non assigned No certificate or invoice as...