background image

www.milesight-iot.com

www.milesight-iot.com

6. Web GUI Access

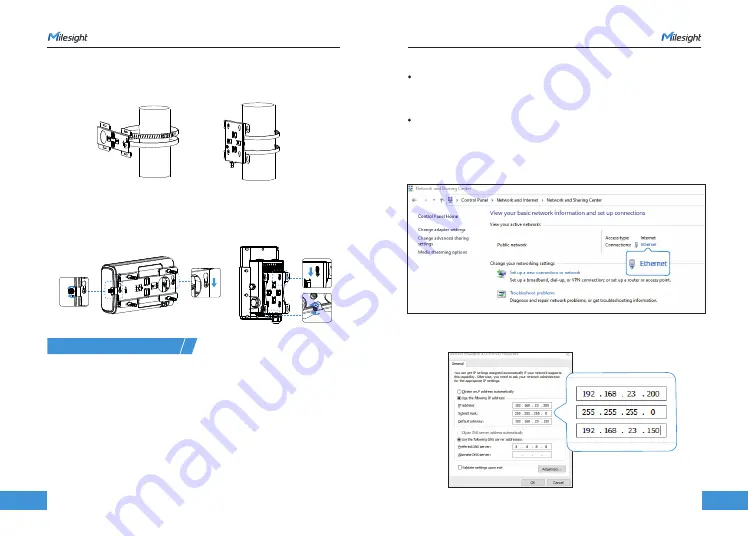
Screw the bracket mounting screws behind the device and hang the device to the 

mounting bracket via bracket mounting screws on the back of device.

Step 2:


Gateway Mounted.

Pole mounting: 

Straighten out the hose clamp and slide it through the rectangular

rings in the mounting bracket, wrap the hose clamp around the pole. After that use

a screwdriver to tighten the locking mechanism by turning it clockwise.

1 10

1

11

UG6x provides web-based configuration interface for management. If this is the

first time you configure the gateway, please use the default settings below:

ETH IP Address: 

192.168.23.150

Wi-Fi IP Address: 

192.168.1.1

Wi-Fi AP: 

Gateway_******

Username: 

admin

Password: 

password

Browser: 

Chrome (recommended)

Here are 2 ways of accessing the web GUI:

Note:


Wireless Mode: 

Enable Wireless Network Connection on your computer and 

search for access point " Gateway_******" to connect it. Then, type 192.168.1.1 to 

your Internet browser to log in the web GUI of UG6x. This mode only works with 

UG65 and UG67.

    Wired Mode: 

Connect UG6x to your computer via Ethernet port and configure 

the IP address of computer manually, then type 192.168.23.150 to your browser 

to log in the web GUl of UG6x. You can follow the steps below to configure computer

IP address manually based on Windows 10 system.
A. Go to " Control Panel "

" Network and Internet " 

 " Network and Sharing Center ",

then click " Ethernet " (It may have different names).

B. Go to "Properties" 

 "Internet Protocol Version 4 (TCP/IPv4) "and select "

“Use the following IP address”, then assign a static IP manually within the same

subnet of UG6x.

Milesight 5G

Summary of Contents for LoRaWAN UG6 Series

Page 1: ...UG6x All software files can be downloaded from https www milesight iot com documents download Cloud App Quick Start Guide Milesight IoT Co Ltd www milesight iot com LoRaWAN Gateway...

Page 2: ...Table of Contents 1 Packing List 2 Hardware Introduction 3 Fitting Installation 4 PoE Supply 5 Gateway Installation 6 Web GUI Access 2 3 5 8 8 10 1 1 www milesight iot com...

Page 3: ...s Mounting Bracket Cable Gland Wall Mounting Kits Wall Mounting Kits Quick Start Guide Warranty Card Warranty Card Ethernet Cable DC Jack Power Adapter LoRa Antenna EA version included Type C Cable Po...

Page 4: ...SIM Slot LoRa Antenna Connector Vent Plug SIM Slot Mounting Bracket Ethernet Port PoE DC Power Connector LED Area Type C Port Reset Button Press and hold the reset button for more than 5 seconds unti...

Page 5: ...ix it to clamp with nuts and other accessories Note UG6x does not support hot plugging also called hot swapping Please turn off the power before you insert or take off cards Please tighten the SIM dus...

Page 6: ...ing Take off the mounting plate on the back of the device drill 2 holes on the wall or ceiling according to the mounting plate then fix the wall plugs into the wall or ceiling Fix the mounting plate t...

Page 7: ...name admin Password password Browser Chrome recommended Here are 2 ways of accessing the web GUI Note Wireless Mode Enable Wireless Network Connection on your computer and search for access point Gate...

Page 8: ...LoRaWAN Gateway Thank you for choosing Milesight Product 1 12 www milesight iot com Milesight IoT Co Ltd...

Page 9: ...200g 80g UG6X 120x85mm 44 005 000117 V1 2...

Reviews: