


31
To check vent action,
hold a match or
source of smoke in
front of Draft Channel
(smoke should be drawn
inward)
Draft Channel
Draft Channel
Bracket secured
by 2 screws
RH side of fireplace
Vent Switch
Vent Switch
Bracket
Check Vent Safety Switch
This unit is equipped with a vent safety switch, located
on the right side of the draft hood, which will shut the
burner off if the vent is not functioning properly. Use
a match or a source of smoke at the front of the draft
channel to check direction of fl ow in the vent. Access to
the vent switch for servicing is shown below.
Vent Check
Vent Safety Switch Location
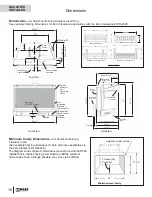
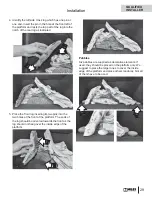
Installation
Air Shutter
Check Operation
Turn the fi replace fl ame up and down using the
remote control to confi rm that the full range of inputs
is achieved—see the remote control operation
instructions on pages 8–9.
Adjust Aeration (if necessary)
Light the fi re and allow the unit to warm up for 10–15
minutes to evaluate the fl ame picture. The burner
is equipped with an adjustable shutter to control
primary aeration. See the fi gures below. The shutter is
factory-set to an aeration gap which will give optimum
performance for the vast majority of installations.
Flashback shield
(propane only)
Air Shutter Slider
(propane gas)
Open
Close
Propane gas
Open
Open
Close
Close
Natural gas
Air Shutter
Slider & Cover
(natural gas)
Depending of fuel bed used, altitude and other
considerations, the fl ame picture may be improved by
adjusting the aeration. The need for adjustment should
be determined only by operating the appliance with the
fuel bed and window installed and evaluating the fl ame
picture after a 15-minute warm-up.
Increasing aeration
will cause the fl ames to appear
more transparent and blue making the ceramic logs
glow more.
Decreasing aeration
will cause the fl ames to appear
more yellow or orange making the ceramic logs glow less.
Too little aeration may result in black carbon
forming and dropping into the fi rebox.
QUALIFIED
INSTALLER


