background image

10

Installing the SM7 Shockmount 

The CV3 kit comes with a SM7 shockmount, which you can use to greatly 
reduce any noise transmitted through the mic stand  The shockmounts 
are especially useful in reducing the problems caused by a boomy 
soundstage; for example when miking overhead cymbals, or even in the 
studio with talent that likes to move a lot on a floor that may not be as 
solid as it should be 
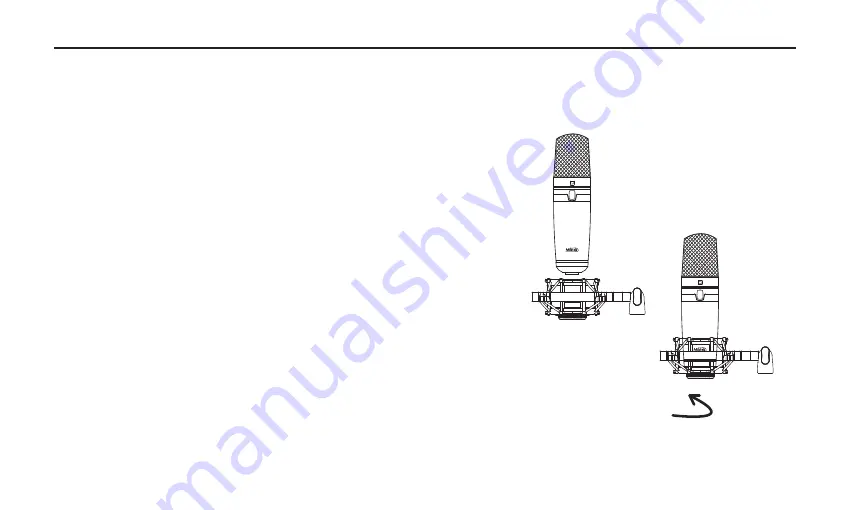
•   To use the CV3 with its included shockmount, screw the shockmount 

on a solid mic stand  If you are using a US standard 5/8-inch mic stand, 
remove the Euro adapter by unscrewing it from the shockmount 

•   Once the shockmount is mounted to the stand, line up the bottom 

threaded section of the CV3 to the holder and slowly rotate the bottom 
thumbscrew clockwise until it screws on hand tight  Be careful not to 
cross thread the screws   

•   You can loosen the bottom thumbscrew slightly to make left and 

right adjustments to the mic, and then re-tighten it once it’s in place  
Remember, the front side of the microphone is the same side as the 
Miktek logo 

•   Loosen the thumbscrew to set the microphone angle and then tighten 

once it’s in place 

Operating the CV3

CV3

CV3

Summary of Contents for cv3

Page 1: ...CV3 Large Diaphragm Multi pattern Tube Condenser Microphone...

Page 2: ...Miktek LLC 348 Valeria Street Nashville TN 37210 tel 615 250 2434 fax 615 346 9298 2010 2014 All Rights Reserved Miktek LLC Printed August 2014 v1 1 www miktekaudio com...

Page 3: ...vel 8 Microphone Placement 8 The Proximity Effect 9 Stand Mounting the CV3 9 Installing the SM7 Shockmount 10 Applications Guide 11 19 Vocal 11 Acoustic Guitar 12 Piano 13 Strings 14 Overhead Drum Kit...

Page 4: ...specifications In addition we ve also included some basic miking techniques for typical recording and live sound applications Most of us who ve purchased the CV3 are already experienced engineers so...

Page 5: ...ackplates and set back to back to create the final capsule Tight tolerances and special attention to precise machining of the backplate produce a linear off axis response that ensures the accuracy of...

Page 6: ...sure to complete the included warranty registration card or visit miktekaudio com to register on line In the unlikely instance that your microphone would ever require service please contact us at 615...

Page 7: ...erns Omni Cardioid Figure 8 and transitional 7 7 patterns in between each of those Custom Designed US Made Miktek Output Transformer 7 7 Subminiatre Pentode Vacuum Tube 7 7 Individual serialized Frequ...

Page 8: ...e staying in the same place in front of the mic using the omni pattern can be extremely useful since the off axis change will have less of an effect on the frequency response When the CV3 is set to th...

Page 9: ...e up the 7 Pin connectors so that you do not accidently bend them Now connect the Mic Output on the CV3 power supply to your mixer s mic pres or DAWs Digital Audio Workstation mic input using a standa...

Page 10: ...setting is when the trim control is turned up as high as possible without lighting the PEAK LED Microphone Placement To help maximize the quality of your recording you must pay careful attention to t...

Page 11: ...ss lift is caused by the amount of pressure present at the ports that are used to create the directional pattern Since omnidirectional microphones do not normally use these ports they do not have prox...

Page 12: ...mic stand If you are using a US standard 5 8 inch mic stand remove the Euro adapter by unscrewing it from the shockmount Once the shockmount is mounted to the stand line up the bottom threaded sectio...

Page 13: ...ce to start Vocals When using the CV3 on vocals position the microphone with the logo facing in front of the artist and so that the microphone grill is approximately 4 to 10 inches away To avoid unwan...

Page 14: ...c try positioning the microphone above the bridge to emphasize more of the attack from the sound of the finger picking or for less move the mic closer to the sound hole If you have a pair of CV3 s try...

Page 15: ...hieve a more realistic sound it s a good idea to leave some space between the instrument and the microphone especially if you are recording a solo instrument Also keep in mind how the track ultimately...

Page 16: ...se capture the entire kit making them awesome on overheads You can position one CV3 on a boom mic stand directly above the kit pointing from front to back For stereo miking use two CV3 s placed over t...

Page 17: ...rument You ll also capture an image that translates the distance between the ensemble and the listener and you capture the sound of the acoustic space surrounding the instrument or ensemble When recor...

Page 18: ...e or no delay difference Therefore the stereo image is created by the level difference of the left and right microphones Since there is no appreciable delay there is less of a chance for phase cancela...

Page 19: ...ree hard left and hard right respectively Channels two and three should be at equal level and always adjusted the same amount as if they were grouped together Now use the balance between channel one a...

Page 20: ...m given to the French Broadcasting Organization which stands for Office de Radiodiffusion Television Fran aise The ORTF standard specifies the capsules to be spaced 17cm apart and set at a 110 degree...

Page 21: ...a baffled stereo set up two omni directional microphones are placed roughly the distance between your left and right ears with a physical hard or foam baffle placed in between the two mics It uses ti...

Page 22: ...20 Specifications CV3 Typical Frequency Response 7 7 CV3 Polar Response 7 7...

Page 23: ...ure 8 and a transitional patterns in between each of those Frequency Response 7 7 20 20000Hz Sensitivity 7 7 35 dBV Pa Equivalent Noise Level 7 7 16 dB Dynamic range 7 7 117dB S N Ratio 7 7 78dB Max S...

Page 24: ...www miktekaudio com 348 B Valeria Street Nashville TN 37210 tel 615 250 2434 fax 615 346 9298 2009 All Rights Reserved Miktek Printed May 2010 v1...

Reviews: