


8
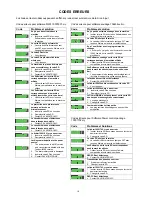
11.
Fault indicator – See SIGMA
2
instruction
manual.
12.
Display of welding current, wire feed speed or
material thickness.
13.
Display of trim voltage, welding voltage or Arc
adjust
14.
Setting welding current /
selecting welding programme
Turn the control knob to set the desired welding
current.
Short press (14A):
Change between display of
welding current, wire feed speed or material
thickness.
Long press (14A):
Select welding program.
15.
Setting welding voltage, Arc adjust and
welding process
Turn the control knob to set the desired welding
voltage or Arc adjust.
Short press (15A):
Change between display of
trim voltage, welding voltage, Arc adjust or seam
average (welding current/voltage).
Long press (15A):
Opens for setting the welding
process.
16. Selecting
sequences
Allows the operator up to nine sets of all
adjustable values.
Short press:
Changes to next sequence.
Long
press:
Opens for selecting number of
sequences. Turn (15) to choose number.
The function is off when 0 is chosen. Press (15A)
briefly to accept choice.
17. Tack
welding
When this function is activated, sequence,
hotstart and slope down are off.
18. DUO
Plus™
Pulsating wire in connection with synergic MIG
on/off.
19. Pulse
welding
(only Synergic Pulse Box)
MIG pulse welding on/off.
20. Selecting trigger mode
Change between 2-stroke (indicator off) and 4-
stroke (indicator on).
2-stroke:
The welding process starts when the
torch trigger is activated and ends when the torch
trigger is released.
4-stroke:
The welding process starts when the
torch trigger is activated and released (hotstart is
active until release of torch trigger) and ends
when the torch trigger is activated again.
21. Water
cooling
(not all versions)
Indicator is on when watercooling of torch is
activated. (For detail information see SIGMA
2
instruction manual).
22. Internal / external adjustment
When external adjustment is chosen, the
indicator is on.
For special configuration, see SIGMA
2
instruction
manual.
23. Wire
inching
Press the key to feed the wire and adjust the wire
feed speed by turning (14) simultaneously.
24. Gas
test
The gas valve is open as long as the key is held
down. If the IGC
®
function is available, it is
possible at the same time to read off the gas
quantity. Turn (15) to adjust the value. Hold down
(24) and press (20) simultaneously to change
between synergic and manual gas adjustment.
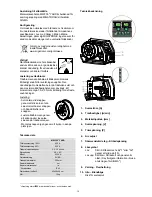
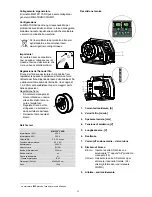
25. Connection of torch
26. Torch water cooling connection
27. Shielding gas connection
28. Control cable connection
29. Welding cable connection
Summary of Contents for MWF 552 YARD
Page 40: ...40 TRÅDFREMFØRING WIRE FEED UNIT DRAHTVORSCHUBEINHEIT DISPOSITIF DE GUIDAGE DE FIL ...
Page 42: ...42 ...
Page 43: ... ...