Instruction Manual
3
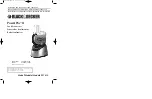
Components
A. Motor base
B. Start button (speeds 1 and 2 )
C. Bowl cover
D. Standard blade (white)
E. Mouloukhia blade (green)
F. Milkshake accessory
G. Graduated bowl
H. Storage base
I. Storage base cover
Before using your appliance, you must familiarize
yourself with the different components of your
appliance. Every letter corresponds to one of
the components of your appliance.
Using your appliance
1. Take the motor base (A) and the bowl cover (C) off and put the graduated bowl (G) onto
a stable, dry and clean working surface. Make sure the appliance is not connected to
the power supply before you start.
2. Make sure that the blade (D or E) is correctly positioned on the spindle in the middle
of the container. Fill the container with the desired food to chop. Do not overfill the
bowl (maximum: 0.5 liter). For best results, you must cut the food into smaller pieces.
NB: Depending on your recipe, you may use the standard blade or the
Mouloukhia blade (see Mouloukhia blade section below).
3. Fit the bowl cover (C) in place. The appliance will not work if the bowl cover is not
fitted correctly.
4. Place the motor base (A) onto the covered bowl and connect the appliance to a wall
socket. You may then press the start button (B). Please note that a mild press will
operate in speed 1 while a stronger press will operate speed 2. To stop the operation,
release the pressure off the start button and the appliance will stop.
5. In the case of wet or damp food, it is best to press briefly several times to get the
best results.
6. Always take the plug out of the socket before removing the motor base.
7. Take out the blade (D or E) before emptying the container.
Beware: the blade is very
sharp and can cause serious injury. Kindly exercise caution when handling it..
Before the first use
- Clean the bowl, the bowl cover, the blades
and the shaker accessory using warm water
with dish washing liquid. You may put them
in the dishwasher.
- For the motor unit, use a damp cloth to wipe
it. Do not wash it in water or pass it under
running water.
D
E
F
A
B
C
H
I
G
Summary of Contents for CH - 173
Page 1: ...Instruction Manual 1 Instruction Manual Mini Chopper CH 173...
Page 7: ...Instruction Manual 7 Mode D emploi Mini Hachoir CH 173...
Page 13: ...Mode D emploi 13...
Page 14: ...7 CH 173 220 240V 50 60Hz 400...
Page 15: ...6 25 25 4 1 2 3 1 1 1 2 1 1 2 4 4 3...
Page 16: ...5 G E C A 500...
Page 19: ...2...
Page 20: ...1 CH 173...