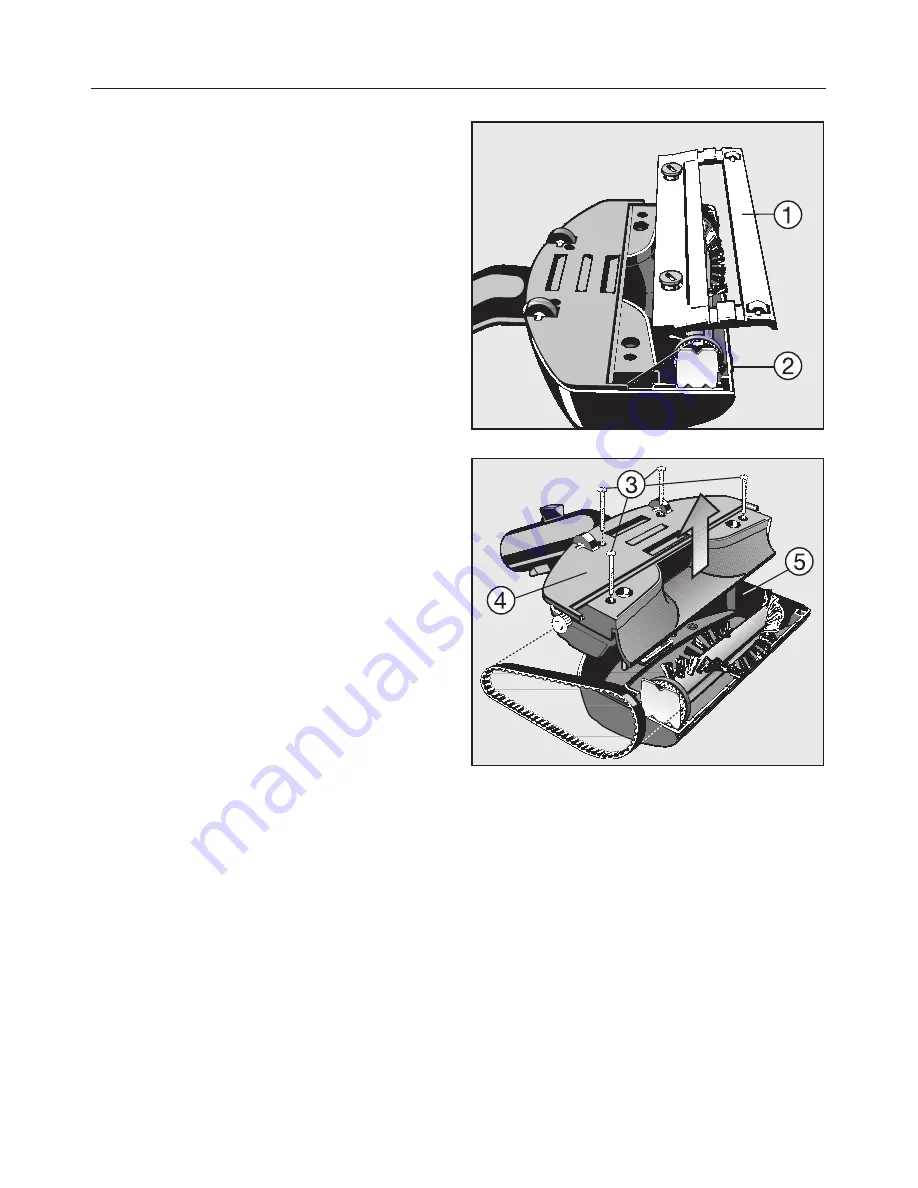
Replacing the roller brush drive belt
The Powerbrush housing must be
opened in order to replace the drive
belt.
^
Remove the roller cover
a
by
loosening the two lock screws on the
bottom of the Powerbrush using a
coin or screwdriver. Remove the
roller cover.
^
Pull up the roller brush
b
until it
releases from the main housing, and
slide the drive belt over the end of
the brush. Set the roller brush aside.
^
Remove the 4 screws
c
in the lower
housing of the Powerbrush
d
, then
separate the lower housing from the
upper housing
e
.
^
Install a new drive belt by slipping it
over the gear on the motor shaft and
the toothed side of the roller brush.
^
Reassemble the Powerbrush by
reversing the procedure.
en - Maintenance and Care
23
Summary of Contents for SEB 213
Page 5: ...Electric hose SES 100 or 105 Electric hose SES 113 en Identifying the Components 5 ...
Page 6: ...Electric hose SES 116 Electric hose SES 117 en Identifying the Components 6 ...
Page 7: ...Electric hose SES 118 Electric hose SES 119 en Identifying the Components 7 ...
Page 8: ...Electric hose SES 125 Electric hose SES 130 en Identifying the Components 8 ...
Page 13: ...Combination 1 SEB 213 and SES 100 or SES 105 en Connecting the Powerbrush 13 ...
Page 14: ...Combination 2 SEB 213 2 and SES 113 en Connecting the Powerbrush 14 ...
Page 15: ...Combination 3 SEB 217 2 SET 220 and SES 118 en Connecting the Powerbrush 15 ...
Page 16: ...Combination 4 SEB 217 3 SET 220 and SES 116 en Connecting the Powerbrush 16 ...
Page 17: ...Combination 5 SEB 217 3 SET 220 and SES 117 en Connecting the Powerbrush 17 ...
Page 18: ...Combination 6 SEB 217 3 SET 220 and SES 119 en Connecting the Powerbrush 18 ...
Page 19: ...Combination 7 SEB 217 3 SET 220 and SES 130 en Connecting the Powerbrush 19 ...
Page 34: ...Combinaison 1 SEB 213 et SES 100 ou SES 105 fr Raccordement de la brosse électrique 34 ...
Page 35: ...Combinaison 2 SEB 213 2 et SES 113 fr Raccordement de la brosse électrique 35 ...
Page 36: ...Combinaison 3 SEB 217 2 SET 220 et SES 118 fr Raccordement de la brosse électrique 36 ...
Page 37: ...Combinaison 4 SEB 217 3 SET 220 et SES 116 fr Raccordement de la brosse électrique 37 ...
Page 38: ...Combinaison 5 SEB 217 3 SET 220 et SES 117 fr Raccordement de la brosse électrique 38 ...
Page 39: ...Combinaison 6 SEB 217 3 SET 220 et SES 119 fr Raccordement de la brosse électrique 39 ...
Page 40: ...Combinaison 7 SEB 217 3 SET 220 et SES 130 fr Raccordement de la brosse électrique 40 ...
Page 48: ...Manguera SES 100 or 105 Manguera SES 113 es Identificación de las piezas 48 ...
Page 49: ...Manguera SES 116 Manguera SES 117 es Identificación de las piezas 49 ...
Page 50: ...Manguera SES 118 Manguera SES 119 es Identificación de las piezas 50 ...
Page 51: ...Manguera SES 125 Manguera SES 130 es Identificación de las piezas 51 ...
Page 56: ...Combinación 1 SEB 213 y SES 100 o SES 105 es Conectando el cepillo eléctrico 56 ...
Page 57: ...Combinación 2 SEB 213 2 y SES 113 es Conectando el cepillo eléctrico 57 ...
Page 58: ...Combinación 3 SEB 217 2 SET 220 y SES 118 es Conectando el cepillo eléctrico 58 ...
Page 59: ...Combinación 4 SEB 217 3 SET 220 y SES 116 es Conectando el cepillo eléctrico 59 ...
Page 60: ...Combinación 5 SEB 217 3 SET 220 y SES 117 es Conectando el cepillo eléctrico 60 ...
Page 61: ...Combinación 6 SEB 217 3 SET 220 y SES 119 es Conectando el cepillo eléctrico 61 ...
Page 62: ...Combinación 7 SEB 217 3 SET 220 y SES 130 es Conectando el cepillo eléctrico 62 ...
Page 67: ...67 ...


