background image

Automatic "warming" function

The "warming" function will switch on for
a maximum of 15 minutes, approx.
2 minutes after the end of a cooking
process which used at least 600 watts,
providing that the door remains closed
and no buttons are pressed.

H:H

lights up in the display. If the turn-

table was engaged it will start turning. If
it was turned off during the cooking
process it will not come on.

Opening the door or pressing the
Stop/C button while the "warming" func-
tion is in process cancels the function.

The "warming" function cannot be set
as a separate function.

Quick-Start (programmable)

Pressing the START /

c

button is suffi-

cient to set the appliance operating on
maximum power. Three set times are
stored in memory:

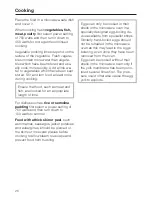
^

30 s: Press START /

c

once

^

1 min: Press START /

c

twice

^

2 mins: Press START /

c

three times

Pressing the START /

c

button four

times in succession will bring back the
first stored time and so on.

Programming times

To alter the set times:

^

Use the START /

c

button to select

the relevant set time (press once,
twice or three times) and hold the
START /

c

button pressed in.

^

Alter the time with the time selector.
The altered time is stored in memory
when the START /

c

button is re-

leased.

An interruption to the power supply
will cancel any altered programmed
times and they will need to be en-
tered again.

Operation

23

Summary of Contents for M 638 EC

Page 1: ... instructions Microwave oven M 638 EC To avoid the risk of accidents or damage to this appliance it is essential to read these instructions before it is installed or used for the first time GWOZ 05 785 100 M Nr ...

Page 2: ...l accessories 17 Gourmet plate MGP 24 17 Preparation for use 18 Setting time of day 18 Altering the time of day 18 Switching off the time of day display 18 Night time 18 Minute minder 18 To open the door 19 To close the door 19 Audible tone 19 Safety lock 19 Operation 20 Types of operation 20 Microwave Solo mode 21 Microwave power settings 21 Times for defrosting reheating cooking 21 Placing the c...

Page 3: ...wave 30 Practical tips 31 Grilling 32 Combination mode Microwave Grill 33 Fan grill 34 Combination mode Microwave Fan grill 35 Cooking with Grill and Fan Grill 36 Fan heat 37 Combination mode Microwave Fan heat 38 Using the combination microwave and fan 39 Automatic programmes 40 Cleaning and care 41 Problem solving guide 45 After sales service 47 Electrical connection 48 Electrical connection U K...

Page 4: ...ll button n nFan grill button N oFan button D pTime of day button m qMinute minder button l rStop cancel button sTurntable button ä tSTART Quick Start programmable c uDoor release button a Using the microwave oven Food can be defrosted reheated or cooked by entering a power setting and a time Deep frozen ready made meals can be defrosted and then reheated or cooked The microwave oven can also be u...

Page 5: ...f suffocation Rather than just throwing these materi als away please ensure they are of fered for recycling Disposal of your old appliance Old appliances may contain material which can be reclaimed or recycled Please contact your dealer your local waste collection centre or scrap mer chant about potential recycling schemes Ensure that the appliance presents no danger to children while being stored...

Page 6: ...of how a mi crowave oven works and understand the dangers of improper use Technical safety Do not use the microwave if the door is warped the door hinges are loose holes or cracks are visible in the cas ing the door the door seal or the oven interior walls Operating the appliance with this type of damage will result in microwave leak age and present a hazard to the user Repairs may only be carried...

Page 7: ...uch usage subject to a risk assess ment of the installation being carried out by a suitably qualified engineer Use Always ensure that food is suffi ciently heated Many factors will affect the overall cooking time including the size and amount of food its initial temperature changes to the recipe and the shape and size of cooking container Some foods may contain micro organ isms which are only dest...

Page 8: ...of the actual food itself after taking it out of the microwave The temperature of the con tainer is not an indication of the temper ature of the food or liquid in it This is particularly important when prepar ing food for babies children and the elderly or infirm When heating liquids the boiling rod provided should be placed into the container When heating liquids milk sauces etc in the oven witho...

Page 9: ...f plastic paper or other inflammable materials Before using single use containers make sure they are suitable for use in microwave ovens See appropriate sec tion Eggs can only be cooked in their shells in the microwave oven in a specially designed egg boiling device available from specialist shops Simi larly hard boiled eggs should not be reheated in the microwave oven as this may lead to the eggs...

Page 10: ...tion It must not be used with the microwave function Never place the hot glass tray or any other hot cooking containers on a cold surface such as a tiled or granite worktop The glass tray or con tainer could crack or shatter and the worktop surface could get damaged Use a heat resistant mat or wire cooling rack Do not use the oven to heat up the room Due to the high temperatures radiated objects l...

Page 11: ... be used in a microwave oven or as a serving dish In a conventional oven the special glaze would suffer damage Disposal of your old appliance Before disposing of your old appli ance first make it unusable Cut off and render any plug unusable Cut off the cable directly behind the appliance to prevent misuse This should be done by a competent person The manufacturer cannot be held lia ble for damage...

Page 12: ...bsorbed Microwaves pass through a suitable container and find their way directly into the food All food contains moisture molecules which when subjected to microwave energy start to oscillate 2 5 thousand million times a second The friction caused by this vibration creates heat which first starts developing around the outside of the food and then slowly penetrates towards the centre The moisture f...

Page 13: ...ed in an oven being used in microwave mode The metal reflects the microwaves hin dering the cooking process Exceptions If recommended by the producer pre cooked meals packed in alu minium foil containers can be de frosted and reheated in the micro wave oven Important remove the lid first However as food is only heated from the top it is better to remove the food from the aluminium foil container a...

Page 14: ...se pressure Earthenware Decorated earthenware is only suit able if the decoration is beneath an all over glaze Earthenware can get very hot and may crack Glazes and colours Some glazes and colours contain metal This makes them unsuitable for use in a microwave oven Plastics Plastic containers must only be used for microwave mode alone Plastics must be heat resistant to a minimum of 110 C Otherwise...

Page 15: ...cyclable or bio degradable Testing dishes for their suitability If in doubt as to whether glass earthen ware or porcelain plates or dishes are suitable for use in a microwave oven a simple test can be performed Place the item you wish to test in the centre of the oven fill a suitable glass with water and also place this in the oven Close the door Turn the power selector to 900 watts Enter a time o...

Page 16: ...nded for use in a microwave oven pierce as instructed by the manufacturer Normal clingfilm can distort Sealed glass containers such as jars of food and babyfood must be opened before they are placed the oven Do not use a lid or cover if food coated with breadcrumbs is be ing cooked cooking meals which are to be given a crisp finish The cover supplied may only be used in solo microwave operation Th...

Page 17: ...y on the rack the glass tray should be placed underneath the rack to catch any fat or juices The glass tray is suitable for use with all cooking functions Baking tray The baking tray is only suitable for use with the fan heat oven function It must not be used with microwave mode When used with fan heat the baking tray gives a well baked finish to the base of the food When inserting the baking tray...

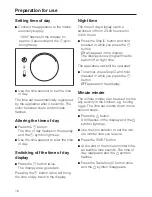
Page 18: ...ay display can be switched off from 23 00 hours until 04 00 hours Press the Stop C button and hold pressed in while you press the m button ON will appear in the display The display is now programmed to switch off at night time The appliance can still be operated To cancel press Stop C and hold pressed in while you press the m button OFF appears in the display Minute minder The minute minder can be...

Page 19: ... door has not been closed prop erly Audible tone An audible tone sounds after the set times have elapsed Press any button to cancel the tone early Safety lock The safety lock prevents the appliance being used by children for example To activate the safety lock Press and hold the ä button in until an audible tone sounds and the key symbol appears in the display The key symbol disappears from the di...

Page 20: ...ishes and dishes with toppings The microwave cooks the food and the grill browns it Combination mode Microwave Fan grill This combination is particularly suited to food which needs to be cooked and browned Combination mode Microwave Fan heat This combination is ideal for cooking one pot dishes e g casseroles Automatic programmes You can choose from the following auto matic programmes three automat...

Page 21: ...e amount of food As a general rule allow approx time and a half for double the quantity For a smaller quantity possibly shorten the time but ensure food is cooked thoroughly The shape and material of the con tainer Placing the container in the oven Ideally the dish should be placed in the middle of the oven Turntable Do not operate the microwave without the turntable in place The turntable starts ...

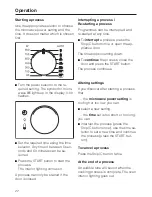
Page 22: ... interrupted and re started at any time To interrupt a process press the Stop C button once or open the ap pliance door The time stops counting down To continue the process close the door and press the START button The process continues Altering settings If you discover after starting a process that the microwave power setting is too high or too low you can select a new setting the time set is too...

Page 23: ...ction Quick Start programmable Pressing the START c button is suffi cient to set the appliance operating on maximum power Three set times are stored in memory 30 s Press START c once 1 min Press START c twice 2 mins Press START c three times Pressing the START c button four times in succession will bring back the first stored time and so on Programming times To alter the set times Use the START c ...

Page 24: ...i cally and then off at the selected end of cooking time If the end of cooking time is pro grammed for microwave operation make sure that there is food in the oven The check the end of cooking time It is possible to check the end of cook ing time before a programmed process has started Press the m button The selected method of operation and the pre se lected end time will appear Large cooking dish...

Page 25: ... oven even without the shell The eggs can burst Food taken straight from the refrigerator requires longer to reheat than food stored at room temperature The time required depends largely on the nature of the food its initial temperature and the amount to be cooked Always ensure that food is suffi ciently cooked or reheated If in any doubt that a sufficiently high temperature has been reached con t...

Page 26: ...emolina pudding first select a power setting of 750 watts and then turn down to 150 watts to simmer Food with a thick skin or peel such as tomatoes sausages jacket potatoes and aubergines should be pierced or the skin cut in several places before cooking to allow steam to escape and prevent food from bursting Eggs can only be cooked in their shells in the microwave oven in a specially designed egg...

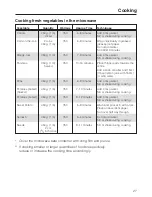
Page 27: ...int water Peas 450 g 1 lb 750 6 9 minutes Add 4 tbsp water Stir or shake during cooking Potatoes boiled halved 450 g 1 lb 750 7 10 minutes Add 4 tbsp water Stir or shake during cooking Potatoes boiled 450 g 1 lb 750 9 12 minutes Add 4 tbsp water Stir or shake during cooking Sweet Potato 450 g 1 lb 750 5 9 minutes Wash and prick skin with a fork Place on absorbent paper Turn over half way through S...

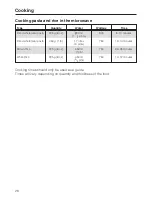
Page 28: ...pints 900 8 10 minutes Dried wholemeal pasta 450 g 1 lb 1 7 litres 3 pints 750 12 14 minutes Brown Rice 225 g 8 oz 650 ml 1pint 750 30 35 minutes White Rice 225 g 8 oz 450 ml 3 4 pint 750 10 12 minutes Cooking times should only be used as a guide Times will vary depending on quantity and thickness of the food Cooking 28 ...

Page 29: ...at to spread evenly throughout the food Defrosting and reheating cooking Deep frozen food can be defrosted and immediately reheated or cooked After defrosting select 750 watts fol lowed by 450 watts Remove the food from its packaging and place in a covered microwave safe dish for defrosting and reheating or cooking Exception Minced meat should be left uncovered while cooking Soups stew and vegetab...

Page 30: ...ox Time Techniques Beans broad 225 g 8 oz 750 7 9 minutes Stir or shake during cooking Peas 225 g 8 oz 750 5 6 minutes Stir or shake during cooking Spinach 275 g 10 oz 750 7 9 minutes Do not add water Stir or shake during cooking Defrosting Defrosting and reheating cooking 30 ...

Page 31: ...450 watts for approx 1 2 1 min ute stirring occasionally Preparing flan topping jelly glaze Gently heat 1 sachet 1 4 litre liquid at 450 watts uncovered for approx 4 5 minutes stirring occasionally Proving dough 500 g flour cover and leave to rise for approx 8 10 minutes at 80 watts Skinning tomatoes Cut 3 tomatoes crosswise drop into water and heat at 450 watts for approx 2 minutes The skin can n...

Page 32: ...od on the rack and or glass tray into the oven on the required run ner level or place the food directly on the turntable Use the 2nd runner from the top for thicker items such as pork chops and the top runner for thinner items such as bacon The glass tray and grill rack will be eas ier to clean if washed in soapy water immediately after grilling If placing food on the turntable leave the turntable...

Page 33: ... flashes Press n The grill symbol n and the recom mended temperature of 200 C flash in the display and h and 0 00 light up Use the rotary selector to change the grill temperature if required A few seconds later 0 00 will flash The duration can now be set using the rotary selector Use the n button to alternate between temperature and duration Once a temperature and duration have been selected press...

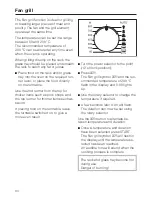
Page 34: ...top runner for thinner items such as bacon If placing food on the turntable leave the turntable switched on to give a more even result Turn the power selector to the point 12 o clock position Press N The Fan grill symbol N and the rec ommended temperature of 200 C flash in the display and 0 00 lights up Use the rotary selector to change the temperature if required A few seconds later 0 00 will fla...

Page 35: ...rature if required A few seconds later 0 00 will flash The duration can now be set using the rotary selector Use the N button to alternate be tween temperature and duration Once a temperature and duration have been selected press START The Fan grill symbol N will flash in the display until the temperature se lected has been reached An audible tone will sound when the cooking process is complete Th...

Page 36: ...rill 200 C 4 10 12 minutes turn half way Sausages thick Fan Grill 200 C 4 9 10 minutes turn half way Bacon Grill 200 C 5 6 8 minutes turn half way Cod Fillet Grill 185 C 4 10 12 minutes Cod Fillet Fan Grill 185 C 4 8 10 minutes Cooking with Grill and Fan Grill 36 ...

Page 37: ...sed Turn the power selector to the point 12 o clock position Press D The Fan heat symbol D and the rec ommended temperature of 160 C flash in the display and 0 00 lights up Use the rotary selector to change the temperature if required A few seconds later 0 00 will flash The duration can now be set using the rotary selector Use the D button to alternate between temperature and duration Once a tempe...

Page 38: ...ay and 0 00 flashes Then press D The D symbol and the recom mended temperature of 160 C flash in the display and h and 0 00 light up Use the rotary selector to change the temperature if required A few seconds later 0 00 will flash The duration can now be set using the rotary selector Use the D button to alternate between temperature and duration Once a temperature and duration have been selected p...

Page 39: ... 15 18 plus 15 mins 150 185 C 80 85 C Chops 11 12 150 185 C 220 N B The above chart is intended as a guide only Cakes can be baked on this setting if the baking time is longer than 20 mins Select the temperature recommended in the recipe e g 160 C and a microwave setting of between 80 150 watts To reheat food e g pies and pastries select a temperature between 180 200 C and a microwave setting of b...

Page 40: ...h a microwave power setting of 150 or 450 watts Q Poultry 100 1500 g Grill temperature180 C L Pork G 500 1500 g Grill temperature 160 C Turn the selector to the automatic programme you require The Start symbol and 100 g flash in the display 500 g with setting L Use the rotary selector to enter the weight Press the START button The appropriate time for the weight will begin to count down An audible...

Page 41: ...es until the water begins to boil The steam will collect on the walls and soften the soiling a little The oven interior can now be wiped clean using a little washing up liquid if necessary The turntable can be removed for cleaning Always keep the roller ring under neath it clean as well as the oven floor Otherwise the ring might not run smoothly Clean the area between the turntable and the carrier...

Page 42: ... cream cleaners abrasive sponges e g pot scourers or sponges which have been previ ously used with abrasive cleaning agents oven sprays Stainless steel fronts The appliance front and controls are susceptible to scratches and abrasion Please observe the cleaning instruc tions for stainless steel surfaces stainless steel coloured controls Stainless steel surfaces Stainless steel surfaces can be clea...

Page 43: ...ainless steel cleaners oven sprays Accessories supplied Boiling rod The boiling rod can be washed in a dishwasher Cover The cover can be washed in a dish washer However discolouration may occur Natural dyes e g from carrots tomatoes or ketchup may be the cause This discolouration is irreversible but does not affect the stability of the cover Side runners The side runners can be removed for cleanin...

Page 44: ...hing up liquid and clean off using a soft nylon brush or sponge Glass tray The glass tray can be washed by hand using a solution of hot water and wash ing up liquid or in a dishwasher Do not use abrasive cleaning agents Ceramic splash guard The ceramic splash guard can be washed by hand using a solution of hot water and washing up liquid or in a dishwasher It should be cleaned after each use An ov...

Page 45: ...ck whether The time of day display has been switched off press the m button twice The display has been programmed to switch off at night the turntable does not turn smoothly Check whether The area underneath the roller ring is soiled The surfaces between the turntable and the carrier are clean Remove any soiling food is not adequately defrosted heated or cooked at the end of the selected time Chec...

Page 46: ... meals it is sensi ble to start with a low power level and lengthen the time required the microwave switches itself off during a cooking reheating or de frosting process There may be insufficient air circulation Check whether The air inlet is blocked An object is blocking the ventilation outlets Anything is blocking the gap be tween the base of the appliance and the worktop surface Remove any obje...

Page 47: ...epartment see back cover for address When contacting the Service Depart ment please quote the model and se rial number of your appliance both of which are shown on the data plate at the rear of the appliance Please note that telephone calls may be monitored and recorded to im prove our service After sales service 47 ...

Page 48: ...nection must be provided for all poles When switched off there must be an all pole gap of 3 mm in the isolator switch including switch fuses and re lays acc to EN 60335 For extra safety it is advisable to install a residual current device with a trip cur rent of 30 mA in accordance with DIN VDE 0664 VDE 0100 Section 739 If the appliance is connected via an iso lator switch the plug must be cut off...

Page 49: ...ket elsewhere in the house electric shock hazard The fuse cover must be re fitted when changing the fuse and if the fuse cover is lost the plug must not be used until a suitable replacement is obtained The colour of the correct replacement cover is that of the coloured insert in the base of the plug or the colour that is em bossed in words on the base of the plug as applicable to the design of plu...

Page 50: ... cur rent of 30 mA AUS NZ The plug rating is 15 A Test marks Electrical safety C Tick Mark Electrically suppressed according to AS NZS 1044 Important The wires in the mains lead of this ap pliance are coloured in accordance with the following code Green yellow Earth Blue Neutral Brown Live As the colours of the wires in the mains lead of this appliance may not corre spond with the markings identif...

Page 51: ...f the appli ance Do not place any objects on the ven tilation outlets or block the gap be tween the base of the appliance and the worktop surface The microwave oven can be placed on a worktop built into a tall unit or into a unit un der a worktop Exception Appliances with a stain less steel front must not be built un der a worktop A building in frame must be used The measurements given in its fitt...

Page 52: ...0 Hz Rated load see data plate Power settings 7 80 150 300 450 600 750 900 Watt Fuse rating GB 13 A Timer 60 90 minutes Freestanding appliance Dimensions H x W x D in mm Housing 348 x 555 x 484 Nett weight 26 kg Technical data 52 ...

Page 53: ...53 ...

Page 54: ...54 ...

Page 55: ...55 ...

Page 56: ...Alteration rights reserved 2802 M 638 C This paper consists of cellulose which has been bleached without the use of chlorine 01 M Nr 05 785 100 V ...

Reviews: