background image

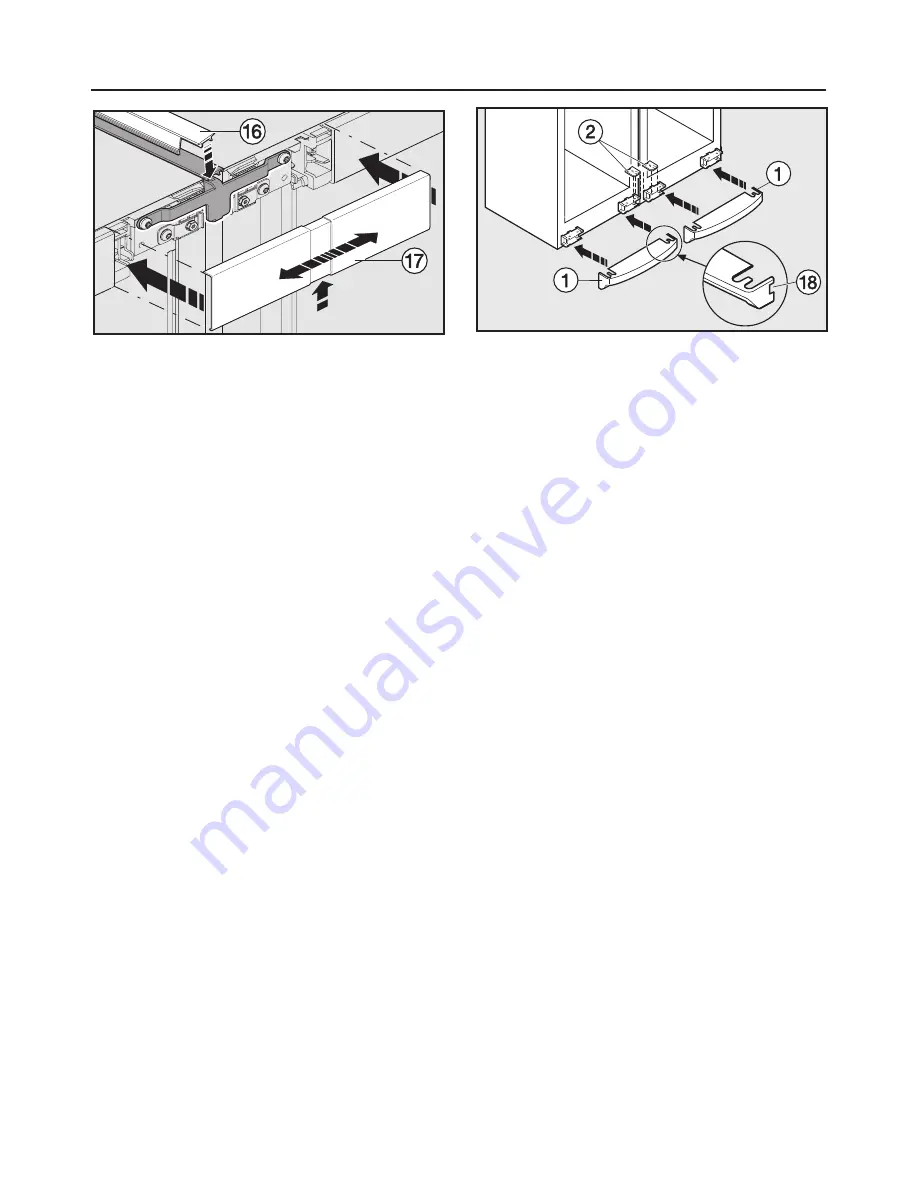
^

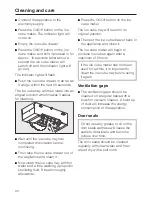
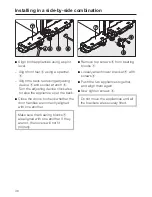
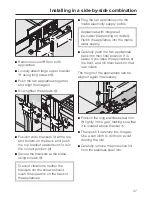
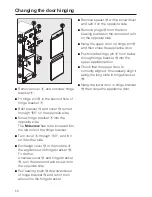
Push short trim

p

into the gap at the

top. Make sure that the gap in the
trim faces the front. The trim must sit
flush with the top of the appliances at
the front.

^

Fit cover

q

in the space between the

control panels. Make sure that the
outer edges of the cover are flush
with the control panels. The cover
can be pulled out to adjust it to the
right size.
The gap in the cover must face
downwards to fit properly over the
stainless steel trim.

^

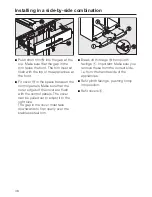
Break off thin tags

r

from plinth

facings

a

. Important: Make sure you

remove these from the correct side -
i.e. from the handle side of the
appliances.

^

Refit plinth facings , pushing firmly
into position.

^

Refit covers

b

.

Installing in a side-by-side combination

48

Summary of Contents for KWFN 8706 SE ED-1

Page 1: ...Frost free freezer with wine cooler and ice cube maker KWFN 8706 SE ed 1 To avoid the risk of accidents or damage to the appliance it is essential to read these instructions before it is installed and used for the first time G M Nr 06 785 780 ...

Page 2: ...tem 18 Switching the alarm off early 18 Using the wine cooler 19 The correct temperature 19 Setting the temperature in the wine cooler 19 Temperature range 19 Dynamic cooling m 20 Switching on Dynamic cooling 20 Switching off Dynamic cooling 20 Storing wine bottles 22 Wooden shelf fronts 22 Descriptive labels 22 Using the freezer section 23 The correct temperature 23 Setting the temperature in the...

Page 3: ...e cube maker 30 Defrosting 32 Cleaning and care 33 Cleaning the outer casing the interior and accessories 33 Cleaning the ice cube tray 33 Ventilation gaps 34 Door seals 34 Metal grille at the back of the appliance 35 Active charcoal filter 35 Problem solving guide 36 Noises 39 After sales service 40 Mains water connection 41 Notes on connecting to the mains water supply 41 Connection to the water...

Page 4: ...Installing in a side by side combination 45 Installation 45 Joining the two appliances together 45 Changing the door hinging 49 Building in the appliance 53 Contents ...

Page 5: ...lder dDynamic cooling constant humidity button and indicator light eSafety lock indicator light fFreezer section On Off button gFreezer section temperature display hFreezer section temperature selector buttons left hand button warmer right hand button colder iSuper freeze button and indicator light jAlarm off button Description of the appliance 5 ...

Page 6: ... descriptive labels bActive charcoal filter cCondensate channel and drain hole dIce cube drawer with automatic ice cube maker eFreezer drawers with freezer calendar fMarker system for frozen food Description of the appliance 6 ...

Page 7: ... The plug must be rendered useless and the cable cut off directly behind the appliance to prevent misuse See the Warning and Safety section of this booklet for further details Electrical and electronic appliances often contain materials which if handled or disposed of incorrectly could be potentially hazardous to human health and to the environment They are however essential for the correct functi...

Page 8: ... the coolant Isobutane R600a a natural gas which is environmentally friendly Although it is flammable it does not damage the ozone layer and does not increase the greenhouse effect The use of this environmentally friendly coolant has however led to a slight increase in the noise level of the appliance In addition to the noise of the compressor you might be able to hear the coolant flowing around t...

Page 9: ...if a risk assessment of the installation has been carried out by a suitably qualified engineer Installation work maintenance and repairs may only be carried out by suitably qualified and competent persons to ensure safety Repairs and other work by unqualified persons could be dangerous and the manufacturer will not be held liable The manufacturer cannot be held liable for damage due to a faulty co...

Page 10: ...ould freeze in the freezer The cans or bottles could explode Danger of injury and damage to the appliance When cooling drinks quickly in the freezer make sure bottles are not left in for more than one hour otherwise they could burst Danger of injury and damage to the appliance Observe the use by dates given on food to avoid the risk of food poisoning Storage times will depend on several factors in...

Page 11: ...o infestation by cockroaches or other vermin pay particular attention to keeping the appliance and its surrounding in a clean condition at all times Any damage caused by cockroaches or vermin will not be covered by the appliance guarantee Disposal of your old appliance Before disposing of an old appliance first make the door latch or lock unusable This way you will prevent children from accidental...

Page 12: ...sure that the winter setting is switched off when the ambient temperature is warmer than 16 C Refrigerator section 4 to 5 C StayFresh zone just above 0 C Freezer section 18 C Use Only open the door when necessary and for as short a time as possible Frequent opening of the door for long periods will cause a loss of coldness Store food in an organised way If food is not stored in an organised way se...

Page 13: ...ed energy consumption Defrosting Defrost the freezer when a layer of ice one centimetre thick has built up A layer of ice hinders the cold from reaching the frozen food and causes an increase in energy consumption How to save energy 13 ...

Page 14: ...t if required you can switch on only one Wine cooler Press the wine cooler On Off button on the left hand side of the control panel The wine cooler temperature display will light up and the wine cooler starts cooling Freezer section Press the freezer section On Off button on the right hand side of the control panel Bars light up in the freezer section temperature display and the freezer section st...

Page 15: ...The safety lock indicator light X will light up when the safety lock has been activated Press the freezer section On Off button to come out of the setting mode The electronics will then switch over to normal operation after a couple of minutes Switching off for longer periods of time If the appliance is not going to be used for a longer period of time e g whilst on holiday switch the appliance off...

Page 16: ...circumstances when the door has been left open for a while e g for removing or storing a large amount of food when freezing large amounts of food at once if the temperature of the food you have recently placed in the freezer section is too warm if the ambient temperature surrounding the appliance is too high The appliance is designed for use in specific ambient temperatures climate ranges Do not u...

Page 17: ...n choose from settings 1 to 5 1 lowest setting 5 brightest setting Press the Super freeze button to save the setting Press the freezer section On Off button to come out of the setting mode The electronics will then switch over to normal operation after a couple of minutes Temperature displays 17 ...

Page 18: ...ne bottles The temperature display continues to flash until the set temperature has been reached Door alarm If one of the doors has been left open for more than approx 60 seconds the alarm will sound The alarm will stop as soon as the door is closed Switching on the alarm system The alarm system is always active It does not have to be switched on manually Switching the alarm off early Once the set...

Page 19: ...tain a constant temperature Safety feature A thermostat prevents the temperature in the wine cooler falling below 2 C If the external temperature should drop below this level a heater element in the appliance switches on automatically to keep the temperature inside as constant as possible Setting the temperature in the wine cooler Use the two buttons underneath wine cooler temperature display to s...

Page 20: ...ottle Dynamic cooling m With Dynamic cooling the relative humidity inside the wine cooler and the temperature are distributed evenly around the interior which enables you to store all your wine under the exactly the same excellent conditions The fan will switch itself on automatically at regular intervals to ensure that the humidity level in the wine cooler remains constant Switching on Dynamic co...

Page 21: ...er maintains the air quality in the wine cooler by filtering the incoming air to ensure that all air entering the appliance is fresh and free from dust and smells Replace the active charcoal filter with a new one once a year see Cleaning and care Using the wine cooler 21 ...

Page 22: ...elf Removing a bottle of one type will then leave the other types undisturbed and will avoid the need to move different bottles around The wine cooler can hold a maximum of 42 bottles standard 0 75 litre Bordeaux wine bottles Descriptive labels Use the labels supplied to identify your wine quickly and easily Insert the labels into the wooden shelf fronts from above Additional labels can be purchas...

Page 23: ...nformation in the display by pressing the buttons When first pressed the last temperature selected flashes Each subsequent press of the button adjusts the temperature shown in 1 C steps Keeping the button pressed in adjusts the temperature continually Approx 5 seconds after letting go of the button the current actual temperature of the freezer section is automatically shown If you have adjusted th...

Page 24: ...ot so much moisture it is easier for the food to reabsorb it during the defrosting process and very little water collects around the defrosted food Super freeze Switch the Super freeze function on before putting fresh food into the freezer section Exceptions when putting in food that is already frozen when freezing less than 2 kg fresh food daily Switching on Super freeze When freezing small quant...

Page 25: ...ximum freezing capacity must not be exceeded The maximum freezing capacity for freezing within a 24 hour period is given on the data plate Freezing capacity kg 24 hrs Storing frozen food When buying frozen food to store in your freezer compartment check that the packaging is not damaged the use by date the temperature at which the frozen food is being stored in the shop The length of time it can b...

Page 26: ...ts or rolled meat from freezing together in solid blocks when packed separate with a sheet of plastic freezer film Do not season fresh foods or blanched vegetables before freezing Only season cooked food lightly before freezing but care should be taken as the taste of some spices alters when frozen Do not place hot foods or drinks in the freezer This causes already frozen food to thaw and increase...

Page 27: ...e loaded with a maximum of 25 kg If you remove the top freezer drawer make sure that you do not block the ventilation slits in the back wall of the appliance They are important for trouble free operation of the appliance Make sure that the packaging and containers are dry to prevent them sticking together when frozen When freezing make sure that food already frozen does not come into contact with ...

Page 28: ...o boiling water or hot fat The cooking time is slightly less than that of fresh vegetables Never re freeze partially or fully defrosted food Consume defrosted food as soon as possible as it will lose its nutritional value and spoil if left for too long Defrosted food may only be re frozen after it has been cooked Cooling drinks When placing bottles in the freezer section for rapid cooling make sur...

Page 29: ...freezer for approx 24 hours If there is a power cut place the cool pack directly on top of the frozen food in the upper drawer so that the food will be kept cold for as long as possible When placing fresh food in the freezer use the cool pack to separate the fresh food from the food which is already frozen so that the frozen food does not begin to thaw The cool pack can also be used in a cool bag ...

Page 30: ... water pipes are thoroughly flushed through before use ice cubes from the first three ice cube making processes must not be consumed This applies not only to when the appliance is installed for the first time but also if the appliance has been out of use for a longer period e g whilst on holiday Making a large amount of ice cubes The amount of ice cubes which the appliance makes depends on the tem...

Page 31: ...r section if you do not want the appliance to make any ice cubes Press the On Off button on the ice cube maker until the indicator light goes out If the ice cube maker is switched off the ice cube drawer can be used as an extra drawer for freezing fresh food and storing frozen food Ice cube maker 31 ...

Page 32: ...e channel and drain hole are kept clean and are never blocked so that condensate can flow away without hindrance Freezer section This freezer is equipped with a Frost free system The freezer section defrosts automatically The moisture generated by defrosting collects on the condenser and is automatically dissipated from time to time This enables the freezer section to remain permanently ice free w...

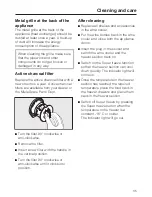
Page 33: ... removable parts e g shelves for cleaning Cleaning the outer casing the interior and accessories Use warm water with a little washing up liquid Wash all accessories by hand only Do not wash in a dishwasher Clean the appliance at least once a month Clean the condensate channel and drain hole in the wine cooler frequently so that condensate can drain away unhindered Use a straw or similar to clear t...

Page 34: ...ube tray with hot water and a little washing up liquid or sterilising fluid Rinse thoroughly afterwards Press the On Off button on the ice cube maker The ice cube tray will return to its original position Then put the ice cube drawer back in the appliance and close it The ice cube maker will begin to produce ice cubes again after a maximum of 6 hours If the ice cube maker has not been used for a w...

Page 35: ... the vertical position Turn the filter 90 clockwise or anti clockwise until it clicks into position After cleaning Replace all shelves and accessories in the wine cooler Put the wine bottles back in the wine cooler and close both the appliance doors Insert the plug in the socket and switch the wine cooler and the freezer section back on Switch on the Super freeze function so that the freezer secti...

Page 36: ... opened and closed too many times in succession This is not a fault The suction caused by opening and closing the door is preventing the door from opening Wait a few minutes and then try again It should now open without force the temperature in the wine cooler or freezer section is too low Select a warmer temperature Check that the doors have been closed properly Super freeze has not switched itse...

Page 37: ...ast couple of days because of a power cut Press the alarm off button whilst nA is lit up in the display The temperature display will show the warmest temperature recorded in the freezer section during the power cut Depending on the temperature displayed you should check the condition of food in the freezer If it has defrosted or started to defrost check that it is still safe to use and if so use i...

Page 38: ...t you cannot switch the appliance off The safety lock has been activated the floor of the wine cooler is wet The drain hole is blocked Clean the condensate channel and drain hole If you still cannot remedy the fault having followed these suggestions please contact the Miele Service Department To prevent unnecessary loss of temperature it is advisable not to open the door while waiting for the appl...

Page 39: ...ise of the compressor and the coolant circulating in the system is unavoidable Noises that you can easily rectify What causes them and what can you do about them Rattling vibrating The appliance is uneven Realign the appliance using a spirit level by raising or lowering the screw feet underneath the appliance The appliance is touching another appliance or piece of furniture Move it away Drawers ba...

Page 40: ...ler or The Miele Service Department see back cover for address When contacting your Dealer or the Service Department please quote the model and serial number of your appliance This information is given on the data plate Please note that telephone calls may be monitored and recorded for training purposes After sales service 40 ...

Page 41: ...vailable from the Miele Spare Parts Department and must only be fitted by a suitably qualified fitter A stopcock must be provided between the stainless steel hose and the household water supply to ensure that the water supply can be cut off if necessary The stopcock should be easily accessible after the appliance has been built in Connection to the water inlet Before making plumbing connections en...

Page 42: ...n the stopcock slowly and check the whole water system for leaks The appliance can then be connected to the electricity supply Push the appliance into its final position When doing so make sure that the stainless steel hose is not kinked or damaged After a maximum of 24 hours the first ice cubes will drop out of the ice cube maker and collect in the drawer Mains water connection 42 ...

Page 43: ...electricity supply by an extension lead Extension leads do not guarantee the required safety of the appliance e g danger of overheating The appliance must not be connected to an inverter and must not be used with a plug adapter as these can cause damage to the appliance s electronic unit Non rewireable plugs BS 1363 The fuse cover must be re fitted when changing the fuse and if the fuse cover is l...

Page 44: ...range The climate range of this appliance is stated on the data plate inside the appliance Climate range Ambient room temperature SN N ST T SN ST SN T 10 C to 32 C 16 C to 32 C 18 C to 38 C 18 C to 43 C 10 C to 38 C 10 C to 43 C Operating in a room which is too cold will cause the cooling system to switch off for too long causing the internal temperature in the appliance to rise with the risk of f...

Page 45: ...etween the two appliances Place the two appliances as close as possible to their final position so that they can be aligned for any unevenness in the floor The back of the appliances still needs to be kept accessible to complete the installation Joining the two appliances together You will need a spirit level spanners a torque screwdriver and a socket wrench Before starting peel off any protective...

Page 46: ...hether the door handles are correctly aligned with one another Make sure that bearing blocks g are aligned with one another If they are not the covers will not fit properly Remove top screws h from bearing blocks g Loosely attach lower bracket i with screws h Push the two appliances together and align them again Now tighten screws h Do not move the appliances until all the brackets are securely fi...

Page 47: ...iances into the mains electricity supply points Appliances with integrated ice maker depending on model Plumb the appliance into the mains water supply Carefully push the two appliances back into their final position It is easier if you raise the appliances at the front and roll them back on their rear rollers The height of the appliances can be aligned again if necessary Position the long stainle...

Page 48: ...of the cover are flush with the control panels The cover can be pulled out to adjust it to the right size The gap in the cover must face downwards to fit properly over the stainless steel trim Break off thin tags r from plinth facings a Important Make sure you remove these from the correct side i e from the handle side of the appliances Refit plinth facings pushing firmly into position Refit cover...

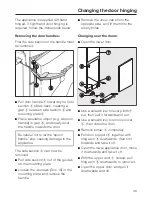
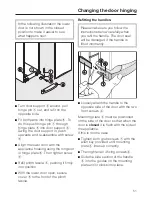
Page 49: ...oved Pull side section b out of the guides on the mounting plate Loosen the 4 screws Torx 15 in the mounting plate and remove the handle Remove the cover caps from the opposite side and fit them into the empty holes Changing over the doors Open the lower door Use a screwdriver to lever plinth a out then pull it forwards and out Use a screwdriver to remove cover b then close the door Remove screw c...

Page 50: ... around and screw in on the opposite side Pull bearing bush n downwards out of hinge bracket o and refit it from above into the hinge bracket Remove spacer p with a screwdriver and refit it on the opposite side Remove plugs q from the door bearing bushes in the doors and refit on the opposite side Hang the upper door on hinge pin j and then close the appliance door Push middle hinge pin f from bel...

Page 51: ...wer door open secure cover e to the front of the plinth fascia Refitting the handles Please make sure you follow the instructions below carefully when you refit the handle The door seal will be damaged if the handle is fitted incorrectly Loosely attach the handle to the opposite side of the door with the two front screws b Mounting plate c must be positioned on the side of the door so that when th...

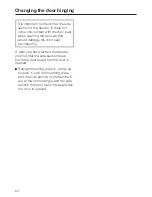
Page 52: ...seal permanently If after you have refitted the handle you find that the side section does touch the door seal when the door is opened Realign mounting plate c with grub screws a until the mounting plate and the side section of the handle d are at the correct angle and the side section does not touch the seal when the door is opened Changing the door hinging 52 ...

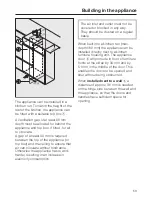
Page 53: ... increase in electricity consumption The air inlet and outlet must not be covered or blocked in any way They should be dusted on a regular basis When built into a kitchen run max depth 580 mm the appliance can be installed directly next to a kitchen furniture housing unit The appliance door b will protrude in front of furniture fronts at the sides by 34 mm and by 51 mm in the middle of the door Th...

Page 54: ...54 ...

Page 55: ...55 ...

Page 56: ...Alteration rights reserved 4905 KWFN 8706 SE ed 1 M Nr 06 785 780 00 en GB ...

Reviews: