background image

30

Chapter 10: Printing Test Results

EXP-800

If  you  are  using  the  EXP  internal  printer,  keep  the  clamps 

connected to the battery during the printing process. After a 

test the results automatically print. 

  NOTE:

 When the option TRACK CALLS is enabled, 

the EXP writes the results to the data card.

To print a second copy of the results:
1.  Press the 

PRINT

 soft key.

2.  Select the language for the printed results. Use the 

UP/

DOWN ARROWS

 to move the dot to the option button of 

your choice (1, 2, or 3). 

 ENGLISH

 ESPAÑOL

 FRANÇAIS

3.  Press the 

NEXT

 soft key to continue.

Changing the Paper in the Internal Printer

The internal printer is shipped with a roll of thermal printing 

paper installed in the paper compartment. The roll size is 2-1/4 

inches wide by 1-7/8 inch in diameter. Replacement rolls are 

available at most office supply stores. 
The analyzer uses only thermal printing paper. Below are four 

major office supply stores that carry thermal  paper:

Store 

Part Number

Phone

Office Depot

209-653-271

800-463-3768

Office Max

20121146

800-283-7674

Quill

856607

800-789-1331

Staples

531236

800-378-2753


NOTE: 

Due to production variances some paper 

roll  diameters  may  be  too  large.  Please  remove 

paper  from  roll  to  recommended  1-7/8  inch  di-

ameter. DO NOT force cover to close if roll is too 

large.

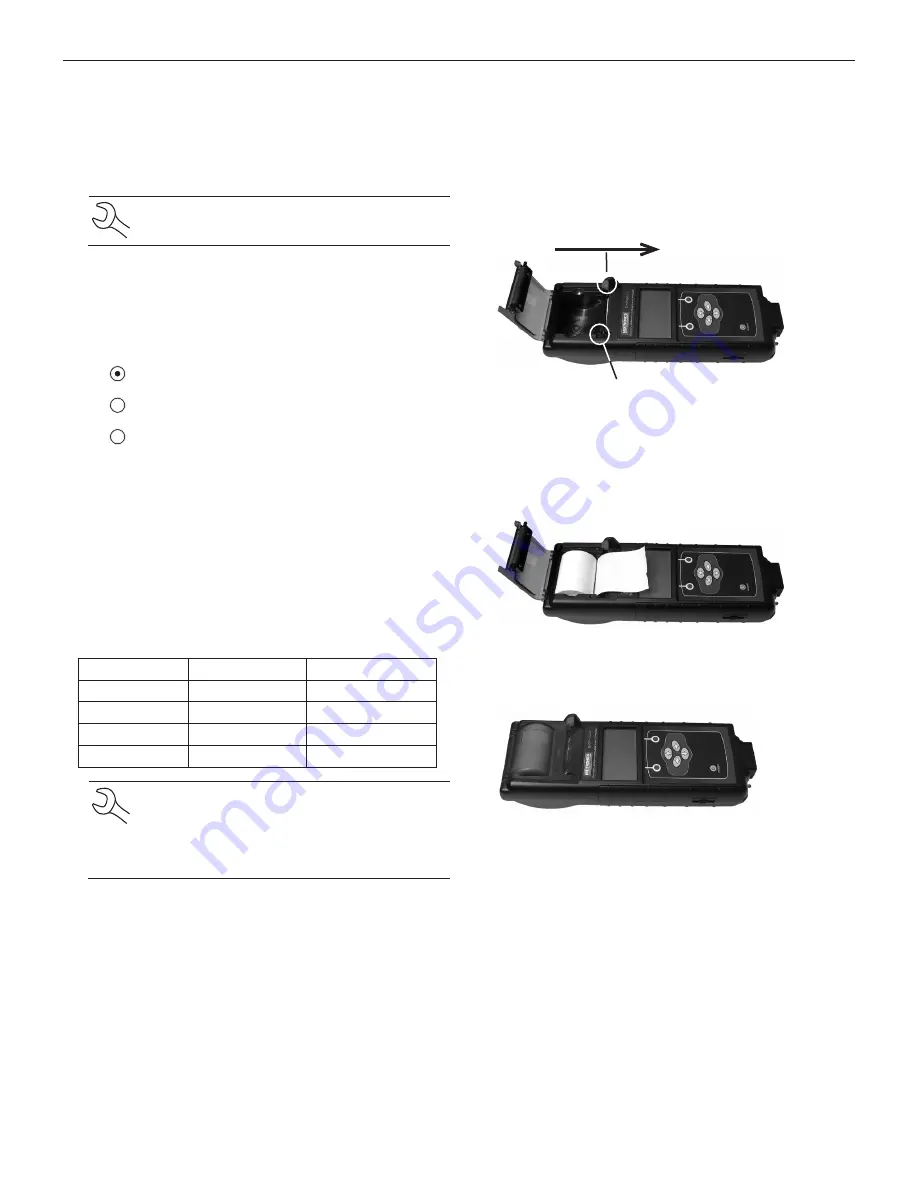
To replace the paper roll:
1.  Unlock the printer door by gently pressing down on the 

red lever.

2.  Lift the printer door and remove the spent roll.

Push the lever in this direction

Paper sensor

3.  Place a new roll of paper in the compartment. As the dia-

gram in the paper compartment indicates, the paper feeds 

from the bottom of the roll.

4.  Pull the paper forward so that it extends past the serrated 

edge of the paper slot.

 5.  Close the door and make sure the lever locks securely. For 

a clean tear, pull the paper along the serrated edge. 

Do 

not pull the paper straight out of the printer. 

Chapter 10: Printing Test Results

Summary of Contents for EXP-800

Page 1: ...nostic Analyzer For testing 6 and 12 volt automotive batteries and 12 and 24 volt charging systems INSTRUCTION ManuAl EXP 800 July 2008 168 547A INNOVATION TECHNOLOGY QUALITY WORLDWIDE INNOVATION TECHNOLOGY QUALITY WORLDWIDE ...

Page 2: ...blank page behind cover ...

Page 3: ...p 13 Entering Your Store ID Number and Zip Code 13 Logging in as an Unregistered User 13 Adding a User 13 Disabling the Login Screens 13 Chapter 4 Admin Utility Menu 14 Clock 15 Mode 15 Time 15 Format 15 Date 15 Shop 16 Users 16 Entering a New User ID 16 Deleting a User ID 17 Display 17 Contrast Level 17 Backlight Time 17 Coupon 17 Edit Coupon 18 Temp 18 Track Calls 18 Language 19 Admin 19 Options...

Page 4: ...n the EXP displays a total of 100 Tests 28 Chapter 9 Info Menu 29 View Test 29 View PDI Test 29 Totals 29 Transfer 29 Version 29 Chapter 10 Printing Test Results 30 Changing the Paper in the Internal Printer 30 Chapter 11 Troubleshooting 31 Problems with the Display 31 Problems with the Internal Printer 31 Chapter 12 Test Cable Maintenance 32 Cleaning the Clamps 32 Handling the Test Cables 32 Stor...

Page 5: ...in a well ventilated area Never smoke or allow a spark or flame in the vicinity of a battery WARNING REQUIRED BY CALIFORNIA PROP 65 Bat tery posts terminals and related accessories contain lead and lead compounds chemicals known to the state of California to cause cancer and birth defects or other re productive harm Wash hands after handling Battery acid is highly corrosive If acid enters your eye...

Page 6: ...orts Integrated thermal printer Release lever for door to paper compart ment Paper slot LCD screen with Main Menu Control Panel keypad and power button 6 pin connector for the battery test cable see the next page for detail Spring loaded data card slot for test data storage and software upgrades Infrared temperature sensor with a range of 28 C to 93 C 20 F to 200 F Data transmitter sends test resu...

Page 7: ...e always hold the ridged part of the cable connector as shown in the photo when inserting and removing the cable Hold the cable connector here Arrows Removing and Inserting the Data Card The analyzer ships with a plastic insert in the data card slot to protect it from dust and debris To remove the plastic insert or a data card push briefly on its edge to release it and pull it from the slot When i...

Page 8: ... functions change depending on the menu or test process So it may be helpful to think of the words appearing above them as part of the keys Some of the more common soft key functions are SELECT BACK and END POWER Key Press the POWER button to turn the analyzer on and off The analyzer also turns on automatically when you connect its test leads to a battery Title Bar The title bar shows you the name...

Page 9: ...ering text use the UP ARROW key to move to the previous character Press the DOWN ARROW key to move down to the next selectable item or row When entering text use the DOWN ARROW key to move to the next available character Use the UP and DOWN ARROW keys to scroll to the letters A through Z numbers 0 through 9 and the following symbols When entering text use the RIGHT ARROW key to move one space to t...

Page 10: ...lists contain items that extend above and below the screen The first number above the right soft key indicates the position in the list of the highlighted item The second number above the right soft key indicates the number of items in the list To select an item press the UP or DOWN ARROW key to highlight the item and press the appropriate soft key To move the highlight bar up four lines at a time...

Page 11: ...lts a test counter a data transfer utility and information on the analyzer software version and serial number Provides access to the Utility Menu which allows you to customize the analyzer and administrative functions that include setting passwords Provides tips for troubleshooting problems with the printer the cables and loss of power Also includes Midtronics Customer Service phone numbers Info M...

Page 12: ...created a coupon in the Edit Coupon utility use Coupon to enable or disable Allows you to create and store up to three separate coupons to be printed on test results Allows you to select degrees in C or F for temperature measurements Stores test results on the data card when enabled ON Sets the language of the display and printouts Allows you to enable or disable the user login screen clear test t...

Page 13: ...analyzer saves stores them in memory until you change them using the STORE ID option in the Admin Utility Menu Logging in as an Unregistered User The default setting requires a user name to display the Main Menu You can log in as an unregistered user or you can create a new user ID To log in as an unregistered user press the NEXT soft key to selected the highlighted UNREG 0 UNREG 1 ADD USER Adding...

Page 14: ...re placeholder IDs used to create user names DISPLAY CONTRAST LEVEL BACKLIGHT TIME Range 0 lightest to 10 darkest The default is set at 9 Range 0 to 60 seconds The default is set at 15 seconds COUPON Disabled NO COUPON PRINTED EDIT COUPON Eight lines of text with 17 characters per line Default USER COUPON LINE 1 through USER COUPON LINE 8 TEMPERATURE DEGREES F Fahrenheit TRACK CALLS Tracking OFF L...

Page 15: ...changes Time 1 Use the LEFT or RIGHT ARROW keys to highlight the hour minutes or AM or PM To rapidly scroll hold down an UP or DOWN ARROW key 9 19 PM 2 Press the SAVE soft key to save your setting or press the BACK soft key to return to the CLOCK ADJUST screen Format Use the UP or DOWN ARROW to move the dot to the option button of your choice 1 or 2 1 Select the format of the date 1 MM DD YYYY mon...

Page 16: ... you edit the line To exit the edit mode of the se lected line without saving the changes press the BACK soft key Screen 2 5 YOUR COUNTRY 6 YOUR PHONE NUMBER 7 WWW WEBSITE COM 8 Screen 1 1 YOUR SHOP NAME 2 1000 ANY STREET 3 YOUR TOWN STATE 4 YOUR ZIP CODE To help you edit and center your header use a pencil to write the information in the template below before entering it into the EXP Header Templ...

Page 17: ...y the option s numeri cal scroll box 9 1 10 3 Press the UP or DOWN ARROW key to select your prefer ence To erase a character press the LEFT ARROW key 4 Press the SAVE soft key to save your setting or the BACK soft key to return to the LCD OPTIONS screen without sav ing the changes Backlight Time Backlight time is from 0 to 30 seconds To change it 1 Press the UP or DOWN ARROW key to highlight the o...

Page 18: ...F 2 DEGREES C 2 Press the SAVE soft key to save your setting or the BACK soft key to return to the Admin Utility Menu without sav ing the changes Track Calls The TRACK CALLS utility stores the test results and test codes by date as an xml Extensible Markup Language file in a folder named XML on the data card before the EXP prints the results This utility requires a data card reader not included to...

Page 19: ... disable OFF the USER ID login screen 2 UNREG USER Select this setting to enable ON or disable OFF unregistered login access to the analyzer when option 1 USER ID is ON 3 PRINT HEADER Select this setting to enable ON or disable OFF the address header on the printout 4 LANGUAGE Select this setting to enable ON or disable OFF the language selection option when the EXP boots up 5 DATE CODE Select thi...

Page 20: ...rd to receive data or erase all data on the card The analyzer will warn you before formatting the disk and ask if you want to continue Update When software updates become available for the EXP this utility walks you though the quick process of updating the analyzer s software using a data card ...

Page 21: ... wrench to tighten the adapters more than 1 4 turn Fail ure to properly install lead terminal adapters or using adapters that are dirty or worn may cause false test results Testing In Vehicle System Test Before starting the test inspect the alternator drive belt A belt that is glazed or worn or lacks the proper tension will prevent the engine from achieving the rpm levels needed for the test The p...

Page 22: ... the vehicle Press the NEXT soft key to continue 4 Select the POST TYPE The REMOTE option appears for the IN VEHICLE test 1 TOP POST 2 SIDE POST 3 JUMP START POST appears for System Test Press the NEXT soft key to continue 5 Select the BATTERY TYPE 1 AUTOMOTIVE default 2 MARINE BATTERY 3 MOTORCYCLE 4 GROUP31 5 COMMERCIAL_4D 8D 6 LAWN GARDEN Press the NEXT soft key to continue If you select MOTORCY...

Page 23: ... it no longer detects system noise If the message reappears You may be testing too close to a noise source such as a charger or other high current device If so move away and retest If you are unable to find the source of the noise fully charge the battery and retest If the message appears after recharging test the battery out of the vehicle Disconnect the battery cables and retest Unstable Battery...

Page 24: ...ure to fully charge the battery before retesting may cause false readings If CHARGE REQUIRED appears again after you fully charge the battery replace the battery REPLACE BATTERY A REPLACE BATTERY result may also mean a poor connection between the battery and the vehicle If you tested the battery using the In Vehicle Test disconnect the battery cables and retest using the Out of Vehicle Test before...

Page 25: ...s NOTE In some cases the analyzer may not de tect the vehicle s starting profile and display the soft key options STARTED and NO START If you select STARTED the analyzer skips to the Charg ing System Test If you select NO START the test process ends Starter System Test Results The results include the battery analysis Use the UP or DOWN ARROW key to scroll to each screen See Table 4 for on the next...

Page 26: ... a few seconds the analyzer will ask you to turn on the accessory loads It will determine if the charging system is able to provide enough current for the demands of the electrical system IMPORTANT Turn on the high beam headlights and the blower to high Do not use cyclical loads such as air condition ing or windshield wipers 8 TESTING ALTERNATOR AT IDLE LOADS ON The analyzer will determine if the ...

Page 27: ...you to replace the alternator In older vehicles that use external voltage regulators you may need to replace only the voltage regulator The regulator controls voltage output based on the battery voltage under hood temperature and vehicle loads used In other words it controls the maximum voltage the system can produce based on the current needs and amount of current that can be produced by the spin...

Page 28: ...ites the results to the data card and displays the results starting from the last battery tested To view a previous result for a battery use the UP or DOWN ARROW key to scroll to the screen showing the battery that was tested Example of displayed results for a test of two batteries 5 To continue testing connect to the next battery The ana lyzer starts the test automatically using the same parame t...

Page 29: ...rder in which they were test ed Select the PRINT soft key 1 PDI BATTERY 2 PDI SUMMARY Totals The TOTALS menu shows the total number of tests in four categories since the totals were reset to zero Use the UP or DOWN ARROW key to move the dot to the option button of your choice 1 2 3 or 4 See the screen illustrations on the next page 1 TOTALS TOTALS displays the total number of battery tests perform...

Page 30: ...ly thermal printing paper Below are four major office supply stores that carry thermal paper Store Part Number Phone Office Depot 209 653 271 800 463 3768 Office Max 20121146 800 283 7674 Quill 856607 800 789 1331 Staples 531236 800 378 2753 NOTE Due to production variances some paper roll diameters may be too large Please remove paper from roll to recommended 1 7 8 inch di ameter DO NOT force cov...

Page 31: ...ast may need to be adjusted in the Admin Util ity menu Highlight the Display icon and press ENTER Use the UP or DOWN ARROW key to scroll the contrast value to 10 The analyzer s internal batteries may need to be replaced See Chapter 13 EXP Internal Batteries on page 34 Problems with the Internal Printer The internal printer will not print The analyzer must be connected to the vehicle battery to pri...

Page 32: ...ry by opening and closing the clamps Never pull on the test cables to remove the battery clamps Pulling can damage the Y junction the cables and the clamps to the extent that the analyzer may produce lower than expected con ductance readings or fail completely Never carry the analyzer by the cables Carrying the ana lyzer or swinging it by the cables puts unnecessary strain on the cables and can re...

Page 33: ...k clamp jaw with teeth and its corre sponding pin hole 1 Grip a pencil with the clamp as shown in the figure Con tacts for Clamp Jaws Do not grip the metal part of the eraser or any area that may conduct current 2 Insert a probe tip into the hole designated NO TEETH for the color BLACK or RED of the clamp you are testing as shown in the figure Contacts for Cable Connector 3 Touch the toothless jaw...

Page 34: ...vel declines The EXP will display a warning message when the batteries need replacing Full Powered by vehicle battery Decreasing Low Replacing the Internal Batteries 1 Turn the analyzer face down 2 Use a Philips screwdriver to remove the screw securing the door to the battery compartment Remove the screw and lift the tab 3 Lift the door at the tab and place it aside 4 Remove the discharged batteri...

Page 35: ...35 ...

Page 36: ...e unit or to modify the cable assembly SERVICE To obtain service contact Midtronics for a Return Authorization number and return the unit to Midtronics freight prepaid Attention RA ________ Midtronics will service the analyzer and reship the next scheduled business day following receipt using the same type carrier and service as received If Midtronics determines that the failure was caused by misu...

Reviews: