1. Overview
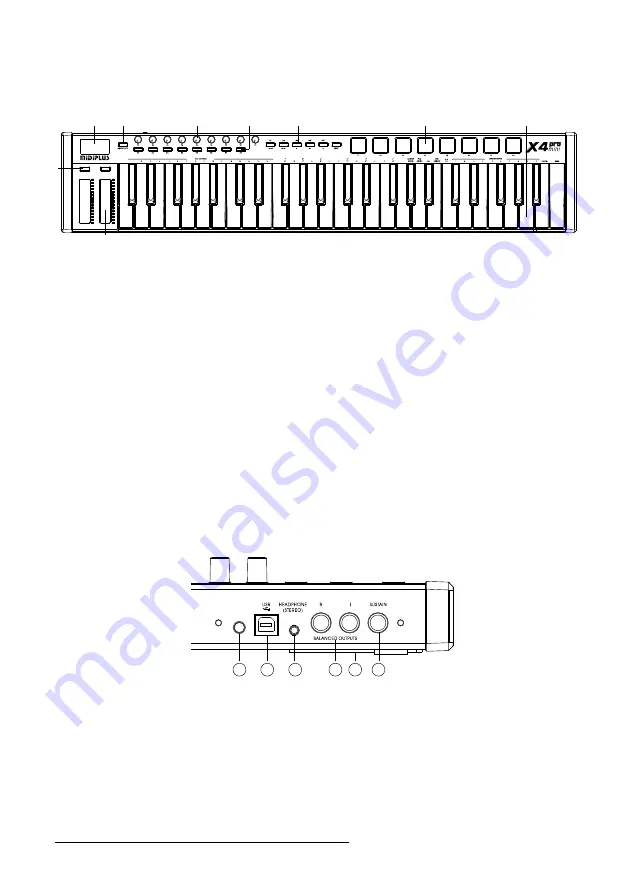
1.1 The Top Panel
1.2 The Rear Panel
①
Power Switch:
Hold to power the device on/off.
②
USB Connection:
This port provides both power, MIDI data and charge the batteries. You can use
this to connect X pro mini to your computer or external USB 5V power via USB cable.
③
Stereo Headphone Output:
Connect to headphone or active monitor.
④
Balanced Line Output:
Connect to external amplifying system or linear recording system.
⑤
Sustain Pedal Input:
The Sustain pedal input automatically detects the polarity of the pedal when
X pro mini is turned on, so it can be used with any standard pedal.
⑥
Battery Compartment:
Three nickel hydrogen batteries (AA) can be used to power this device.
Do not use alkaline batteries or carbon zinc batteries
.
②
③
⑤
⑥
⑦
⑧
⑨
①
④
3
①
Display:
Provides real time feedback of control information.
②
Octave buttons:
Activate keyboard’s pitch control.
③
Pitch & Modulation touch bar:
Control the pitch bend and modulation parameters of your
sound.
④
MIDI/SELECT button:
Enter or exit the Edit mode of the keyboard.
⑤
Knobs:
Can control the effects of the built in sounds, as well as, DAW or software instrument
parameters.
⑥
Buttons:
Store favorites of built in sounds, and control DAW or software instrument parameters.
⑦
Transport controls:
When the MMC button is activated, offers standard features to control your
DAW: Record, Play, Stop, etc., When the MMC button is deactivated, control DAW or software
instrument parameters.
⑧
Pads:
To trigger the built in percussive sounds, as well as the samples within your DAW.
⑨
Keyboard:
Trigger notes on/off, also can be used as shortcuts to access Edit more parameters.
1
3
2
4
5
6


