background image

1. The battery is not charged when shipped from the factory. Please be sure to fully 

charge it before use;

2. Do not charge in the environment below 5°C or above 40°C;

3. If the battery power is insufficient during operation, the battery power indicator will flash;

4. When the battery life of the machine becomes significantly shorter and the charging 

time becomes longer, please ask qualified personnel to replace the battery. Do not 

disassemble the machine yourself in order to avoid danger;

Place the main unit on the storage base smoothly;

Charging time: 4-6 hours

Discharge time: Up to 10 minutes for high power, about 20 minutes for medium 

power, and about 1 hour for low power.

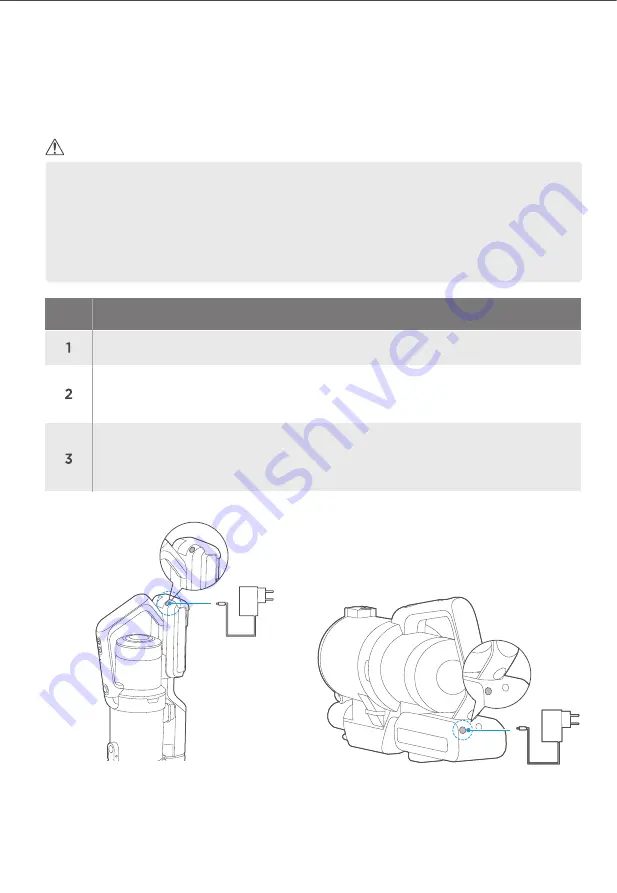
Connect one end of the power cord to the socket, and the other end to the 

charging port at the end of the battery pack of the main unit. The power 

indicator flashes. After the battery is fully charged for a period of time, the 

indicator turns off;

Functional Operation

Battery charging

Note

No.

Instructions

Summary of Contents for VCP6P

Page 1: ...This manual is for reference only the information has been carefully checked if there are any discrepancy the factory specifications shall prevail Quick Start Guide Cordless Cyclone Vacuum Cleaner VCP6P ...

Page 2: ...h When cleaning high places accessories can be installed on the extension tube Manual 2 in 1 brush Storage buckle assembly Storage base assembly Power adapter Electric floor brush Product Introduction Installation and component introduction Parts List Tips ...

Page 3: ... Whether the machine is at work or placed on a storage rack it must be handled gently to avoid damage 1 Installation of storage rack Install the storage buckle assembly and storage base as shown in the figure and place the assembled storage rack assembly vertically on the horizontal surface as shown on the right Functional Operation Installation and use of storage rack Note ...

Page 4: ...m whether the placement position is horizontal and make sure that the machine is turned off and stopped working Place the machine on the position of the storage rack gently as shown in the figure below and leave after the machine is stable Functional Operation Installation and use of storage rack ...

Page 5: ... personnel to replace the battery Do not disassemble the machine yourself in order to avoid danger Place the main unit on the storage base smoothly Charging time 4 6 hours Discharge time Up to 10 minutes for high power about 20 minutes for medium power and about 1 hour for low power Connect one end of the power cord to the socket and the other end to the charging port at the end of the battery pac...

Page 6: ... the Speed button is pressed once it enters high power LED1 and LED2 on LED3 blue when the Speed button is pressed again it enters low power LED1 and LED2 on LED3 off Battery indication when charging When LED1 or LED2 flashes the battery power is low and the battery needs charging When both LED1 and LED2 are on the battery power is full and the indicators will turn off after a period of time 1 To ...

Page 7: ...ton with one hand and take out the dust cup assembly with the other hand Dust cup cleaning Method 1 Keep the machine body vertical press the button open the lower cover of the dust cup and pour the dust Method 2 Remove the dust cup as shown in the figure above and then press the bottom cover of the dust cup to pour the dust Cleaning and Maintenance Dust cup disassembly and cleaning Note ...

Page 8: ... assembly from the dust cup assembly 3 After removing the filter assembly rotate and remove the cyclone as shown in the figure to clean it After fully drying install it back according to the disassembly steps Filter assembly Uninstall Install back Filter sponge Cyclone assembly 2 Take out the filter sponge and cyclone components in turn Cleaning and Maintenance Filter disassembly and cleaning Note...

Page 9: ...r brush Cleaning and Maintenance Disassembly and cleaning of electric floor brush 1 In order to avoid affecting the operation of the electric floor brush please clean and maintain it when the roller brush or wheels are tangled or dirty 2 Before disassembling and maintaining be sure to stop the operation of the electric floor brush 3 It is not recommended to wash the floor brush The tangled hair ca...

Page 10: ...shown in the figure below and then rotate to remove the bottom plate Pull down Cleaning and Maintenance Electric bed brush cleaning 1 When the dust blocks the air duct of the electric bed brush please use disposable chopsticks to remove it 2 Except for the bottom cover the brush can t be washed with water 3 During operation do not touch the roller brush that rotates at the bottom 4 To avoid affect...

Page 11: ...he right HEPA can be gently washed with water Do not scrub it vigorously and fully dry it before installing back according to the disassembly steps Cleaning and Maintenance Disassembly and cleaning of HEPA 1 HEPA should be completely dry before being installed 2 Do not scrub or apply brute force to the HEPA 3 When assembling please make sure that HEPA is installed in place 4 Do not continue to use...

Page 12: ......

Page 13: ......

Page 14: ...VCP6P 25 2 350W 3 9kg 244 228 1104mm ...

Reviews: