

4
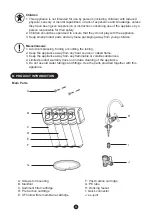
Box Contents
This product is shipped in one carton box, consisting of the following components:
1. 1 under-sink drinking water system with 4 cartridges
2. 1 coil ¼” PE tubing for inlet and outlet
3. 1 set of drinking faucet and accessories
4. 1 tee-joint with valve and quick connector
5. 1 set of screws for mounting
6. 1 booklet of User's Manual
Product Specifications
C: INSTALLATION
Model
Dimensions
Filtration flow rate
Water pressure
Water temperature
MU1649-4
350 (W) x 106 (D) x 340 (H) mm
2.3L/min @ 4 bar
1.5 - 4 bar
5-38°C
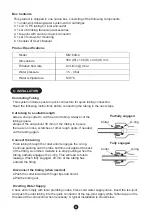
Connecting Tubing
Cut tubing to a suitable length
This system includes push-in quick connectors for quick tubing connection.
Read the following instructions before connecting the tubing in the next steps.
O-ring
Partially engaged
Collet
O-ring
Collet
Fully engaged
●Use a sharp cutter to cut the end of tubing. Always cut the
tubing square.
●Inspect the end (about 30 mm) of the tubing to be sure
there are no nicks, scratches or other rough spots. If needed,
cut the tubing again.
Push tubing through the collet until it engages the o-ring.
Continue pushing until the tube bottoms out against the back
of the fitting. A common mistake is to stop pushing when the
tubing partially engages the o-ring. This will lead to future
leakage. When fully engaged, 20 mm of the tubing has
entered the fitting.
Connect the tubing
●Push the collet inward with finger tips and hold it.
●Pull the tubing out.
Disconnect the tubing (when needed)
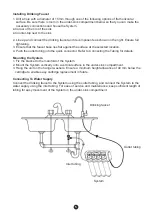
Check and comply with local plumbing codes. Close cold water supply valve, insert the tee-joint
and push the inlet tubing into the quick connector of the tee-joint. Apply white Teflon tape on the
threads at the connection when necessary. A typical installation is show below.
Diverting Water Supply


