background image

Maintenance 

MCAC-KTSM-2009-03 

22 

Heat Recovery Ventilation 

15. Maintenance 

1,  During new use stage, one should check the fan operation regularly. 

2,  The cleaning regulation for filter mesh depends on local environment. It could be clean by vacuum dirt 

exhauster or water, if heavy dust accumulates, it should use neutral detergent to clean it, and then dry it 
in shady and cool place for 20 to 30 minutes and replace it. 

3,  Clean the core at least 2 years a time by vacuum dirt exhauster to remove dust and foreign substance in 

the unit assemblies, do not touch the assemblies by exhauster and flush by water to avoid core 
damage. 

4,  Check the fan every half a year to maintain the well balance of it and check whether the axletree has 

loosed. 


16. Controller 

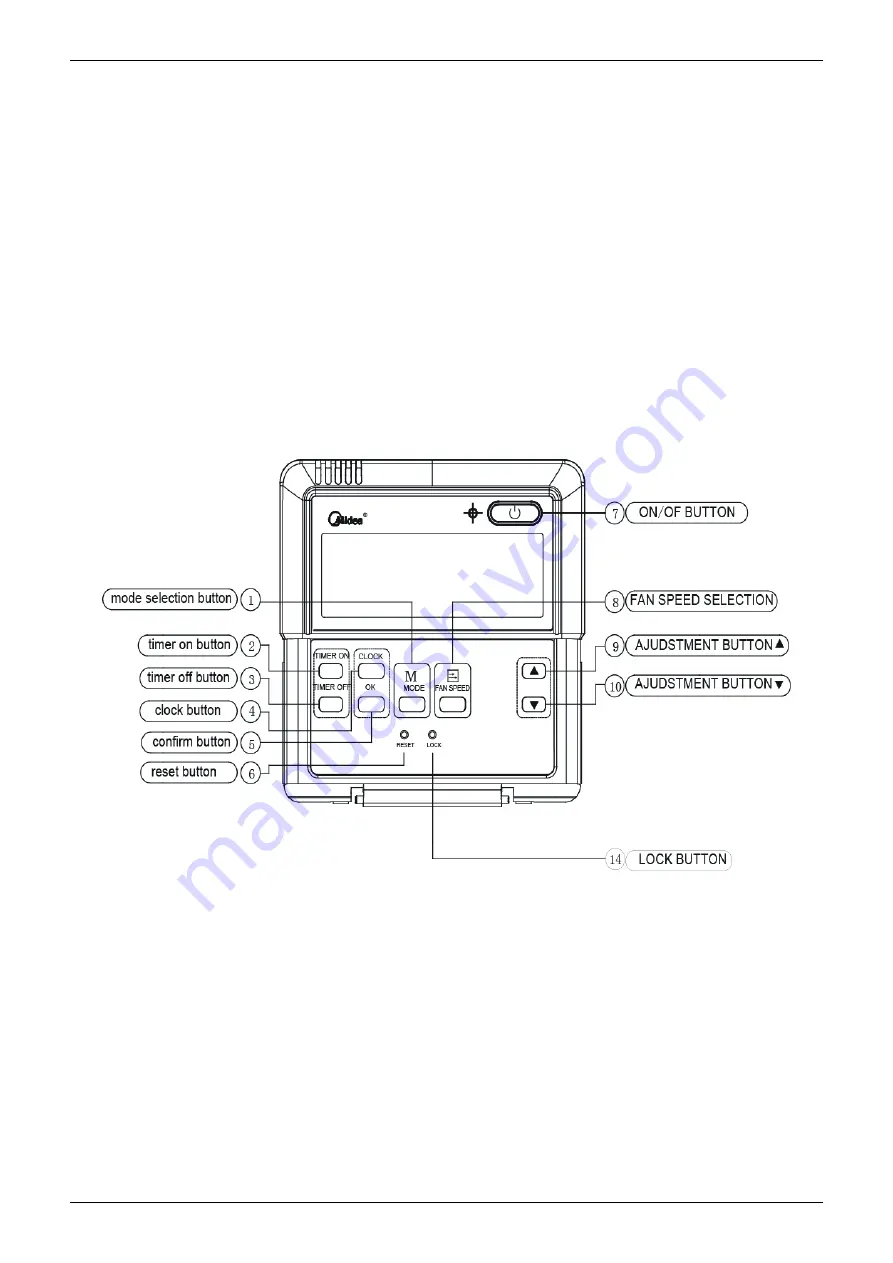
KJR-27B/E:  


The basic operation conditions of wired controller are as follows: 

1. The range of power supply voltage: the voltage input is 5V DC.   

2. Ambient temperature range: -15

~+43

3. Ambient humidity range: RH40%~RH90%. 

4. The safety certification of electric control should conform to GB4706.32-2004, GB/T7725-2004. 

Summary of Contents for HRV-1000

Page 1: ...e J K L E G L E G P c e e f F X W n d X G G H W e f E G L X H L G K L l e W H e F G E F e L f L E X Y W e G H K d L L g f X G G J e d e F c E G W P e J G E F c J Y X q L L e J P W G H I J L J e d e F c Y H L X e e f F X W G e f e E J X H e M e W g f X G G J e d e F c e e f F X I L d e G H g e J s e H I J L W J Y e d e G e e L Y e J J Y J L e X W W Y Y Mg f L P c ME f G E Y J e L f e d W J g h L E ...

Page 2: ... I 5 2 4 J K L A E F G 2 H 1 1 I 5 2 4 J K L A B3 F M 2 F 8 1 N 5 7 4 5 F 1 7 4 0 H N A B3 F M 2 F 8 1 N 5 7 4 M 7 4 0 H N A B3 F M 2 F 8 1 N 5 7 4 5 F 1 7 4 0 H N A B3 F M 2 F 8 1 N 5 7 4 M 7 4 0 H N A O 5 6 1 P 7 6 4 5 F 1 7 4 0 H N A O 5 6 1 P 7 6 4 5 F 1 7 4 0 H N A O 5 6 1 P 7 6 4 M 7 4 0 H N A O 5 6 1 P 7 6 4 M 7 4 0 H N A B3 F M 2 F 8 1 N 5 7 4 5 F 1 7 4 0 H N A B3 F M 2 F 8 1 N 5 7 4 5 F 1...

Page 3: ...Kezelési útmutató KJR 27B vezetékes távirányító Köszönjük hogy az általunk forgalmazott terméket vásárolta ...

Page 4: ...és Az időzítés törléséhez állítsa 0 0 ra az értéket 3 Kikapcsolási időzítés A kikapcsolási időzítés beállításához többször nyomja meg a gombot A gomb minden megnyomásakor 0 5 órával nő az időzítés Amikor eléri a 10 órát minden gombnyomáskor 1 órával nő az időzítés Az időzítés törléséhez állítsa 0 0 ra az értéket 4 Óra gomb Alap esetben az órát mutatja 12 00 a feszültség alá helyezéskor Ha a gombot...

Page 5: ...vagy MAGAS A gomb minden megnyomásakor az alábbi sorendben változik a ventilátor sebesség 9 Beállítás gomb Ezt óra beállításkor használjuk Nyomja meg a gombot az érték nő 10 Beállítás gomb Ezt óra beállításkor használjuk Nyomja meg a gombot az érték csökken 11 Zárolás gomb rejtett Egy 1mm átmérőjű pálcával nyomja meg a LOCK gombot a zárolás bekapcsolásához a gomb újbóli megnyomásávan oldhatja azár...

Page 6: ...van beállítva az OFF ikon látható Ha kikapcsolási és bekapcsolási időzítés is be van állítva az ON és OFF ikonok egyidejűleg láthatók 16 4 Automatikus üzemmód Kapcsolja be a készüléket az ON OFF gombbal Az üzemmód kiválasztó gombbal válassza az AUTO üzemmódot Automata üzemmódban a ventilator sebesség nem szabályozható mert azt az automatika állítja be 16 5 Hővisszanyerő beszívás üzemmód Kapcsolja ...

Page 7: ...pipes can not be grounded if hard vinyl pipes are used Telephone grounded and lightning rods the ground potential when struck by lightning gets extremely high Do no turn on the power supply wiring interrupter or ground fault circuit interrupter until all other work is done Tightening torque for the terminal screws Use the correct screwdriver for lighting the terminal screws If the blade of screwdr...

Page 8: ...g Diagrams 9 8 Electric Characteristics 10 9 Operation Condition Limits 11 10 Exploded View 11 11 Pressure Chart for Air Volume 13 12 Installation 15 13 Wiring 17 14 Troubleshooting 19 15 Maintenance 22 16 Controller 22 17 Accessory 25 Manufacture reserves the right to discontinue or change at any time specifications or designs without notices and without incurring obligations ...

Page 9: ...1 HRV 200 200 666 264 580 22 220V 1Ph 50Hz 2 HRV 300 300 744 270 599 23 220V 1Ph 50Hz 3 HRV 400 400 744 270 804 30 220V 1Ph 50Hz 4 HRV 500 500 824 270 904 35 5 220V 1Ph 50Hz 5 HRV 800 800 1116 388 884 57 5 220V 1Ph 50Hz 6 HRV 1000 1000 1116 388 1134 59 220V 1Ph 50Hz 7 HRV 1500 1500 1500 540 1200 160 380V 3Ph 50HZ 8 HRV 2000 2000 1550 540 1400 175 380V 3Ph 50HZ External appearance HRV 200 300 400 5...

Page 10: ... outdoor air acquire heating from air exhaust to increase temperature that is to say it realizing the energy recovery during air exhaust process to exchange the heating in heat exchanged core to outdoor air Energy saving Fresh air and exhaust air are crossed through the exchanger Temperature exchange was happened in the heat recovery ventilator Fresh air can beget a great deal of energy from exhau...

Page 11: ... 5 1 5 3 Indoor fan motor Speed r min 1050 1050 1150 material ABS ABS ABS Type Centrifugal fan Centrifugal fan Centrifugal fan Diameter mm Φ146 Φ195 Φ195 Indoor fan Height mm 104 90 90 Indoor air flow m 3 h 200 300 400 Indoor external static pressure Hi Pa 75 75 80 Indoor sound level sound pressure level dB A 27 30 32 Dimension W H D mm 666 264 580 744 270 599 744 270 804 Packing W H D mm 968 456 ...

Page 12: ...n motor Speed r min 1250 1350 1150 material ABS ABS ABS Type Centrifugal fan Centrifugal fan Centrifugal fan Diameter mm Φ205 Φ246 Φ246 Indoor fan Height mm 140 203 203 Indoor air flow m 3 h 500 800 1000 Indoor external static pressure Hi Pa 80 100 100 Indoor sound level sound pressure level dB A 35 39 40 Dimension W H D mm 824 270 904 1116 388 884 1116 388 1134 Packing W H D mm 1126 462 1159 1418...

Page 13: ...or uF Indoor fan motor Speed r min 1350 1350 material metal metal Type Centrifugal fan Centrifugal fan Diameter mm Φ252 Φ252 Indoor fan Height mm 225 233 Indoor air flow m 3 h 1500 2000 Indoor external static pressure Hi Pa 160 170 Indoor sound level sound pressure level dB A 51 53 Dimension W H D mm 1500 540 1200 1550 540 1400 Packing W H D mm 1672 1372 716 1722 1572 716 Indoor unit Net Gross wei...

Page 14: ... HRV 500 HRV 800 HRV 1000 Model L L1 W W1 W2 H C G N N2 HRV 300 744 675 599 657 315 270 100 19 Φ144 111 HRV 400 744 675 804 862 480 270 100 19 Φ144 111 HRV 500 824 754 904 960 500 270 107 19 Φ194 111 HRV 800 1116 1045 884 940 428 388 85 19 Φ242 170 HRV 1000 1116 1045 1134 1190 678 388 85 19 Φ242 170 ...

Page 15: ...Dimension MCAC KTSM 2009 03 8 Heat Recovery Ventilation 5 3 HRV 1500 5 4 HRV 2000 ...

Page 16: ...MCAC KTSM 2009 03 Maintenance Space Heat Recovery Ventilation 9 6 Maintenance Space 7 Wiring Diagrams 7 1 HRV 200 HRV 300 HRV 400 HRV 500 HRV 800 HRV 1000 ...

Page 17: ...98 242 0 625 15 0 02 0 5 HRV 300 50 220 198 242 0 7 15 0 04 0 56 HRV 400 50 220 198 242 1 25 15 0 08 1 HRV 500 50 220 198 242 1 25 15 0 12 1 HRV 800 50 220 198 242 2 5 15 0 36 2 HRV 1000 50 220 198 242 3 15 0 36 2 4 HRV 1500 50 380 342 418 4 15 0 9 3 2 HRV 2000 50 380 342 418 4 5 15 1 1 3 6 Remark MCA Min Current Amps A MFA Max Fuse Amps A FLA Full Load Amps A KW Rated Motor Input kW IFM Indoor Fa...

Page 18: ...View 10 1 HRV 200 HRV 300 HRV 400 HRV 500 HRV 800 HRV 1000 No Part Name Quantity No Part Name Quantity 1 Heat exchange core 1 4 8 Pole 4 2 1 Fan 2 4 9 Power supply wire 1 2 2 Volute shell 2 5 Wire joint ass y 1 3 1 Fan Motor 2 6 Display board ass y 1 3 2 Motor capacitor 2 7 Temp sensor 1 4 E part box ass y 1 8 Room temp sensor ass y 1 4 1 Installation board 1 9 Wire controller 1 4 2 Main control b...

Page 19: ... 1 14 Yellow wire 1 1 3 Wire joint 1 1 15 Connect wire 1 1 4 AC contactor 2 1 16 Pole 4 1 4 Contactor rail 1 2 Heat exchange core 2 1 5 Transformer 1 3 4 Fan Motor 2 1 6 Main control board ass y 1 5 Wire joint ass y 1 1 7 Wire joint 4p 1 6 Display board ass y 1 1 8 Fixing board 1 7 Temp sensor 1 1 9 Signal wire 1 8 Room temp sensor ass y 1 1 10 Connect wire 1 9 Wire controller 1 1 11 Signal wire 1...

Page 20: ... pressure Pa 120 105 90 75 60 45 30 15 250 260 0 3 Air volume m h 330 320 310 300 290 External static pressure Pa 120 105 90 75 60 45 30 15 340 350 0 360 HRV 400 HRV 500 3 Air volume m h 600 550 500 450 400 External static pressure Pa 120 105 90 75 60 45 30 15 650 0 350 300 3 Air volume m h 700 650 600 550 500 External static pressure Pa 120 105 90 75 60 45 30 15 750 0 450 400 ...

Page 21: ...0 800 750 3 Air volume m h External static pressure Pa 160 140 120 1 80 60 40 20 180 200 1150 1100 1050 1000 950 1200 900 0 HRV 1500 HRV 2000 3 Air volume m h External static pressure Pa 160 140 120 1 80 60 40 20 180 200 0 1950 1850 1750 1650 1550 2050 1450 2150 1350 3 Air volume m h External static pressure Pa 160 140 120 1 80 60 40 20 180 200 0 2400 2300 2200 2100 2000 2500 1900 2600 1800 ...

Page 22: ...ause vibration and unusual operating noise c Do not install the unit directly against a ceiling or wall If the unit is in contact with the ceiling or wall it can cause vibration d Where sufficient clearance for maintenance and service can be ensured Caution Install the units power supply wiring and connecting wires at least 1 meter away from televisions or radios in order to prevent image interfer...

Page 23: ...r woodworker if necessary 4 Install the suspension bolts Use M10 to M12 suspension bolts Use a hole in anchor sunken insert anchor for existing ceilings or other parts to be procures in the field to reinforce the ceiling to bearing the weight of the unit 5 Install vibration damping feet For vibration damping 12 4 Installation the Unit 1 Before installation please confirm all external parts are sta...

Page 24: ...one grounded and lightning rods The ground potential when struck by lightning gets extremely high Do no turn on the power supply wiring interrupter or ground fault circuit interrupter until all other work is done Tightening torque for the terminal screws Use the correct screwdriver for lighting the terminal screws If the blade of screwdriver is too small the head of the screw might be damaged and ...

Page 25: ...eat Recovery Ventilation 13 3 System connection diagram Caution 1 Never turn screws too tightly or else the cover would be dented or the Liquid Crystal breaks 2 Please leave enough space for maintain and upkeep the wire controller ...

Page 26: ...hes No Operation lamp Timer lamp Defrosting lamp Alarm lamp Explanation 1 T4 sensor error 2 T1 sensor error 3 Current protection 4 Phase absent phase error Note Light Extinguish Slow flash Quick flash T1 temp sensor site at the return air cavity T4 temp sensor site at the outdoor air inlet cavity ...

Page 27: ...whether the wiring of the temp sensor is break off Connect the wiring well Yes No Check whether the resistance of temp sensor is wrong refer to the Annex 1 Yes Replace temp sensor No Replace main controller panel Current protection Check whether the current reach 5A Turn off all motors and restart 3 minutes later Yes No Check the main controller panel ...

Page 28: ...phase error Check whether Lack of phase Connect it well No Check the connection between power supply and terminal is the voltage in outdoor terminal is 3 phase Yes Change the order of two of the wires to power supply Switch on the unit again If the problem can not be solved the main controller panel is defective ...

Page 29: ...e core at least 2 years a time by vacuum dirt exhauster to remove dust and foreign substance in the unit assemblies do not touch the assemblies by exhauster and flush by water to avoid core damage 4 Check the fan every half a year to maintain the well balance of it and check whether the axletree has loosed 16 Controller KJR 27B E The basic operation conditions of wired controller are as follows 1 ...

Page 30: ...te When set clock or alter clock setting must push the confirm button to complete the setting 5 Confirm button The button is used at the state of CLOCK adjustment After select the time push the button to confirm then exit the current clock will display 6 RESET button hidden Use a small stick with a diameter of 1mm to push the RESET button to cancel the current settings and get into the condition o...

Page 31: ...e buttons are invalid except for LOCK button 4 CLOCK display Usually display the clock set currently Press the button CLOCK for 4 seconds the HOUR part will flash press button and to adjust HOUR Press the button CLOCK again the minute part flash press button or to adjust MINUTE After clock set or clock operation it must press CONFIRM to complete the set 5 TIMER ON OFF display Display ON at the sta...

Page 32: ...2 2438 20 12 6431 47 3 8867 6 49 3161 21 12 0561 48 3 7348 5 46 5725 22 11 5 49 3 5896 4 44 23 10 9731 50 3 451 3 41 5878 24 10 4736 51 3 3185 2 39 8239 25 10 52 3 1918 1 37 1988 26 9 5507 53 3 0707 0 35 2024 27 9 1245 54 2 959 1 33 3269 28 8 7198 55 2 8442 2 31 5635 29 8 3357 56 2 7382 3 29 9058 30 7 9708 57 2 6368 4 28 3459 31 7 6241 58 2 5397 5 26 8778 32 7 2946 59 2 4468 6 25 4954 33 6 9814 60...

Reviews: