4
INSTRUCTIONS FOR USE
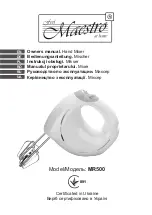
Kitchen machine
1
3
2
4
6
5
Always
make
sure
mixer
is
unplugged
and
setting
control
is
set
to
OFF
(
0
).
Press the head of the mixer, then
release the lock lever right.
Tilt mixer head up, then, lock the
lever left.
Place bowl in bowl base and turn
clockwise until bowl locks into
place.
Release the lock lever right, press
down the head of the mixer.
Then lock the lever left.
Slide the bowl lid.
Insert attachment onto output
shaft and press upward as far
as possible. Turn the attachment
counterclockwise, hooking
attachment over pin on shaft.
12
3
11
Select desired speed.
control to Off(0).
Unplug from outlet.
Slide out the bowl lid.
7
7
10
3
7
9
8
Plug mixer into wall outlet.