background image

GROUNDING AND  BONDING

NOTE: 

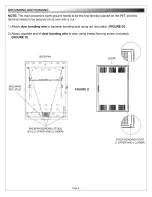
The  main  protective earth  ground  needs to  be the first terminal  placed  on the  PET and  this 

terminal  needs to be secured  on  its own with  a  nut.

1) Attach 

door bonding wire 

to  backpan  bonding  stud  using  nut (included). 

(FIGURE  D)

2) Attach  opposite end  of 

door bonding wire 

to door using thread forming  screw  (included). 

(FIGURE  D)

BACKPAN

10-32  (2  UPPER AND 2  LOWER)

FIGURE  D

(1  UPPER AND  1  LOWER)

Page 4

Summary of Contents for HDR Series

Page 1: ...hank you for purchasing the HDR Series Please read these instructions thoroughly before installing assembling this product PRODUCT FEATURES Innovative low profile parallel to the wall design Reversible hinged door includes lock and padlockable latch for added security Ideal for mounting patch panels switches hubs and routers Middle Atlantic Products I 00036 Rev E ...

Page 2: ...e weight of the cabinet fully loaded with equipment CAUTION Some parts of the enclosure system may not be effectively bonded to the Protective Earth Terminal PET If these parts need to be bonded to the PET it should be done in accordance with Article 250 of the National Electrical Code CAUTION Power cord s for fans or other accessories need to be secured to ensure that they are routed away from pi...

Page 3: ...URE A 2 To reverse the door orientation if required remove the door and lock latch hardware as shown FIGURE B 3 Reinstall the door and hardware on the opposite side FIGURE B HINGE STAYS ON DOOR 4 To reverse electrical box side if required remove as shown and install on the opposite side FIGURE C FIGURE C Page 2 ...

Page 4: ...r contain or are provided with bonding points for connection to the backpan PET Protective earth and bonding connections shall be in accordance with Article 250 of the National Electric Code OPTIONAL PROTECTIVE EARTH TERMINAL KIT PET K HDR PARTS LIST Door bonding wire 12 Gauge Wire 10 32 ring terminal to 10 32 ring terminal Flange Nut 1 4 20 Locking Nut 10 32 QTY 2 1 2 Page 3 ...

Page 5: ...ET and this terminal needs to be secured on its own with a nut 1 Attach door bonding wire to backpan bonding stud using nut included FIGURE D 2 Attach opposite end of door bonding wire to door using thread forming screw included FIGURE D BACKPAN 10 32 2 UPPER AND 2 LOWER FIGURE D 1 UPPER AND 1 LOWER Page 4 ...

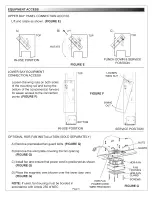
Page 6: ... F TOP LOOSEN WING NUT FIGURE F SWING OUT BOTTOM IN USE POSITION SERVICE POSITION OPTIONAL HDR FAN INSTALLATION SOLD SEPARATELY A Remove preinstalled fan guard bolts FIGURE G B Remove the solid plate covering the fan opening FIGURE G C Install fan and ensure that power cord is positioned as shown FIGURE G D Place the magnetic vent blocker over the lower door vent FIGURE G NUTS GUARD NOTE If used f...

Page 7: ...IES OF ANY KIND EITHER EXPRESSED OR IMPLIED INCLUDING BUT NOT LIMITED TO IMPLIED WARRANTIES OF MERCHANTABILITY AND FITNESS FOR A PARTICULAR PURPOSE TO THE MAXIMUM EXTENT PERMITTED BY APPLICABLE LAW IN NO EVENT SHALL THE COMPANY BE LIABLE FOR ANY SPECIAL INCIDENTAL INDIRECT OR CONSEQUENTIAL DAMAGES WHATSOEVER INCLUDING WITHOUT LIMITATION DAMAGES FOR LOSS OF BUSINESS PROFITS BUSINESS INTERRUPTION OR...

Reviews: