ScanMaker i300 Installing and Getting Started 9
In the preview window, you can resize the scan frame (floating dotted line) around
the image by dragging on the edge or corner of the scan frame to determine the
final size of the actual scan.
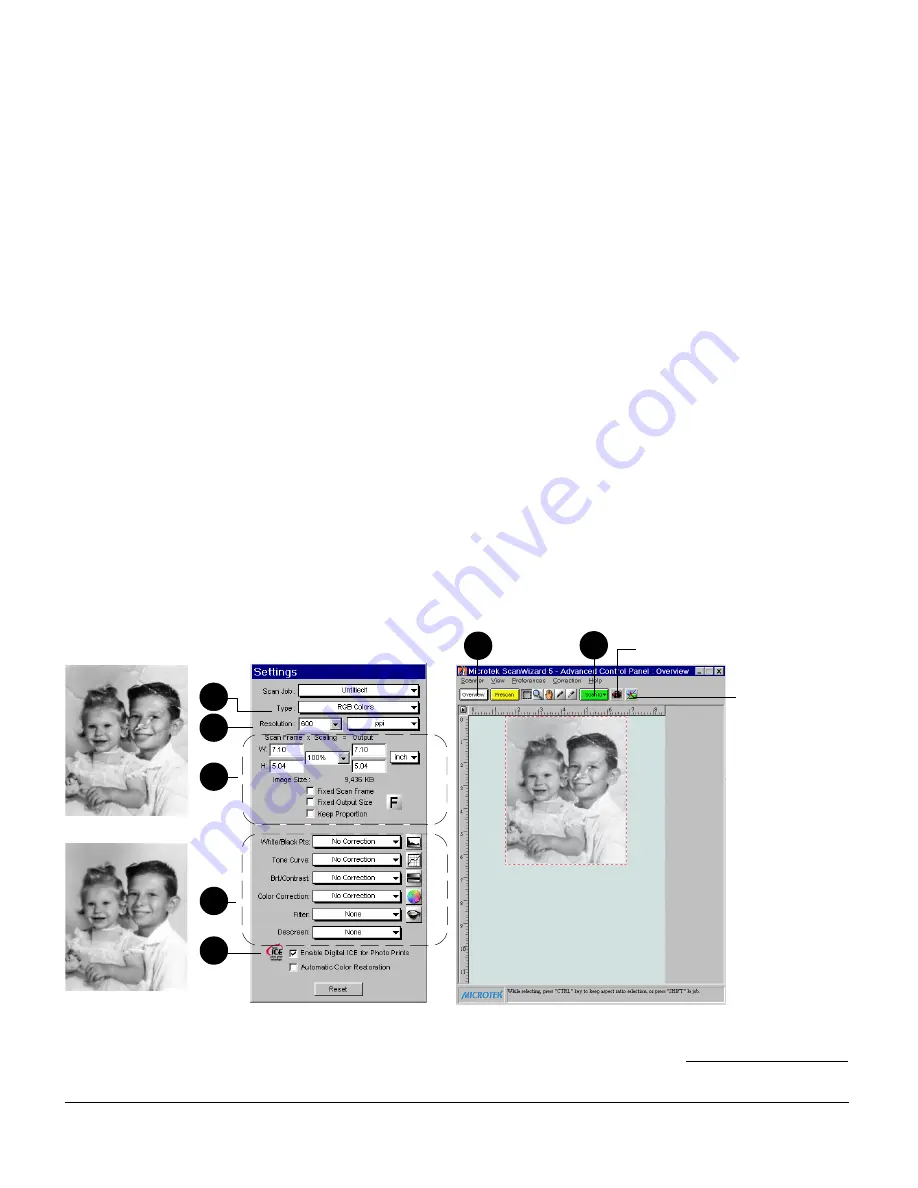
5. Specify your scanning requirements in the Settings window when the ScanWizard
5 Advanced Control Panel appears.
a) Select RGB Colors/RGB Color (48-bit) or Gray Scale/Gray Scale (16-bit) in
the Type pull-down menu as your image output type.
b) Select a desired resolution in the Resolution pull-down menu for your image
output resolution.
c) Adjust the scan frame settings if necessary.
6. If necessary, adjust image quality using the image corrections tools (White/Black
Points, Tone Curve, Brightness/Contrast, Color Correction, Filter, and Descreen).
Important: The Descreen setting in the Settings window should be “None.”
Otherwise the “Enable Digital ICE for Photo Prints” option in the next step will be
dimmed and will not be available for selection.
7. Click to check the “Enable Digital ICE for Photo Prints” option.
8. Click the Scan to button to scan the image. After the scan, defects such as dust,
scratches, cracks, creases, rips, folds and other artifacts on the original image are
all removed, resulting in an improved image.
Depending on your selection, the scanned and processed image can be saved to a
file, opened in an image-editing program, sent to a printer, attached in an e-mail, or
uploaded to a website.
Note: When
executing the
Digital ICE
function, a message
will prompt you to
increase your
virtual memory and
preferred memory
size if your current
memory allocation
is insufficient.
Note: Microtek is always working to enhance ScanWizard 5. For the most recent
version of ScanWizard 5 with the latest enhancements, visit www.microtekusa.com
and download the most current driver.
Before
After
Switch icon
Switches to
the Standard
Control
Panel
8
5a
5b
5c
6
7
4
Scan Material icon


