background image

8     ScanMaker i300 Installing and Getting Started

B. Scanning Damaged Photos

When scanning damaged photos with the Digital ICE feature, take note that Digital
ICE is designed to work with continuous-tone reflective originals such as photos; it is
not designed to work with slides, transparencies, negatives, and printed matter.

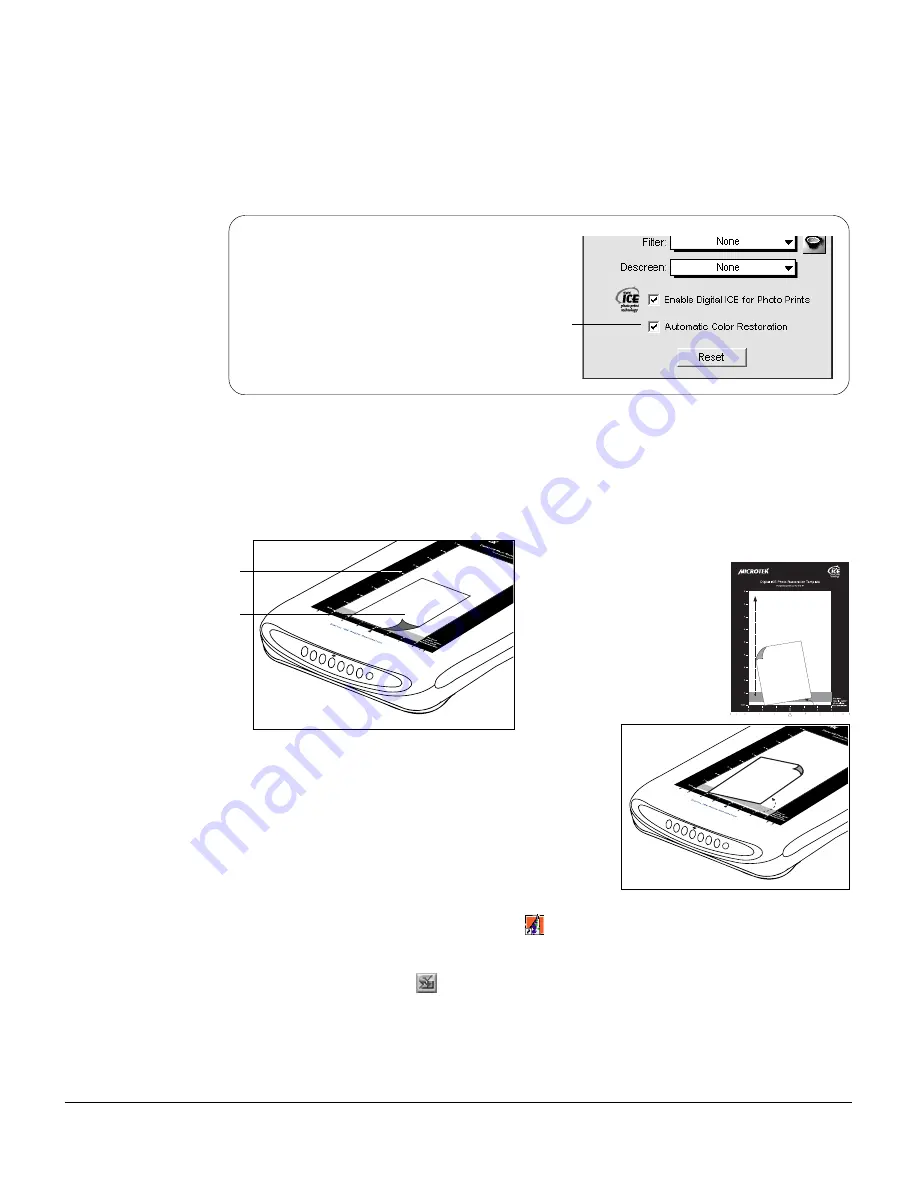
While Digital ICE fixes damaged photos,
ScanWizard 5 also has the Automatic
Color Restoration
 feature for bringing
color-faded photos back to life. This
feature is for Windows and Mac OS X
only; see other printed material included in
your scanner package for more details.

1. Raise the scanner lid, and place the template marked "Digital ICE Photo

Restoration Template" on the scanner bed.  Position the damaged photo within
the cut-out area of the template, with the photo placed face down on the scanner
bed.  Photo prints up to 6" x 9" in size can be accommodated within the template
area.

Place photo here for

photo restoration

Template

Direction of 
carriage moving 

Note: If the creases lie in the same direction
where the carriage is moving, the creases may
not be detected by the scanner. To fix this
problem, position your photo slightly skewed
(min. 10°, max. 45°), so that none of the
creases are parallel to the direction of the
moving carriage.

2. Double-click the ScanWizard 5 icon (

) on your desktop to launch the

ScanWizard 5 Standard Control Panel.

3. Click the Switch icon (

) on the right corner of the Standard Control Panel to

switch to Advanced Control Panel.

4. Click the Overview button to perform a preliminary view of the entire image.

When done, you will see an image appear in the preview window.

Summary of Contents for ScanMaker i300

Page 1: ...s For details on how to use the scanner buttons and how to configure the parameters for each button refer to the last page of this document and additionally to the online help of the Microtek Scanner...

Page 2: ...rayscale approx 65 536 shades of gray Scanning Area 8 5 x11 7 216mmx297mm Resolution Optical 4800 dpi x 2400 dpi Interpolated 65 535 dpi Dimensions L x W x H 19 x11 5 x2 3 483mmx294mmx60mm Weight 5 7...

Page 3: ...rd 5 Quick Reference Guide and other inserts Step 2 Unlocking the Scanner 1 With the scanner power off turn the scanner on its side to see the locking screw at the bottom of the scanner 2 Using a coin...

Page 4: ...CD ROM included in your scanner package 6 Restart your computer For Macintosh Users 1 Turn on your computer 2 Install the image editing software application which is on a separate CD ROM included in y...

Page 5: ...a Hi Speed USB card that works properly in your computer For more details on how to install the Hi Speed USB card in your computer please refer to the documentation that came with your Hi Speed USB c...

Page 6: ...the scanner the light on the scanner s front panel will illuminate and stay lit Your system will detect the scanner automatically For PC users with a built in USB port For Macintosh users the USB por...

Page 7: ...r on the scanner 2 Double click the ScanWizard 5 icon on your desktop to launch the ScanWizard 5 Standard Control Panel When ScanWizard 5 launches it automatically performs a fast preview of the mater...

Page 8: ...Position the damaged photo within the cut out area of the template with the photo placed face down on the scanner bed Photo prints up to 6 x 9 in size can be accommodated within the template area Pla...

Page 9: ...ise the Enable Digital ICE for Photo Prints option in the next step will be dimmed and will not be available for selection 7 Click to check the Enable Digital ICE for Photo Prints option 8 Click the S...

Page 10: ...image and sends it to your printer transforming your scanner and printer into a convenient copy station Simply specify the number of copies you want E mail Scans the image and delivers it directly to...

Reviews: