Microtek LS-3700 User Manual Download Page 12

12     LS-3700 User's Manual

Note

: When you have a need to spin Elevating Knobs and to rise up black

pedestals from the ground, follow the steps below:

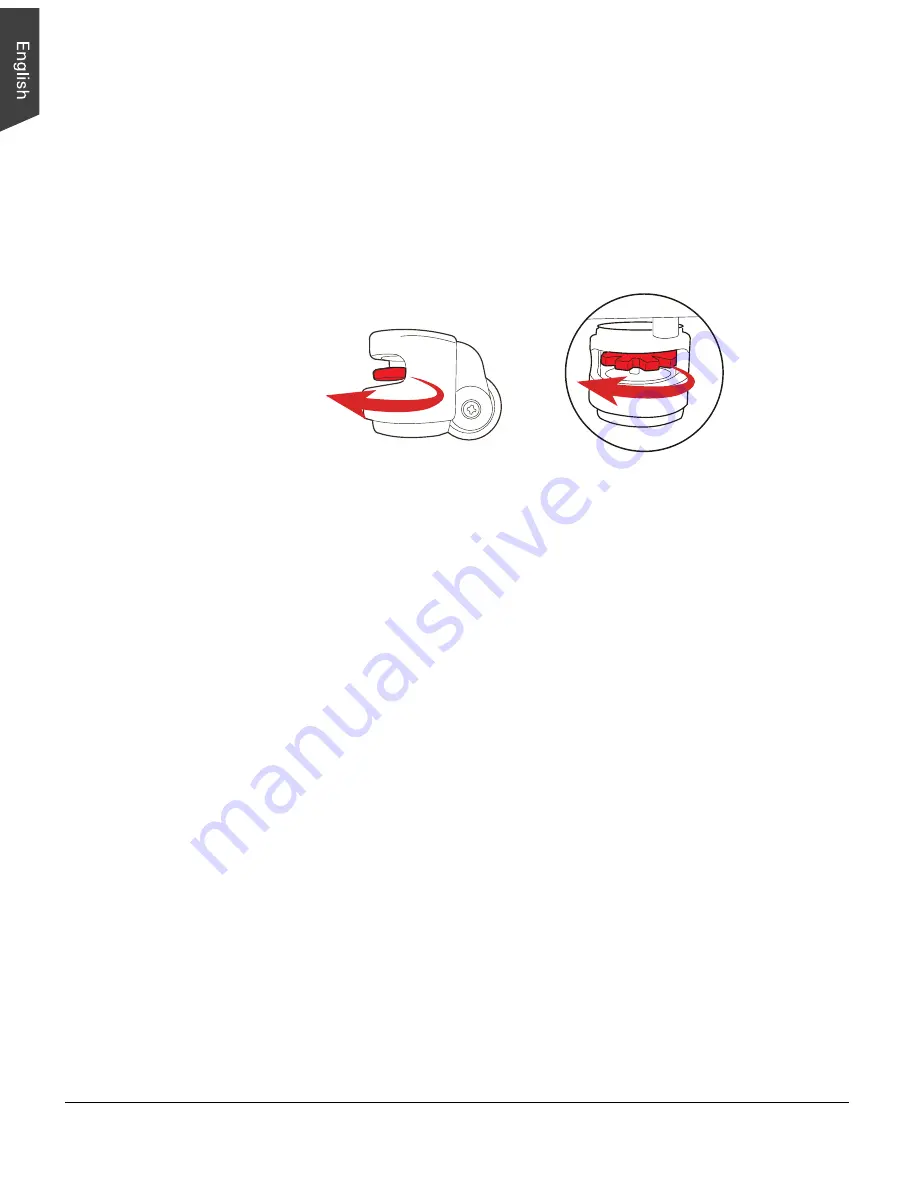
1. Spin the red gear of the Elevating Knob counterclockwise to rise up the black

pedestal located at bottom.  Continually, spin the red gear until the black

pedestal is fully raised from the ground.

2. Repeat the step 1 until four black pedestal have been moved up from the

ground.

Spin the Elevating Knob counterclockwise until

the black pedestal is moved up from the ground.

Summary of Contents for LS-3700

Page 1: ...www microtek com User s Manual A1 Large Format Scanner...

Page 2: ...roperty of their respective holders Specifications software and hardware bundles are subject to change without notice Not responsible for typographical errors Disclaimer The contents of this manual ha...

Page 3: ...ise if you pull the cable only it may damage the core wire and result in fire or electric shock Place and route the power supply cord such that it is not likely to be walked on or pinched by items pla...

Page 4: ...damage to users or equipment When opening or closing the upper cover of the scanner please use it carefully and watch out for pressing your hands Maintenance and Service When the scanner is going to b...

Page 5: ...ting the Scanner 14 Scanning the Materials 15 Positioning the Materials 15 Using ScanWizard LS USB Software 16 Understanding ScanWizard LS USB Further 18 Launching ScanWizard LS USB 18 Exiting ScanWiz...

Page 6: ...Manual The Window Menu 27 Open a Window 27 Tools Window 28 Advanced ToolBox Window 29 The About Menu 31 User s Manual 31 Cleaning the Glass Surface 32 Maintenance 32 Appendix 33 Troubleshooting 33 Sp...

Page 7: ...zingly With its stable performance the image quality will remain consistent even after used for a certain period of time Elevating Knobs There are four Elevating Knobs at the bottom of LS 3700 which e...

Page 8: ...iginal is positioned 4 Indicator Green Displays the status of the scanner 5 Safety Locks 2 Locks the scanner cartridge 6 Power Connector Connects the scanner to the power adapter 7 Power Button Turns...

Page 9: ...User s Manual 9 Initiate Setup Step 1 Unpacking Package Contents After unpacking your scanner package please check for the major components listed below Scanner Hi Speed USB cable Power cord Software...

Page 10: ...reen instructions to install the driver and software Note If the Microtek Software Installer screen does not come up automatically double click the following in succession My Computer the CD DVD ROM i...

Page 11: ...and locate the Elevating Knobs next to the four casters at the bottom of the scanner 2 Spin a red gear of the Elevating Knob clockwise to move down a black pedestal located at the bottom of the Eleva...

Page 12: ...ed gear of the Elevating Knob counterclockwise to rise up the black pedestal located at bottom Continually spin the red gear until the black pedestal is fully raised from the ground 2 Repeat the step...

Page 13: ...rce b Turn counterclockwise Unlocked Locked Note If you have to transport the scanner you will need to lock the scanner back Follow the steps below 1 Turn off the scanner if your scanner is on Make su...

Page 14: ...the other end of the power cord into a power source 3 Press the Power button to turn the scanner on When the scanner is on the power button light the green power light will be turned on as well To the...

Page 15: ...of hinges used to unite the upper cover and scanner s main unit can be increased or decreased based on the demands of users The maximum numbers are up to 6 sets If you have special requirements towar...

Page 16: ...te If you want to cancel the action of the Preview command press the Esc button on the keyboard 4 If necessary click the Scan Frame tool button to adjust the size of the scan frame enclosed within the...

Page 17: ...l 17 7 Click the Scan button to start scanning The material will be scanned and delivered to the directory where you specify Note If you want to cancel the action of the Scan command press the Esc but...

Page 18: ...unctions of ScanWizard LS USB software further and better then you would be able to manipulate it more conveniently Launching ScanWizard LS USB To launch ScanWizard LS USB double click the ScanWizard...

Page 19: ...ntrol and dominate your scanner Elements on the Main Control Panel A B C D E F G H I J A Menu bar Includes Files Scanner Window and About options menu B Select Frame button Used to select and adjust t...

Page 20: ...nerate a preliminary scanned image G Scan to Save button Clicks to perform the final scan of the original and save the scanned image to your chosen folder H Minimize button Clicks to minimize ScanWiza...

Page 21: ...e removed immediately from the screen Magnify Button The Magnify button lets you magnify zoom in the partial area of a scanned image to inspect the quality for after scan image To magnify click the Ma...

Page 22: ...isplays the preview image on the preview window To cancel a preview action please click the Esc button on the keyboard Preview area Scan to Save Button The Scan to Save button scans the images from yo...

Page 23: ...m will be attached afterward 3 File format This menu box lets you select a file format when saving a file The supported format includes JPEG BMP and TIFF If JPEG is selected as your file format you ar...

Page 24: ...ings such as resolutions color modes saturation and brightness as a template when performing a scan job The saved template can be loaded at a later time when scanning the same kind of the images To us...

Page 25: ...tness helping you to save time on doing tedious and repetitious settings and improving work efficiency To use the Load Scanning Settings command 1 Click the Files menu and then select Load Scanning Se...

Page 26: ...al number the driver version and the total scanning times Restore the Default Settings This command cancels the current settings used for the scanned image and retrieve the default values of factory s...

Page 27: ...to practice such as color level contrast saturation and calibration which are designed for the professional users in order to satisfy with their specific demands If you like to restore the values of...

Page 28: ...odes Select a desired image output type from a drop down menu Select Color 24 bits to scan the image in color Select Gray 8 bits to scan the image in gray Scan Type Select a desired image input type f...

Page 29: ...iately Level Adjustments Gamma Drag the slider left or right to adjust Gamma values of images Black White Levels Drag the slider left or right to adjust the dark or light levels of images Brightness C...

Page 30: ...ater when a scan job with a same value of scanning settings is performed again This mode eliminates calibration time and therefore enhances the scanning speed when you often scan materials sharing sam...

Page 31: ...related information about the ScanWizard LS USB scanning software and its supported website User s Manual When this option is selected a folder will appear on the screen In the folder you can find use...

Page 32: ...free cloth to gently wipe the glass surface area on the scanner s flatbed Maintenance After usage for a period of time the parts inside your scanner such as the light source may become worn out and a...

Page 33: ...e from your computer and refer to the installation instructions in this document 3 When trying to scan an error message appears on your screen that reads Can t Find Scanners Make sure your scanner is...

Page 34: ...B 2 0 Dimensions L x W x H 52 4 x 34 3 x 28 3 1330 mm x 870 mm x 720 mm Upper cover is not included Weight 374 lbs 170 kg Voltage AC 100V to 240V 50 60 Hz 1 7A Max Input Environment Operating temperat...

Reviews: