background image


LVS-7510 Integrated System Installation and Quick Start Guide for Zebra Printers


LVS-7510 Integrated System Installation and Quick Start Guide for Zebra Printers 

Page 8 of 16


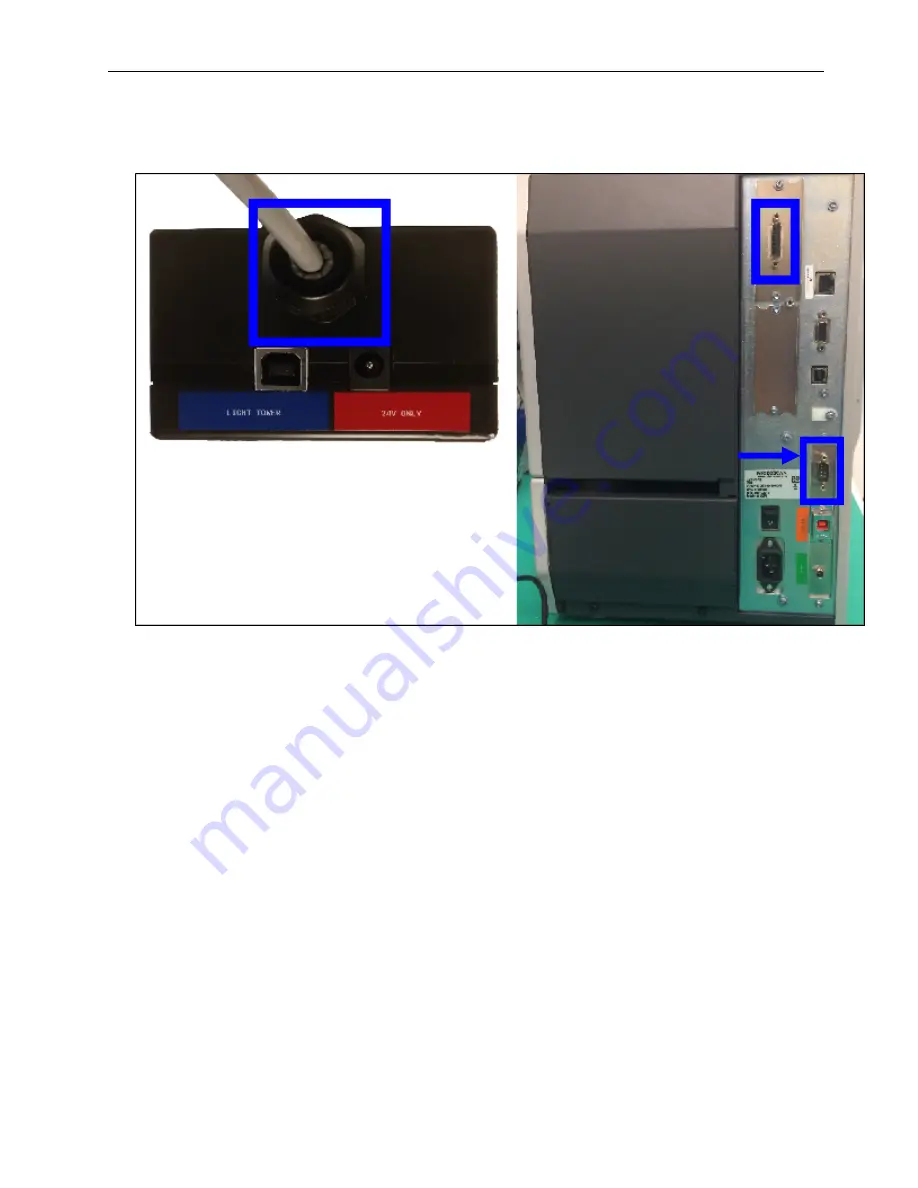
7.  The 15-pin DB connector (connector shown below) is attached to the light tower. Connect the other end of 

the connector to the printer. For the Peel and Present option, connect the other 9-pin DB connector cable 
from the light tower to the mating DB connector on the back of the printer, as shown here. 


8.  The printer and computer cables are connected. Proceed to the next section.  


Peel and Present 
option only. 

Summary of Contents for LVS 7510

Page 1: ...P N 84 9320003 02 Rev D LVS 7510 Integrated System Installation and Quick Start Guide for Zebra Printers ...

Page 2: ... state herein that we are using the names to the benefit of the trademark owner with no intention of infringement GS1 Solution Partner Disclaimer The information and specifications described in this manual are subject to change without notice Latest Manual Version For the latest version of this manual see the Download Center on our web site at www microscan com Technical Support For technical supp...

Page 3: ... Zebra Printers Page 3 of 16 Table of Contents Safety Instructions 4 Important Information 4 Step 1 Inspect System Components 5 Step 2 Connect the Cables 6 Step 3 Install and Mount the Light Tower 9 Step 4 Printer Media Setup 15 Step 5 Log On to LVS 7510 Integrated System Software 15 Appendix A LVS 7510 Integrated System Preventive Maintenance 16 ...

Page 4: ...can be stepped on If the AC power cord becomes damaged or frayed replace it immediately Avoid looking directly into any system lights If you need to examine the lights or look at any component near the lights be sure to first turn off the lights If the lights cannot be turned off then wear polarized sunglasses while examining the lights To avoid damaging the system turn off and unplug the system b...

Page 5: ... Line Cord Light Tower Interface Unit Package Contents include o Light Tower Interface Unit o USB Cable o Power Supply 24 volts LVS 7510 installation flash drive includes LVS 7510 Integrated System software and LVS 7510 Integrated System Operations Manual LVS 7510 Integrated System Installation and Quick Start Guide for Zebra Printers this document WARNING The LVS 7510 Integrated System is package...

Page 6: ...r Zebra Printers Page 6 of 16 Step 2 Connect the Cables Items Needed Computer Zebra printer Power supply AC Line Cord USB cable Instructions 1 Connect the power supply cable to the back of the printer WARNING Do not use the 24 volt power supply that is included in the light tower package Using the wrong power supply will result in system failure ...

Page 7: ...ck of the printer and the other end to the computer s USB port Cables are color coded in orange 5 If connecting to the read head for the first time launch LVS 7510 software and the below popup message appears Click Yes and continue with the Java runtime environment and Atmel flip controller installation WARNING The two USB cables provided with the system are NOT interchangeable Make sure to use th...

Page 8: ... DB connector connector shown below is attached to the light tower Connect the other end of the connector to the printer For the Peel and Present option connect the other 9 pin DB connector cable from the light tower to the mating DB connector on the back of the printer as shown here 8 The printer and computer cables are connected Proceed to the next section Peel and Present option only ...

Page 9: ...ms Needed Light Tower Interface Unit LTIU package contents listed in Step 1 below Mounting solution if following the mounting steps listed below you will need two customer supplied screws in 8 32 or M4 size Instructions 1 Open the LTIU package and verify the contents listed below are included in the package Light Tower Interface Unit USB Cable Power Supply 24 volt AC Line Cord 2 Mount the light to...

Page 10: ...egrated System Installation and Quick Start Guide for Zebra Printers Page 10 of 16 4 Plug one end of the USB cable into the light tower USB connector and the other end into the computer s USB port Cables are color coded in blue 5 Light tower installation is complete Proceed to the next section ...

Page 11: ...Tall Follow these steps to access these settings via the printer web server interface 1 Connect the printer to your local network via an Ethernet cable 2 Navigate to the IP address displayed on the printer GUI using a web browser 3 On the printer landing page navigate to View and Modify Printer Settings Advanced Setup 4 When prompted for a password enter 1234 5 Set the desired parameters and click...

Page 12: ...the printer in rewind mode using the printer GUI 2 Follow the printer manual for other printer settings relevant to your specific print job and label type including a media ribbon calibration 3 Route labels through the printer and the mount as described in the following scenarios a Without the internal rewinder Route labels as shown below Refer to the printer manual for instructions for routing ri...

Page 13: ...rt Guide for Zebra Printers LVS 7510 Integrated System Installation and Quick Start Guide for Zebra Printers Page 13 of 16 b With the internal rewinder Loosen the rewind bar using the thumbscrew on the side of the mount and follow the process shown below ...

Page 14: ...to 90 This may need to be adjusted later to achieve optimum peel performance 2 Follow the printer manual for other printer settings relevant to your specific print job and label type including media ribbon calibration 3 Remove some labels from the web swing the rewind bar down using the thumbscrew on the side and route the web through the printer and the mount as shown below Feed a label and check...

Page 15: ...grated System software by double clicking the LVS 7510 icon located on the computer desktop 2 The Welcome screen appears 3 Click the Log In button and enter admin uppercase or lowercase letters in the Operator ID and Password fields 4 You are now logged in to the LVS 7510 Integrated System software Refer to the LVS 7510 Integrated System Operations Manual located on the installation flash drive fo...

Page 16: ...ean and clear appearance spray a soft lint free non abrasive towel or cloth with a commercially available household glass cleaner such as Windex Glassex VISS and Mr Muscle and gently clean the outside of the sensor glass o DO NOT directly spray the sensor glass with glass cleaner always spray a towel or cloth with glass cleaner and then gently wipe the sensor glass o DO NOT use an industrial stren...

Reviews: